Mystery Cushion Club 2025: post 5, October - the final instalment!
Debbie AbrahamsHELLO AND WELCOME TO THE FINAL INSTALMENT OF THE FINAL MYSTERY CUSHION CLUB! I am delighted to reveal to you the final panel and the title of this year’s Mystery Cushion, and also to talk to you about the inspiration for the design. After five months of working on this super colourful project, I hope that you’ve enjoyed knitting it up, learning new techniques and taking on some new challenges along the way too.

This morning as I write this blog I am trying to get used to being back at my desk after spending the last week touring County Kerry in Ireland with a group of wonderful knitters. We visited the most amazing mills and saw some beautiful fabrics being made – both woven and knitted - and we fully immersed ourselves in the culture and the breathtaking surroundings as we spent days out touring the west coast in between knitting workshops.
 I posted every day on my Instagram page so you can see exactly where we went and all the wonderful things we saw on our travels. Very soon I am off to Morocco on another Stitchtopia trip (I cannot wait!), and next year I am booked to go to Turkey in September and Zurich in November. It would be great if you could join me – they really are the most amazing trips! So if you fancy treating yourself to a fabulous knitting holiday, pop over to the Stitchtopia website to find out more and make your booking.
 Now back to the Mystery Cushion and the moment you’ve all been waiting for! The title of the 2025 (and final) Mystery Cushion is…..
Gridlock
 I have recorded a final vlog in which I talk about the inspiration for the project and my design process. So before you read the rest of the blog, why not settle down for fifteen minutes with a cuppa and enjoy finding out all about Gridlock…
This is a list of all the tech vids that are available in the Tutorials on our website which give you guidance and advice for some of the trickier knitting techniques in the cushion. They will remain on our website indefinitely so you can go back and watch them any time you need a reminder:
- How to thread beads onto yarn (Tutorials: Beading Techniques)
- Slip-stitch beading (Tutorials: Beading Techniques)
- Hooked-in beads (Tutorials: Beading Techniques)
- How to knit fairisle (Tutorials: Colour Knitting Techniques)
- How to knit intarsia (Tutorials: Colour Knitting Techniques)
- How to carry yarns up the side of the work (Tutorials: Knitting Basics)
- Swiss-darning (Tutorials: Embroidery on Knitting)
- Block 4, On The Dotted Line, How To Knit Rows 3 & 4 (Tutorials: Mystery Cushion 2025)
- Block 4, On The Dotted Line, How To Knit Rows 12 & 13 (Tutorials: Mystery Cushion 2025)
- Block 8, Vivacious, How To Knit Rows 5 & 6 (Tutorials: Mystery Cushion 2025)
WHILE I WAS AWAY IN IRELAND, SUE VERY KINDLY POSTED ALL OF THE MYSTERY CUSHION PRINTED PATTERNS, so if you added them to your order, hopefully you have your copy. However, if it has not arrived yet, it should be with you very soon.
 Due to a Canadian postal strike we have been unable to post the printed patterns to our Canadian members. We tried to post one copy but it was returned to us. So we will wait until the strike ends and then get them sent. I apologise for this, however, it is something that is totally beyond our control which will hope will be resolved very soon.
Don’t forget that the digital file is in your Debbie Abrahams account on our website, from which it can be downloaded. So if you are waiting for your printed copy to arrive, you could have a browse of Mail Out 5 and familiarise yourself with the pattern.
NEW!!! ADDENDUM ALERT! It has been brought to my attention that the bead threading for the Upper Back Panel on page 6 is incorrect. It should say to thread on 21 Velvet, 42 Turquoise, 21 Velvet. Apologies everyone, hopefully you read this before you make a start on it...
SO LET’S TAKE A LOOK AT THE FINAL PANEL TO KNIT…
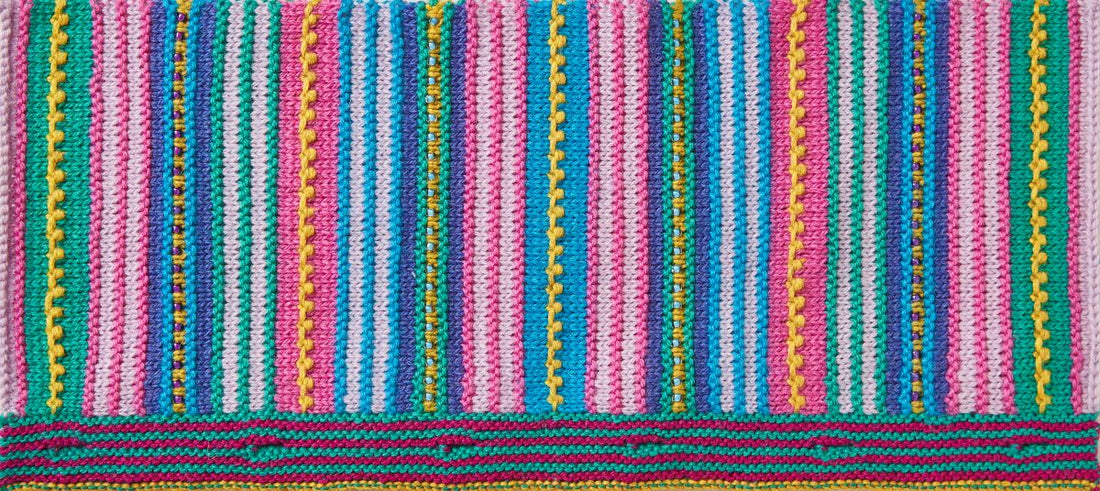
UPPER BACK PANEL: Gridlock – textured stripe pattern with slip-stitch beads and buttonhole band:
 On each pattern page there is a list of Pattern notes and tips that are worth reading before you start to knit each block. These bits of advice will help you and give pre-warnings as to what to look out for in the pattern instructions. Also take note of the description under the title of each block as this tells you what the stitch structure is.
 You can use the tech vids to assist you, but here are a few extra tips for this panel:
- How to thread beads onto yarn (Tutorials: Beading Techniques)
- Slip-stitch beading (Tutorials: Beading Techniques)
- How to carry yarns up the side of the work (Tutorials: Knitting Basics)
- Block 4, On The Dotted Line, How To Knit Rows 12 and 13 (Tutorials: Mystery Cushion 2025)
This panel is knitted sideways, so the stitches are the depth and the rows are the length. You knit it in one long length and when it is completed the buttonhole band is picked up and knitted along the right selvedge edge.
There are various changes of needle size throughout the pattern, which are frequent but absolutely necessary. The garter stitch stripes require a smaller needle so that they knit to the same width as the rest of the panel, otherwise they will bulge out and not look as neat. So although it might be a bit frustrating to do, it will make your panel look so much more perfect and professional.
 I’ve just noticed that the 3.25mm needle is mentioned in the boxed needle info on page 6, but it is not mentioned in the first Pattern note and tip. It is actually only needed for the casting-off of the buttonhole band, so the same rule applies if you’re using different size needles to the suggested main needle size of 3.50mm – for this needle you will need to use one metric size smaller.
I used a circular needle to knit the panel which helped a lot with the transferring of stitches onto the other needle. The reason you are instructed to do this is to enable you to pick up a colour that is at the opposite end of the work, therefore reducing the amount of loose ends. Alternatively you could use long double-pointed needles as my test knitter did, or stick to your straights and simply slide the stitches onto the other needle when instructed. You can use whichever method suits you best to knit this panel.
You are instructed to thread on all the beads at the beginning before you cast on, the instructions for which are on page 6. This is enough beads to complete the four beaded stripes. I am sure you are fine with the slip-stitch technique, however the tech vid for this is in Tutorials if needed.
 This panel is long – it’s a total of 181 rows including the two at the beginning (before Row 1) – however, it is quite easy to knit. So hopefully you will find it straightforward and enjoyable too!
When this panel is completed, 126 stitches need to be picked along the right selvedge edge for the buttonhole band – this is as you look at it flat with the cast-on at the bottom, and with the right-side facing. If you are not sure how to pick up stitches then this tech vid from my 2021 Mystery Blanket blog (post 10) shows you how to do it:
I worked out a sequence for picking up these 126 stitches which you could try yourself, or feel free to create your own sequence. This is what I did. I picked up seven stitches in every wide stripe/band, of which there are seventeen (for example, one wide stripe being counted as Rows 5-13 and the next one as Rows 14-23). I picked up three stitches at each end (across the two rows at the very beginning without row numbers finishing with Row 4, and then Rows 174-179 at the end before casting off). To get 126 stitches I had to pick up one extra stitch in the middle of the panel in stripe nine. I suggest in the pattern instructions that you use a circular needle for this as it might be a tight squeeze on straight needles.
 In the Pattern notes and tips on page 6 of Mail Out 5 there is an explanation of how to cast the stitches back on for the buttonholes. It makes them really neat and is worth trying if you’ve not used this method for buttonholes before. There is a tech vid for this which is in the 2021 Mystery Cushion blog (post 4), which you can view via this link:
https://debbieabrahams.com/blogs/news/mystery-cushion-club-2021-post-4-september
Please note that both of these tech vids are NOT in the Tutorials on our website, and you will need to scroll down the page to locate them.
With the front panel completed (which you may or may not have done yet), the Upper Back Panel can be joined to the Front Panel. But there is a bit of prep work to do first. You will find all the instructions for this on page 9, just before the Gallery. You need to pick up 126 stitches along the left selvedge edge of the panel (which is on the opposite side to the buttonhole band). I used the same sequence that I used to pick up the stitches for the buttonhole band (as detailed above). And if this worked for you, then repeat the same sequence. I used a circular needle again for this rather than a straight needle which I found much easier with the large number of stitches.
I have included in the instructions which colour yarn to pick up the stitches with, but feel free to use your own choice if preferred. My test knitter used Dahlia and it looks fabulous!
 After you’ve completed the whole instruction on page 9 for this pick-up (plus a row of Euphoria, or whatever colour yarn you’ve used), you need to pick up the stitches along the top (cast-off edge) of the completed Front Panel. On page 9, I give specific instructions for how many stitches to pick up along each block. There is a tech vid showing how to pick up stitches along a cast-off edge in our Tutorials in Knitting Basics if you need some guidance.
The final part of this finishing process is to join the live stitches on the Upper Back Panel to the live stitches along the top of the Front Panel. This is best done using a three-needle cast-off and the instructions for how to do this are on page 9.
FINISHING INSTRUCTIONS ARE ON PAGE 9 OF THE OCTOBER MAIL OUT. Before sewing the Lower Back Panel into place you will need to sew the side seams of the Upper Back Panel to the Front Panel.
I began sewing the Upper Back Panel to the Front Panel beginning at the top where the two panels are joined together (using the three-needle cast-off), and finishing at the buttonhole band. The buttonholes should line up (or be very close to) the middle of Blocks 4 and 6 on the Front Panel, which is approximately 17cm down from the top of the Front Panel.
This image shows where the buttonhole-band meets Block 3 on the Front Panel to give you some guidance:
 I used Mattress stitch to sew together all my side seams and I would advise that you use one of the Debbie Abrahams yarn from your kit - choose whichever colour you have plenty of. It doesn’t matter which one you use as Mattress stitch is an invisible seam and it won’t be seen. Don’t use Felted Tweed though as this could break when pulling up to close the seams.
For these seams you will be joining the cast-on and cast-off edges of the Upper Back Panel to the selvedge edges of the Front Panel. So if you use Mattress stitch you will take your needle under bars for rows on the Front Panel and under bars for stitches on the Upper Back Panel. As there will be easing in to do, it might be worth using stitch markers to help you match up the panels so that the seams are even and not puckered or stretched.
 There are tech vids for Mattress stitch (both vertical and horizontal) in the Tutorials on our website if you need a reminder of these techniques. To join the Upper Back Panel to the Front Panel it would be helpful to watch both of these tech vids as although they don't show how to sew a selvedge edge to a cast-on/cast-off edge, they show you where to put the sewing needle along a selvedge edge and a cast-on edge.
Next sew the Lower Back Panel into place, beginning at the bottom edge (where you picked up the stitches from the cast-on edge of the Front Panel), finishing at the striped garter stitch edging at the top. The tension of the blocks on the Front Panel will be different to the Lower Back Panel so make sure that you ease the two pieces of knitting together evenly, finishing with the upper edge tucked under the Upper Back Panel.
I would suggest that you mark out the position of six buttons on the Lower Back Panel before sewing them on. You need to make sure that they correspond to the buttonholes on the Upper Back Panel. You can use the images of the completed cushion in the mail-out to help you position them. You can place your buttons in whichever sequence you prefer.
 After you’ve completed all these steps you can opt to add four pom-poms to the cushion – one on each corner. I think they are rather fun to make and they add a little extra quirkiness to the cushion. The Rowan Kid Classic (Dahlia) is great for this as it creates a really fluffy, full pom-pom. I found it easier (as mentioned in my vlog at the beginning of this blog) to use a Clover pom-pom maker. You can buy them online, and there are great tech vids on YouTube which show you very clearly how to use them. So why not have a go!
 Finally, you need to stuff your cushion-cover with a pad. It is advisable to take your completed cushion-cover to the shop when you purchase your pad to check that you choose the right size. I used a 45cm x 35cm cushion-pad for my cushion-cover, however, if you did not match the given tension in the pattern instructions you might find that you need either a bigger or smaller pad than this. But that won’t matter – your cushion-cover will look stunning whatever size pad you use!
And that’s it, you’ve completed your Gridlock cushion which you can sit back and enjoy!
IF YOU DON’T WANT YOUR ‘MYSTERY’ KNITTING TO END, THEN IT DOESN’T HAVE TO! MEMBERSHIPS FOR MY 2026 MYSTERY BLANKET CLUB ARE STILL AVAILABLE TO PURCHASE IN OUR ONLINE SHOP. We are close to our target of 500 members now, so if you have not signed up yet, it would be a good idea to nip across to our shop sooner rather than later to book your place.

Although our Early Bird offer has expired, we are offering all members who sign up 10% discount off all of the kits in our shop until 31 st December 2026. We will give you a discount code in your confirmation email that you can use whenever you decide you need a new Debbie project in your life, or you want to treat a friend or relative to a lovely gift.
You can find out all you need to know about the 2026 Mystery Blanket Club in our online shop, but this is a quick summary of what I have in store for you next year…
For each new blanket I focus on a totally different theme, and try and make it as different as I can to the previous year’s design, which not only gives you a refreshing new project to work on, but for me it’s great to have a drastic change of direction too! The 2026 colour palette is vibrant and super colourful, with vibrant pinks, teal, sunshine yellow, emerald green and rich red contrasted against brilliant white and deep indigo blue. There’ll be lots of interesting stitch patterns, some beautiful cables, stripes, beads, fairisle and intarsia, so it’s a knitting journey you won’t want to miss out on if colour is your thing!
 I am really excited to be back working with James Laxton and his wonderful team in West Yorkshire in the UK, who are creating eleven exclusive colours in my unique Light Merino Wool (see image above). I am combining my own-branded yarn with some of my favourites from the Rowan collection – Felted Tweed, Soft Yak and Pure Alpaca. So you’re in for a real treat next year, with a selection of some of the most luxurious yarns combined together in one unique blanket project!
If you want to pay for your Mystery Blanket Club membership in instalments then opt for our Splitit payment plan. You can choose from between 2-4 monthly payments to suit your finances.
To find out more and to place your order, visit the online shop on our website: https://debbieabrahams.com/products/mystery-blanket-club-2026
IF YOU ARE LOOKING FOR MORE UNIQUE GIFTS OR A TREAT FOR YOURSELF, THEN WE ARE LAUNCHING PRE-ORDERS FOR OUR FESTIVE MYSTERY KNIT BOXES ON FRIDAY 17TH OCTOBER! Our boxes are packed with ten items including a brand new knitting kit using Rowan yarns designed by me, plus something sweet to eat, stationery, beauty and lifestyle gifts.

We will have 150 boxes up for grabs which will be despatched mid-November. So remember to keep an eye on your inbox for our email alert if you want to bag yourself one.
THE ’MYSTERY’ MEETINGS AT YARN LOFT CONTINUED LAST MONTH WITH A MEET-UP ON THE 1 ST OCTOBER, where I met with Kerry, Alison, Michelle and Mary for a couple of hours of knit and chat, hosted by the lovely Doreen.

The ladies are all getting on so well with their blanket squares, and it was an absolute joy to be with them while they were working on them. For me it brings the whole project to life and it’s such a buzz for me to see them enjoying the stitch patterns that I spent so many months developing and creating.

Doreen’s shop is packed with beautiful yarns, books and every knitting accessory you could think of, and it is always so tempting to make a purchase when I visit her store. At the moment I have little time for anything other than work projects, but I am hopeful that I will have time for a bit of leisure knitting towards the end of the year. In which case, I will be back to Doreen’s lovely shop for a browse.

Our next meeting is on Wednesday 5 th November, so before the fireworks for Bonfire Night begin, we will be at the shop between 4:00-6:00pm for another lovely gathering. If you are in the neighbourhood and want to join us, please do! Yarn Loft is at 118 Hucknall Road, Carrington, Nottingham, tel number 07825 702433, website: www.yarnloft.co.uk . To cover the costs of hosting the meeting there is a small sub to pay (£3.00), which can be paid to Doreen on the day.
THIS IS A REMINDER ABOUT OUR SOCIAL MEDIA PLATFORMS, which can be hugely beneficial if you want to keep up to date with all my latest news or join a Debbie Abrahams group:
Ravelry: Debbie Abrahams Handknits
Facebook: Debbie Abrahams Mystery Knitters
Facebook: Debbie Abrahams Handknits (our own FB page)
Instagram: debbieabrahams_knitting
Pinterest: debbieabrahams@debbieabrahamsk
The Facebook and Ravelry groups are great communities to be part of, especially if you are out there knitting on your own and need a bit of advice or encouragement. They are brilliant for technical support too and there are many very experienced knitters in both groups who are only too happy to help with queries about the projects. And even though we are at the end of this KAL, you can still keep up with everything that is happening in my world before the next one begins!
So it is with much excitement (and a tinge of sadness), that I sign off from the Mystery Cushion for the very last time. I hope that you have enjoyed the journey and will join me again on another ‘mystery’ knitting adventure in the future. But for now, the end is in sight and very soon you will have your own unique cushion to add a big splash of colour to your home. So grab your knitting needles and your yarn and have a fabulous time on this final part of the journey. Thanks for being part of my final Mystery Cushion Club, it’s been an absolute pleasure to have you on board! Happy knitting, Debbie, x


