Mystery Cushion Club 2025: post 3, August
Debbie AbrahamsWELCOME TO THE THIRD INSTALMENT OF THE 2025 MYSTERY CUSHION CLUB! This month you have three blocks to knit which conclude the Front Panel. Instructions for piecing the nine blocks together are included in this blog, so you have plenty to keep you going this month!

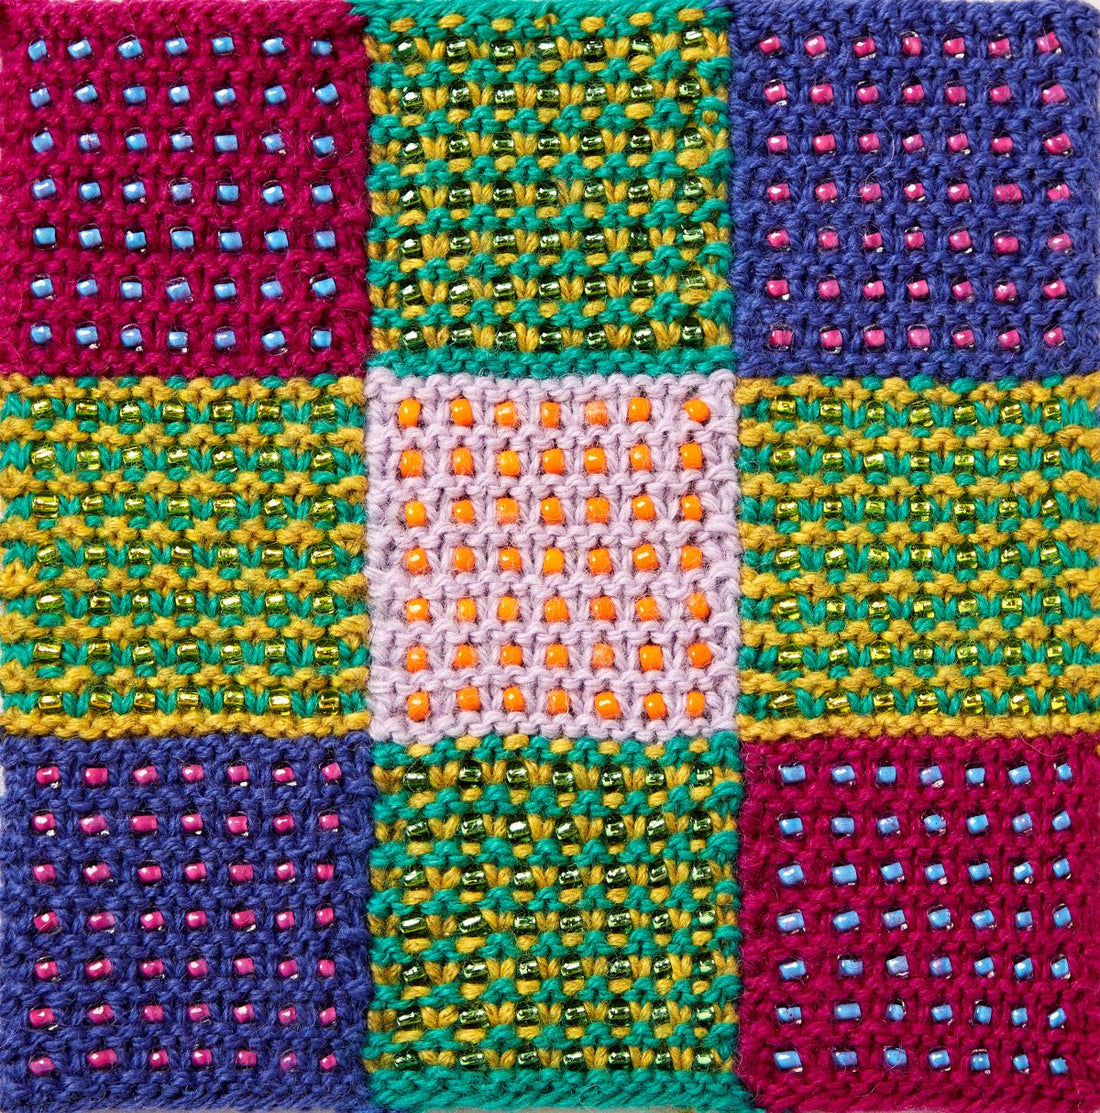
Two of the blocks complete the corners of the Front Panel and are a repeat of previous blocks but in different colourways, so you should find these relatively easy to knit. The centre panel, Block 5, is new and combines intarsia with slip-stitch beads in a vibrant geometric design which is super sparkly – perfect to make your Front Panel look simply stunning!
If you have not knitted intarsia patterns before then we have a new tech vid this month which shows you all the basics. You will find a link to it at the top of the list below, followed by all of the other tech vids which are at your disposal, should you need some guidance. They are easily accessed through the Tutorial link on our Homepage.
- How To Knit Intarsia
- How to thread beads onto yarn (Tutorials: Beading Techniques)
- Slip-stitch beading (Tutorials: Beading Techniques)
- Hooked-in beads (Tutorials: Beading Techniques)
- How to knit fairisle (Tutorials: Colour Knitting Techniques)
- How to carry yarns up the side of the work (Tutorials: Knitting Basics)
- Swiss-darning (Tutorials: Embroidery on Knitting)
- Block 4, On The Dotted Line, How To Knit Rows 3 & 4 (Tutorials: Mystery Cushion 2025)
- Block 4, On The Dotted Line, How To Knit Rows 12 & 13 (Tutorials: Mystery Cushion 2025)
- Block 8, Vivacious, How To Knit Rows 5 & 6 (Tutorials: Mystery Cushion 2025)
IF YOU ORDERED PRINTED PATTERNS THEN THEY SHOULD BE WITH YOU VERY SOON. I managed to get ahead this month (hurray!) and got all of them posted well before the 15th August launch date, so I am hoping that you have them. However, if they have not arrived, pop me a quick email and I will check your shipment: debbie@debbieabrahams.com

SIGN-UPS FOR MY BRAND NEW 2026 MYSTERY BLANKET CLUB OPEN ON FRIDAY 29TH AUGUST, SO BE SURE TO MARK THIS UP ON YOUR CALENDAR! The Mystery Blanket is a larger project than the cushion, so if you’ve enjoyed this journey and are looking for a longer project to knit, then why not come on board and enjoy a new adventure with me next year!?!
Below: 2023 Mystery Blanket, The Enchanted Forest.
![]() For each new blanket I focus on a totally different theme, and try and make it as different as I can to the previous year’s design, which not only gives you a refreshing new project to work on, but for me it’s great to have a drastic change of direction too! So you can probably guess that next year’s colours are far from quiet and peaceful, like this year’s blanket. The 2026 colour palette is vibrant and super colourful, with vibrant pinks, teal, sunshine yellow, emerald green and rich red contrasted against brilliant white and deep indigo blue. There’ll be lots of interesting stitch patterns, some beautiful cables, stripes, beads, fairisle and intarsia, so it’s a knitting journey you won’t want to miss out on if colour is your thing!
For each new blanket I focus on a totally different theme, and try and make it as different as I can to the previous year’s design, which not only gives you a refreshing new project to work on, but for me it’s great to have a drastic change of direction too! So you can probably guess that next year’s colours are far from quiet and peaceful, like this year’s blanket. The 2026 colour palette is vibrant and super colourful, with vibrant pinks, teal, sunshine yellow, emerald green and rich red contrasted against brilliant white and deep indigo blue. There’ll be lots of interesting stitch patterns, some beautiful cables, stripes, beads, fairisle and intarsia, so it’s a knitting journey you won’t want to miss out on if colour is your thing!
Below: colours I am sampling with for the 2026 Mystery Blanket.

I am super excited to be back working with James Laxton and his wonderful team in West Yorkshire in the UK, who are working hard on producing my Light Merino Wool DK in a range of eleven new bespoke colours for the Mystery Blanket. And I am combining these gorgeous yarns with some of my favourites from the Rowan collection – Felted Tweed, Soft Yak and Pure Alpaca. So you’re in for a real treat next year, with a combination of the most luxurious yarns combined together in one project to create another unique Debbie blanket – how can you resist that!?!

Above: 2017 Mystery Blanket, Retrospective.
We will be running an Early Bird special offer for everyone who signs up by the end of September with some super benefits that will make your membership all the more sweeter! And if you decide to opt for our Splitit payment plan, you can still take advantage of our Early Bird offer. Details of this, and everything else you need to know about my exciting new Mystery Blanket will be sent to you in an email, so keep an eye on your inbox. And all being good, if you decide to climb aboard, our knitting journey together will continue next year. And I just can’t wait for that to begin!
DID YOU KNOW THAT THIS YEAR MARKS THE 30-YEAR ANNIVERSARY OF DEBBIE ABRAHAMS LIMITED! I started my business way back in 1995 after completing a BA (HONS) Knitwear Design degree course at Nottingham Trent Polytechnic and soon after that became a Rowan Consultant for their brand, consulting in John Lewis Nottingham (known then as Jessops). While designing my first collection of kits, I started running knitting workshops, and thanks to Rowan Yarns I got my first book deal with Blankets & Throws To Knit. Since then my business has flourished, with the Mystery Clubs becoming one of the most important parts of my business. Day workshops have turned into fabulous knitting holidays and retreats, and I continue to design kits for my website.

So to celebrate this we are launching a new limited edition knitting kit called Allure Bag (Pearl), together with the Limpet Bag which was included in this year’s Mothers Day Boxes.
You can buy them separately or grab yourself a real bargain and buy both kits at a discount for a limited period only!
The Allure Bag (Pearl) is a recolouring of the Allure Evening Bag which we launched a couple of months ago. This version is knitted in Rowan’s beautiful mercerised Cotton Glace in soft cream and is embellished with Pearl, Clear and Metallic Gold beads. It’s large enough to accommodate your phone and other small items, and is the perfect addition to your summer wardrobe.
Price: £25.00
Kit includes: Rowan Cotton Glace, Debbie Abrahams Beads, large glass and stone beads, a magnetic clasp, lining fabric and pattern instructions.
Approx. size: 12cm x 18cm (excluding strap).
(Images of the Allure Bag (Pearl) to follow...).
The Limpet Bag is knitted in Rowan’s beautifully soft Summerlite DK in an all-over lace and bead pattern, and is large enough to keep your phone and other small items safe on a day out this summer.

Price: £30.00
Kit includes: Rowan Summerlite DK, Debbie Abrahams Beads, large glass and stone beads, a magnetic clasp, lining fabric and pattern instructions.
Approx. size: 12cm x 18cm (excluding strap).
We’ll send you an email as soon as they are launched, so keep an eye on your inbox if you want to place an order and be at the front of the queue!
THERE ARE THREE MORE BLOCKS TO KNIT THIS MONTH, which complete the Front Panel.
FRONT PANEL, Block 5: Grid – intarsia pattern with slip-stitch beads:

FRONT PANEL, Block 7: Criss-cross 3 – hooked-in beads on stocking stitch with a garter stitch contrast-coloured edging:

FRONT PANEL, Block 9: Criss-cross 4 – hooked-in beads on stocking stitch with a garter stitch contrast-coloured edging:

On each pattern page there is a list of Pattern notes and tips that are worth reading before you start to knit each block. These bits of advice will help you and give pre-warnings as to what to look out for in the pattern instructions. Also take note of the description under the title of each square as this tells you what the stitch structure is.
You can use the tech vids to assist you, but here are a few extra tips for each block:
BLOCK 5, GRID: we begin this month with a new block which is a sparkling intarsia and super beaded centre-piece for the Front Panel!
Videos to watch for assistance with this block:
NEW! How To Knit Intarsia (Tutorials: Colour Knitting Techniques)
- How to thread beads onto yarn (Tutorials: Beading Techniques)
- Slip-stitch beading (Tutorials: Beading Techniques)
- How to carry yarns up the side of the work (Tutorials: Knitting Basics)
If you are new to intarsia then this is a really good block to give it a go. It’s a gentle intro to the technique as the colour changes all happen in the same place which makes it much easier to knit.

You are knitting three different coloured square blocks in each section, of which there are three, creating a nine-square block. In the first section you need to use one ball of Euphoria, one ball each of Utopia and Jaune, and one ball of Spellbound. You can work from the balls of yarn, but I found it more efficient and easier to wind all of the yarns onto separate yarn bobbins.
All of the beads are pre-threaded before you cast on, the instructions for which are on page 6 of the August Mail Out. You need to cast on using the three colours (as instructed on page 6). There is no new tech vid for this, but if you need some guidance this tech vid from a previous Mystery Cushion will point you in the right direction. It’s from the June instalment of the 2024 Mystery Cushion:
https://debbieabrahams.com/blogs/news/mystery-cushion-club-2024-post-1-june
One thing to note about the centre block in this first section of three ‘strips’ (across the bottom of the block) is that Utopia and Jaune are knitted in a stripe, working two rows of Utopia and two rows of Jaune in a repeat. You are always swapping over colours on a right-side row, which is after the Euphoria block. You simply work two rows using Utopia, then at the colour change on the next row pick up Jaune and work two rows, and so on. This might sound a bit complicated, but once you get going you will see how easy it is to do.

On the second strip (across the centre), you have a block of Jaune and Utopia, a block of Serenity, and then another block of Jaune and Utopia. So you will need to have two balls wound off of Jaune and Utopia, and you will need to thread the Yellow beads onto both balls of Jaune (so that’s 49 Yellow beads onto each ball of Jaune). It instructs you to do this in the beading instructions on page 6.
The needles used to knit this block are small, 2.50mm, and this is because it is basically a garter stitch beaded pattern, and garter stitch requires smaller needles otherwise it is too loose. It knits up quite densely, and because of the amount of beads it is heavy in weight. But it makes a super sparkly centre piece to your front panel, and I am sure you’re going to love it!
BLOCK 7, CRISS-CROSS 3: the second block to knit this month is a recolour of Blocks 1 and 3.
Videos to watch for assistance with this block:
- Hooked-in beads (Tutorials: Beading Techniques)

I don’t think this needs much advice giving as you’ve knitted this same block before but in different colours. Just make sure that you hook in the correct colour beads, as dictated on the chart on page 9 as they are different to Blocks 1 and 3.
BLOCK 9, CRISS-CROSS 4: the final piece of the Front Panel puzzle is a repeat of Blocks 1, 3 and 7, but in a fourth and final colourway.
Videos to watch for assistance with this block:
- Hooked-in beads (Tutorials: Beading Techniques)

Enjoy this block, it’s the final one in the Front Panel, and after this you can move on to sewing the nine separate blocks together. Read on to find out how!
AFTER YOU HAVE COMPLETED THIS MONTH’S BLOCKS, THE FRONT PANEL WILL BE COMPLETED, so the next task is to sew them together to create one block. This will need to be done before you knit the fourth instalment, so I think it’s best to get it done now rather than leaving it until later.
Basically you are going to create three separate horizontal strips, and then join the three strips together. To do this I would use Mattress stitch, and you’ll need to do both horizontal and vertical seams.
If you are unsure of this technique then you can get some guidance from my tech vids which you will find in the Knitting Basics category in our Tutorials – link on the Homepage.
In this cushion all of the blocks are facing in the same direction, so this makes it much easier to sew them together. When sewing together blocks 1, 2 & 3, and 4, 5 & 6, and 7, 8 and 9, you need to watch out for the number of rows which vary from block to block. This means that some easing in will be required.

These are my suggestions of how to piece together your blocks for the Front Panel. However, if you prefer to use your own method and calculations, that is absolutely fine.
My method of vertical mattress stitch is based on taking the needle under 2 ‘bars’ at a time as demonstrated in the tech vid for vertical mattress stitch (see link below). To ease in a row, you will need to take your needle under one less bar on the side you are easing the extra row into.
Link to vertical mattress stitch (from 2024 Mystery Cushion August blog):
https://debbieabrahams.com/blogs/news/mystery-cushion-club-2024-post-3-august
Here are a few tips about how to ease in rows:
- Garter stitch rows have a tighter row tension than stocking stitch, so for every row of garter stitch (which is two knit rows), ease these two rows into one stocking stitch row.
- Fairisle usually has a looser row tension than stocking stitch, so if you need to ease in some rows it is best to do this across fairisle rows, taking the needle under more of the stocking stitch rows than the fairisle rows.
- Hooked-in beads have a slightly looser tension than stocking stitch, so if you need to ease in some rows it is best to do this across the beaded rows, taking the needle under more of the stocking stitch rows than the beaded rows. But it is the reverse for slip-stitch beads which have a slightly tighter tension than stocking stitch, so if you need to ease in rows it is best to do this across the stocking stitch rows, taking the needle under more of the beaded rows than the stocking stitch rows.
Placing a stitch marker in the centre of each block along the selvedge edge can serve as a useful reference point when sewing up. All you need to do is make sure that your markers match up and then you can be sure that your blocks are joining together nice and evenly.
Use any of the Light Merino DK yarns to sew up with. Do not use Felted Tweed.
STRIP 1: Sew Block 1 (34 rows) to Block 2 (54 rows).
Along the left selvedge edge of Block 1 place a marker at the halfway point (between rows 17 and 18).
Along the right selvedge edge of Block 2 place a marker at the halfway point (between rows 27 and 28).
Ease the two blocks together, making sure that the markers along each of the edges match up at the halfway point.
Sew Block 2 (54 rows) to Block 3 (34 rows).
Along the left selvedge edge of Block 2 place a marker at the halfway point (between rows 27 and 28).
Along the right selvedge edge of Block 3 place a marker at the halfway point (between rows 17 and 18).
Ease the two blocks together, making sure that the markers along each of the edges match up at the halfway point.
STRIP 2: Sew Block 4 (55 rows) to Block 5 (89 rows).
Along the left selvedge edge of Block 4 place a marker at the halfway point (on row 28).
Along the right selvedge edge of Block 5 place a marker at the halfway point (on row 45).
Ease the two blocks together, making sure that the markers along each of the edges match up at the halfway point.
Sew Block 5 (89 rows) to Block 6 (46 rows).
Along the left selvedge edge of Block 5 place a marker at the halfway point (on row 45).
Along the right selvedge edge of Block 6 place a marker at the halfway point (between rows 23 and 24).
Ease the two blocks together, making sure that the markers along each of the edges match up at the halfway point.
STRIP 3: Sew Block 7 (34 rows) to Block 8 (41 rows).
Along the left selvedge edge of Block 7 place a marker at the halfway point (between rows 17 and 18).
Along the right selvedge edge of Block 8 place a marker at the halfway point (on row 21).
Ease the two blocks together, making sure that the markers along each of the edges match up at the halfway point.
Sew Block 8 (41 rows) to Block 9 (34 rows).
Along the left selvedge edge of Block 8 place a marker at the halfway point (on row 21).
Along the right selvedge edge of Block 9 place a marker at the halfway point (between rows 17 and 18).
Ease the two blocks together, making sure that the markers along each of the edges match up at the halfway point.
This will complete sewing together your three horizontal strips.
My method of horizontal mattress stitch is based on taking the needle under 1 whole stitch at a time as demonstrated in the tech vid for horizontal mattress stitch in Tutorials. To ease in a stitch, you will need to take your needle under one and a half stitches on one side to one whole stitch on the other side, twice - this will ease in one whole extra stitch. This is demonstrated in the tech vid for horizontal mattress stitch.
Sew Strip 1 (total of 123 stitches after the blocks are sewn together) to Strip 2 (total of 127 stitches after the blocks are sewn together).

You will need to ease in four stitches of Strip 2 into Strip 1. I suggest that you do this as follows:
· Place Strip 2 above Strip 1, as in the image above.
· Along the cast-on edge of Block 4 place a marker on stitch 28 (begin counting from the right-hand side of Block 4).
· Along the cast-on edge of Block 6 place a marker on stitch 28 (begin counting from the left-hand side of Block 6).
· Place two markers along the cast-on edge of Strip 2, one each at the seams between Blocks 4 & 5 and Blocks 5 & 6.
· Beginning at the right-hand side of the strips (Block 1 and Block 4), sew Strip 1 to Strip 2, easing in one stitch at each of the markers. The extra stitches need to be eased in on Strip 2, which has four more stitches than Strip 1.
Sew Strip 2 (total of 127 stitches after the blocks are sewn together) to Strip 3 (total of 125 stitches after the blocks are sewn together).

You will need to ease in two stitches of Strip 2 into Strip 1. I suggest that you do this as follows:
Place Strip 3 above Strip 2, as in the image above.
· Place two markers along the cast-off edge of Strip 2, one each at the seams between Blocks 4 & 5 and 5 & 6.
· Beginning at the right-hand side of the strips (Block 4 and Block 7), sew Strip 2 to Strip 3, easing in one stitch at each of the markers. The extra stitches need to be eased in on Strip 2, which has two more stitches than Strip 3.
After all of the blocks are sewn together and the Front Panel is completed, I would advise to block and press it to size, making sure that it measures the correct dimensions, and that the junctions where the seams meet are sitting square and in line with each other. It is amazing how with a block and press any unevenness or wonky seams can be smoothed out to make your Front Panel look super professional. So I think it’s well worth investing the time – you’ll love the results!
THIS IS A REMINDER ABOUT OUR SOCIAL MEDIA PLATFORMS, which can be hugely beneficial if you want to keep up to date with all my latest news or join a Debbie Abrahams group:
Ravelry: Debbie Abrahams Handknits
Facebook: Debbie Abrahams Mystery Knitters
Facebook: Debbie Abrahams Handknits (our own FB page)
Instagram: debbieabrahams_knitting
Pinterest: debbieabrahams@debbieabrahamsk
The Facebook and Ravelry groups are great communities to be part of, especially if you are out there knitting on your own and need a bit of advice or encouragement. They are brilliant for technical support too and there are many very experienced knitters in both groups who are only too happy to help with queries about the projects. They are both free to join and a lot of fun to be part of, so why not join today!?!
NOW IT’S TIME TO HAVE ANOTHER GO AT GUESSING THE TITLE OF THE MYSTERY CUSHION – unless you have already worked out what it is.
This month the letter I am giving you is ‘R’:
_ R I _ L _ _ _
If you think you know what it is, please email your answer to me at debbie@debbieabrahams.com to see if you are right. And if you are, then with your permission, we will include you in the list of correct guessers in the September blog. And if you are not, then there’ll be more clues next month to help you.

With the temperatures soaring here in the UK, I hope that you manage to keep cool while knitting your August blocks. With the whole of the Front Panel revealed, and just two more instalments to go, it won’t be long before you will have your very own complete and very colourful Mystery Cushion to bring a vibrant sparkle to your home! If you have any pics or stories of your Mystery Cushion adventures, please send them into me and I will share them in the next blog – it’s always lovely to hear how you are getting on with the project. And don’t forget our new 2026 Mystery Blanket launch at the end of this month and our fabulous two new bag kits – there’s certainly plenty to keep you motivated and inspired! So until next month, take care and I will see you back here in September for the first of the back panels – any ideas what they could be?!?...Debbie xx


