
HELLO AND WELCOME TO THE TENTH AND FINAL INSTALMENT OF THE 2021 MYSTERY BLANKET CLUB! And so here we are, finally at the end of this year’s knitting adventure with the last few squares and finishing touches revealed, plus of course, the title of the blanket. It’s been a colourful ten months and hopefully an inspiring experience for you. And if you’ve managed to keep up with each month’s patterns, you will soon have your very own Mystery Blanket to snuggle up to and enjoy!

![]()
![]()
In this month’s blog, as well as lots of help and advice for the final squares and finishing there is an update on the launch dates for my new kits, some lovely stories from the members, and news of my knitting holiday to the Isles of Scilly which I have just returned from along with thirty-six other travel companions (many of them Mystery Blanket members!).
To begin with there are four technical videos:
- Picking up stitches along a cast-on edge for the Edging
- Picking up stitches along a selvedge edge for the Edging
- How to cast on a stitch at the end of a row for the Edging
- How to knit an intarsia bobble
These are followed by my intro vid in which I reveal the title of the Mystery Blanket. So if you want to find out what it is and hear all about the inspiration behind the design, simply press play, sit back and enjoy…


FULL INDEX OF VLOGS BY SUBJECT AND MONTH, to enable you to locate them more easily as and when you need them:
How to knit a braid FEBRUARY
How to knit in a braid FEBRUARY
How to place a bead (pb) FEBRUARY
How to hook in a bead (hb) FEBRUARY
How to knit basic fairisle FEBRUARY
How to Swiss darn FEBRUARY
How to cast on using Thumb method MARCH
How to sew in loose ends MARCH
How to block and press a square MARCH
How to pick up stitches to knit on a square MARCH
How to knit fairisle MARCH
How to do chain stitch embroidery MARCH
How to sew Square 1 to Square 2 MARCH
How to sew Square 2 to Square 3 MARCH
How to c4b on a WS row APRIL
How to c4f on a WS row APRIL
How to c4b on a RS row APRIL
How to c4f on a RS row APRIL
How to weave in (fairisle) APRIL
How to carry yarns up the side of the work APRIL
How to knit intarsia JUNE
How to attach a Shisha mirror JUNE
How to pick up stitches from a selvedge edge JULY
How to join stitches using a 3-needle bind-off JULY
Picking up stitches along a cast-on edge for the Edging NOVEMBER
Picking up stitches along a selvedge edge for the Edging NOVEMBER
How to cast on a stitch at the end of a row for the Edging NOVEMBER
How to knit an intarsia bobble NOVEMBER
A FEW MORE CORRECT GUESSES CAME IN FOR THE MYSTERY BLANKET SINCE THE LAST BLOG, so congrats go out to Natalie Simon, Julie Smith, Ximena Verdugo, Christine Walker, Maggie Bentley and Mary Heller who all guessed ‘One Thousand and One Nights’. There you go, the title for this year’s Mystery Blanket is revealed! Well done to everyone who guessed it correctly this year, and thanks for taking the time to write in!
![]()
THE FINAL SET OF PATTERNS WERE EMAILED TO ALL THE MEMBERS ON THE 1ST NOVEMBER, and the printed patterns were posted just ahead of that with the overseas posted on the 21st October and the UK on the 27th October. If you have not already received them, they will be with you soon.
PLEASE NOTE THAT THERE ARE NO PHOTOS OF THE COMPLETED OPTION TWO BLANKET IN THE NOVEMBER MAIL-OUT. However, I will be including some photos of it in a special Mystery Blanket blog in December. We will let you know as soon as it goes live…
HOPEFULLY YOU ALL RECEIVED OUR EMAIL ABOUT THE MINI BEAD CRISIS AND POSSIBLE SHORTAGES. But if you didn’t and run short of any of the beads for your Mystery Blanket, contact Sue with details of what you need and she will send them to you free of charge: sue@debbieabrahams.com.
THERE ARE THE FINAL FOUR SQUARES TO KNIT THIS MONTH:
Square 25, Option One, The Bazaar – intarsia pattern with hooked-in and slip-stitch beads, a shisha mirror and chain stitch details:

Square 25, Option Two, The Bazaar – striped pattern with basic fairisle, hooked-in and slip-stitch beads, a shisha mirror and chain stitch details:

Square 26, Option One, Back to the Souk – intarsia pattern with cables, hooked-in and slip-stitch beads, shisha mirrors and chain stitch details:

Square 26, Option Two, Back to the Souk – cables, hooked-in and slip-stitch beads, a lace panel, shisha mirrors and chain stitch details:

Square 27, Option One, Plush 2 – fairisle pattern:

Square 27, Option Two, Plush 2 – striped pattern using basic fairisle:

Square 35, The King’s Palace (part 20) – striped pattern with a decorative beaded border and lace panel (same for both options):

On each pattern page there is a list of Pattern notes and tips that are worth reading before you start to knit each square. These bits of advice will help you and give pre-warnings as to what look out for in the pattern instructions. Also take note of the description under the title of each square as this tells you what the stitch structure is.
Here are some extra tips to help you with the squares this month:
SQUARE 25, OPTION ONE, THE BAZAAR: so, it’s intarsia for Option One knitters with concentric squares embellished with beads, embroidery and a shisha mirror - there’s a lot to get stuck into!
You can choose Option One or Option Two for this square regardless of what options you have knitted so far, as both would work well with the squares around them.
For this option you will need to wind off two balls of Amethyst, Topaz, Serpentine and Coral, introducing the second ball into the work on chart row 8 (Amethyst), row 15 (Topaz), row 22 (Serpentine) and row 23 (Coral). This is a single thickness multi-coloured fabric and so it is essential that you do this and do not carry the colours across the back of the work (only on rows 7, 14 and 22).
The colours for the embroidered circles are given in words on the chart. But you can also use the image on page 6 for reference.
Do not cast off this square as it is joined to Square 26 using a three-needle bind-off.
SQUARE 25, OPTION TWO, THE BAZAAR: this is also a very busy square, but the intarsia colourwork has been replaced by stripes. There’s some basic fairisle to knit, although you’ve done this several times before in The King’s Palace squares and in Bedecked.
The chain stitch circles around the beads on row 31 are not shown on the chart on page 9, but you can use the image on page 8 for guidance.
As with Option One, do not cast this square off, leave the stitches on a holder or spare needle for a three-needle bind-off.
SQUARE 26, OPTION ONE, BACK TO THE SOUK: you knitted this same square in Mail Out 8 for Square 24 and there’s no changes at all to it, apart from the fact that you cast it on separately rather than picking up stitches from the square below.
Instructions are given on page 11 for how to join it to Square 25 using a three-needle bind-off.
It may be obvious, but I would advise that you choose Option One for this square if you knitted Option One for Square 24.
SQUARE 26, OPTION TWO, BACK TO THE SOUK: this is exactly the same as Square 26 from Mail Out 8, but as with Option One it is cast on separately rather than picked up from Square 25.
Instructions are given on page 15 for how to join it to Square 25 using a three-needle bind-off.
I’m probably stating the obvious again, but I would advise that you choose Option Two for this square if you knitted Option Two for Square 24.
SQUARE 27, OPTION ONE, PLUSH 2: this square sees a return to Square 23 from Mail Out 7. It’s almost the same, but this time you are instructed to leave the stitches on a holder or spare needle as it is joined to Square 28 using a three-needle bind-off.
SQUARE 27, OPTION TWO, PLUSH 2: likewise, this second and easier option is also a revisit to Square 23 from Mail Out 7.
SQUARE 28, THE KING’S PALACE (part 20): this is the last King’s Palace to knit in the blanket – yay!
As with Squares 14 and 42, it is joined to the square below it by a three-needle bind-off.
![]()
WHEN YOU HAVE COMPLETED YOUR NOVEMBER SQUARES YOU WILL BE ABLE TO SEW THE FINAL STRIPS TOGETHER. In the Finishing and Edging instructions on page 23 of your November mail out, it advises you to join strip 4 into the blanket after knitting the right-hand and left-hand edgings. This is because it will much easier to do when the blanket is in two pieces, rather than picking up the stitches when the blanket is whole.
This is a guide to how to ease the squares together using Mattress stitch:
It is important to note that these are my suggestions as to how to sew together the squares, but please feel free to use your own method and sequence if you prefer.
Before sewing two squares together, mark the centre point (by counting rows) along the two edges to be joined. When you reach this point, you can check that the seam is even on both sides and if needed make any necessary adjustments.
These instructions are based on taking the needle under 2 ‘bars’ at a time if sewing rows (ie, a side edge), and under 1 stitch at a time if sewing stitches (ie, a cast-off edge).
Sewing strip 3 to strip 4:
Sew Square 15 (60 rows) to Square 22 (62 rows): you need to ease 2 rows of Square 22 into Square 15.
Sew together rows 1-28 of Square 15 to rows 1-28 of Square 22. Then along the edge of Square 15 place markers on rows 39 and 50. When you reach each of these markers take the sewing needle under 1 less row on Square 15. You are doing this twice so it will ease in 2 rows.
Sew Square 16 (55 rows) to Square 23, Option One (49 rows): you need to ease 6 rows of Square 16 into Square 23.
Along the edge of Square 23 place markers on rows 7, 14, 21, 28, 35 and 42. When you reach each of these markers take the sewing needle under 1 less row on Square 23. You are doing this 6 times so it will ease in 6 rows.
Sew Square 16 (55 rows) to Square 23, Option Two (53 rows): you need to ease 2 rows of Square 16 into Square 23.
Along the edge of Square 23 place markers on rows 18 and 36. When you reach each of these markers take the sewing needle under 1 less row on Square 23. You are doing this twice so it will ease in 2 rows.
Sew Square 17 (63 rows) to Square 24, Option One (65 rows): you need to ease 2 rows of Square 24 into Square 17.
Along the edge of Square 17 place markers on rows 21 and 42. When you reach each of these markers take the sewing needle under 1 less row on Square 17. You are doing this twice so it will ease in 2 rows.
Sew Square 17 (63 rows) to Square 24, Option Two (66 rows): you need to ease 3 rows of Square 24 into Square 17.
Along the edge of Square 17 place markers on rows 16, 31 and 46. When you reach each of these markers take the sewing needle under 1 less row on Square 17. You are doing this 3 times so it will ease in 3 rows.
Sew Square 18 (45 stitches) to Square 25 (both options) (59 rows): you need to ease 14 rows of Square 25 into Square 18.
Use this sequence: [(sew 1 stitch to 1 row) twice, sew 1 stitch to 2 rows], 7 times, [sew 1 stitch to 1 row] 3 times, [sew 1 stitch to 2 rows, (sew 1 stitch to 1 row) twice] 7 times. This will ease in 14 rows.
Sew Square 19 (63 rows) to Square 26, Option One (65 rows): follow the instructions for joining Square 17 to Square 24.
Sew Square 19 (63 rows) to Square 26, Option Two (66 rows): follow the instructions for joining Square 17 to Square 24.
Sew Square 20 (55 rows) to Square 27, Option One (49 rows): follow the instructions for joining Square 16 to Square 23.
Sew Square 20 (55 rows) to Square 27, Option Two (53 rows): follow the instructions for joining Square 16 to Square 23.
Sew Square 21 (60 rows) to Square 28 (62 rows): follow the instructions for joining Square 15 to Square 22.
![]()
Sewing strip 4 to strip 5:
Sew Square 22 (62 rows) to Square 29 (60 rows): you need to ease 2 rows of Square 22 into Square 29.
Sew together rows 1-28 of Square 22 to rows 1-28 of Square 29. Then along the edge of Square 29 place markers on rows 39 and 50. When you reach each of these markers take the sewing needle under 1 less row on Square 29. You are doing this twice so it will ease in 2 rows.
Sew Square 23, Option One (49 rows) to Square 30 (55 rows): you need to ease 6 rows of Square 30 into Square 23.
Along the edge of Square 23 place markers on rows 7, 14, 21, 28, 35 and 42. When you reach each of these markers take the sewing needle under 1 less row on Square 23. You are doing this 6 times so it will ease in 6 rows.
Sew Square 23, Option Two (53 rows) to Square 30, Option Two (55 rows): you need to ease 2 rows of Square 30 into Square 23.
Along the edge of Square 23 place markers on rows 18 and 36. When you reach each of these markers take the sewing needle under 1 less row on Square 23. You are doing this twice so it will ease in 2 rows.
Sew Square 24, Option One (65 rows) to Square 31 (63 rows): you need to ease 2 rows of Square 24 into Square 31.
Along the edge of Square 31 place markers on rows 21 and 42. When you reach each of these markers take the sewing needle under 1 less row on Square 31. You are doing this twice so it will ease in 2 rows.
Sew Square 24, Option Two (66 rows) to Square 31 (63 rows): you need to ease 3 rows of Square 24 into Square 31.
Along the edge of Square 31 place markers on rows 16, 31 and 46. When you reach each of these markers take the sewing needle under 1 less row on Square 31. You are doing this 3 times so it will ease in 3 rows.
Sew Square 25, (both options) (59 rows) to Square 32 (45 stitches): you need to ease 14 rows of Square 25 into Square 32.
Use this sequence: [(sew 1 stitch to 1 row) twice, sew 2 rows to 1 stitch], 7 times, [sew 1 stitch to 1 row] 3 times, [sew 2 rows to 1 stitch, (sew 1 stitch to 1 row) twice] 7 times. This will ease in 14 rows.
Sew Square 26, Option One (65 rows) to Square 33 (63 rows): follow the instructions for joining Square 24 to Square 31.
Sew Square 26, Option Two (66 rows) to Square 33 (66 rows): follow the instructions for joining Square 24 to Square 31.
Sew Square 27, Option One (49 rows) to Square 34 (55 rows): follow the instructions for joining Square 23 to Square 30.
Sew Square 27, Option Two (53 rows) to Square 34 (55 rows): follow the instructions for joining Square 23 to Square 30.
Sew Square 28 (62 rows) to Square 35 (60 rows): follow the instructions for joining Square 22 to Square 29.
THERE IS A CHOICE OF TWO PATTERNS FOR THE EDGING – and regardless of what options you have chosen for the squares, you can knit whichever one you prefer.
Below: Option One edging.
![]()
![]()
Above: Option Two edging.
I have written a note on page 23 of the mail out about the colours used in the edging. Some of you may have mixed up your options and knitted some Option One squares and some Option Two squares. And as you can imagine, if this is the case then there will be many variations of the completed design with differing quantities of yarn used. Each row in the edging uses approximately 2g of yarn, so if you are worried that you may run short of any of the colours, it is advisable to weigh your yarn (preferably on scientific scales or pop down to your local post office and ask to use theirs), to make sure you have enough. And if you don’t, then use other colours that you do have enough of. Your blanket will still look fabulous and a slight change to your edging will make it look even more unique!
Two sizes of circular needle are needed to knit the edging and you must change needle size when instructed in the pattern to maintain neat and even stitches. It is recommended that you use two circular needles to knit each edging – especially for Option One which has all those bobbles. However, if you only want to use one circular needle for each edging then this is fine too. You can choose whatever method suits you best.
Below: Option One edging.
![]()
![]()
Above: Option Two edging.
If throughout this blanket you have not been able to match my tension and have therefore used different size needles to the suggested ones, it is essential that you grade the needles you use for the edging up and down by the same number of sizes to ensure that it sits to the correct tension and is neither stretched or floppy.
For both options, make sure that you cast off the stitches to complete the edgings neatly and evenly as these are finished edges. Note that the edgings are cast off using the larger of the two needle sizes. This is to ensure that the cast-off edge is not too tight.
FOR GUIDANCE AS TO HOW TO PICK UP STITCHES FOR THE EDGINGS YOU CAN TUNE INTO MY VIDEO AT THE BEGINNING OF THIS BLOG, which demonstrates the technique along both cast-on and selvedge edges.
On the pattern pages for each of the edgings I have advised how many stitches to pick up along the edge of each square, so it is advisable to read to this and stick to it so you get the correct amount. You will find this information on pages 25-28.
You might find the Stitch and Row Reference diagrams on page 5 of the November mail out helpful as these show you the number of stitches and rows in each square.
These additional written notes about how to pick up the stitches and space them evenly may also be useful:
- along a side/selvedge edge: usually the basic rule to follow here is to pick up 3 out of 4 stitches, however, this will not work with every square in this blanket as the row count is not always the same. So the best way to do this is to plan out the pick up along the edge of each square separately. Place markers at equal points of measurement along the edge of the square and then divide the total number of stitches you need to pick up by the number of sections you have marked out. For example, Square 43 has 44 stitches to pick up, so if you separate the edge into four sections of equal measurement you would pick up 11 stitches in each of the four sections. My suggested technique for how to pick up stitches is as follows: with the right-side of the work facing, take the needle through the first gap between the bars (in the same place between the stitches that you inserted your needle for Mattress stitch, ie, between the edge stitch and the next stitch in). Loop the yarn around the needle and pull the new stitch through. Repeat this for all the stitches, skipping over some of the gaps when and if necessary to get the total number of stitches you need to pick up correct.
- along a cast-on edge: usually the basic rule to follow here is to pick up every stitch. So with the right-side of the work facing, take the needle through the middle of the stitch just below the cast-off edge/above the cast-on edge. Loop the yarn around the needle and pull the new stitch through. Repeat this all the way along the edge, making sure that you pick up the correct number of stitches along the edge of each square. Remember that where the strips have been sewn together, one stitch from each edge of the squares are caught into the seam (apart from the first and last squares which have only one stitch caught in). But note that you are instructed to pick up one stitch on every seam between the squares.
I HAVE BEEN ASKED WHICH IS THE BEST YARN TO USE TO SEW TOGETHER THE STRIPS. My advice is to choose a strong yarn. Any of the Merino Light DK yarns that you have plenty of will be fine, but I would avoid using Felted Tweed as this is likely to break.
If you use mattress stitch then you don’t need to use the same colour yarn for each seam as the stitching will not show. I know from the test knits of the blanket that you will have only very small amounts of some of the colours left over at the end of the project, so perhaps avoid using Turquoise or Garnet to sew up if the quantities of these yarns are low.
Happy finishing everyone!
SOME OF YOU MAY CONSIDER BACKING YOUR MYSTERY BLANKET WITH A LINING. And although I have never done this before myself, I think it would be very beneficial – plus it would save having to sew in all those loose ends of yarn!
Back in 2016, Jane McKeag from Las Vegas, USA, offered some wonderful instructions to the members about how to line a knitted blanket. So, I am going to repeat this information in this blog as you might find it helpful.
This is Jane’s advice:
“I’ve had several inquiries as to how to do the backing. So here’s some instructions on how I lined my 2016 Mystery Blanket, based on my quilting experience. It is the same process as preparing the multiple layers for quilting.


I used a good quilting flannel (by Moda Fabrics), which is 44 inches wide. I bought a 1 1/4 yard (45 inches), then machine washed and dried it. I turned an edge all around which I machine sewed. I then pinned it all around to the inner border edges, and hand sewed it in place using a blanket stitch (not necessary but somewhat decorative). I laid the whole thing flat, and used large safety pins at each intersection, pinning through both layers. I used two strands of yarn from the blanket and came up from the back and down to the back at each intersection (they don’t show on the front). Then each time I turned it over and double tied the strands with square knots and clipped them close. For the tying I worked from the outside in to make sure it would stay flat. It takes quite a bit of time to finish this way, but the blanket took quite a bit of time to knit! It’s totally worth the effort, in my opinion.”
Great advice Jane, and I am sure it will be very helpful (for the second year running!) to the members!
FANCY A BRAND NEW MYSTERY KAL IN 2022?!? There are still places available in next year’s Mystery Blanket Club, but with only eight weeks left until the signing up deadline of 31st December, you will need to sign up soon to secure your place. There is an option to pay in instalments, or if you would like to give it as a gift you can order a Gift Voucher in our online shop for any denomination from £10 up to the full cost of the membership. It could be the perfect solution to your Christmas shopping this year or a fabulous treat for yourself!
So what I have got in store for you next year!...
If you like elegance, sophistication and sparkle, then the 2022 could be the project for you. With a soft, nostalgic colour palette of silver, antique gold, vintage rose, fern green and salmon, combined with sparkling beads and rhinestones, it’s going to be a very different knitting adventure to this year’s Mystery Blanket. And if dreamy, soft cashmere is your thing, then you can indulge yourself for ten months in the beautiful Rowan Baby Cashsoft Merino yarn which includes four bespoke shades dyed up by Rowan especially for this project.

Techniques will include fairisle and intarsia as well as textured stitches, cables and stripes. Two options will be offered on some of the trickier squares which will enable knitters of all skill levels to take part.
Knitters from all over the world are invited to join me, so you will find membership packages for UK, Europe and World Zones 1, 2 and 3, with Printed Patterns being an optional extra. Please note that due to the continued uncertainty of Covid-19 and possible disruptions to postal services, Tracked and/or Signed delivery is mandatory on all World and European memberships (it is optional for UK members).
If you would prefer to pay for your membership in monthly instalments, then we have a payment system for this set up in our online shop called Splitit. This means that you can choose to spread your payments over 2-4 months with no interest or administration fees. The option to use Splitit is offered at the final stages of the checkout process, where you can select it as a method of payment and choose the number of months over which you wish to pay.
Everyone who signs up will receive a 10% discount voucher which can be used once in our online shop. It can be used for any purchases except Mystery products. We will email you a discount voucher for this with your membership confirmation email.
If you want to find out more about next year’s Mystery Blanket, then pop across to the FAQ page on our website where you will find lots more information under ‘Mystery Club FAQS’: https://debbieabrahams.com/pages/faq
THERE ARE A FEW UPDATES TO OUR FORTHCOMING KIT LAUNCHES:
Due to unforeseen circumstances, some of my new kit launches are going to be delayed for a week or two. The new launch dates are as follows:
- Friday 5th November: Festive Mystery Knit Boxes, the perfect idea for a gift or a treat for yourself. Debbie’s Mystery Box includes ten mystery gifts including a new festive knitting kit: £59.50 plus shipping (I said in my video intro that they would be launched by the 1st November, but this date has changed since the recording).
- Friday 12th November: Festive Favour Bags and Mini Festive Stockings, re-coloured in silver grey and snowflake white using Rowan Baby Cashsoft Merino yarn. Favour Bags kit includes yarn and printed pattern instructions; Mini Stockings kit includes yarn, beads and printed pattern instructions: £21/£25 plus shipping.
- Friday 19th November: Lavish Cushion Cover kit, a fairisle and beaded design knitted in the round using Rowan Kid Classic, Felted Tweed and Debbie’s Merino Light DK, inspired by the 2021 Mystery Blanket. Kit includes yarn, beads, buttons and printed pattern instructions: price TBC
I HAVE JUST RETURNED FROM A THOROUGHLY ENJOYABLE KNITTING HOLIDAY TO HELL BAY IN THE ISLES OF SCILLY. I was joined by thirty-six travel companions who were a wonderful mixture of knitters, husbands and partners.

Despite a delay to our flights at the beginning of the holiday, we had all safely arrived by Wednesday and started the holiday off with the first workshop session at the Community Hall that afternoon.
Below: Amanda, Elizabeth, Jean and Michelle get stuck in the project.


Above: the ladies continue knitting as Emma Humphries from Popplestone Studio demonstrates how to make her wonderful buttons.
I always design a project for the knitters to work on during their stay at Hell Bay and this year it was a cowl called ‘Fraggle Rock’. Knitted in gorgeously soft Rowan Alpaca Soft DK, the project combined short-row shaping with beads and stripes, finished off with bespoke buttons made by Emma.


Emma came to visit our group on Friday and spent the day with us demonstrating how she makes her amazing buttons. The ladies even got the chance to make their own following Emma’s guidance and expertise. Fortunately she brought boxes and boxes of samples with her, so there was plenty of buttons to browse through and buy.
Below: Emma's button demonstration keeps everyone enthralled!


You can see more of Emma’s work on her website: https://www.popplestonestudio.com/


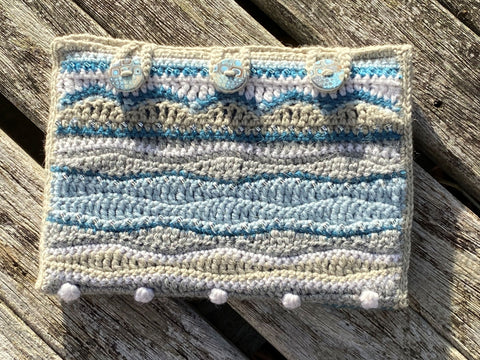
Julie Lavender was the only crocheter in the group, and as last year, Julie used the yarns and beads in the kit and created her own version of the project. Her tablet case looks wonderful and captures perfectly the spirit and essence of the Fraggle Rock Cowl design:

Workshop sessions were interspersed with leisure days which gave everyone the opportunity to explore the island, or time just to relax and knit in the beautiful Hell Bay hotel. There is something very magical about this place. As soon as you step into hotel there is a wonderful calm ambience which immediately puts you at ease. Nothing is too much for the wonderful staff who look after us and the peace and tranquillity of the whole place makes everyone feel so welcome. It’s pure paradise!


Every evening we were treated to a delicious three-course meal where we all sat together and exchanged stories of our day’s activities. The food is always a hi-light of the holiday with exquisitely presented plates of the most amazing food served to us by the wonderful attentive Hell bay staff.
By the end of the week, one cowl had been completed, with many of the others well on their way. Jacqui Lund was delighted with hers and proudly wore it on the final evening – well done Jacqui!

I had hoped to return to Hell Bay in 2022, however, it is already fully booked for the whole of next year – which does not surprise me! So instead I am making plans for a revisit in 2023. In the meantime, Sue is busy researching possible other holiday venues for next year – which we will be sure to keep you posted about.

Who knows – one day you might be able to join me on the wonderful island of Bryher and experience for yourself the magic of Hell Bay!
HERE ARE A FEW FINAL STORIES FOR THIS YEAR FROM MY LOVELY MEMBERS, BEGINNING WITH…..Ximena Verdugo from Vina del Mar, Chile who is super excited with how her Mystery Blanket knitting is going:
Ximena says: “I have been enjoying my project absolutely, it has been a wonderful challenge considering the hard times with the Covid pandemic and quarantine. It has also been a very important experience of learning more skills and techniques! I really feel proud of my job! As you say in the last video, in the UK you are expecting cold winter days, and here in Chile we are happy with these warm sunny days of spring, with lots of new flowers and colours. So I'm sending you two photos where I show you how my beautiful blanket is taking shape.”


What wonderful photos, and it’s great to see you Ximena with your Mystery Blanket. It’s looking brilliant, and it won’t be long before it is finished. Thanks for your update on your progress!
TRACEY NETTLESHIP FROM CONCORD, CALIFORNIA, USA HAD AN INGENIUS IDEA OF HOW TO MAKE THE SEWING OF THE STRIPS EASIER TO DO, and has very kindly shared her ideas with us.


Tracey says: “I found the sewing together instructions quite difficult to follow so I made these images to help myself and thought maybe other knitters might find them useful. If you think they might help please feel free to put them on the blog!”
Thanks Tracey, I am sure that they will be very helpful to the members. Anything to make that job easier is most welcome!
JANE BOYD FROM LEIGH, WORCESTERSHIRE, UK HAS BEEN CONTINUING TO KEEP BUSY, AIDED (OR MAYBE NOT!?!) BY HER THREE LITTLE KITTENS! This time it’s festive projects which she is knitting as presents for her friends and family.

Jane says: “I used an angora yarn to give the festive stockings that luxury feel. More to do yet - I’m planning on giving a set of them to each of my sisters/daughter. They’ll keep me busy in between mystery blanket knitting.
I’m just about to finish the second pair of Let It Snow Mitts. The first pair, the lilac colourway, were a birthday pressie for my sister-in-law.

You’ve no idea how naughty my little ‘bears’ are! Hubby found my knitting needle - along with stitches (amazingly) upstairs in their room. It had been stolen from my knitting bag - the yarn spread out all over and around the furniture, up the stairs and still attached to the knitting. They have their own knitting bag but they prefer to steal mine! Here they are, helping mum with her knitting is soooooo exhausting! As you can see I’m knitting your Kaleidoscope Purse. Just cast on and using up the Cotton Glacé colours that I have. It will be another pressie for some lucky person.”


What wonderful projects Jane (great present ideas!) and what mischievous little kittens too! My goodness, you have a very busy household. But despite those naughty little paws, you have still managed to get so much knitting done. So from one cat lady to another – that’s a real achievement, well done!
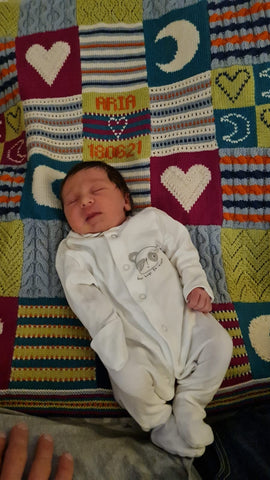
JULIE SMITH FROM HORSHAM, WEST SUSSEX, UK HAS BEEN VERY BUSY WORKING ON SEVERAL PROJECTS, and is thrilled to have recently completed her Love You to the Moon & Back baby blanket. And by the looks of it, little Aria is just loving it!
![]()

Julie says: “This is my first year of mystery blankets. I am really enjoy the knitting and I am up to date with the Mystery Cushion and can't wait to finish this!
Earlier this year I completed the baby blanket for my granddaughter Aria! Her Mum and Dad love it and it sure will keep her cosy!
It has all been a great learning curve and I have learnt so many new techniques!”
I am so pleased that you’ve enjoyed your first Mystery Blanket experience Julie, and it’s great to hear how much you have learnt along the way. Well done on completing Love You to the Moon and Back, and for keeping up with both Mystery projects this year – what an achievement!
NEXT UP IS LAURA JACOBS FROM ROCKVILLE, MARYLAND, USA WHO HAS ALSO RECENTLY COMPLETED HER ‘LOVE YOU TO THE MOON AND BACK’ BLANKET, and her 2020 Mystery Blanket, ‘Our Precious Earth’:

Laura says: “I realized that I had not sent you pictures of my last two blankets, so here they are - Our Precious Earth and I Love You To The Moon and Back.
I am also adding a knitting addict’s story. My nine-year old grandson was facing the prospect of getting his flu shot and was very nervous. The doctor reassured him that it would not be painful and added “Don’t feel bad. Everyone is afraid of needles.” His response, “Not my grandmother. She’s a knitter!.”

Hey, what a splendid little story about your grandson! Some of the things that kids say are so funny, but so true! Both of your blankets look amazing Laura. You must be thrilled to have completed them. Thanks for sharing!
I WILL BE CREATING A MEMBER’S GALLERY BLOG IN JANUARY, so please send in your photos of any Debbie Abrahams projects you have knitted this year, together with a brief description, and I will include them. It’s time to show off all your hard work and be proud of your achievements! Please send all photos and stories to debbie@debbieabrahams.com
AND FINALLY FOR THIS YEAR, THE TENTH AND FINAL 2021 MYSTERY BLANKET CLUB PRIZE DRAW!!! Each month a member is picked at random to win a Debbie Abrahams prize. So it is worth reading right the way to the end of the blog to see if you are that lucky member!
PRIZE DRAW TEN (NOVEMBER): this month’s winner is member 58, Lisa Mottram from Shaw in Oldham, UK. Well done Lisa!
Please choose a prize from the following selection:
- A signed Debbie Abrahams book: Blankets and Throws to Knit/More Blankets and Throws To Knit/25 Beaded Knits/Kaleidoscope
- Four 50g balls of any colours of Debbie’s Merino Light DK yarn
- Four packs of Debbie Abrahams Beads (size 8/0 or 6/0) from the selection on http://www.debbieabrahamsbeads.co.uk
- A £15 voucher towards a Debbie Abrahams Mystery Club: 2020 Mystery Cushion Club; 2020 Mystery Blanket Club
AND JUST IN CASE YOU WERE A WINNER THIS YEAR BUT HAVE NOT CLAIMED YOUR PRIZE, here is the list of all the winners from months 1-9. If your name is on the list and you haven’t claimed your prize then email Sue at sue@debbieabrahams.com and she will get it sorted for you:
- February: Alison Reeves-Brown (member 544)
- March: Alison Cossons (member 101)
- April: Peggy O’Brien Bremer (member 610)
- May: Janet Whiteside (member 343)
- June: Nancy Ferrier (member 415)
- July: Anna Hirst (member 180)
- August: Jo Davies (member 197)
- September: Linda Heald (member 502)
- October: Carol O’Brady (member 406)
I can hardly believe that we are at the end of the 2021 Mystery Blanket which has been one of my most colourful knitting journeys so far! I want to thank you all for being such super members this year and for embracing the project so enthusiastically. Your support as always has been overwhelming, and all your emails, photos and stories have been an absolute joy to read every month! I know that some of you have already signed up to the Club next year, so thank you for your continued support - I look forward to starting a whole new 'mystery' adventure with you in the new year! Until then, enjoy completing your One Thousand & One Nights blanket and look after yourselves until I see you in 2022, Debbie x


