WELCOME TO THE FIRST INSTALMENT OF THE 2024 MYSTERY CUSHION CLUB! I am delighted to be launching my fourteenth KAL in the Mystery Cushion collection and am thrilled that you have decided to join me on this journey. You are now part of a unique global knitting community with members participating from across the world, including Australia, New Zealand, USA, Canada, Malaysia, Germany, Iceland, Norway, Poland, Ireland and the UK.

For those of you who are new to my Mystery Clubs, it’s advisable to make this your first port of call at the beginning of each new instalment. So going forward from today, on the 15th of each month from July to October, if you can set aside half an hour to read my blog and watch the vids, you will be prepped and ready to knit your Mystery Cushion with complete confidence!
In my dedicated blog for the Mystery Cushion, each month I will give you tips and advice about the blocks you are knitting, plus there are tech vids to assist you with some of the techniques such as cables, intarsia and beads. Some of the tech vids have been created specifically for this project and show how to knit rows within the patterns. And some of them are generic and demo the techniques on a sample swatch.
This month you have three blocks to knit which include, beads, cables and intarsia. So there’s plenty to keep you busy while you knit your way through the rest of June.
So, let’s make a start, beginning with my intro vid and eight tech vids to help you with this month’s knitting techniques:
- How to carry yarns up the side of the work
- How to bead, the hooking-in method
- How to pick up stitches along a cast-off edge (to knit the next square)
- Mattress stitch (horizontal)
- How to cast on using several colours
- How to cable
- Block 3, Embossed: how to cross the yarns over when changing colour
- How to knit intarsia
Mystery Cushion Club 2024 - Mailout 1 | MCC2024
How to carry yarns up the side of the work | MCC2024
How to bead: The hooking in method | MCC2024
Picking up stitches to begin a new square | MCC2024
Mattress stitch (Horizontal) | MCC2024
How to knit intarsia | MCC2024
How to cable | MCC2024
How to cast on using several colours | MCC2024
Block 3 Embossed: How to pick up the stitches and work a RS and WS row
ALL OF THE KNITTING KITS HAVE BEEN POSTED, with the overseas posted well ahead of the UK, so hopefully you have received your kit. However, if you are still waiting, please bear with us - postal services around the world differ in their efficiency, and once they leave the UK we are unable to control the speed at which they are delivered.

We have a tracking number for each overseas parcel, and we can give that to you upon request. Just email Sue at sue@debbieabrahams.com and she will email it to you. UK parcels were posted by Royal Mail First Class for which there is no tracking information.

When you receive your kit, please check the contents against the list on page 2 of your June mail out. And if anything is missing, let us know straight away and we will send you what you need. Make sure that you check in between all the balls of yarn as sometimes that’s where we pack the smaller items such as beads and buttons. We take a great amount of care in packing the parcels, but unfortunately sometimes things are omitted in error. So please email Sue at sue@debbieabrahams.com if you have any queries about the contents of your kit.
FOR THE MEMBERS WHO PAID FOR PRINTED PATTERNS, these have been posted in a separate card-backed envelope and if you have not already received them, they should arrive very soon. We aim to have them delivered to you by the middle of the month, but apologies if they are a little late. Again, we are at the mercy of the global postal services, and some countries are less efficient than others at delivering mail. But we will do our best to get them to you on time.

Overseas patterns are posted by standard Airmail so unfortunately there is no tracking number for them. UK patterns are posted by Standard Royal Mail.
YOU SHOULD HAVE RECEIVED AN EMAIL FROM US ON THE 14TH JUNE NOTIFYING YOU THAT THE MYSTERY CUSHION PATTERNS ARE AVAILABLE TO DOWNLOAD FROM YOUR ONLINE ACCOUNT. For those of you who have joined my Mystery clubs before, please note that this is a different system to how you used to access your monthly patterns (it used to be via a direct link to the file).
These are the steps that everyone needs to follow in order to access the new patterns each month:
- Log into your Debbie Abrahams account on our website with your username and password.
- Click the "DIGITAL DOWNLOADS" buttons to view your mail-outs.
- Your latest available mail-outs will be visible here in PDF format to download
If you are having a problem with logging into your account, please contact Jason on our tech team and he will be able to assist you: support@debbieabrahams.com
From July - October (the remaining four instlaments), the patterns will be emailed to everyone on the 15th of the month, and on that date they will be available to download from your online account.
PLEASE LET US KNOW IF YOU DON’T RECEIVE OUR EMAILS – it might be because we have made an error with your email address in our database, which we can correct immediately. But sometimes our emails go into a spam folder instead of the inbox, so please make sure that you check this before contacting us.
These are some trouble-shooting steps that you can take to make sure that you are set up correctly to receive our Mailchimp newsletters:
- add our “From” email address to your email contact list or address book
- check any spam filter settings to be sure that your content isn't being flagged
- find the email in your spam folder (if this is the case), and mark it as “Not Spam” or “Not Junk”. This will help register that our content is safe for delivery into your inbox
If you do not receive the June patterns from us then please try some or all of these checks. And if you need further help then please contact Sue at: sue@debbieabrahams.com and we will investigate further.
IT’S ALWAYS A GOOD IDEA TO HAVE A THOROUGH READ OF EACH MAIL- OUT BEFORE YOU START KNITTING. Then you can be sure that you are fully prepped and ready for what you are going to knit each month. On page 3 there is some handy information about tension, construction, the finished size of the cushion-cover and blocking and pressing.

More information about how to knit a tension square and how to block and press is included in this blog, but the information on this page in the mail-out will give you an overall idea of how it all works.
IN EACH INSTALMENT ON PAGE 4 YOU ARE GIVEN A PIECING DIAGRAM WHICH SHOWS YOU WHICH SQUARES YOU ARE KNITTING and where they are positioned in the design. The Front Panel of the cushion-cover is constructed from six different shaped blocks which are going to be worked in three separate sections and then pieced together. The Back Panel is knitted in two halves – an Upper Back Panel and a Lower Back Panel.

As we progress through each month, images will be added to the diagrams which will enable you to see how the design is developing. The finished measurements of each block will be given within its pattern instructions.
THERE IS A TIPS AND TECHNIQUES SECTION IN YOUR MAIL-OUT, it is at the back of the June mail out on pages 12-13 and includes important information about the intarsia and fairisle techniques, knitting with beads, embroidery on knitted fabric and how to attach a stud.

On page 14 there is an Abbreviations list which gives you an explanation of all the abbreviations that are used in the patterns. Keep an eye on this list each month as it will be updated when there is a new abbreviation in the patterns.

PLEASE NOTE THAT THE COLOURS IN THE MAIL-OUTS MIGHT NOT BE COMPLETELY ACCURATE TO THE COLOUR OF THE ACTUAL YARNS – both in the printed paperwork and in the digital files. We have done our very best to make sure that the colours are as accurate as possible, however some discrepancies might occur in the images and on the charts. Therefore, it is always best to read the name and shade number of the colours rather than going by the photographs of the knitting.
LOOK OUT FOR THE LITTLE COLOURED ENVELOPE IN YOUR KIT! –this has your woven label inside it. The label has the name of the Mystery Cushion on it, so if you don’t want to spoil the surprise it would be best to put this in a safe place until you have guessed the theme.
YOU HAVE A COLOUR CODER IN YOUR PARCEL, and it is important that you use it to identify the colours in the cushion. The shade numbers on the ball–bands correspond to those stated in the patterns, beside which I have written the name for each colour. If you do not use the correct colour for the correct square then you may run out of some of the yarns, so please take some time to set up your colour coder to avoid getting the colours mixed up.

Tie a small amount of each yarn onto the colour coder and also write the name of each yarn and its shade number beside it. And then remember to keep your colour coder near to you at all times when you are knitting so that you can make sure you have picked up the correct colours to work with!
THE PACK OF SIX BUTTONS ARE FOR YOUR BACK PANEL FASTENINGS – so be sure to keep them in a safe place until they are needed at the end of the project.

IT IS ADVISABLE NOT TO PURCHASE YOUR CUSHION INSERT UNTIL YOU HAVE COMPLETED KNITTING THE CUSHION COVER as the finished size of it will depend on your own tension. If your tension differs from what I achieved, then it will result in the cushion-cover knitting up slightly bigger or smaller than the size I have quoted in the pattern instructions. The recommended size is 45cm x 35cm.
WE DO OUR VERY BEST TO KEEP ERRORS IN THE PATTERN INSTRUCTIONS TO AN ABSOLUTE MINIMUM, (our aim is none at all!). But unfortunately, they do occur sometimes despite a thorough test knit and several checks before the patterns are signed off. Any corrections that are found after the patterns are released are listed in the Addendums on our website, so it is advisable to check this before you start to knit each block, and that way you will be aware of anything before you make a start. If you scroll down to the bottom of the Homepage, you will see a button that takes you to the Addendums.
BEING PART OF A MYSTERY CLUB MEANS THAT YOU ARE PART OF A HUGE KNITTING COMMUNITY, so you shouldn’t ever feel that you are on your own. There are several social media platforms that you can join for free to keep up with all the latest news and chat, as well as sharing advice and ideas, and resolving any queries you might have about the Mystery Cushion with other members:
Ravelry: Debbie Abrahams Handknits
Facebook: Debbie Abrahams Mystery Knitters
Facebook: Debbie Abrahams Handknits (our own FB page)
And if you have a specific query that you need to ask us about, please send your correspondence to Sue at sue@debbieabrahams.com and she will either answer it herself or forward it onto me. Either way round, you will get a response from us.
I have an Instagram and a Pinterest page too. So, if you want to keep an eye on all the latest news about the Club and Debbie Abrahams Handknits, please follow us on our social media platfoms. It’s a great way to keep up with what is happening!
Instagram: debbieabrahams_knitting
Pinterest: debbieabrahams@debbieabrahamsk
IF YOU CAN GET YOURSELF ACROSS TO YARN LOFT IN CARRINGTON, NOTTINGHAM, then you can join our hugely enjoyable Mystery Club meetings which are held there once a month.

Doreen who owns the shop hosts it on the first Wednesday of each month, and for a couple of hours we sit, chat and eat cake while we knit – what could be better that that!?! Members from all my Mystery clubs are welcome – both past and present projects. So if you are able to attend, it would be great to see you!

Our next meeting is on Wednesday 3rd July between 4-6pm at Yarn Loft, 118 Hucknall Road, Carrington, Nottingham, tel number 07825 702433, website: www.yarnloft.co.uk. To cover the costs of hosting the meeting there is a small sub to pay (£3.00), which can be paid to Doreen on the day.
The remaining dates for your diaries for our 2025 meetings at Yarn Loft are:
Wednesday 4th September
Wednesday 2nd October
Wednesday 6th November.
Just send a quick email to me at debbie@debbieabrahams.com to let me know you are coming, and we will make sure that we have a hot drink and a cake ready for you!
I WANT TO MOVE ON TO TALK ABOUT SOMETHING VERY IMPORTANT - HOW TO KNIT A TENSION SWATCH, which is essential to do before you start knitting your Mystery Cushion.
The tension for this project is 24 stitches and 34 rows to 10cm (4in) measured over stocking stitch using 3.50mm needles and using Rowan Felted Tweed (any colour from your kit).
Any discrepancies in your tension could lead to shortages of yarn, especially if you knit looser that the given tension. So please take time to do this. Here are some tips about measuring tension:
- the tension swatch should be longer and wider than the stated tension, so it is advisable to cast on a minimum of 35 stitches and work a minimum of 46 rows
- block and press your tension swatch so that the stitches are fully relaxed
- use a solid ruler rather than a tape measure to measure your stitches and rows
- start and finish counting the stitches and rows in from the edges of the knitting and not from edge to edge
- if your tension is too loose you will need to resample using a smaller metric size needle
- if you tension is too tight you will need to resample using a larger metric size needle
- if you need to change your needle size then you will need to change all of the other needles used in the project as well by the same number of sizes
- stitch tension is more important than row tension, so if you are unable to match both to the recommended tension, choose the needle size that gives you the closest match.
Keep your tension swatch to one side, just in case you need to reference it while you are knitting.
BLOCKING AND PRESSING YOUR KNITTING IS ALSO VERY IMPORTANT, and if you want a professional look to your cushion-cover, this will go a long way to help achieve it. It is essential that your blocks are knitted to the correct sizes so that when they are joined together, the front and back panels fit together perfectly. There is a bit of room for tolerance here though, and this is where blocking and pressing can help. There are several different stitch patterns used in the project which may differ in tension to your stocking stitch swatch, and therefore may require a bit of easing in or easing out to get them to the right size. However, if you have tested your tension and it is correct, this should not be a problem.

Blocking is the pinning out of your knitting, and in the Pattern notes and tips section on the first page of each block, I have advised whether to pin them out with the right side or wrong side facing upwards – so be sure to read this and take note. Pin frequently along each edge, keeping all four edges as flat and even as possible. There is no need to use heat to press your squares. Much more preferable – and much safer too! – is cold water. So, if you have one available, fill up a plant spray bottle and use this to generously wet down the knitting, making sure that the water is dispersed right across the knitting from edge to edge. And then simply leave it to dry completely before removing the pins.
Pressing is the process of applying either heat or water to your knitting which relaxes the stitches and softens the fibres, resulting in a much more fluid and softer feeling fabric.
Blocking and pressing also helps the edges of the knitting stay flat rather than curling over, as is the tendency with most stitch structures.
I would suggest that you block and press your front panel blocks after you have knitted each one. I think it’s far easier to do this as you go along rather than leaving them all to the end. It also ensures that as you work through them, they are all knitting up to the correct measurements.
THERE ARE THREE BLOCKS TO KNIT IN THE FIRST INSTALMENT, and here are some useful tips which are worth a read before you begin…
FRONT PANEL, Block 2: Corrugated – garter stitch and stocking stitch stripes with hooked-in beads:

FRONT PANEL, Block 3: Embossed – intarsia cable with optional bronze and gold studs:

FRONT PANEL, Block 4: Leaf Cut-out – intarsia leaf motif:

On each pattern page there is a list of Pattern notes and tips that are worth reading before you start to knit each block. These bits of advice will help you and give pre-warnings as to what to look out for in the pattern instructions. Also take note of the description under the title of each square as this tells you what the stitch structure is.
You can use the tech vids to assist you, but here are a few extra tips for each block:
BLOCK 1, CORRUGATED: this two-colour stripe alternates between garter stitch and stocking stitch stripes with rows of hooked-in beads.
Videos to watch for assistance with this block:
- How to bead, the hooking-in method
- How to carry yarns up the side of the work
This is a nice easy start to the project and uses two of the gorgeously soft Alpaca Soft yarns, Verdigris and Autumn Gold. Once both yarns have been joined in, they should not be cut off. Instead, carry them neatly up the side of the work. There is a tech vid in this blog if you need some guidance for how to do this.

The beaded stocking stripes in Verdigris use the suggested main needle size of 3.50mm, but you will need to change to smaller needles (2.50mm) for the garter stitch stripes in Autumn Gold (this is written into the pattern instructions). This is because garter stitch has a different tension to stocking stitch – it condenses down the rows but extends the width of stitches – so the smaller needle will ensure that the whole block is a uniform width from the cast-on to the cast-off.

The Emerald and Red beads are hooked in, so there is no pre-threading to do. The total number needed for this block are listed in the Pattern notes and tips on page 6. If you need guidance on how to hook-in beads, there is a tech vid in this blog to assist you.
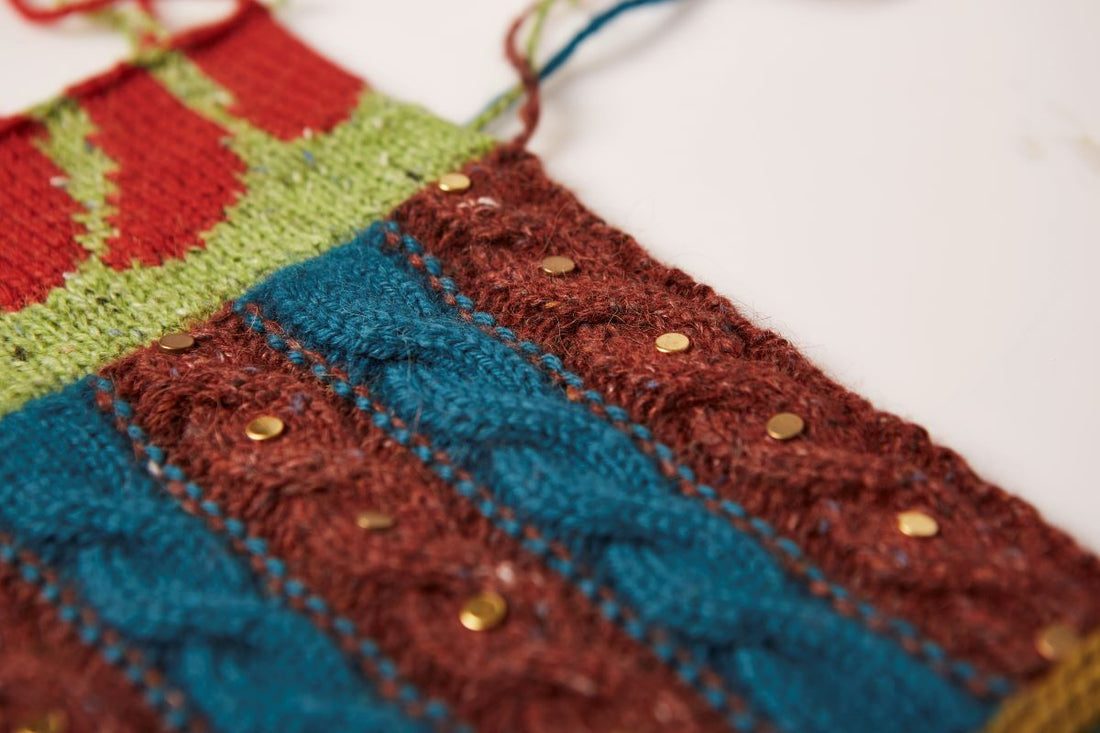
BLOCK 3, EMBOSSED: the next block to knit this month, which builds onto Block 2, is an intarsia cable knitted in two colours – Barn Red and Verdigris.
Videos to watch for assistance with this block:
- How to pick up stitches along a cast-off edge (to knit the next square)
- Mattress stitch (horizontal)
- How to cast on using several colours
- How to cable
- Block 3, Embossed: how to cross the yarns over when changing colour
This might look complicated to knit, however, once you get the hang of the intarsia technique, it really is quite simple. If you have knitted intarsia before but not tried it within a cable pattern, then this is something new for you to try. And if intarsia is completely new to you, then this is a great way to learn the basics of it.

Intarsia is a multi-coloured, single thickness knitted fabric, so this means that before you cast on (or pick up stitches) you need to wind off five balls (or use yarn bobbins) of yarn – three of Barn Red and two of Verdigris. One ball/bobbin should be used for each individual cable as there is no carrying across of yarns across the back of the work (as in fairisle). I am always asked how much yarn to wind off for intarsia patterns, but it is very difficult to estimate. I prefer to use yarn bobbins rather than small balls of yarn, and I always fill up each bobbin so that, if possible, I can complete each section without running out. If I do run out then yarns can be joined in, but it is preferable to try and avoid this if you can.
The first thing to point out is that this block uses a smaller needle than the suggested main needle size. It is one metric size smaller (3.25mm), so make sure that you grab the correct pair before you make a start.

You need to cast on (or pick up stitches) in the colour sequence as specified on page 8. If you need some guidance for either of these techniques, take a look at the tech vids in this blog. After casting on there is a WS row on which you increase by a total of 13 stitches. The increase is ‘inc purlwise’ which is worked by purling into the front and then the back of the stitch.
Once the cast-on and the WS rows are completed, your yarns are set up and you are ready for your first RS row. It is essential that the yarns are crossed over at each colour change on the RS of the work to create the vertical dotted lines you can see in the image on page 8. This is the opposite to how you would usually cross them over in intarsia. There is a tech vid which shows how this is done (make sure you select the one for Block 3, Embossed), so if you are not sure about it, I would suggest you watch it before you start knitting to make sure that you are doing it correctly. To get a really neat colour change, pull each of the yarns firmly as you cross them over and give them an extra tug after they have been worked. Just beware though of Barn Red as Felted Tweed can break if pulled too hard.

There is both a chart (see page 10) and worded instructions for this block, so choose whichever suits you best to work from. If you have not worked from a cable chart before, then this is a great opportunity to give it a go. And if you need any reassurance, then the worded instructions are there for back up – the worded row numbers relate to the row numbers on the chart.

After this block has been completed, blocked and pressed, there is the option to attach bronze and gold studs to the middle of the Barn Red cables. If you look at the image on page 8 you can see where they are positioned – there are six studs in each cable. I alternated mine within each one, with the left and right cables, from the top down, bronze, gold, bronze, gold, bronze. And then for the centre cable I reversed this, gold, bronze, gold, bronze, gold. For guidance on how to attach them there is information in the mail out on page 13. They are claw studs and need to be pressed through the knitting and secured at the back of the work. If you are not sure whether you want to attach them, you can always leave this for now and go back to it later.
BLOCK 4, LEAF CUT-OUT: the final block for this month is another intarsia pattern, but this time it follows the usual rules of the technique where yarns are crossed over on the WS of the work.
Videos to watch for assistance with this square:
- How to pick up stitches along a cast-off edge (to knit the next square)
- Mattress stitch (horizontal)
- How to knit intarsia
You will need to wind off balls or bobbins of yarn to knit this pattern, but some of the sections are so narrow with few stitches between colour changes that you could use long lengths to knit them rather than bobbins or balls.

I used five bobbins of Vermillion – one for each leaf – plus a short length for the few stitches of Vermillion in the top left-hand corner of the block. Before casting on I divided up the Lime yarn into several small balls and lengths, used the ball of Lime for casting on, and then introduced a new bobbin or length of yarn of Lime when needed – ie, on the rows when a new Vermillion leaf started. I didn’t carry across any of the yarns at all, and kept it completely single thickness. This is advisable to do if you want to achieve a lovely flat piece of knitting with no puckering. Admittedly there are a lot of loose ends to sew in. But I would much rather have that than uneven knitting!

If you need some tips on how to knit intarsia, then the tech vid this month will help you. It’s the one called ‘How to knit intarsia’ and it shows you how to join in yarns and cross them over to stop gaps between the colour changes.
Now you are fully clued up on what you are knitting this month, you can make a start. I hope you enjoy the first set of patterns!
AND FINALLY FOR THIS MONTH, IT’S TIME TO HAVE A GUESS AT THE TITLE OF THE MYSTERY CUSHION! Each month I am going to give you a letter which is in the title. Then if you think you know what it is, drop us a line and we will let you know if you are right. There are clues in the patterns, the colours of the yarns and names of the blocks – what do the words ‘corrugated’, ‘embossed’ and ‘cut-outs’ bring to mind? Any ideas?!?
This month the letter I am giving you is ‘O’:
_ _ _ O _ _ _ _ _
If you think you know what it is, please email your answer to Sue at sue@debbieabrahams.com to see if you are right. And if you are, then with your permission, we will include you in the list of correct guessers in the July blog. And if you are not, then there’ll be more clues next month to help you.

Thank you for taking the time to read my first blog for this year’s Mystery Cushion. I hope that all the tips and advice have left you feeling inspired to grab your knitting needles and make a start on this month’s patterns! We always love to hear from our members, so if you have any stories or photos that you’d like to share about your Mystery Cushion knitting, please send them in and we will share them in the next blog. And don’t forget to let us know your guesses for the title of the Mystery Cushion too. There are clues in all of the patterns, so have a really good think and be sure to write in if you have that lightbulb moment! Until next time, enjoy your June knitting, and I will see you back here on 15th July for the second instalment. Have fun everyone! Debbie, x


