Mystery Baby Blanket Club 2023/24: Mail Out 7 - the final instalment!
Debbie AbrahamsWELCOME TO THE FINAL INSTALMENT OF THE 2023/24 MYSTERY BABY BLANKET CLUB! Congratulations, you’ve made it to the end of the project, and are now just five squares and an edging away from completing your blanket. And if you haven’t guessed the title of it yet, then you are about to find out what it is…
![]()
So before you grab your knitting needles, make yourself a cuppa, settle down in your favourite comfy chair, and have a listen to my intro in which the title of the Mystery Baby Blanket is revealed!
![]()
There are also a couple of new tech vids this month to help you with the edging of the blanket. Plus of course there all the other vids from previous blogs that you can access if you need some guidance.
- NEW! How to pick up stitches for the edging
- NEW! How to M1R (make one right) and M1L (make one left)
- Mattress stitch (Vertical) (MO6 blog)
- How to knit intarsia (MO1 blog)
- Picking up stitches to knit the next square (MO1 blog)
- Mattress stitch (horizontal) (MO1 blog)
- How to carry yarns up the side of the work (MO1 blog)
- How to knit fairisle (MO1 blog)
- How to add Swiss darning to your knitting (MO1 blog)
- How to cable (MO1 blog)
- How to knit a bobble (MO1 blog)
- How to add Chain stitch to your knitting (MO2 blog)
Mystery Baby Blanket 2023 - The Big Reveal! | MBBC2024
How to M1R (make one right) and M1L (make one left) | MBBC2023
How to pick up stitches for the edging | MBBC2023
MAIL OUT 7 HAS BEEN EMAILED TO ALL THE MEMBERS ON 1ST APRIL, so if you can’t see an email from us, please check your Spam folder first before contacting us as this is usually where it ends up. Remember you can also download this mail out and all the previous six mail outs from your Debbie Abrahams account.

BEFORE WE TAKE A LOOK AT THIS MONTHS’ SQUARES, JUST A REMINDER THAT MEMBERSHIPS FOR THE 2024 MYSTERY CUSHION CLUB ARE STILL AVAILABLE IF YOU WANT TO TAKE ON A BRAND NEW KNITTING CHALLENGE THIS YEAR. Over five fun-packed months of inspirational knitting using some of Rowan’s finest and most luxurious yarns including Alpaca Soft DK and Felted Tweed, you will have the opportunity to create your very own Mystery Cushion.
If you’re new to the Mystery Cushion Club then it’s a smaller project than the blanket, beginning on 14th June and finishing mid-October. The theme is different to the Mystery Blanket, but it works in the same way with a knitting kit sent out to members at the beginning of the project and monthly emailed patterns. I write a separate blog for the Mystery Cushion which includes knitting technique videos, so you can get all the help and support you need as you knit along.
The knitting kit includes Rowan yarn, Debbie Abrahams Beads and buttons for fastening.
So what about some hints?!? If you like rich Autumnal colours with a hint of Vintage, then this could be the cushion you’ve always dreamed of knitting! Bold motifs are mixed with simple stripes and textured stitches, finished off with a sprinkling of sparkling beads and bronze stud details. The theme has several different strands to it, including a nod to one of the great masters of 20th century art…now there’s food for thought!

Discount for MBBC23 members: because you are a Mystery Baby Blanket Club member you get 5% discount off the cost of the basic membership whenever you decide to sign up before it begins in June. Simply input this code, LOYALTY5 into the coupon box at checkout to enable the discount.
There will be a download option only (no knitting kit) for this club, which will enable you to use yarns and beads from your own stash to knit the cushion. The list of yarns and beads for the knitting kit will be released a week before the project begins so you can yourself prepped and ready. The five sets of patterns will be emailed monthly from June to October.

To make things easier you can choose to spread the cost of your payment. If you don’t want to pay in one go you have the option to pay in 2-4 instalments using our Splitit payment plan. There are no admin fees for splitting your payment so you can choose whatever is easiest for you and your finances. This can only be used for the knitting kit option.
Feeling tempted?!? As with all my Mystery Clubs, memberships are limited and once they have sold out the Club will be closed. So don’t delay in getting yourself signed up. There are packages for UK, Europe and the World - it’s a global project and everyone is invited to join in!
THERE ARE FIVE SQUARES TO KNIT IN THIS FINAL INSTALMENT, PLUS THE EDGING AND FINISHING:
Square 17: The Letter ‘Q – striped pattern with fairisle letter motifs (two colourways):
![]()
![]()
Square 18: Sweetheart – intarsia heart motif with self-coloured bobble, embroidered details and optional embroidered initials and date (same for both colourways):
![]()
Square 19: The letter ‘J’ – striped pattern with fairisle letter motifs (two colourways):
![]()
![]()
Square 20: Love You– lace heart motif (same for both colourways):

Square 21: The Letter ‘C – striped pattern with Swiss darned letter motifs (two colourways):
![]()
![]()
On each pattern page there is a list of Pattern notes and tips that are worth reading before you start to knit each square. These bits of advice give you a pre-warning of what to look out for, as well as some useful information about how to knit each square. In the following notes below I am going to give you a few extra tips about the squares so that you can knit them with complete confidence.
SQUARE 17, THE LETTER ‘Q: this square looks similar to ‘F’, ‘G’, ‘T’ and ‘U’, with fairisle letters knitted in Duckling, but it is subtlety different:
Tech vids to watch for assistance with this square:
- Picking up stitches to knit the next square (MO1 blog)
- Mattress stitch (horizontal) (MO1 blog)
- How to carry yarns up the side of the work (MO1 blog)
- How to knit fairisle (MO1 blog)

Two bands of letters are combined with stocking stitch and garter stitch stripes. The fairisle technique is used to knit the letters so this is not an intarsia square, despite the letters being fairly large.
![]()
There are 39 stitches in this square which is slightly more than the average number. So to compensate for this the main needle size (the one used for stocking stitch) has been downsized from 3.25mm to 3.00mm. There are some needle size changes to watch out for as well, so if you are using different sized needles to the ones that are stated, you need to make sure that you resize all of them to suit your tension.
SQUARE 18, SWEETHEART: this is the centre square, which has the option to personalise it with initials and a date:
Tech vids to watch for assistance with this square:
- Picking up stitches to knit the next square (MO1 blog)
- Mattress stitch (horizontal) (MO1 blog)
- How to knit intarsia (MO1 blog)
- How to knit a bobble (MO1 blog)
- How to add Swiss darning to your knitting (MO1 blog)
- How to add Chain stitch to your knitting (MO2 blog)
This heart motif is knitted using the intarsia technique, with the outer edges defined by a reverse stitch (purl on RS). I used five bobbins to knit this square – two of Heavenly, casting on with one and introducing the second one on chart row 36, and three of Duckling, casting on with one, and introducing a second one on chart row 8 and a third one on chart row 36. I decided to let the yarn travel across the back of the stitches where the heart divides (chart rows 6 and 34), as it was tricky to introduce new bobbins on these rows and far easier to manage it when the gap was three stitches wide rather than one.

The outline inside the heart can be Swiss darned or knitted in. If you choose to Swiss darn it then it might be difficult to find the first stitch at the bottom (chart row 11) as the reverse stitches around the edge of the heart make the rows more difficult to count. So to help with this, I added a marker to Row 11 as I was knitting so that I didn’t have to count the rows.
![]()
To complete the square you can leave it as it is (as in both of the completed blankets in this mail out), or you can add in initials and/or a date. There is a chart on page 11 which includes all of the letters of the English alphabet, plus numbers 0-9 (use the 'O' from the alphabet for zero). I have suggested the placement of these on the chart on page 10, but if you want to position them somewhere else within the square, that is absolutely fine. You could use a pencil to draw them onto the chart to make sure you get them in the right place. And if you prefer to knit them in rather than embroider them, then you will need to do this before you cast on.

SQUARE 19: THE LETTER ‘J’: this is the same as Square 17, but the letter ‘Q’ has been swapped for ‘J’:
Tech vids to watch for assistance with this square:
- Picking up stitches to knit the next square (MO1 blog)
- Mattress stitch (horizontal) (MO1 blog)
- How to carry yarns up the side of the work (MO1 blog)
- How to knit fairisle (MO1 blog)
![]()
SQUARE 20, LOVE YOU: this is the same as Square 16 from Mail Out 2:
Tech vids to watch for assistance with this square:
- Picking up stitches to knit the next square (MO1 blog)
- Mattress stitch (horizontal) (MO1 blog)
- How to knit a bobble (MO1 blog)
The heart motif is created by knitting basic lace stitches (K2tog, yf, skpo and sk2po) with a self-coloured bobble in the centre. The Abbreviations list on page 27 gives instructions for all these if you need a reminder.

You can choose to work from worded instructions or from a chart for this square. If you work from the chart, just make sure that you make the necessary needle size changes as given on page 16. They are for the moss stitch borders which frame the heart motif at the top and bottom of the square.
SQUARE 21, THE LETTER ‘C’: this is similar to Square 15 from Mail Out 2, but the letter ‘X’s have been replaced with ‘C’s:
Tech vids to watch for assistance with this square:
- Picking up stitches to knit the next square (MO1 blog)
- Mattress stitch (horizontal) (MO1 blog)
- How to carry yarns up the side of the work (MO1 blog)
- How to add Swiss darning to your knitting (MO1 blog)
I noticed recently that there was an error in the charts for Square 15, which as far as I know went unnoticed by any of the members. This is probably because the worded pattern instructions are correct – it is the chart that is wrong. The background of the letters should be Taupe which you are instructed to knit on Rows 15-22 and on its subsequent repeat, but the chart shows these rows in Sea Green. Fortunately I think that everyone has knitted these rows correctly as the worded instructions would have been followed for Square 15. But if you followed the chart and used Sea Green, it is important that you use Sea Green for this square too so that they match each other.

The ‘C’s are in three colours, so these need to be Swiss-darned onto the square rather than knitting them in (as you did for Square 15). It is important to embroider these letters rather than knit them in as the ‘C’s will look elongated and the whole square will be too long. This is because fairisle extends the row count, thus making the stitches longer.
The last thing to remind you about are the frequent needle size changes which are in bold so that you don’t miss them. They are important to do as the different stitch structures in this square will affect the tension and consequently the width of your knitting.
And that concludes the last five squares of the blanket, happy knitting everyone!
WITH ALL FIVE STRIPS COMPLETED, YOU NEED TO SEW THEM TOGETHER SO THAT YOU CAN KNIT THE EDGINGS. If you followed my advice last month and sewed strip 1 to strip 2, and strip 4 to strip 5, then you have just two more seams to do.
![]()
![]()
It is advisable to knit the left and right edgings before you sew in the centre strip. So you might want to skip over this for now and come back to it when the left and right edgings are completed.
Here are a few reminders (from the beginning), before you make a start on sewing your strips together…
If you have knitted your squares separately then you will need to join these together first to create strips 1, 2, 3, 4 and 5 (Squares 1-7, 8-14, 15-21, 22-28 and 29-35). If you need some guidance with this, check out the tech vid in the first blog for horizontal mattress stitch which demonstrates this technique.
Once you have your five strips completed you can make a start. This is a guide to how to sew the squares together using Mattress stitch. It is important to note that these are my suggestions as to how to sew together the squares, but please feel free to use your own method and sequence if preferred.
In this blanket all of the squares are facing in the same direction, so this makes it much easier to sew them together. All you need to watch out for is the number of rows, which vary from square to square. This means that some easing in will be required.
These instructions are based on taking the needle under 2 ‘bars’ at a time as demonstrated in the tech vid for vertical mattress stitch. To ease in a row, you will need to take your needle under one less bar on the side you are easing the extra row into.
Before we make a start, these are a couple of tips about how to ease in rows:
- Garter stitch rows have a tighter row tension than stocking stitch, so for every row of Garter stitch (which is two knit rows), ease these two rows into one stocking stitch row.
- Fairisle usually has a looser row tension than stocking stitch, so if you need to ease in some rows it is best to do this across fairisle rows, taking the needle under more of the stocking stitch rows than the fairisle rows.
These are my guidelines and do not have to be followed if you prefer to use your own method and calculations. See the blog for MO6 for how to sew strip 1 to strip 2, and strip 4 to strip 5.

SEW STRIP 2 (squares 8-14) TO STRIP 3 (squares 15-21)
Sew Square 8 (48 rows) to Square 15 (62 rows): you need to ease 14 rows of Square 15 into Square 8.
Along the edge of Square 8 place a marker between Rows 24 and 25.
Along the edge of Square 15 place a marker between Rows 31 and 32.
Ease in 14 rows as evenly as you can across the whole length of the squares, making sure that the marker on Square 8 is matched to the marker on Square 15.
Sew Square 9 (47 rows) to Square 16 (51 rows): you need to ease 4 rows of Square 16 into Square 9.
Along the edge of Square 9 place a marker on Row 24.
Along the edge of Square 16 place a marker on Row 26.
Ease in 4 rows where the marker on Square 9 matches to the marker on Square 16.
Sew Square 10 (48 rows) to Square 17 (50 rows): you need to ease 2 rows of Square 17 into Square 10.
Along the edge of Square 10 place a marker between Rows 24 and 25.
Along the edge of Square 17 place a marker between Rows 25 and 26.
Ease in 2 rows where the marker on Square 10 matches to the marker on Square 17.
Sew Square 11 (52 rows) to Square 18 (47 rows): you need to ease 5 rows of Square 11 into Square 18.
Along the edge of Square 11 place a marker between Rows 26 and 27.
Along the edge of Square 18 place a marker on Row 24.
Ease in 5 rows where the marker on Square 11 matches to the marker on Square 18.
Sew Square 12 (48 rows) to Square 19 (50 rows): you need to ease 2 rows of Square 19 into Square 12.
Along the edge of Square 12 place a marker between Rows 24 and 25.
Along the edge of Square 19 place a marker between Rows 25 and 26.
Ease in 2 rows where the marker on Square 12 matches to the marker on Square 19.
Sew Square 13 (47 rows) to Square 20 (51 rows): you need to ease 4 rows of Square 20 into Square 13.
Along the edge of Square 13 place a marker on Row 24.
Along the edge of Square 20 place a marker on Row 26.
Ease in 4 rows as evenly as you can across the whole length of the squares, making sure that the marker on Square 13 is matched to the marker on Square 20.
Sew Square 14 (47 rows) to Square 21 (62 rows): you need to ease 15 rows of Square 21 into Square 14.
Along the edge of Square 14 place a marker on Row 24.
Along the edge of Square 21 place a marker between Rows 31 and 32.
Ease in 15 rows as evenly as you can across the whole length of the squares, making sure that the marker on Square 14 is matched to the marker on Square 21.
SEW STRIP 3 (squares 15-21) TO STRIP 4 (squares 22-28)
Sew Square 15 (62 rows) to Square 22 (48 rows): you need to ease 14 rows of Square 15 into Square 22.
Along the edge of Square 15 place a marker between Rows 31 and 32.
Along the edge of Square 22 place a marker between Rows 24 and 25.
Ease in 14 rows as evenly as you can across the whole length of the squares, making sure that the marker on Square 15 is matched to the marker on Square 22.
Sew Square 16 (51 rows) to Square 23 (47 rows): you need to ease 4 rows of Square 16 into Square 23.
Along the edge of Square 16 place a marker on Row 26.
Along the edge of Square 23 place a marker on Row 24.
Ease in 4 rows where the marker on Square 16 matches to the marker on Square 23.
Sew Square 17 (50 rows) to Square 24 (49 rows): you need to ease 1 row of Square 17 into Square 24.
Along the edge of Square 17 place a marker between Rows 25 and 26.
Along the edge of Square 24 place a marker on Row 25.
Ease in 1 row where the marker on Square 17 matches to the marker on Square 24.
Sew Square 18 (47 rows) to Square 25 (52 rows): you need to ease 5 rows of Square 25 into Square 18.
Along the edge of Square 18 place a marker on Row 24.
Along the edge of Square 25 place a marker between Rows 26 and 27.
Ease in 5 rows where the marker on Square 18 matches to the marker on Square 25.
Sew Square 19 (50 rows) to Square 26 (47 rows): you need to ease 3 rows of Square 19 into Square 26.
Along the edge of Square 19 place a marker between Rows 25 and 26.
Along the edge of Square 26 place a marker on Row 24.
Ease in 3 rows where the marker on Square 19 matches to the marker on Square 26.
Sew Square 20 (51 rows) to Square 27 (47 rows): you need to ease 4 rows of Square 20 into Square 27.
Along the edge of Square 20 place a marker on Row 26.
Along the edge of Square 27 place a marker on Row 24.
Ease in 4 rows where the marker on Square 20 matches to the marker on Square 27.
Sew Square 21 (62 rows) to Square 28 (47 rows): you need to ease 15 rows of Square 21 into Square 28.
Along the edge of Square 21 place a marker between Rows 31 and 32.
Along the edge of Square 28 place a marker on Row 24.
Ease in 15 rows as evenly as you can across the whole length of the squares, making sure that the marker on Square 21 is matched to the marker on Square 28.
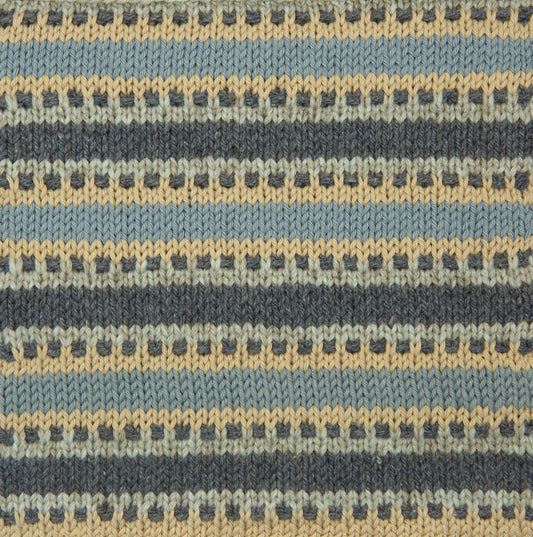
THERE IS ONE PATTERN FOR THE EDGING, WITH INSTRUCTIONS FOR COLOURWAY 1 AND COLOURWAY 2. You can follow the instructions for the edging and knit it as it is. Or if you feel adventurous you could create your own edging pattern from what colours you have left over. As a guide, one row along the shorter edge of the blanket use approximately 2g of yarn.
![]()
Above: Colourway 1 edging.
You are advised to knit the left and right-hand edgings first ahead of joining all the strips together. This is because it will be easier to manage the weight of the blanket while you are picking up and knitting these stitches. Therefore, I would suggest that you knit the edgings in this order: right side and left side of the blanket first, and then the top and bottom. This is the order that the edging pattern has been written in.
You are instructed to knit the edging on one circular needle. This will be long enough to comfortably accommodate all the stitches –there are a maximum of 267 stitches after the increase on the final row of the right and left edgings. I have advised that you use a slightly larger needle to cast off the edging to stop it from being too tight.
![]()
Above: Colourway 2 edging.
If throughout this blanket you have not been able to match my tension and have therefore used different size needles to the suggested ones, it is essential that you grade the needles you use for the edging up or down by the same number of sizes.
AND NOW FOR SOME TIPS ON PICKING UP STITCHES (for the edging)… I would advise that you use the Stitch and Row Reference Diagram on page 5 of Mail Out 7 which shows the number of stitches and rows in each square. And this, together with the instructions for the edging where I have given you the amount of stitches to pick up along the edge of each square, should help you with this task.
There is a tech vid this month which shows you how to pick up stitches along all the edges (cast-off, cast-on and side/selvedge). But these written notes are advisable to read too.
![]()
There are several ways that you can pick up stitches. However, along a cast-off or cast-on edge (horizontal) I prefer to pick up through the middle of stitches (rather than through the cast-on or cast-off edges). And along a selvedge (vertical) edge I prefer to pick up in the gaps between the bars that exist between the edge stitch and the next stitch in from the edge:
- Along a vertical (side) edge: usually the basic rule to follow here is to pick up 3 out of 4 stitches, however, this will not work with every square in this blanket as the row count is not always the same. So the best way to do this is to plan out the pick-up along the edge of each square separately. Place markers at equal points of measurement along the edge of the square and then divide the total number of stitches you need to pick up by the number of sections you have marked out. For example, Square 30 has 36 stitches to pick up, so if you separate the edge into four sections of equal measurement you would pick up 9 stitches in each of the four sections. My suggested technique for how to pick up stitches is as follows: with the right-side of the work facing, take the needle through the first gap between the bars (in the same place between the stitches that you insert your needle for Mattress stitch, ie, between the edge stitch and the next stitch in). Loop the yarn around the needle and pull the new stitch through. Repeat this for all the stitches, skipping over some of the gaps when and if necessary to get the total number of stitches you need to pick up correct.
- Along a horizontal edge (cast-on/cast-off edge): usually the basic rule to follow here is to pick up every stitch. So with the right-side of the work facing, take the needle through the middle of the stitch just below the cast-off edge/above the cast-on edge. Loop the yarn around the needle and pull the new stitch through. Repeat this all the way along the edge, making sure that you pick up the correct number of stitches along the edge of each square. Remember that where the strips have been sewn together, one stitch from each edge of the squares are caught into the seam (apart from the first and last squares which have only one stitch caught in). But note that you are instructed to pick up one stitch on every seam between the squares, see page 22.
IF YOU WANT TO LINE YOUR BABY BLANKET, THEN THIS IS AN OPTION YOU COULD CONSIDER. Lining fabric is not included in your kit so you will need to buy something which is a suitable weight and complements the design of the blanket.
![]()
Jane Mckeag from Las Vegas, USA, is a pro at lining knitted blankets and several years ago she sent me these instructions for how do it. They are so good and so clear to follow that I have reused them in many blogs since then, including this one. So here goes (and thanks Jane!).
This is Jane’s advice:
“I’ve had several inquiries as to how to do the backing. So here’s some instructions based on my quilting experience. It is the same process as preparing the multiple layers for quilting.
I used a good quilting flannel (by Moda Fabrics), which is 44 inches wide. I bought a 1 1/4 yard (45 inches), then machine washed and dried it. I turned an edge all around which I machine sewed. I then pinned it all around to the inner border edges, and hand sewed it in place using a blanket stitch (not necessary but somewhat decorative). I laid the whole thing flat, and used large safety pins at each intersection, pinning through both layers. I used two strands of yarn from the blanket and came up from the back and down to the back at each intersection (they don’t show on the front). Then each time I turned it over and double tied the strands with square knots and clipped them close. For the tying I worked from the outside in to make sure it would stay flat. It takes quite a bit of time to finish this way, but the blanket took quite a bit of time to knit! It’s totally worth the effort, in my opinion.”
Thanks for your marvellous advice Jane – which is still so helpful after all these years! I am sure that many of the members will find it extremely useful and will, like you, successfully line their blanket!
BEFORE I SIGN OFF FOR THE LAST TIME, I JUST WANT TO REMIND YOU THAT THE MONTHLY MEETINGS AT YARN IN NOTTINGHAM ARE IN FULL SWING! So if you live close to Nottingham and fancy meeting up with other members for a couple of hours of lively knit and chat, come and join us. Meetings are held on the first Wednesday of the month, with the next meeting scheduled on Wednesday 3rd April.

You can read all about our very enjoyable meeting in March in the Mystery Blanket blog for April, which has gone live today!
Yarn Loft is at 118 Hucknall Road, Carrington, Nottingham, tel number 07825 702433, website: www.yarnloft.co.uk. Meetings are held between 4-6pm and to cover the costs of hosting the meeting there is a small sub to pay (£3.00), which can be paid to Doreen on the day.
![]()
I want to finish the blog by saying a huge great big ‘thank you’ to all the members who participated in this club! You’ve been an absolute pleasure to knit along with during the past seven months. I have thoroughly enjoyed reading your comments on the social media platforms and receiving your emailed messages, all of which have been overflowing with positivity and enthusiasm. I hope that this blanket has turned out to be everything that you hoped it would be, and that it brings much joy and happiness to whoever it is gifted to.
Happy knitting everyone!
Debbie x