HELLO AND WELCOME TO THE OCTOBER MYSTERY BLANKET BLOG! This month you have another six squares to knit which include some you have knitted before plus one new panel. There are options to choose as well, so make sure that you read the pattern instructions carefully as your decision will be guided by your previous choices.

I have to apologise that there is no intro vid from me this month. I had a bad fall recently and consequently my face has suffered some trauma with a busted lip, severely bruised teeth and now a black eye that is coming on very nicely this morning – I’m not a pretty sight. I am struggling to talk as well as I can’t move my upper lip, so I can only offer you a worded blog this month, and just hope that I improve enough to see you next month. However, despite my injuries I count myself very lucky as my hands and wrists are absolutely fine, so I can still sit and knit. The doctor has recommended lots of rest and to keep calm, so I guess that knitting is the best tonic for that!
So, let’s crack on with all the news this month, starting with the tech vids. There are no new ones this month as all of the techniques for this months’ squares are covered in previous blogs.
INDEX OF MBC22 VLOGS BY SUBJECT AND MONTH, to enable you to locate them more easily as and when you need them:
- How to thread beads onto yarn MARCH
- How to bead, the slip-stitch method MARCH
- How to bead, the hooking-in method MARCH
- Razzle Dazzle: Chevron stitch MARCH
- Diamonds: T3R and T3L MARCH
- Diamonds: T2R and T2L MARCH
- How to attach a rhinestone stud to knitting MARCH
- Squares 15 & 16, Lanvin: lace stitches APRIL
- Square 36, Suave: P1tbl, K1tbl, c9b, c9f APRIL
- How to pick up stitches along a cast-off edge MAY
- How to knit the decorative slip-stitch stripe MAY
- How to pick up stitches using a long tail & ‘m1’ MAY
- The fairisle technique MAY
- How to knit the decorative beaded loop stitch MAY
- Mattress stitch (horizontal) AUGUST
- Mattress stitch (vertical) AUGUST
- Three-needle bind-off AUGUST
THE PRINTED PATTERNS HAVE BEEN POSTED AND ARE ON THEIR WAY! The overseas patterns were posted on the 23rd September and the UK were posted on the 28th September. I am hoping that they won’t get delayed by the postal strikes we are having here in the UK at the moment. But if they are late in arriving, I apologise as this is the reason why.

Every member has been sent the patterns by email but remember you can also download them from your Debbie Abrahams account.
AFTER COMPLETING YOUR OCTOBER SQUARES YOU WILL HAVE ANOTHER TWO STRIPS THAT CAN BE SEWN TOGETHER, STRIPS 7 & 8. I think that it’s a good idea to crack on with this sooner rather than later. It always gives me an enormous sense of satisfaction to get the strips sewn together – I feel as if the blanket is finally coming together! So maybe this is something you will do too this month. And with my notes for guidance (which you will find later on in this blog), the task should be pretty straightforward. It’s very similar to the sewing together of strips 1 and 2, the order of the squares is just reversed for strips 7 and 8.
I WANT TO SAY A HUGE THANK YOU TO EVERYONE WHO HAS SIGNED UP TO MY 2023 MYSTERY BLANKET CLUB! We have had a record number of knitters sign up within the first month – just over 450 memberships out of 500 have been sold. This is absolutely brilliant, and I am sincerely grateful for your continued support. Our Early Bird offer has now expired, and I will be notifying the winners within the next few days – fingers crossed it’s you!
So if you haven’t signed up yet you can still take part by visiting our online shop where you can place your order and choose to pay in one go or spread the cost over several months. Just think, a brand-new project delivered to your doorstep with exciting new patterns for ten months and a whole new mystery to guess – what could be better!?!
Here is a reminder of what I have in store for you next year…
YARNS AND COLOURS

I am thrilled to be working with UK spinner James Laxton for this project, and together we have created a beautiful bespoke yarn for the blanket called Light Wool DK. Laxtons have produced yarns for three previous Mystery Blankets – Nordic Adventure, Back To The Country and One Thousand & One Nights. And this year I am absolutely delighted to be working with this wonderful team again. What’s so great about this venture is that they are spinning my yarn in the UK, at their state-of-the-art new warehouse which is just a couple of hours drive from my house. So there is no trans-Europe delivery to worry about and if there are any issues, I can nip up there very easily to sort them out. For me it’s the perfect way wo work, and for everyone that signs up, you will get a beautiful unique yarn to knit your blanket with.


I know how much you like variety in the blanket, so I have combined my bespoke yarn with a few of my favourite Rowan yarns – Felted Tweed, Alpaca Soft and Soft Yak. These yarns knit up beautifully together with my Merino wool and create a wonderful mixture of fibres that I have loved working with, so hopefully you love them too!
I don’t like to say too much about the blanket, but I think it’s always helpful for you to have an idea of what the colour palette is going to be (and if you are hesitating it might just tempt you to hit that ‘buy’ button!). So for next year the colours are bold and bright and have an Autumnal feel, with rich shades of rust red, emerald green, gold and deep turquoise included in the palette. That’s not the whole palette, there are over twelve different shades in the blanket. But it gives you some idea of what to expect. Oh, and there are plenty of my glass beads in it too, giving the blanket an extra bit of sparkle!

Above: Mystery Blanket 2014, Back To The Country
HOW DOES THE CLUB WORK?
It works exactly the same as this year’s Mystery Blanket Club, with each member receiving a knitting kit (which includes over thirty balls of premium quality yarn), ten sets of emailed patterns (with the option to purchase additional printed patterns), Debbie Abrahams size 6 beads and a woven label. The kit will be posted in two halves with the first one delivered in February, followed by the second one in May.
WHAT ABOUT THE DESIGN?
The theme of the blanket is a ‘mystery’ which is revealed bit by bit as more of the squares are knitted each month – that’s all part of the fun! It includes the techniques of intarsia, fairisle, lace, textured stitches, stripes and beads, offering you a feast of squares to knit up over ten months. It’s a great way to learn new knitting techniques, with my monthly online blog and knitting tech vids available for members to access throughout the whole project. So there’s plenty of help at hand. However, if you fancy an easier option, I offer a choice of two options for the trickier squares (fairisle and intarsia), enabling both novice and experienced knitters to participate in this unique knitting experience.
WHO CAN SIGN UP
Knitters from all over the world are invited to join me – this is a global project! So you will find membership packages for UK, Europe and World Zones 1, 2 and 3, with Printed Patterns being an optional extra. Tracked Delivery is mandatory on all World and European memberships but is optional for UK members.

CHOOSE TO SPREAD THE COST OF YOUR MEMBERSHIP
For those who would prefer to pay in instalments we have a new payment system in place called Splitit which enables you to choose to make your payment between 2-4 months. Simply select this option at checkout when you make your first payment and then your remaining payments will be taken automatically from your account. It’s simple, easy to use and does not incur any extra fees than if you pay in one go.
Interested? Then why not visit our online shop today and sign yourself up!?! With under 50 memberships left you won’t want to miss out on next year’s brand new KAL – it’s going to be so much fun!
THE TITLE OF THE 2022 MYSTERY BLANKET has been guessed correctly by another two members this month, so congratulations go to Mabel Farrar and Elizabeth Webber - well done to you both!
I can’t give you any more letters without revealing the title, so here it is again from last month with no changes. Any ideas?
_ E C O / _ R E A M S
Please send your guesses to Sue. There are no prizes for the correct answer – it is simply a bit of fun each month. And if you do guess it right, with your permission we will include your name in next months’ blog which will be the last one before the reveal in December. Good luck everyone!
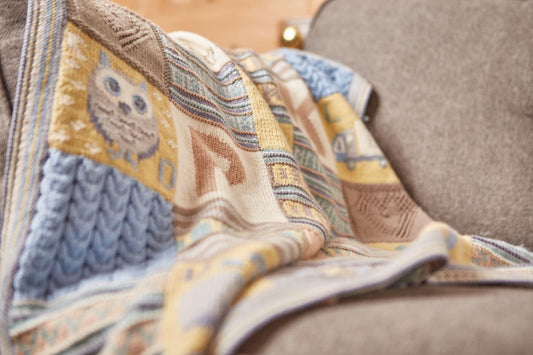
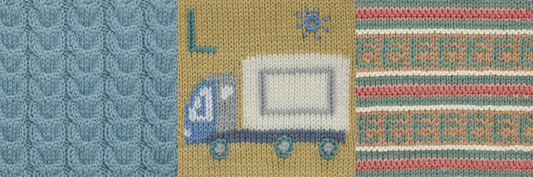
THERE ARE SIX SQUARES TO KNIT THIS MONTH:
Squares 22 & 23, Cartier 2 (Option One) – textured stripes, fairisle, hooked-in beads and a decorative beaded slip-stitch detail:


Squares 22 & 23, Cartier 2 (Option Two) –stripes and slip-stitch beads with basic fairisle rows:

Squares 40 & 41, Flapper (Option One) – textured stripes, fairisle, hooked-in beads and a decorative beaded slip-stitch detail:


Squares 40 & 41, Flapper (Option Two) – textured stripes, hooked-in beads, decorative beaded slip-stitch detail and buttons:

Squares 42, Panache – cable pattern with hooked-in and slip-stitch beads (same for both options):

Square 47, Diamonds – textured diamond pattern with slip-stitch beads and twisted stitches (same for both options):

On each pattern page there is a list of Pattern notes and tips that are worth reading before you start to knit each square. These bits of advice will help you and give pre-warnings as to what look out for in the pattern instructions. Also take note of the description under the title of each square as this tells you what the stitch structure is.
There are no new tech vids this month, but if needed you can use the vids from previous blogs to help you knit your squares. Here are a few extra tips to assist you:
SQUARES 22 & 23, Cartier 2 (Option One) – you need to choose between two options for these squares, and my advice (as stated on page 7 of the October mail out), is to choose the same option that you knitted for Squares 4 and 46.
Videos to watch for assistance with these squares:
- How to bead, the hooking-in method MARCH
- How to knit the decorative slip-stitch stripe MAY
- The fairisle technique MAY
- How to knit the decorative beaded loop stitch MAY
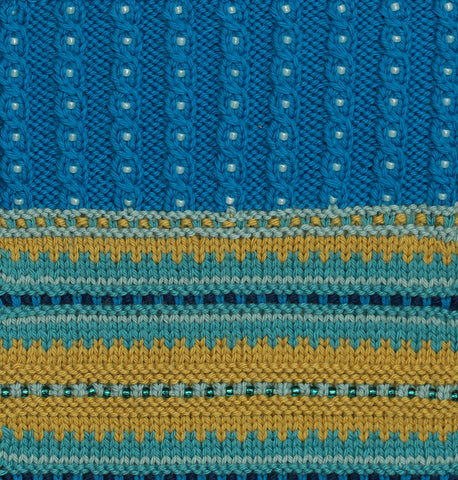
This panel begins with a mini cable pattern with hooked-in beads, and there is an increase row to do straight after the cast on to accommodate them. Following on from this there is a decorative slip-stitch stripe (which has featured before in other squares), and then you are into the fairisle section.

You will recognise the fairisle from Cartier 1, but it has been extended with some additional patterns at the top and bottom. It might be a little difficult to see the colours on the chart on page 11, but just to clarify, you are working rows 1-9 using Chaise Longue and Pickles, rows 10-11 using Sea Green and Royal, and rows 12-2- using Chaise Longue and Pickles.
When you have completed Squares 22 & 23 you will need to block them to the correct measurements. This is 18cm across in width and 36cm down in length. The halfway point of this panel is row 67, which is in the middle of the Pickles section with the beaded loops.
There is an option to sew buttons onto this panel, but you can only do this if you have knitted all Option One squares. If you have mixed your options then it might be a good idea to wait until you have completed knitting all the squares in the whole blanket before you sew any on, and then you can decide where to place them. This image shows where they need to be positioned, there are ten buttons (they are not shown in the images in the mail out):

SQUARES 22 & 23, Cartier 2 (Option Two) – this is the easier option of the two, and you should choose this option if you knitted Option Two for Squares 4 and 46:
Videos to watch for assistance with these squares:
- How to bead, the hooking-in method MARCH
- How to knit the decorative slip-stitch stripe MAY
- How to thread beads onto yarn MARCH
- How to bead, the slip-stitch method MARCH
I have just noticed in the Pattern notes and tips on page 13 of the October mail out that it says that beads are hooked-in and it does not mention that there are slip-stitch beads too. The hooked-in beads are in the cables, and the slip-stitch beads are in the thin stripes of Sea Green, so apologies for that!
There are some basic fairisle rows in this panel, beginning on Row 30 where you are simply alternating between two colours across the whole row. If you knitted Option Two for Squares 4 and 46 then you’ve come across this before, so it should not be a problem. Just remember to keep the stitches spread to the correct width on the needle while you knit these rows. The change to a larger needle (as instructed in the pattern), will also help maintain a neat and even tension.

When you have completed Squares 22 & 23 you will need to block them to the correct measurements. This is 18cm across in width and 36cm down in length. The halfway point of this panel is row 70, which is in the middle of the decorative slip-stitch stripe using Svelte and Royal.
SQUARES 40 & 41, Flapper (Option One): this is an exact repeat of Squares 9 & 10 from the July mail out, so you should knit the same option that you chose for these squares:
Videos to watch for assistance with these squares:
- How to pick up stitches along a cast-off edge MAY
- How to knit the decorative slip-stitch stripe MAY
- How to pick up stitches using a long tail & ‘m1’ MAY
- The fairisle technique MAY
- How to knit the decorative beaded loop stitch MAY
- How to bead, the hooking-in method MARCH
Just as a reminder, there are instructions to increase the number of stitches to accommodate the changes in stitch structure, and these stitches are decreased back out again in stages so that you end with the same number that you started with, which is 48 stitches. Just watch out for them as they happen several times throughout the square and are important to do otherwise you won’t have the correct number of stitches to work certain parts of the pattern.
Keep an eye on the changes to needle size too as they switch between 2.50mm and 3.25mm. These needle size changes will help to maintain the same width across the whole square.
When you have completed Squares 40 & 41 you will need to block them to the correct measurements which is 18cm across in width and 36cm down in length. In the last Pattern note and tip on page 17 it tells you that the halfway point of this panel is Row 75 where you were instructed to add markers to your knitting. This is in the middle of the Pickles section with the beaded loops.
SQUARES 40 & 41, Flapper (Option Two): this is the easier option and should be the one you go for if you knitted Option Two for Squares 9 & 10:
Videos to watch for assistance with these squares:
- How to pick up stitches along a cast-off edge MAY
- How to knit the decorative slip-stitch stripe MAY
- How to knit the decorative beaded loop stitch MAY
- How to bead, the hooking-in method MARCH
The structure of this square and the different sections of patterns are the same as 9 & 10.
When you have completed Squares 40 & 41 you will need to block them to the correct measurements which is 18cm across in width and 36cm down in length. In the last Pattern note and tip on page 22 it tells you that the halfway point of this panel is Row 76 where you were instructed to add markers to your knitting. This is in the middle of the Pickles section with the beaded loops.
SQUARE 42, Panache: this square is the same as Square 8 which was in the June mail out, but the stitches are picked up from the cast-off edge of Square 41 rather them casting them on separately.
Videos to watch for assistance with this square:
- How to pick up stitches along a cast-off edge MAY
- Square 36, Suave: P1tbl, K1tbl, c9b, c9f APRIL
- How to thread beads onto yarn MARCH
- How to bead, the slip-stitch method MARCH
- How to bead, the hooking-in method MARCH
- How to attach a rhinestone stud to knitting MARCH
The pattern is presented as worded instructions and as a chart so you can choose to work from whichever you prefer. The chart has a whole mixture of different symbols and some are very similar to each other, so it would be wise to have a good look at it and the key before you start knitting.

This cable pattern is different to Suave, but the basics of how to cable to the front and to the back can be followed if you decide to watch the video for assistance. You will find the explanation for how to c5f and c5b in the Abbreviations list on page 35 of the October mail out. There are twisted stitches (K1tbl and P1tbl) in the cables, so make sure that you watch out for these.
SQUARE 47, Diamonds: this square is the same as Square 3 from the first mail out in March and can be worked from either a chart or worded instructions.
Videos to watch for assistance with this square:
- How to pick up stitches along a cast-off edge MAY
- Diamonds: T3R and T3L MARCH
- Diamonds: T2R and T2L MARCH
It’s been some time since you knitted this square. But you’ve had plenty of practice of twisted stitches as this same technique is used in Sauvage and Zig-zags. So hopefully it will be a straightforward one to knit.

Just remember to watch out for the row following a T2L where the stitches tend to sit on top of each other. You need to make sure that you knit each of them separately and not together as one stitch. This only seems to be an issue with T3L. You should find that with T2R, the stitches do not overlap one another and are easier to knit on the following row.
Due to the high row density of this pattern, there are more rows in this square than in others. However, you should find that it knits up to the same measurements. If necessary you can ease it into shape when blocking and pressing.
SO ARE YOU READY FOR SOME MORE SEWING UP?!? After completing this months’ squares you will have strips 6 and 7 completed. So you could ahead of the finishing and sew them together now. It would be one less task to do at the end, and that’s got to be a bonus!
If you have knitted your squares separately then you will need to join them together first to create strips 6 and 7 (these are the two vertical rows of squares on the right side of the Piecing diagram on page 4 (Squares 36-42 and Squares 43-49). If you need some guidance with this, you can use the tech vid in the August blog for horizontal mattress stitch to help you with the technique.

Once you have your two strips you can make a start. This is a guide to how to ease the squares together using Mattress stitch. It is important to note that these are my suggestions as to how to sew together the squares, but please feel free to use your own method and sequence if preferred.
Because the design is offset by the 2-square panels, I have given instructions as to where parts of the design need to be matched up. Therefore, markers will need to be added to the work on specific rows and then matched to the square next to it as instructed, with the number of rows to be eased in as advised. When I give a reference to a row number, refer to the pattern instructions and charts to locate which row that is on your knitted square.
These instructions are based on taking the needle under 2 ‘bars’ at a time as demonstrated in the tech vid for vertical mattress stitch. To ease in a row, you will need to take your needle under one less bar on the side you are easing the rows into.
Sew Square 43 (66 rows) to Square 36 (62 rows): you need to ease 4 rows of Square 43 into Square 36.
Along the edge of Square 43 place a marker on Row 33, there is already a marker placed on Row 66 (which is Chart Row 22).
Along the edge of Square 36 place a marker on Chart Row 28.
Match the marker on Row 33/Square 43 to the marker on Chart Row 28/Square 36, easing in 2 rows.
Beginning at Row 34/Square 43 and Chart Row 29/Square 36, match the marker on Row 66/Square 43 to the top of Square 36, easing in 2 rows.
Option One: sew Square 44 (61 rows) to Square 37 (75 rows): you need to ease 14 rows of Square 37 into Square 44.
Along the edge of Square 44 place a marker on Row 95.
Along the edge of Square 37 place a marker on Row 40, there is already a marker placed on Row 75.
Match the marker on Row 95/Square 44 to the marker on Row 40/Square 37, easing in 11 rows.
Beginning at Row 96/Square 44 and Row 41/Square 37, match the marker on Row 75/Square 37 to the top of Square 44 easing in 3 rows.
Option Two: sew Square 44 (61 rows) to Square 37 (76 rows): you need to ease 15 rows of Square 37 into Square 44.
Along the edge of Square 44 place a marker on Row 95.
Along the edge of Square 37 place a marker on Row 40, there is already a marker placed on Row 76.
Match the marker on Row 95/Square 44 to the marker on Row 40/Square 37 easing in 11 rows.
Beginning at Row 96/Square 44 and Row 41/Square 37, match the marker on Row 76/Square 37 to the top of Square 44, easing in 4 rows.
Option One: sew Square 45 (69 rows) to Square 38 (74 rows): you need to ease 5 rows of Square 38 into Square 45.
Along the edge of Square 45 place a marker on Chart Row 35.
Along the edge of Square 38 place a marker on Row 113.
Match the marker on Row 35/Square 45 to the marker on Row 113/Square 38, easing in 2 rows.
Beginning at Chart Row 36/Square 45 and Row 114/Square 38, match the top of Square 45 to the top of Square 1038 easing in 2 rows.
Option Two: sew Square 45 (69 rows) to Square 38 (75 rows): you need to ease 6 rows of Square 38 into Square 45.
Along the edge of Square 45 place a marker on Chart Row 35.
Along the edge of Square 38 place a marker on Row 115.
Match the marker on Row 35/Square 45 to the marker on Row 115/Square 38, easing in 3 rows.
Beginning at Chart Row 36/Square 45 and Row 116/Square 38, match the top of Square 45 to the top of Square 38 easing in 3 rows.
Option One: sew Square 46 (60 rows) to Square 39 (75 rows): you need to ease 15 rows of Square 39 into Square 46.
Along the edge of Square 46 place a marker on Chart Row 7 of Chart 2.
Along the edge of Square 39 place a marker on Row 37.
Match the marker on Chart Row 7/Square 46 to the marker on Row 37/Square 39, easing in 7 rows.
Beginning at Chart Row 8 of Chart 2/Square 46 and Row 38/Square 39, match the top of Square 46 to the top of Square 39 easing in 8 rows.
Option Two: sew Square 46 (76 rows) to Square 39 (75 rows): you need to ease 1 row of Square 46 into Square 39.
Along the edge of Square 46 place a marker on Row 38.
Along the edge of Square 39 place a marker on Row 38.
Match the marker on Row 38/Square 46 to the marker on Row 38/Square 39, easing in one row at the markers.
Beginning at Row 39/Square 46 and Row 39/Square 39, match the top of Square 46 to the top of Square 39.
Option One: sew Square 47 (72 rows) to Square 40 (75 rows): you need to ease 3 rows of Square 40 into Square 47.
Along the edge of Square 47 place a marker on Chart Row 36.
Along the edge of Square 40 place a marker on Row 38, there is already a marker placed on Row 75.
Match the marker on Row 36/Square 47 to the marker on Row 38/Square 40, easing in 2 rows.
Beginning at Chart Row 37/Square 47 and Row 39/Square 40, match the marker on Row 75/Square 40 to the top of Square 47, easing in 1 row.
Option Two: sew Square 47 (72 rows) to Square 40 (76 rows): you need to ease 4 rows of Square 40 into Square 47.
Along the edge of Square 47 place a marker on Chart Row 36.
Along the edge of Square 40 place a marker on Row 38, there is already a marker placed on Row 76.
Match the marker on Row 36/Square 47 to the marker on Row 38/Square 40, easing in 2 rows.
Beginning at Chart Row 37/Square 47 and Row 39/Square 40, match the marker on Row 76/Square 40 to the top of Square 47, easing in 2 rows.
Option One: sew Square 48 (61 rows) to Square 41 (74 rows): you need to ease 13 rows of Square 41 into Square 48.
The rows for Squares 48 & 49 are counted from the cast-on edge up to the cast-off edge.
Along the edge of Square 48 place a marker on Row 95, there is already a marker placed on Chart row 22.
Along the edge of Square 41 place a marker on Row 110.
Match the marker on Row 95/Square 48 to the marker on Row 110/Square 41, easing in 3 rows.
Beginning at Row 94/Square 48 and Row 111/Square 41, match the marker on Row 22/Square 48 to the top of Square 41, easing in 10 rows.
Option Two: sew Square 48 (61 rows) to Square 41 (75 rows): you need to ease 14 rows of Square 41 into Square 48.
The rows for Squares 48 & 49 are counted from the cast-on edge up to the cast-off edge.
Along the edge of Square 48 place a marker on Row 95, there is already a marker placed on Chart row 22.
Along the edge of Square 41 place a marker on Row 112.
Match the marker on Row 95/Square 48 to the marker on Row 112/Square 41, easing in 4 rows.
Beginning at Row 94/Square 48 and Row 113/Square 41, match the marker on Row 22/Square 48 to the top of Square 41, easing in 10 rows.
Sew Square 49 (66 rows) to Square 42 (61 rows): you need to ease 5 rows of Square 49 into Square 42.
The rows for Squares 48 & 49 are counted from the cast-on edge up to the cast-off edge.
Along the edge of Square 49 place a marker on Row 33, there is already a marker placed on Row 66 (which is Chart Row 22).
Along the edge of Square 42 place a marker on Chart Row 30.
Beginning at Chart Row 22/Square 49 and Row 1/Square 42, match the marker on Row 33/Square 49 to the marker on Row 30/Square 42, easing in 2 rows.
Beginning at Row 32/Square 49 and Chart Row 31/Square 42, sew Square 49 to Square 42 finishing at the cast-on edge of Square 49 and the cast-off edge of Square 42, easing in 3 rows.
Happy sewing up everyone!
AND FINALLY FOR THIS POSTING, THE EIGHTH 2022 MYSTERY BLANKET CLUB PRIZE DRAW! Each month a member is picked at random to win a Debbie Abrahams prize. So it is worth reading right the way to the end of each blog to see if you are that lucky member!
PRIZE DRAW EIGHT (OCTOBER): this month’s winner is member 229, Ginnie Burnside from Nottingham, UK. Well done Ginnie! Please choose a prize from the following selection:
- Your choice of one of the Rainbow Purse knitting kits: Neon, Hot or Cool (take a look at them in our online shop)
- Five packs of Debbie Abrahams Beads (size 8/0 or 6/0) from the selection on http://www.debbieabrahamsbeads.co.uk
- A £20 voucher towards a Debbie Abrahams Mystery Club membership, choose either the 2023 Mystery Cushion Club or the 2023 Mystery Blanket Club
- A ‘mystery’ bag of five small gifts.
We will notify Ginnie to let her know the good news!
Thank you for taking the time to read my blog this month, and hopefully all the help and advice in it will guide you successfully through your October squares. Next month will be the penultimate instalment, so if you've kept up, you're well on your way to having your Mystery Blanket completed - and that's a great achievement! Next month I hope to back to full health and if all goes well I will see you in my October vlog intro - I have missed talking to you! So until then take care (take extra care on those kerbs!), and I will see you back here in a months' time! Debbie x