https://debbieabrahams.com/blogs/news.atomDebbie Abrahams Ltd - Debbie's Blog2024-03-31T22:07:34+01:00Debbie Abrahams Ltdhttps://debbieabrahams.com/blogs/news/mystery-baby-blanket-club-2023-24-post-7-mail-out-72024-03-31T22:07:34+01:002024-03-31T22:07:34+01:00Mystery Baby Blanket Club 2023/24: Mail Out 7 - the final instalment!Debbie AbrahamsWELCOME TO THE FINAL INSTALMENT OF THE 2023/24 MYSTERY BABY BLANKET CLUB! Congratulations, you’ve made it to the end of the project, and are now just five squares and an edging away from completing your blanket. And if you haven’t guessed the title of it yet, then you are about to find out what it is…
So before you grab your knitting needles, make yourself a cuppa, settle down in your favourite comfy chair, and have a listen to my intro in which the title of the Mystery Baby Blanket is revealed!
There are also a couple of new tech vids this month to help you with the edging of the blanket. Plus of course there all the other vids from previous blogs that you can access if you need some guidance.
NEW! How to pick up stitches for the edging
NEW! How to M1R (make one right) and M1L (make one left)
Mattress stitch (Vertical) (MO6 blog)
How to knit intarsia (MO1 blog)
Picking up stitches to knit the next square (MO1 blog)
Mattress stitch (horizontal) (MO1 blog)
How to carry yarns up the side of the work (MO1 blog)
How to knit fairisle (MO1 blog)
How to add Swiss darning to your knitting (MO1 blog)
How to cable (MO1 blog)
How to knit a bobble (MO1 blog)
How to add Chain stitch to your knitting (MO2 blog)
Mystery Baby Blanket 2023 - The Big Reveal! | MBBC2024
How to M1R (make one right) and M1L (make one left) | MBBC2023
How to pick up stitches for the edging | MBBC2023
MAIL OUT 7 HAS BEEN EMAILED TO ALL THE MEMBERS ON 1ST APRIL, so if you can’t see an email from us, please check your Spam folder first before contacting us as this is usually where it ends up. Remember you can also download this mail out and all the previous six mail outs from your Debbie Abrahams account.
BEFORE WE TAKE A LOOK AT THIS MONTHS’ SQUARES, JUST A REMINDER THAT MEMBERSHIPS FOR THE 2024 MYSTERY CUSHION CLUB ARE STILL AVAILABLE IF YOU WANT TO TAKE ON A BRAND NEW KNITTING CHALLENGE THIS YEAR. Over five fun-packed months of inspirational knitting using some of Rowan’s finest and most luxurious yarns including Alpaca Soft DK and Felted Tweed, you will have the opportunity to create your very own Mystery Cushion.
If you’re new to the Mystery Cushion Club then it’s a smaller project than the blanket, beginning on 14th June and finishing mid-October. The theme is different to the Mystery Blanket, but it works in the same way with a knitting kit sent out to members at the beginning of the project and monthly emailed patterns. I write a separate blog for the Mystery Cushion which includes knitting technique videos, so you can get all the help and support you need as you knit along.
The knitting kit includes Rowan yarn, Debbie Abrahams Beads and buttons for fastening.
So what about some hints?!? If you like rich Autumnal colours with a hint of Vintage, then this could be the cushion you’ve always dreamed of knitting! Bold motifs are mixed with simple stripes and textured stitches, finished off with a sprinkling of sparkling beads and bronze stud details. The theme has several different strands to it, including a nod to one of the great masters of 20th century art…now there’s food for thought!
Discount for MBBC23 members: because you are a Mystery Baby Blanket Club member you get 5% discount off the cost of the basic membership whenever you decide to sign up before it begins in June. Simply input this code, LOYALTY5 into the coupon box at checkout to enable the discount.
There will be a download option only (no knitting kit) for this club, which will enable you to use yarns and beads from your own stash to knit the cushion. The list of yarns and beads for the knitting kit will be released a week before the project begins so you can yourself prepped and ready. The five sets of patterns will be emailed monthly from June to October.
To make things easier you can choose to spread the cost of your payment. If you don’t want to pay in one go you have the option to pay in 2-4 instalments using our Splitit payment plan. There are no admin fees for splitting your payment so you can choose whatever is easiest for you and your finances. This can only be used for the knitting kit option.
Feeling tempted?!? As with all my Mystery Clubs, memberships are limited and once they have sold out the Club will be closed. So don’t delay in getting yourself signed up. There are packages for UK, Europe and the World - it’s a global project and everyone is invited to join in!
THERE ARE FIVE SQUARES TO KNIT IN THIS FINAL INSTALMENT, PLUS THE EDGING AND FINISHING:
Square 17: The Letter ‘Q – striped pattern with fairisle letter motifs (two colourways):
Square 18: Sweetheart – intarsia heart motif with self-coloured bobble, embroidered details and optional embroidered initials and date (same for both colourways):
Square 19: The letter ‘J’ – striped pattern with fairisle letter motifs (two colourways):
Square 20: Love You– lace heart motif (same for both colourways):
Square 21: The Letter ‘C – striped pattern with Swiss darned letter motifs (two colourways):
On each pattern page there is a list of Pattern notes and tips that are worth reading before you start to knit each square. These bits of advice give you a pre-warning of what to look out for, as well as some useful information about how to knit each square. In the following notes below I am going to give you a few extra tips about the squares so that you can knit them with complete confidence.
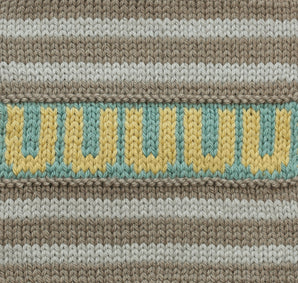
SQUARE 17, THE LETTER ‘Q: this square looks similar to ‘F’, ‘G’, ‘T’ and ‘U’, with fairisle letters knitted in Duckling, but it is subtlety different:
Tech vids to watch for assistance with this square:
Picking up stitches to knit the next square (MO1 blog)
Mattress stitch (horizontal) (MO1 blog)
How to carry yarns up the side of the work (MO1 blog)
How to knit fairisle (MO1 blog)
Two bands of letters are combined with stocking stitch and garter stitch stripes. The fairisle technique is used to knit the letters so this is not an intarsia square, despite the letters being fairly large.
There are 39 stitches in this square which is slightly more than the average number. So to compensate for this the main needle size (the one used for stocking stitch) has been downsized from 3.25mm to 3.00mm. There are some needle size changes to watch out for as well, so if you are using different sized needles to the ones that are stated, you need to make sure that you resize all of them to suit your tension.
SQUARE 18, SWEETHEART: this is the centre square, which has the option to personalise it with initials and a date:
Tech vids to watch for assistance with this square:
Picking up stitches to knit the next square (MO1 blog)
Mattress stitch (horizontal) (MO1 blog)
How to knit intarsia (MO1 blog)
How to knit a bobble (MO1 blog)
How to add Swiss darning to your knitting (MO1 blog)
How to add Chain stitch to your knitting (MO2 blog)
This heart motif is knitted using the intarsia technique, with the outer edges defined by a reverse stitch (purl on RS). I used five bobbins to knit this square – two of Heavenly, casting on with one and introducing the second one on chart row 36, and three of Duckling, casting on with one, and introducing a second one on chart row 8 and a third one on chart row 36. I decided to let the yarn travel across the back of the stitches where the heart divides (chart rows 6 and 34), as it was tricky to introduce new bobbins on these rows and far easier to manage it when the gap was three stitches wide rather than one.
The outline inside the heart can be Swiss darned or knitted in. If you choose to Swiss darn it then it might be difficult to find the first stitch at the bottom (chart row 11) as the reverse stitches around the edge of the heart make the rows more difficult to count. So to help with this, I added a marker to Row 11 as I was knitting so that I didn’t have to count the rows.
To complete the square you can leave it as it is (as in both of the completed blankets in this mail out), or you can add in initials and/or a date. There is a chart on page 11 which includes all of the letters of the English alphabet, plus numbers 0-9 (use the 'O' from the alphabet for zero). I have suggested the placement of these on the chart on page 10, but if you want to position them somewhere else within the square, that is absolutely fine. You could use a pencil to draw them onto the chart to make sure you get them in the right place. And if you prefer to knit them in rather than embroider them, then you will need to do this before you cast on.
SQUARE 19: THE LETTER ‘J’: this is the same as Square 17, but the letter ‘Q’ has been swapped for ‘J’:
Tech vids to watch for assistance with this square:
Picking up stitches to knit the next square (MO1 blog)
Mattress stitch (horizontal) (MO1 blog)
How to carry yarns up the side of the work (MO1 blog)
How to knit fairisle (MO1 blog)
SQUARE 20, LOVE YOU: this is the same as Square 16 from Mail Out 2:
Tech vids to watch for assistance with this square:
Picking up stitches to knit the next square (MO1 blog)
Mattress stitch (horizontal) (MO1 blog)
How to knit a bobble (MO1 blog)
The heart motif is created by knitting basic lace stitches (K2tog, yf, skpo and sk2po) with a self-coloured bobble in the centre. The Abbreviations list on page 27 gives instructions for all these if you need a reminder.
You can choose to work from worded instructions or from a chart for this square. If you work from the chart, just make sure that you make the necessary needle size changes as given on page 16. They are for the moss stitch borders which frame the heart motif at the top and bottom of the square.
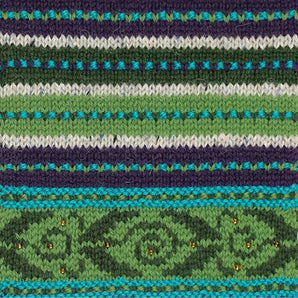
SQUARE 21, THE LETTER ‘C’: this is similar to Square 15 from Mail Out 2, but the letter ‘X’s have been replaced with ‘C’s:
Tech vids to watch for assistance with this square:
Picking up stitches to knit the next square (MO1 blog)
Mattress stitch (horizontal) (MO1 blog)
How to carry yarns up the side of the work (MO1 blog)
How to add Swiss darning to your knitting (MO1 blog)
I noticed recently that there was an error in the charts for Square 15, which as far as I know went unnoticed by any of the members. This is probably because the worded pattern instructions are correct – it is the chart that is wrong. The background of the letters should be Taupe which you are instructed to knit on Rows 15-22 and on its subsequent repeat, but the chart shows these rows in Sea Green. Fortunately I think that everyone has knitted these rows correctly as the worded instructions would have been followed for Square 15. But if you followed the chart and used Sea Green, it is important that you use Sea Green for this square too so that they match each other.
The ‘C’s are in three colours, so these need to be Swiss-darned onto the square rather than knitting them in (as you did for Square 15). It is important to embroider these letters rather than knit them in as the ‘C’s will look elongated and the whole square will be too long. This is because fairisle extends the row count, thus making the stitches longer.
The last thing to remind you about are the frequent needle size changes which are in bold so that you don’t miss them. They are important to do as the different stitch structures in this square will affect the tension and consequently the width of your knitting.
And that concludes the last five squares of the blanket, happy knitting everyone!
WITH ALL FIVE STRIPS COMPLETED, YOU NEED TO SEW THEM TOGETHER SO THAT YOU CAN KNIT THE EDGINGS. If you followed my advice last month and sewed strip 1 to strip 2, and strip 4 to strip 5, then you have just two more seams to do.
It is advisable to knit the left and right edgings before you sew in the centre strip. So you might want to skip over this for now and come back to it when the left and right edgings are completed.
Here are a few reminders (from the beginning), before you make a start on sewing your strips together…
If you have knitted your squares separately then you will need to join these together first to create strips 1, 2, 3, 4 and 5 (Squares 1-7, 8-14, 15-21, 22-28 and 29-35). If you need some guidance with this, check out the tech vid in the first blog for horizontal mattress stitch which demonstrates this technique.
Once you have your five strips completed you can make a start. This is a guide to how to sew the squares together using Mattress stitch. It is important to note that these are my suggestions as to how to sew together the squares, but please feel free to use your own method and sequence if preferred.
In this blanket all of the squares are facing in the same direction, so this makes it much easier to sew them together. All you need to watch out for is the number of rows, which vary from square to square. This means that some easing in will be required.
These instructions are based on taking the needle under 2 ‘bars’ at a time as demonstrated in the tech vid for vertical mattress stitch. To ease in a row, you will need to take your needle under one less bar on the side you are easing the extra row into.
Before we make a start, these are a couple of tips about how to ease in rows:
Garter stitch rows have a tighter row tension than stocking stitch, so for every row of Garter stitch (which is two knit rows), ease these two rows into one stocking stitch row.
Fairisle usually has a looser row tension than stocking stitch, so if you need to ease in some rows it is best to do this across fairisle rows, taking the needle under more of the stocking stitch rows than the fairisle rows.
These are my guidelines and do not have to be followed if you prefer to use your own method and calculations. See the blog for MO6 for how to sew strip 1 to strip 2, and strip 4 to strip 5.
SEW STRIP 2 (squares 8-14) TO STRIP 3 (squares 15-21)
Sew Square 8 (48 rows) to Square 15 (62 rows): you need to ease 14 rows of Square 15 into Square 8.
Along the edge of Square 8 place a marker between Rows 24 and 25.
Along the edge of Square 15 place a marker between Rows 31 and 32.
Ease in 14 rows as evenly as you can across the whole length of the squares, making sure that the marker on Square 8 is matched to the marker on Square 15.
Sew Square 9 (47 rows) to Square 16 (51 rows): you need to ease 4 rows of Square 16 into Square 9.
Along the edge of Square 9 place a marker on Row 24.
Along the edge of Square 16 place a marker on Row 26.
Ease in 4 rows where the marker on Square 9 matches to the marker on Square 16.
Sew Square 10 (48 rows) to Square 17 (50 rows): you need to ease 2 rows of Square 17 into Square 10.
Along the edge of Square 10 place a marker between Rows 24 and 25.
Along the edge of Square 17 place a marker between Rows 25 and 26.
Ease in 2 rows where the marker on Square 10 matches to the marker on Square 17.
Sew Square 11 (52 rows) to Square 18 (47 rows): you need to ease 5 rows of Square 11 into Square 18.
Along the edge of Square 11 place a marker between Rows 26 and 27.
Along the edge of Square 18 place a marker on Row 24.
Ease in 5 rows where the marker on Square 11 matches to the marker on Square 18.
Sew Square 12 (48 rows) to Square 19 (50 rows): you need to ease 2 rows of Square 19 into Square 12.
Along the edge of Square 12 place a marker between Rows 24 and 25.
Along the edge of Square 19 place a marker between Rows 25 and 26.
Ease in 2 rows where the marker on Square 12 matches to the marker on Square 19.
Sew Square 13 (47 rows) to Square 20 (51 rows): you need to ease 4 rows of Square 20 into Square 13.
Along the edge of Square 13 place a marker on Row 24.
Along the edge of Square 20 place a marker on Row 26.
Ease in 4 rows as evenly as you can across the whole length of the squares, making sure that the marker on Square 13 is matched to the marker on Square 20.
Sew Square 14 (47 rows) to Square 21 (62 rows): you need to ease 15 rows of Square 21 into Square 14.
Along the edge of Square 14 place a marker on Row 24.
Along the edge of Square 21 place a marker between Rows 31 and 32.
Ease in 15 rows as evenly as you can across the whole length of the squares, making sure that the marker on Square 14 is matched to the marker on Square 21.
SEW STRIP 3 (squares 15-21) TO STRIP 4 (squares 22-28)
Sew Square 15 (62 rows) to Square 22 (48 rows): you need to ease 14 rows of Square 15 into Square 22.
Along the edge of Square 15 place a marker between Rows 31 and 32.
Along the edge of Square 22 place a marker between Rows 24 and 25.
Ease in 14 rows as evenly as you can across the whole length of the squares, making sure that the marker on Square 15 is matched to the marker on Square 22.
Sew Square 16 (51 rows) to Square 23 (47 rows): you need to ease 4 rows of Square 16 into Square 23.
Along the edge of Square 16 place a marker on Row 26.
Along the edge of Square 23 place a marker on Row 24.
Ease in 4 rows where the marker on Square 16 matches to the marker on Square 23.
Sew Square 17 (50 rows) to Square 24 (49 rows): you need to ease 1 row of Square 17 into Square 24.
Along the edge of Square 17 place a marker between Rows 25 and 26.
Along the edge of Square 24 place a marker on Row 25.
Ease in 1 row where the marker on Square 17 matches to the marker on Square 24.
Sew Square 18 (47 rows) to Square 25 (52 rows): you need to ease 5 rows of Square 25 into Square 18.
Along the edge of Square 18 place a marker on Row 24.
Along the edge of Square 25 place a marker between Rows 26 and 27.
Ease in 5 rows where the marker on Square 18 matches to the marker on Square 25.
Sew Square 19 (50 rows) to Square 26 (47 rows): you need to ease 3 rows of Square 19 into Square 26.
Along the edge of Square 19 place a marker between Rows 25 and 26.
Along the edge of Square 26 place a marker on Row 24.
Ease in 3 rows where the marker on Square 19 matches to the marker on Square 26.
Sew Square 20 (51 rows) to Square 27 (47 rows): you need to ease 4 rows of Square 20 into Square 27.
Along the edge of Square 20 place a marker on Row 26.
Along the edge of Square 27 place a marker on Row 24.
Ease in 4 rows where the marker on Square 20 matches to the marker on Square 27.
Sew Square 21 (62 rows) to Square 28 (47 rows): you need to ease 15 rows of Square 21 into Square 28.
Along the edge of Square 21 place a marker between Rows 31 and 32.
Along the edge of Square 28 place a marker on Row 24.
Ease in 15 rows as evenly as you can across the whole length of the squares, making sure that the marker on Square 21 is matched to the marker on Square 28.
THERE IS ONE PATTERN FOR THE EDGING, WITH INSTRUCTIONS FOR COLOURWAY 1 AND COLOURWAY 2. You can follow the instructions for the edging and knit it as it is. Or if you feel adventurous you could create your own edging pattern from what colours you have left over. As a guide, one row along the shorter edge of the blanket use approximately 2g of yarn.
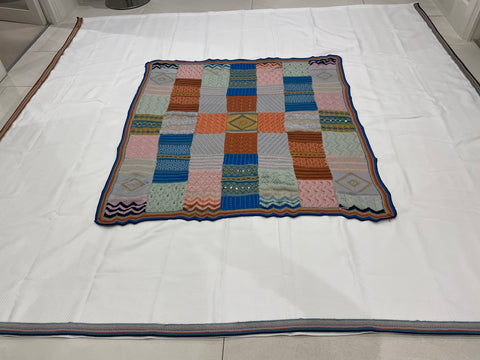
Above: Colourway 1 edging.
You are advised to knit the left and right-hand edgings first ahead of joining all the strips together. This is because it will be easier to manage the weight of the blanket while you are picking up and knitting these stitches. Therefore, I would suggest that you knit the edgings in this order: right side and left side of the blanket first, and then the top and bottom. This is the order that the edging pattern has been written in.
You are instructed to knit the edging on one circular needle. This will be long enough to comfortably accommodate all the stitches –there are a maximum of 267 stitches after the increase on the final row of the right and left edgings. I have advised that you use a slightly larger needle to cast off the edging to stop it from being too tight.
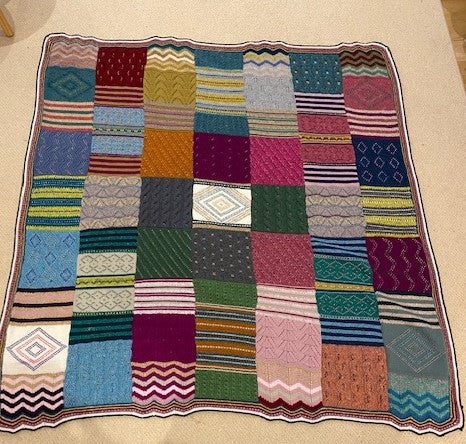
Above: Colourway 2 edging.
If throughout this blanket you have not been able to match my tension and have therefore used different size needles to the suggested ones, it is essential that you grade the needles you use for the edging up or down by the same number of sizes.
AND NOW FOR SOME TIPS ON PICKING UP STITCHES (for the edging)… I would advise that you use the Stitch and Row Reference Diagram on page 5 of Mail Out 7 which shows the number of stitches and rows in each square. And this, together with the instructions for the edging where I have given you the amount of stitches to pick up along the edge of each square, should help you with this task.
There is a tech vid this month which shows you how to pick up stitches along all the edges (cast-off, cast-on and side/selvedge). But these written notes are advisable to read too.
There are several ways that you can pick up stitches. However, along a cast-off or cast-on edge (horizontal) I prefer to pick up through the middle of stitches (rather than through the cast-on or cast-off edges). And along a selvedge (vertical) edge I prefer to pick up in the gaps between the bars that exist between the edge stitch and the next stitch in from the edge:
Along a vertical (side) edge: usually the basic rule to follow here is to pick up 3 out of 4 stitches, however, this will not work with every square in this blanket as the row count is not always the same. So the best way to do this is to plan out the pick-up along the edge of each square separately. Place markers at equal points of measurement along the edge of the square and then divide the total number of stitches you need to pick up by the number of sections you have marked out. For example, Square 30 has 36 stitches to pick up, so if you separate the edge into four sections of equal measurement you would pick up 9 stitches in each of the four sections. My suggested technique for how to pick up stitches is as follows: with the right-side of the work facing, take the needle through the first gap between the bars (in the same place between the stitches that you insert your needle for Mattress stitch, ie, between the edge stitch and the next stitch in). Loop the yarn around the needle and pull the new stitch through. Repeat this for all the stitches, skipping over some of the gaps when and if necessary to get the total number of stitches you need to pick up correct.
Along a horizontal edge (cast-on/cast-off edge): usually the basic rule to follow here is to pick up every stitch. So with the right-side of the work facing, take the needle through the middle of the stitch just below the cast-off edge/above the cast-on edge. Loop the yarn around the needle and pull the new stitch through. Repeat this all the way along the edge, making sure that you pick up the correct number of stitches along the edge of each square. Remember that where the strips have been sewn together, one stitch from each edge of the squares are caught into the seam (apart from the first and last squares which have only one stitch caught in). But note that you are instructed to pick up one stitch on every seam between the squares, see page 22.
IF YOU WANT TO LINE YOUR BABY BLANKET, THEN THIS IS AN OPTION YOU COULD CONSIDER. Lining fabric is not included in your kit so you will need to buy something which is a suitable weight and complements the design of the blanket.
Jane Mckeag from Las Vegas, USA, is a pro at lining knitted blankets and several years ago she sent me these instructions for how do it. They are so good and so clear to follow that I have reused them in many blogs since then, including this one. So here goes (and thanks Jane!).
This is Jane’s advice:
“I’ve had several inquiries as to how to do the backing. So here’s some instructions based on my quilting experience. It is the same process as preparing the multiple layers for quilting.
I used a good quilting flannel (by Moda Fabrics), which is 44 inches wide. I bought a 1 1/4 yard (45 inches), then machine washed and dried it. I turned an edge all around which I machine sewed. I then pinned it all around to the inner border edges, and hand sewed it in place using a blanket stitch (not necessary but somewhat decorative). I laid the whole thing flat, and used large safety pins at each intersection, pinning through both layers. I used two strands of yarn from the blanket and came up from the back and down to the back at each intersection (they don’t show on the front). Then each time I turned it over and double tied the strands with square knots and clipped them close. For the tying I worked from the outside in to make sure it would stay flat. It takes quite a bit of time to finish this way, but the blanket took quite a bit of time to knit! It’s totally worth the effort, in my opinion.”
Thanks for your marvellous advice Jane – which is still so helpful after all these years! I am sure that many of the members will find it extremely useful and will, like you, successfully line their blanket!
BEFORE I SIGN OFF FOR THE LAST TIME, I JUST WANT TO REMIND YOU THAT THE MONTHLY MEETINGS AT YARN IN NOTTINGHAM ARE IN FULL SWING! So if you live close to Nottingham and fancy meeting up with other members for a couple of hours of lively knit and chat, come and join us. Meetings are held on the first Wednesday of the month, with the next meeting scheduled on Wednesday 3rd April.
You can read all about our very enjoyable meeting in March in the Mystery Blanket blog for April, which has gone live today!
Yarn Loft is at 118 Hucknall Road, Carrington, Nottingham, tel number 07825 702433, website: www.yarnloft.co.uk. Meetings are held between 4-6pm and to cover the costs of hosting the meeting there is a small sub to pay (£3.00), which can be paid to Doreen on the day.
I want to finish the blog by saying a huge great big ‘thank you’ to all the members who participated in this club! You’ve been an absolute pleasure to knit along with during the past seven months. I have thoroughly enjoyed reading your comments on the social media platforms and receiving your emailed messages, all of which have been overflowing with positivity and enthusiasm. I hope that this blanket has turned out to be everything that you hoped it would be, and that it brings much joy and happiness to whoever it is gifted to.
Happy knitting everyone!
Debbie x
]]>
https://debbieabrahams.com/blogs/news/mystery-blanket-club-2024-post-3-april2024-03-31T22:07:11+01:002024-03-31T22:07:11+01:00Mystery Blanket Club 2024: post 3, AprilDebbie AbrahamsHELLO AND WELCOME TO THE THIRD INSTALMENT OF THE 2024 MYSTERY BLANKET CLUB! We are getting up to speed this month with five squares to knit. And with the next parcels being packed up and posted to you very soon, the project is well and truly underway!
The weather has been very up and down here in the UK, but I don’t mind because when it’s wet and windy outdoors, it’s great for knitting indoors. And with the Easter celebrations in full swing (Happy Easter everyone!), there’s plenty of chocolate in our house to enjoy while knitting the hours away.
So let’s start with some new tech vids, there are two this month and they are both for Square 22, Lunar (Option One). One shows how to cast on using several colours and the other shows how to cross the yarns over when knitting intarsia cables. Remember that there are all the other vids too from previous blogs that you can access if you need further assistance.
NEW! How to cast on using several colours
NEW! Square 22, Lunar (Option One), how to cross over the yarns
Square 1, Capricorn (Option Two) (March blog)
How to knit intarsia (March blog)
How to cable (March blog)
Square 8, Tranquility: Japanese short-row shaping (February blog)
How to carry yarns up the side of the work (February blog)
How to add Swiss darning to your knitting (February blog)
How to thread beads onto your yarn (February blog
How to bead, the slip-stitch method (February blog)
How to bead, the hooking-in method (February blog)
How to knit fairisle (February blog)
Picking up stitches to begin a new square (February blog)
Mattress stitch (horizontal) (February blog)
How to cast on using several colours | MBC2024
SQ 22 Lunar (Option One): How to cross over the yarns | MBC2024
THE APRIL PATTERNS HAVE BEEN SENT TO ALL THE MEMBERS, so you should find an email from us in your inbox. However, if you cannot see it then please check your Spam folder first before doing anything else as sometimes our emails end up in there. Remember that you can also download the April file and all of the other digital files from your Debbie Abrahams account on our website.
THE PRINTED PATTERNS HAVE BEEN POSTED TO THE MEMBERS WHO OPTED FOR THEM. The overseas went ahead of the UK on the 20th March, followed by the UK on the 27th March. So if you have not received them yet, they will be with you very soon.
AFTER LAST MONTH’S TEAL AND CLEAR BEAD DILEMMA, WE SENT OUT EXTRA BEADS TO ALL THE MEMBERS, AS PROMISED. Most of you have received them, but some of you have contacted us to say that they have not been delilvered yet. They were posted in small white envelopes (padded white Jiffys for the overseas), so there is a possibility that some of them may have gone astray. So if you are still waiting for them, please let us know and we will send you some more. For our overseas members, we will include them in your second parcel which is being packed straight after the Easter break.
THERE IS AN ADDENDUM ALERT TO TELL YOU ABOUT, IT’S FOR SQUARE 22, LUNAR, AND AFFECTS BOTH OPTIONS. Several errors have been flagged up which I have added to the Addendum page on the website. The good news is that because I was notified of them before we emailed you the digital file, all but one of them has been corrected in the digital file, but unfortunately it was too late for the printed patterns.
These are the corrections (in the printed patterns only):
Page 11, Lunar (Option One): NEXT ROW (WS) should read as: [using Fjord K2, P8, K2, keeping yarn held at back (away from you), cross Fjord with Baby Blue, then using Baby Blue K2, P8, K2, keeping yarn held at back (away from you) cross Baby Blue with Fjord] twice, using Fjord K2, P8, K2.
Pages 11 & 12, Lunar (Option One): the cast-off instructions should read as RS facing and stitches cast off knitwise (not WS and purlwise).
Page 15, Lunar (Option Two): Row 1, after the bracketed instruction it should read: repeat to last 4 stitches (the word 'to' has been missed).
Page 15, Lunar (Option Two): Rows 2, 4 and 6, after the bracketed instruction it should read: repeat to last 4 stitches, P1, K3.
And this correction is in both the digital file and the printed patterns:
Page 27, Abbreviations: c8f should read as, slip next four stitches onto cable needle and hold at front (not back).
I apologise for these errors and hope they don’t spoil your enjoyment of knitting either option.
THANK YOU TO EVERYONE WHO HAS SIGNED UP TO THE 2024 MYSTERY CUSHION CLUB. Most of you were lucky enough to qualify for the Early Bird Special Offer and will be sent free Winter Wonderland socks as well as being entered into the Prize Draw (find out below if you are a winner!). And you also benefited from 5% discount off the cost of the membership for being a Mystery Blanket Club member.
Despite the Early Bird offer coming to an end, you can still claim 5% discount off the cost of the Mystery Cushion membership. So if you have not signed up, it’s something you might want to add to your to-do list.
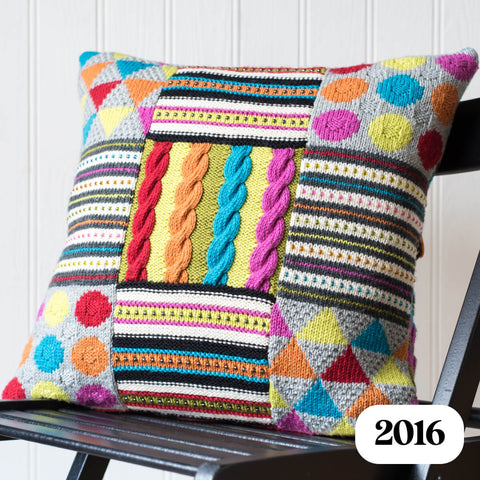
Below: Mystery Cushion 2016, Geo Jungle.
These are the results of the Prize Draw. Check to see if you are a winner!
Winner of Prize 1 is Samantha Berry: 2024 Mystery Cushion Club membership (we will refund what you paid in full)
Winner of Prize 2 is Melanie Makin : 2024 Mystery Cushion Club set of printed patterns, five full-colour brochures in total (if you’ve added them to your order we will refund what you’ve paid in full)
Winner of Prize 3 is Ruth Lozano: 2024 Festive Mystery Knit Box (released in November)
Winner of Prize 4 is Toril Grue: A knitting kit of your choice up to the value of £40 from the selection on our website
Winner of Prize 5 is Kate Hill: Four packs of Debbie Abrahams Beads (you choose the colours and size).
We will notify all of the winners by email. Well done if you are one of the lucky five!
This is a reminder of what the 2024 Mystery Cushion Club is all about…
Over five fun-packed months of inspirational knitting using some of Rowan’s finest and most luxurious yarns including Alpaca Soft DK and Felted Tweed, you will have the opportunity to create your very own Mystery Cushion.
If you’re new to the Mystery Cushion Club then it’s a smaller project than the blanket, beginning on 14th June and finishing mid-October. The theme is different to the Mystery Blanket, but it works in the same way with a knitting kit sent out to members at the beginning of the project and monthly emailed patterns. I write a separate blog for the Mystery Cushion as well which will include knitting technique videos, so you can get all the help and support you need as you knit along.
Above: Mystery Cushion 2022, Pure Nouveau.
The knitting kit includes Rowan yarn, Debbie Abrahams Beads and buttons for fastening.
So what about some hints?!? If you like rich Autumnal colours with a hint of Vintage, then this could be the cushion you’ve always dreamed of knitting! Bold motifs are mixed with simple stripes and textured stitches, finished off with a sprinkling of sparkling beads and bronze stud details. The theme has several different strands to it, including a nod to one of the great masters of 20th century art…now there’s food for thought!
MBC24 discount! The good news is that because you are a 2024 Mystery Blanket Club member you get 5% discount off the cost of the basic membership whenever you decide to sign up before it begins in June. A unique discount code for this was included in the emailed newsletter you should have received from us. However, if you did not receive it (or can’t find it), then no worries - send us a quick message and we will let you know what it is.
There will be a download option only (no knitting kit) for this club, which will enable you to use yarns and beads from your own stash to knit the cushion. The list of yarns and beads for the knitting kit will be released a week before the project begins so you can yourself prepped and ready. The five sets of patterns will be emailed monthly from June to October.
To make things easier you can choose to spread the cost of your payment. If you don’t want to pay in one go you have the option to pay in 2-4 instalments using our Splitit payment plan. There are no admin fees for splitting your payment so you can choose whatever is easiest for you and your finances. This can be used for both the knitting kit and download pattern only options.
Feeling tempted?!? As with all my Mystery Clubs, memberships are limited and once they have sold out the Club will be closed. So don’t delay in getting yourself signed up. There are packages for UK, Europe and the World - it’s a global project and everyone is invited to join in!
OUR EASTER SALE IS NOW ON, BUT ONLY FOR A LIMITED TIME! So if you need to stock up on beads, fancy a new knitting kit or are feeling the urge to purchase some yarn, pop over to our online shop today where you can fill your basket with lots of goodies for a reduced price.
We are offering 10% off books, yarn, beads, kits and accessories (discount is applied before shipping costs are added on). But our offer expires at midnight on the 4th April, so you’ll have to be quick if you want to grab yourself a bargain. Happy shopping!
THE TITLE OF THE MYSTERY BLANKET has been guessed by even more of you since I wrote the last blog, so because the list is now so long, I have decided to add together the first month’s correct guessers to the more recent correct guessers and publish them altogether in one blog. So keep your eyes open for this as I will be publishing it sometime this week.
If you're still trying to work out what the title is, then here is another letter in the puzzle clue. This month I am giving you the letter “N”:
_ _ ‘ _ / _ R _ _ _ E N / _ N / _ _ E / _ _ _ R _
If you think you know what it is, pop us a quick email to see if you are right: sue@debbieabrahams.com. There are no prizes for the correct answer but think how good you’ll feel if you get it right! Plus you’ll get the chance to have your name published as a correct guesser in next month’s blog. So, what are you thinking?!?...
THERE ARE FIVE SQUARES TO KNIT THIS MONTH:
Square 3, Libra (Option One) – fairisle pattern with textured stripes and slip-stitch beads:
Square 3, Libra (Option Two) – slip-stitch pattern with textured stripes and hooked-in beads:
Square 30, Celestial 2 – moss stitch stripes (same for both options):
Square 36, Tranquility 2 – multi-coloured wave pattern using Japanese short-row shaping with optional embroidered details (same for both options):
Square 36, Solar – cable pattern with hooked-in beads (same for both options):
On each pattern page there is a list of Pattern notes and tips that are worth reading before you start to knit each square. These bits of advice will help you and give pre-warnings as to what to look out for in the pattern instructions. Also take note of the description under the title of each square as this tells you what the stitch structure is.
You can use the tech vids to help you knit your squares. But here are a few extra tips to assist you:
SQUARE 3, LIBRA (Option One): this is the third square in the blanket that has fairisle zodiac symbols, and it uses the same colours as squares 15 and 29.
Videos to watch for assistance with this square:
Picking up stitches to begin a new square (February blog)
Mattress stitch (horizontal) (February blog)
How to carry yarns up the side of the work (February blog)
How to thread beads onto your yarn (February blog
How to bead, the slip-stitch method (February blog)
How to knit fairisle (February blog)
It doesn’t matter which option you choose for this square – it doesn’t have to match your choices for Squares 15 and 29. But if you fancy a bit of fairisle – not too much, just 18 rows in total – go for this one. And if you need a reminder of the fairisle technique, you can scroll back to the February blog for some guidance.
After the feedback I had about the chart for Square 15, Taurus, you will see that the chart on page 7 has been drafted up in the same way as Square 29, Pisces, with a white background. Hopefully you will agree that this is far easier to work from as it's not so hard on the eyes.
Don’t forget that the needle sizes change from 3.50mm to 2.50mm for the rows of garter stitch in the beaded stripes. This will keep the stitch tension the same as the rest of the square.
SQUARE 3, LIBRA (Option Two): this is the easier alternative and uses the same colours as Option One.
Videos to watch for assistance with this square:
Picking up stitches to begin a new square (February blog)
Mattress stitch (horizontal) (February blog)
How to carry yarns up the side of the work (February blog)
How to thread beads onto your yarn (February blog
How to bead, the slip-stitch method (February blog)
Despite the different name, this square is exactly the same as Option Two for squares 15 and 22. So if you’ve already knitted them, you will find this square an easy one to knit. It has the same beaded stripes as Option One, but the fairisle is replaced with a textured stitch with Indigo hooked-in beads. There is no tech vid for this, but if you read the written instructions carefully, you should be fine. You work two rows in each colour, alternating between Sapphire and Electric Green.
SQUARE 22, LUNAR (Option One): this is the second cable square in the blanket, but this one is knitted in two colours which will put your intarsia skills to the test again.
Videos to watch for assistance with this square:
NEW! How to cast on using several colours
NEW! Square 22, Lunar (Option One), how to cross over the yarns
How to cable (March blog)
It does not matter which option you choose for this square, so go for whichever one you fancy.
Before you start knitting, make sure that you read the Addendums which I mentioned earlier on in this blog. There are some corrections to the pattern instructions which you need to be aware of.
For this square you can work from either worded instructions or a chart. If you have not knitted from a cable chart before then it might be a good idea to give it a go as this one is straightforward to follow. If you look at the chart on page 12, you can see long diagonal lines which represent c8f, and ‘x’s which represent reverse stitches (knit on WS, purl on RS).
The tricky part is the intarsia - there are five vertical stripes to knit. For each strip I wound the yarn onto a bobbin (which you can see in my tech vid) as I found this much easier to manage than using large balls of wool. I filled each bobbin right up and had enough to complete each section without running out. Any left over yarn can be kept and used to knit other squares (it is far better to have yarn left over than run out halfway up a cable).
It is advisable to watch both tech vids before you begin this square. In the first one I demonstrate how to cast on using several colours. It is a generic video and not specific to this square, but it enables you to see how it’s done. I demonstrate two different techniques – Thumb and Cable cast-on.
In the second tech vid I demonstrate how to cross over the yarns at the colour changes. Unlike the standard intarsia technique, yarns are crossed over on the right side of the work, which creates the vertical broken lines that you can see in the image on page 10. It is not difficult to do, you just need to get used to crossing them over on wrong side rows. It might seem a bit strange at first, but because of the repetitive nature of the pattern, you will quickly get used to it.
Just one last thing about this square. Block and press it with the right side facing, as mentioned in the Pattern note and tips on page 10. I would advise to block and press all cable patterns with a reverse stocking stich background this way as it is far easier to pin them out this way rather than with the wrong side facing up.
SQUARE 22, LUNAR (Option Two): if you don’t fancy knitting intarsia cables, then this is the alternative choice for Lunar. It’s a vertical slip-stitch pattern in a three-colour stripe.
Videos to watch for assistance with this square:
How to carry yarns up the side of the work (February blog)
I find three-colour stripe patterns really intriguing, and when you throw a slip-stitch into the mix, things get even more exciting!
Once you have joined in all three yarns, they are not cut off until the square is completed. Simply carry them up the side of the work at the end of each row, making sure that they are neat and not pulled too tightly. The hardest thing about this pattern is making sure that you pick up the correct yarn at the beginning of each new row – it is easy to work two rows in one colour if you're not careful. At the beginning of each row all you need to do is pick up the next colour in line – and it’s easy because it’s the yarn that’s sitting there waiting for you!
It's on all the RS rows that the stitches are slipped, and on all the WS rows that the stitches are knitted or purled – there are no slipped stitches on WS rows. If you can remember this it will enable you to knit a bit quicker once you’ve got used to the pattern repeat.
I have written the pattern over 72 rows, but on page 15 I have also given a measurement of 18cm to work to. So if you find that 72 rows is either too long or to short, you can tweak it until it's the correct length.
SQUARE 30, CELESTIAL 2: this is similar to Square 16, but the sequence of colours has been reversed. It begins with pale, silvery shades and graduates to deeper shades of blue and green towards the top.
Videos to watch for assistance with this square:
Picking up stitches to begin a new square (February blog)
Mattress stitch (horizontal) (February blog)
How to carry yarns up the side of the work (February blog)
A smaller needle is used to knit this square. This is because the constant movement of the yarn backwards and forwards between the needles creates a looser tension than stocking stitch. If you found that the needle I recommended for Square 16 did not achieve the correct tension, then make sure that you use the same needles that you used for it to knit this square.
Remember to wind Silver Ghost onto two separate bobbins before you begin – one of Silver Lurex and one of Kidsilk Haze Ghost. And you’ll have to do the same with Turquoise Daisy – that is one of Turquoise Lurex and one of Kidsilk Haze Blue Daisy.
SQUARE 36, TRANQUILITY 2: this is a recolour of Square 8 from the February mail out and uses the technique of Japanese short-row shaping.
Videos to watch for assistance with this square:
Square 8, Tranquility: Japanese short-row shaping (February blog)
How to carry yarns up the side of the work (February blog)
How to add Swiss darning to your knitting (February blog)
If you can’t remember the technique of Japanese short-rows then my tech vid is worth a watch again as it demonstrates how to turn the work, attach a marker, remove a marker and close a gap. Personally I find that it’s one of those techniques that I can’t remember until I’m reminded about what to do. So I watch the tech vid and then it all falls back into place, and I can comfortably knit away without any worries.
Remember when working the stitch after you’ve attached a marker to hold the marker against the work and knit/purl the next stitch firmly so that the marker sits tight against the work.
When you remove the marker, pull firmly on the loop and make sure that it is not twisted as you place it on the left needle.
Remember to wind your Silver Lurex and Ghost yarns onto two separate bobbins and then you will find them much easier to knit with.
If you look closely at the image on page 18, you will see that there is some embroidery along the top of the Fjord lozenges. It is in the same position as the embroidery on Square 8, and likewise, it is optional. So if you prefer the square without it, leave it off. It is very subtle and just adds a hint of sparkle to the pattern. You need to use the Turquoise Lurex for this, which is on a card, and the embroidery is Swiss darning.
SQUARE 37, SOLAR: the last square to knit this month is an exact repeat of Square 9. There’s a lot going on in it, but as you’ve knitted it before, hopefully it will be relatively easy, especially with the tech vid reminders.
Videos to watch for assistance:
How to cable (March blog)
How to bead, the hooking-in method (February blog)
Picking up stitches to begin a new square (February blog)
Mattress stitch (horizontal) (Fevruary blog)
This is the square in which some of the rows on the chart correspond to the worded instructions - these are the ones that are in green. You will see that under the chart on page 23 it says for one of the symbols to ‘see instructions in green for corresponding row’.
It has been pointed out to me that the symbol on the chart for Sl 1 purlwise, should be preceded by ‘with yarn held at front’. If you read the worded instructions for rows where the stitches are slipped, such as Row 8, it says, ‘bring yarn forward between needles (towards you) and slip next stitch purlwise…’. So this is what you need to do every time you slip stitches on a WS row. It keeps the yarn at the back of the work (on the WS of the work), otherwise there will be bars across the front of the stitches. To clarify what it should look, take a look at the image of the square on page 21.
SO NOW FOR SOME TIPS AND STORIES FROM THE MEMBERS, BEGINNING WITH MARY LEESON FROM LOUGHBOROUGH, UK, WHO YOU MIGHT REMEMBER LAST MONTH COULDN’T DECIDE WHICH OPTION TO KNIT FOR SQUARE 15, TAURUS, SO SHE COMBINED BOTH OF THEM IN ONE SQUARE. So, for Square 29, Pisces, she decided to create another hybrid square, and this is what she came up with:
Mary says:“Here's my Pisces, Square 29. It's Option Two with an Option One middle band. I've hooked beads into the middle band.”
What another super idea Mary! And as with Square 15, you’ve got the best of both worlds again! I wonder what you will come up with for Square 3, Libra? Be sure to write in and let us know!
ANNABEL CASEY FROM BANBURY, OXFORDSHIRE, UK, HAS A FABULOUS TECHNIQUE FOR LOADING UP THE BEADS ONTO FLOSS FOR THE HOOKING-IN METHOD. This is something I have seen done by knitters at workshops, but afterwards I can never remember how to do it. So Annabel has very kindly created a 4-step pictorial guide to show how it works:
These images make it super clear, and I will certainly reference them when I next hook in beads. It’s a much more efficient way to hook in rather than picking up each bead individually. And the added bonus is that if there is a multi-colour sequence, the beads can be threaded on and loaded up in sequence, ready to use. All round this is definitely a winner and I will be giving it a go. Thanks so much Annabel!
MARIA DIDONNA FROM BLOOMINGDALE, ILLINOIS, USA, ALSO HAD A VERY USEFUL TIP TO SHARE. This time it’s a tip for stopping the lurex yarn from fraying. Because of the way this yarn has been spun, it will undo if the loose end is pulled. So Maria found this neat little gadget which can be used to cauterize the end of the yarn. It is battery run and has a small heated filament which gets very hot and will seal the fibres together. I went straight out and bought one, and it’s great fun to use!
Maria says: “I just did an experiment on the lurex thread. If you use the Thread Zapper it will prevent it from unravelling. By using it on the lurex thread it also made it easier to thread on the needle. You just need a bigger eye on the needle for it to work.
I recently purchased some wide-eye needles as well. I cut one end with wire cutters and I'm using it to hook the yarn for the hooking method and am using the other one for stringing beads. They work great especially if you have arthritis in your hands”.
I love a gadget, and these are both very useful for the blanket. I have some of those wide-eye needles and use them a lot when I am beading. Thanks for sharing all of this with us Maria. Any tips to make knitting a bit easier are always very welcome!
THE MYSTERY CLUB MEETINGS AT ‘YARN LOFT’ IN NOTTINGHAM ARE BACK ON AND IT WOULD BE GREAT TO SEE YOU IF YOU CAN MAKE IT! We meet up on the first Wednesday of the month between 4-6pm and spend a couple of hours knitting and nattering while Doreen keeps us topped up with hot drinks and something sweet to eat.
Our last meeting was on the 6th March, and the banter was interesting and varied, as usual, with plenty of giggles too as we knitted and chatted together in Doreen’s gorgeous shop.
As you can see in the images above and below, great progress was made with the blanket squares, and I was super pleased to hear how enthusiastic everyone was about the project! All of the ladies had guessed the title, so we talked about that too and about what could be in store in the remaining mail outs. This was very interesting for me to hear, but don’t worry, I didn’t say a word about what is to come!
Yarn Loft is at 118 Hucknall Road, Carrington, Nottingham, tel number 07825 702433, website: www.yarnloft.co.uk. If you are able to join us, then do pop down. It would be lovely to see you.
To cover the costs of hosting the meeting there is a small sub to pay (£3.00), which can be paid in cash to Doreen on the day.
DON’T FORGET TO FOLLOW US AND JOIN IN ALL THE FRIENDLY BANTER ON OUR SOCIAL MEDIA PLATFORMS!
If you are not already a Ravelry member, then it is very easy (and free!) to join. Just follow the instructions on their website: http://www.ravelry.com
The Debbie Abrahams Mystery Knitters group on Facebook is another fun way to keep in touch with other members. It was set up a couple of years ago and has grown in size to over 500 members, so that’s well worth joining too.
We also have our own Facebook page where you will find regular updates on everything we are doing from knitting kits to workshops and events!
Instagram: debbieabrahams_knitting
Pinterest: debbieabrahams@debbieabrahamsk
Facebook: Debbie Abrahams Mystery Knitters
Facebook: Debbie Abrahams Handknits
Ravelry: Debbie Abrahams Handknits
I AM PLANNING TO LAUNCH THE MEMBER’S GALLERY IN APRIL – A LITTLE OVERDUE BUT WORTH THE WAIT! I had intended to put it live in February, just before the Mystery Blanket Club started. But I got so horrendously busy that it stayed in the middle of my to-do list. However, it is now at the top of it and will be launched this month. So if you have any ‘Debbie’ projects that you would like to share (including pics of your completed ‘mystery’ projects), please do send them in and I will include them. It’s always great to see what you’ve been knitting and to share all your wonderful creations with knitters globally. Please send them directly to me at, debbie@debbieabrahams.com with a few words if you can, and I’ll be sure to include it.
AND FINALLY, IT’S TIME TO FIND OUT WHO THE WINNER IS OF THE THIRD 2024 MYSTERY BLANKET CLUB PRIZE DRAW!!! Each month a member is picked at random to win a Debbie Abrahams prize. So it is worth reading right the way to the end of each blog to see if you are that lucky member!
PRIZE DRAW THREE (APRIL): this month’s winner is member 467, Evelyne Zueblin from Gland in Switzerland. Well done Evelyne! Please choose a prize from the following selection:
Your choice of one of Debbie’s knitting kits up to the value of £30.00 (take a look at them in our online shop).
A £30 voucher towards a Debbie Abrahams Mystery Club membership: 2024 Mystery Cushion Club or 2025 Mystery Blanket Club.
A Mystery bag of five gifts!
We will notify Evelyne to let her know the good news!
So now you are up to speed with all this month’s news, it’s time to grab your knitting needles and make a start on the April squares. I am looking forward to spending some time with my family over the Easter holidays and am glad to say that the Easter Bunny was extremely kind to me and brought me plenty of chocolate to help me through the next couple of weeks. I hope he’s been kind to you too and that you have a super Easter break. Until next time, take care and happy knitting everyone! Debbie x
]]>
https://debbieabrahams.com/blogs/news/mystery-baby-blanket-club-2023-24-mail-out-62024-03-06T01:22:47+00:002024-03-06T01:22:48+00:00Mystery Baby Blanket Club 2023/24: Mail Out 6Debbie AbrahamsHELLO AND WELCOME TO THE PENULTIMATE BLOG OF THE 2023/24 MYSTERY BABY BLANKET CLUB! First of all I must apologise for the delay in posting this blog. We had an extremely hectic week in the run up to the 1st March with some unexpected tasks to deal with (Mystery Blanket Club members will know what I am referring to!) and consequently there just wasn’t enough time to get it written. So here it is, a few days late, but hopefully you'll still find the tips and advice in it helpful this month.
I can hardly believe that we are in the penultimate month of this club, with just one more instalment to go before the whole blanket is completed! Thirty out of the thirty-five squares in the blanket have been revealed, so that leaves just the remainder in the central strip to complete, which includes the centre square. Any ideas as to what that might be?!? We’ve had lots of correct guesses for the title of the blanket, but you’ve still got time to have one more go at guessing it before the reveal next month. A lot of the letters have now been revealed in the word puzzle, and with one more given to you in this post, the title might now become very obvious. So if you’ve got any ideas, be sure to write in and let us know!
There is no intro from me this month, but there is one new tech vid which demonstrates how to sew your strips together – with four strips completed, you could get ahead and make a start on the finishing!
NEW! Mattress stitch (Vertical)
How to knit intarsia (MO1 blog)
Picking up stitches to knit the next square (MO1 blog)
Mattress stitch (horizontal) (MO1 blog)
How to carry yarns up the side of the work (MO1 blog)
How to knit fairisle (MO1 blog)
How to add Swiss darning to your knitting (MO1 blog)
How to cable (MO1 blog)
How to knit a bobble (MO1 blog)
How to add Chain stitch to your knitting (MO2 blog)
New Tech Video: Mattress Stitch (Vertical) | MBBC2024
MAIL OUT 5 HAS BEEN EMAILED TO ALL THE MEMBERS ON 1ST MARCH, so if you can’t see an email from us, please check your Spam folder first before contacting us as this is usually where it ends up.
The printed patterns were posted to both the overseas and UK members last week, with the overseas posted just before the UK. If you are still waiting for your brochure to arrive then it will be with you very soon. I packed and posted them this month, so I know that they are definitely on their way to you!
FANCY A NEW 'MYSTERY' KAL THIS YEAR? THEN YOU MIGHT BE INTERESTED TO KNOW THAT SIGN-UPS ARE NOW OPEN FOR THE 2024 MYSTERY CUSHION CLUB! This year sees the launch of the fourteenth design in this collection, and with the few hints and tips (but not too much!) I am going to give you, I hope that you decide to sign up and join me!
Over five fun-packed months of inspirational knitting using some of Rowan’s finest and most luxurious yarns including Alpaca Soft DK and Felted Tweed, you will have the opportunity to create your very own Mystery Cushion.
If you’re new to the Mystery Cushion Club then it’s a smaller project than the blanket, beginning on 14th June and finishing mid-October. The theme is different to the Mystery Blanket, but it works in the same way with a knitting kit sent out to members at the beginning of the project and monthly emailed patterns. I write a separate blog for the Mystery Cushion as well which will include knitting technique videos, so you can get all the help and support you need as you knit along.
The knitting kit includes Rowan yarn, Debbie Abrahams Beads and buttons for fastening.
So what about some hints?!? If you like rich Autumnal colours with a hint of Vintage, then this could be the cushion you’ve always dreamed of knitting! Bold motifs are mixed with simple stripes and textured stitches, finished off with a sprinkling of sparkling beads and bronze stud details. The theme has several different strands to it, including a nod to one of the great masters of 20th century art…now there’s food for thought!
Discount for MBBC23 members: because you are a Mystery Baby Blanket Club member you get 5% discount off the cost of the basic membership whenever you decide to sign up before it begins in June. Simply input this code, LOYALTY5 into the coupon box at checkout to enable the discount.
In addition to the discount, if you are one of the first one hundred to purchase a membership you will receive some other amazing benefits (but hurry, as we are down to the last few!!!)…
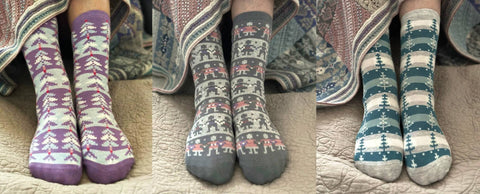
Free pair of Debbie’s bespoke ready-made socks: receive a free pair of Debbie’s Winter Wonderland socks which were inspired by her 2019 Mystery Blanket design. They will be shipped in June with your knitting kit. Choose your pair from these three designs:
Free Prize Draw: in addition to this, everyone will be entered into a Free Prize Draw, with the chance to win one of five great prizes:
Prize 1: 2024 Mystery Cushion Club membership (we will refund what you paid in full)
Prize 2: 2024 Mystery Cushion Club set of printed patterns, five full-colour brochures in total (if you’ve added them to your order we will refund what you’ve paid in full)
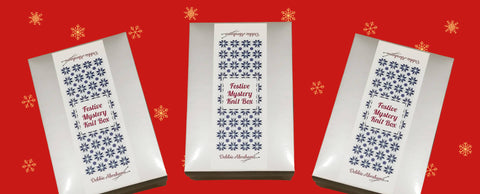
Prize 3: 2024 Festive Mystery Knit Box (released in November)
Prize 4: A knitting kit of your choice up to the value of £40 from the selection on our website
Prize 5: Four packs of Debbie Abrahams Beads (you choose the colours and size).
There will be a download option only (no knitting kit) for this club, which will enable you to use yarns and beads from your own stash to knit the cushion. The list of yarns and beads for the knitting kit will be released a week before the project begins so you can get yourself prepped and ready. The five sets of patterns will be emailed monthly from June to October.
To make things easier you can choose to spread the cost of your payment. If you don’t want to pay in one go you have the option to pay in 2-4 instalments using our Splitit payment plan. There are no admin fees for splitting your payment so you can choose whatever is easiest for you and your finances. This can be used for the knitting kit option but not for the download pattern only option.
Feeling tempted?!? As with all my Mystery Clubs, memberships are limited and once they have sold out the Club will be closed. So don’t delay in getting yourself signed up, especially if you want to take advantage of our fabulous Early Bird offer! There are packages for UK, Europe and the World - it’s a global project and everyone is invited to join in!
OTHER NEW PRODUCTS COMING SOON! We are very excited about the launch of some other new products and special offers, so it might be worth marking these on your calendar…
MARCH: Bespoke Mystery Boxes –tell us who it is for, choose your own bespoke message on the label, and we will create a bespoke box of eight treats which includes one of Debbie’s knitting kits (your choice from the selection on our website).
MARCH: Easter sale! – special discounts on yarns, beads and kits for a limited time.
APRIL: Fraggle Rock Cowl kit – released in a new colourway as an alternative to the original colourway that is currently available in our online shop (see original colourway below).
SO NOW IS YOUR CHANCE TO HAVE ONE MORE GUESS AT THE TITLE OF THE MYSTERY BABY BLANKET BEFORE THE BIG REVEAL NEXT MONTH! There must be a lot of you out there still trying to guess it as we have not had any more correct guesses since last month. So here you go, one last clue, and this month it’s the letter “B”:
_ O W / I / _ _ O W / M Y / _ B _ ‘ _
There are not many more letters to add to the puzzle, so this final clue might just tip the balance in your favour! Think children’s nursery rhymes and songs…any ideas?!? Send in your thoughts and ideas to Sue at sue@debbieabrahams.com and let’s see if you can get it right. There are no prizes for a correct guess, but think how fabulous it would be to guess it before the final reveal! Good luck everyone!
THESE ARE THE FIVE SQUARES TO KNIT IN MAIL OUT 6:
Square 14: The Letter ‘B’ – Intarsia letter motif:
Square 32: Love You 2 – lace heart motif:
Square 33: ‘L’ is for Lorry! – intarsia lorry motif with contrast-coloured bobbles and embroidered details (tow colourways):
Square 34: Hug– cable pattern:
Square 35: The Letter ‘E’ – striped pattern with fairisle letter motifs:
On each pattern page there is a list of Pattern notes and tips that are worth reading before you start to knit each square. These bits of advice give you a pre-warning of what to look out for, as well as some useful information about how to knit each square. In the following notes below I am going to give you a few extra tips about the squares so that you can knit them with complete confidence.
SQUARE 14, THE LETTER ‘B’: this is the sixth and final large letter intarsia motif in the design, knitted in the same colours as Square 22, The Letter ‘Y’:
Tech vids to watch for assistance with this square:
Picking up stitches to knit the next square (MO1 blog)
Mattress stitch (horizontal) (MO1 blog)
How to knit intarsia (MO1 blog)
By now you will be familiar with this type of square and know that it is intarsia which means using small balls or bobbins of yarn to knit it. I used the ball of Duckling (which I cast on with) plus two bobbins of Duckling, and two bobbins of Heavenly.
When you reach Chart Row 22 you can reduce the number down to one bobbin/ball of Heavenly and two of Duckling, and then reintroduce the others again on Chart Row 28.
There is a half-page Notes section on page 11 which could be useful if you want to write down how you knitted this square, and on which rows you joined in the yarns.
SQUARE 32, LOVE YOU 2: this is an exact repeat of Square 4, knitted in Taupe.
Tech vids to watch for assistance with this square:
Picking up stitches to knit the next square (MO1 blog)
Mattress stitch (horizontal) (MO1 blog)
How to knit a bobble (MO1 blog)
The heart motif is created by knitting basic lace stitches (K2tog, yf, skpo and sk2po) with a self-coloured bobble in the centre. Having knitted this square before, and once using Camel (Square 16) as well, you will no doubt whizz through this one without any problems. But if you do get stuck, check out the Abbreviations list on page 19 of your mail out.
Looking at the Piecing Diagram on page 4, do you think there might be one more of these squares to come? You can make a pretty good guess at this, but you’ll have to wait until MO7 to be sure…
SQUARE 33: ‘L’ IS FOR LORRY!: so here is another picture knit, and this time it’s a Lorry which is presented in two colourways.
Tech vids to watch for assistance with this square:
Picking up stitches to knit the next square (MO1 blog)
Mattress stitch (horizontal) (MO1 blog)
How to knit intarsia (MO1 blog)
How to add Swiss darning to your knitting (MO1 blog)
How to add Chain stitch to your knitting (MO2 blog)
Small balls or bobbins of yarn will need to be wound off for this square. But to keep them down to a minimum, you can choose to embroider on some of the smaller details. I embroidered onto the completed square the letter ‘L’, the two windows on the cab, the headlamp and the rectangular outline on the lorry using Swiss-darning. I found this much easier to do than knitting them in.
There are three contrast-coloured bobbles to knit for the wheels. Two separate ends of Silver (Colourway 1) or Vintage Pink (Colourway 2) are purled on chart row 10 so that you have them in place to knit the bobbles on the next row up. If you need a reminder of how to knit a contrast coloured bobble, you can scroll back to my 2023 Mystery Blanket for some assistance: https://debbieabrahams.com/blogs/news/mystery-blanket-club-2023-post-1-february
There are some chain stitch details to add to this square as well. The sun in the top left-hand corner of the square is embroidered using chain stitch, and the eight rays are running stitch (but you can use whichever embroidery stitch you prefer). The circles around each wheel are also embroidered on using chain stitch. If you need a reminder of this, or Swiss darning, then there are tech vids of these techniques in previous blogs for guidance.
Just one last thing, it is easier to embroider onto knitting that has been blocked and pressed, so it is advisable to do this before you begin stitching. I blocked and pressed my squares again after I had embroidered them, so I think that’s worth doing too if you want them to look super spectacular!
SQUARE 34, HUG: you’ll recognise this cable pattern from a previous mail out because it is exactly the same as Square 2 from Mail Out 3.
Tech vids to watch for assistance with this square:
Picking up stitches to knit the next square (MO1 blog)
Mattress stitch (horizontal) (MO1 blog)
How to cable (MO1 blog)
This pattern is presented as both worded and a chart, so feel free to choose whichever suits you best to work from. You’ll remember from last time that it is a fairly simple cable to knit with a repeat every six rows of c4b and c4f which are knitted right next to each other. If you need a reminder of these cable abbreviations you will find them in the Abbreviations list on page 19 of your mail out.
As with all cable patterns, it is advisable to block and press this square with the RS facing upwards. There is a note about this in the Pattern notes and tips on page 13.
SQUARE 35, THE LETTER ‘E’: this square completes the outer corners of the blanket, and is similar to the other fairisle letters you’ve already knitted, ‘V’, ‘A’ and ‘Z’.
Tech vids to watch for assistance with this square:
Picking up stitches to knit the next square (MO1 blog)
Mattress stitch (horizontal) (MO1 blog)
How to carry yarns up the side of the work (MO1 blog)
How to knit fairisle (MO1 blog)
Having knitted several variations of this square a few times before, this should be a piece of cake! The two strips of fairisle are worked over eight rows, with two of these rows knitted in plain Camel (see chart on page 16). There are plain stocking stitch stripes in between with rows of garter stitch – remember to watch out for the needle size changes!
There are two colour options for this square so make sure that you follow the correct instructions for the colourway you are knitting. Colourway 1 (Silver) is always written first with any changes for Colourway 2 (Rosy) written afterwards in brackets and bold.
And that concludes the squares for this month, happy knitting everyone!
WITH FOUR STRIPS COMPLETED AFTER THIS INSTALMENT, YOU COULD GET AHEAD AND SEW THEM TOGETHER. If you decide to make a start on this, these useful tips will guide you through the process.
If you have knitted your squares separately then you will need to join these together first to create strips 1, 2, 4 and 5 (Squares 1-7, 8-14, 22-28 and 29-35). If you need some guidance with this, check out the tech vid in the first blog for horizontal mattress stitch which demonstrates this technique.
Once you have your four strips completed you can make a start. This is a guide to how to sew the squares together using Mattress stitch. It is important to note that these are my suggestions as to how to sew together the squares, but please feel free to use your own method and sequence if preferred.
In this blanket all of the squares are facing in the same direction, so this makes it much easier to sew them together. All you need to watch out for is the number of rows, which vary from square to square. This means that some easing in will be required.
These instructions are based on taking the needle under 2 ‘bars’ at a time as demonstrated in the tech vid for vertical mattress stitch. To ease in a row, you will need to take your needle under one less bar on the side you are easing the extra row into.
Before we make a start, these are a couple of tips about how to ease in rows:
Garter stitch rows have a tighter row tension than stocking stitch, so for every row of garter stitch (which is two knit rows), ease these two rows into one stocking stitch row.
Fairisle usually has a looser row tension than stocking stitch, so if you need to ease in some rows it is best to do this across fairisle rows, taking the needle under more of the stocking stitch rows than the fairisle rows.
These are my guidelines and do not have to be followed if you prefer to use your own method and calculations.
SEW STRIP 1 (squares 1-7) TO STRIP 2 (squares 8-14)
Sew Square 1 (52 rows) to Square 8 (48 rows): you need to ease 4 rows of Square 1 into Square 8.
Along the edge of Square 1 place a marker between Rows 26 and 27.
Along the edge of Square 8 place a marker between Rows 24 and 25.
Ease in 4 rows as evenly as you can across the whole length of the squares, making sure that the marker on Square 1 is matched to the marker on Square 8.
Sew Square 2 (48 rows) to Square 9 (47 rows): you need to ease 1 row of Square 2 into Square 9.
Along the edge of Square 2 place a marker between Rows 24 and 25.
Along the edge of Square 9 place a marker on Row 24.
Ease in 1 row where the marker on Square 2 matches to the marker on Square 9.
Sew Square 3 (48 rows) to Square 10 (48 rows): these squares have the same number of rows so there is no easing to be done.
Sew Square 4 (51 rows) to Square 11 (52 rows): you need to ease 1 row of Square 11 into Square 4.
Along the edge of Square 4 place a marker on Row 26.
Along the edge of Square 11 place a marker between Rows 26 and 27.
Ease in 1 row where the marker on Square 4 matches to the marker on Square 11.
Sew Square 5 (47 rows) to Square 12 (48 rows): you need to ease 1 row of Square 12 into Square 5.
Along the edge of Square 5 place a marker on Row 24.
Along the edge of Square 12 place a marker between Rows 24 and 25.
Ease in 1 row where the marker on Square 5 matches to the marker on Square 12.
Sew Square 6 (49 rows) to Square 13 (47 rows): you need to ease 2 rows of Square 6 into Square 13.
Along the edge of Square 6 place a marker on Row 25.
Along the edge of Square 13 place a marker on Row 24.
Ease in 2 rows as evenly as you can across the whole length of the squares, making sure that the marker on Square 6 is matched to the marker on Square 13.
Sew Square 7 (52 rows) to Square 14 (47 rows): you need to ease 5 rows of Square 7 into Square 14.
Along the edge of Square 7 place a marker between Rows 26 and 27.
Along the edge of Square 14 place a marker on Row 24.
Ease in 5 rows as evenly as you can across the whole length of the squares, making sure that the marker on Square 7 is matched to the marker on Square 14.
SEW STRIP 4 (squares 22-28) TO STRIP 5 (squares 29-35)
Sew Square 22 (48 rows) to Square 29 (52 rows): you need to ease 4 rows of Square 29 into Square 22.
Along the edge of Square 22 place a marker between Rows 24 and 25.
Along the edge of Square 29 place a marker between Rows 26 and 27.
Ease in 4 rows as evenly as you can across the whole length of the squares, making sure that the marker on Square 22 is matched to the marker on Square 29.
Sew Square 23 (47 rows) to Square 30 (49 rows): you need to ease 2 rows of Square 30 into Square 23.
Along the edge of Square 23 place a marker on Row 24.
Along the edge of Square 30 place a marker on Row 25.
Ease in 2 rows where the marker on Square 23 matches to the marker on Square 30.
Sew Square 24 (49 rows) to Square 31 (48 rows): you need to ease 1 row of Square 24 into Square 31.
Along the edge of Square 24 place a marker on Row 25.
Along the edge of Square 31 place a marker between Rows 24 and 25.
Ease in 2 rows where the marker on Square 24 matches to the marker on Square 31.
Sew Square 25 (52 rows) to Square 32 (51 rows): you need to ease 1 row of Square 25 into Square 32.
Along the edge of Square 25 place a marker between Rows 26 and 27.
Along the edge of Square 32 place a marker on Row 26.
Ease in 1 row where the marker on Square 25 matches to the marker on Square 32.
Sew Square 26 (47 rows) to Square 33 (48 rows): you need to ease 1 row of Square 33 into Square 26.
Along the edge of Square 26 place a marker on Row 24.
Along the edge of Square 33 place a marker between Rows 24 and 25.
Ease in 1 row where the marker on Square 26 matches to the marker on Square 33.
Sew Square 27 (47 rows) to Square 34 (48 rows): you need to ease 1 row of Square 34 into Square 27.
Along the edge of Square 27 place a marker on Row 24.
Along the edge of Square 34 place a marker between Rows 24 and 25.
Ease in 1 row where the marker on Square 27 matches to the marker on Square 34.
Sew Square 28 (47 rows) to Square 35 (52 rows): you need to ease 5 rows of Square 35 into Square 28.
Along the edge of Square 28 place a marker on Row 24.
Along the edge of Square 35 place a marker between Rows 26 and 27.
Ease in 5 rows as evenly as you can across the whole length of the squares, making sure that the marker on Square 28 is matched to the marker on Square 35.
THE MYSTERY CLUB MEETINGS AT ‘YARN LOFT’ IN NOTTINGHAM HAVE RESTARED. So if you live close to Nottingham and fancy meeting up with other members for a couple of hours of lively knit and chat, come and join us! Meetings are held on the first Wednesday of the month, with the next meeting scheduled on Wednesday 6th March.
Yarn Loft is at 118 Hucknall Road, Carrington, Nottingham, tel number 07825 702433, website: www.yarnloft.co.uk. Meetings are held between 4-6pm and to cover the costs of hosting the meeting there is a small sub to pay (£3.00), which can be paid to Doreen on the day.
I hope you will be able to join me!
FOLLOW US AND JOIN IN ALL THE FRIENDLY BANTER ON OUR SOCIAL MEDIA PLATFORMS!
If you are not already a Ravelry member, then it is very easy (and free!) to join. Just follow the instructions on their website: http://www.ravelry.com
The Debbie Abrahams Mystery Knitters group on Facebook is another fun way to keep in touch with other members. It was set up a couple of years ago and has grown in size to over 500 members, so that’s well worth joining too.
We also have our own Facebook page where you will find regular updates on everything we are doing from knitting kits to workshops and events!
Instagram: debbieabrahams_knitting
Pinterest: debbieabrahams@debbieabrahamsk
Facebook: Debbie Abrahams Mystery Knitters
Facebook: Debbie Abrahams Handknits
Ravelry: Debbie Abrahams Handknits
As we approach the end of the project, the excitement is rapidly building with the anticipation of the final batch of squares and the reveal of the blanket at the beginning of April. If you’ve kept up with the squares each month, then you are almost there. So keep up the momentum – the finishing line is in sight! – and very soon you will have your own completed blanket to treasure or gift to someone special! Remember that if you have any ideas about the title, then don’t forget to write in – we always love to hear from you! Until next month, take care and I will see you back here on 1st April when the 'mystery' of this year's Baby Blanket will be revealed to you all! Happy knitting everyone! Debbie x
]]>
https://debbieabrahams.com/blogs/news/mystery-blanket-club-2024-post-1-february2024-02-16T00:00:01+00:002024-02-16T00:00:01+00:00Mystery Blanket Club 2024: post 1, FebruaryDebbie AbrahamsHELLO AND WELCOME TO THE 2024 MYSTERY BLANKET CLUB! I am absolutely thrilled to be launching Mystery Blanket Club number 17 in my collection, and I am so happy that you have decided to join me! It’s fabulous to see lots of familiar faces in the club this year, but we have many new members signed up too, so thanks to everyone for taking the leap and jumping on board. For the next ten months we will be knitting our way through forty-nine squares which will give you the opportunity to try out different stitches and learn new knitting techniques. And at the end of it you will have your very own beautiful blanket to wrap yourself up in and enjoy! Life just couldn’t get any better than that, could it!?!
This is our virtual meeting place each month and it is advisable to come here and have a read of my blog before you make a start on your squares. My blog has lots of very helpful information and advice about the club and the squares you are knitting each month so that you can start each mail out fully prepped and ready for what lies ahead.
In addition to the written blog there will be knitting technique demos which will help you learn new skills or master your existing ones. There won’t be a tech vid for every technique in the blanket, but when there is a tricky one or something a little more advanced, I will offer you this extra bit of support. Some of them are generic and some of them are specific to this year’s blanket, but hopefully you will find them all helpful. Here is a list of the tech vids for this month, beginning with my intro. This month there are nine tech vids:
Debbie’s February intro!
Square 8, Tranquility: Japanese short-row shaping
How to carry yarns up the side of the work
How to add Swiss darning to your knitting
How to thread beads onto your yarn
How to bead, the slip-stitch method
How to bead, the hooking-in method
How to knit fairisle
Picking up stitches to begin a new square
Mattress stitch (horizontal)
Mystery Blanket Club 2024 - Mailout 1 Intro
Square 8 Tranquility: Japanese Short-Row Shaping | MBC2024
How to carry yarns up the side of the work | MBC2024
How to add Swiss Darning to your Knitting | MBC2024
How to thread beads onto yarn | MBC2024
How to Bead: The Slip Stitch Method | MBC2024
How To Bead: The Hooking In Method | MBC2024
How to knit Fairsle | MBC2024
Picking up stitches to begin a new square | MBC2024
Mattress Stitch (Horizontal) | MBC2024
YOU ARE PART OF A GLOBAL KNITTING CLUB, WITH MEMBERS PARTICIPATING FROM ALL OVER THE WORLD! And although this has always been the case since I started the Mystery Blanket Club way back in 2008, I still find it completely fascinating that so many knitters around the globe are working on the same blanket squares at the same time - I think that’s pretty cool! This year we have members from USA, New Zealand, Australia, Malaysia, Canada, Switzerland, Belgium, Finland, Norway, Sweden, Germany, Poland, Italy, the Netherlands, Ireland, and the UK. Thank you to all my lovely members for signing up and making this a truly global knitting club!
WE HAVE BEEN FLAT OUT PACKING AND POSTING THE KNITTING KITS FOR THE PAST MONTH, so hopefully you are sitting with your kit ready to make a start. However, we are aware that some of the parcels are still in transit, so if you are still waiting for yours, we ask that you stay patient and calm, and it will be with you soon.
We notified all the members by email at the beginning of January about the slight delay to the start of the club, which we decided to move from the 1st February to the 16th February following the Houthi rebel attacks on cargo ships crossing the Red Sea and Suez Canal. This impacted the journey of our beads which at that time were travelling from Hong Kong to the UK. And although much to our relief our cargo ship was not attacked, it was forced to change course and was diverted around the Cape of Africa, which added an extra 3-4 weeks onto our delivery.
However, as soon as the beads were delivered to our doorstep all hands were on deck to get them measured and bagged up for the kits. We were aware how important it was to get the overseas parcels posted first, so we used what stock we had here (before our big delivery arrived), hence the reason why some of the colours are part bags rather than full bags of beads. This means that in your second parcel you will receive more of some of these colours, plus some new ones too.
I was deeply touched by the amount of emails we received from our members who were all so supportive and understanding of the situation we were in. The delay was hugely disappointing for everyone (we were devastated), but our wonderful knitting community kept positive throughout and never grumbled once. So thank you to everyone for your patience, you made a very difficult and frustrating situation so much more bearable for us.
YOU SHOULD FIND AN EMAIL FROM US IN YOUR INBOX WITH A LINK TO THE FIRST SET OF PATTERNS FOR THE BLANKET. If you cannot find this email from us, then please check your Spam folder. Often our emails end up in there and are not seen. However, if you are still unable to find it please contact Sue and she will check that we have your correct email details in our database.
MEMBERS THAT PAID FOR PRINTED PATTERNS will receive them each month in a separate card-backed envelope. If you did not sign up for printed patterns but have changed your mind, contact Sue and she will be able to set this up for you for an additional cost. All members, including the printed pattern members, will be emailed the remaining nine mail outs each month from March - November.
EACH MONTH, IN ADDITION TO YOUR EMAILED PATTERNS, YOU WILL BE ABLE TO DOWNLOAD THE FILE FROM YOUR ACCOUNT ON MY WEBSITE. This is a quick guide to how you can do this:
Under "MYSTERY CLUB DOWNLOADS" click "View all downloads"
Your latest available mail-outs will be visible here in PDF format to download
PLEASE NOTE THAT THE COLOURS IN THE MAIL-OUTS MIGHT NOT BE COMPLETELY ACCURATE TO THE COLOUR OF THE ACTUAL YARNS – both in the printed paperwork and in the digital files. We have done our best to make sure that the colours are as accurate as possible, however some discrepancies might occur. Therefore, it is always best to read the name and shade number of the colours rather than going by the photographs of the knitting.
THE PIECING DIAGRAMS ON PAGE 4 OF YOUR FEBRUARY MAIL-OUT SHOW WHERE THE SQUARES ARE POSITIONED IN THE BLANKET. There are two diagrams – one for Option One and one for Option Two. Each month the new squares will be added to them so that you can see how the overall design is progressing.
TOWARDS THE END OF EACH MAIL OUT YOU WILL FIND THE ABBREVIATIONS. This will be updated each month with any new additions to the list, so make sure that you always check out the latest one for any recent updates.
IT IS ADVISABLE, ALTHOUGH NOT NECESSARY, TO WORK IN VERTICAL STRIPS. Not only does this make it easier to keep track of which squares are which - there will be some repeats. But it also means less finishing off at the end of the project as you will only have seven strips to sew together instead of forty-nine individually knitted squares. Over the ten months you will be sent the squares in such a way that they can be knitted in strips, so this is what I would advise you do. Instructions are included in the patterns for this, it’s done by picking up stitches along the cast-off edge of a square to begin the next one in the strip. And if you’re not sure how to do this, there’s a tech vid this month to help you. So if you don’t like picking up stitches or find it a struggle, hopefully my vid will go a long way to helping you master the technique, and you never know - you might actually enjoy it once you see how easy it is to do! For more advice about this read the info on page 3 of your February mail-out. You’ll find it on the right hand side of the page under the heading Working in vertical strips.
SOME OF THE SQUARES IN THE BLANKET HAVE A SECOND OPTION. This means that when there is a square that involves a more advanced technique such as fairisle or intarsia, you can opt to knit an alternative square, Option Two, which replaces it with something that is easier to knit. This will be either a textured, beaded or striped stitch pattern. It is clearly stated in the pattern instructions when there is an option – there is a note in the left-hand column of the first pattern page for each square - and you can also see it on the Piecing Diagrams. Throughout the project you can stick completely to either Option One (pink-headed pages) or Option Two (blue-headed pages), or, if preferred, you can choose to mix your options. Patterns that do not have an option are purple-headed. Mixing options is perfectly okay to do, so you can pick and choose and go for Option One for some of the squares and Option Two for others. This gives the project increased flexibility and means that although you are all working on the same design you can, if you choose, make your blanket unique. Occasionally it is important to repeat the choice of an option to keep the overall design balanced. When this happens there will be a note in the left column on the first page of each pattern advising you about this choice. I will also mention it in the written blog.
BLOCKING AND PRESSING THE SQUARES IS VERY IMPORTANT, and although it’s not everyone’s favourite task, it really should be done if you want to create a professional looking blanket. Blocking the squares ensures that they are all a uniform size, which in turn will make joining them together so much easier to do. You might find that you have to ease some of them in or stretch some of them out to get them to the same measurements as other squares, and within reason this is fine - I know I had to do this with some of mine. Alternatively, other squares may block out quite easily with no easing in or out required. If your individual squares are measuring slightly bigger or smaller than 18xm x 18cm, then this should not be a problem either. But you will need to decide on what size you are going to block them all to and stick to this throughout the whole blanket.
Above: a square from the 2023 Mystery Blanket blocked out on a board.
Blocking is the pinning out of your knitting, and, unless instructed otherwise, you should always pin it out with the wrong side facing upwards. Pin frequently along each edge, keeping all four edges as flat and even as possible. There is no need to use heat to press your squares. Much more preferable – and safer too – is cold water. So, if you have one available, fill up a plant spray bottle and use this to generously wet down the knitting, making sure that the water is dispersed right across the knitting from edge to edge. And then leave it to dry completely before removing the pins.
Pressing is the process of applying either heat or water to your knitting which relaxes the stitches and softens the fibres, resulting in a much more fluid and pleasant feeling fabric. After pressing you will find that your knitting drastically changes in quality and will feel beautiful and soft.
Blocking and pressing also helps the edges of the knitting stay flat rather than curling over, as is the tendency with most stitch structures.
I would suggest that you block and press your squares after you have knitted each one. I think it’s far easier to do this as you go along rather than leaving them all to the end. It also ensures that as you work through the squares, they are all knitting up to the correct measurements.
NOBODY LIKES AN ERROR IN A KNITTING PATTERN, AND I KNOW JUST HOW FRUSTRATING THEY ARE FOR EVERYONE. However, despite the test knits and numerous checks which are carried out before we sign off each set of patterns, unfortunately they do still occur sometimes. When an error is reported I check it and once it is confirmed I list it in the ‘Addendum’ section on the website. It can be accessed through a link at the bottom of the Homepage.
I would advise that you check this before you start knitting each square just in case anything has been found. It could save you a lot of time.
GOOD PREPARATION IS THE KEY TO SUCCESSFUL BLANKET SQUARE KNITTING! So here are a few things I would suggest you do before you make a start on your blanket.
First of all, have a good read of the February mail-out and familiarise yourself with the contents. The patterns are laid out in exactly the same way each month, so once you get familiar with them and how the patterns are written, they should be easy to follow.
On page 3 of your February mail-out there is lots of general information about the project including information about tension/gauge. It is very important that you test your tension before you start knitting.
The tension for this project is 24 stitches and 34 rows to 10cm (4in) measured over stocking stitch using 3.50mm needles and using Debbie Abrahams Light Wool DK yarn.
I suggest that you use shade 040 Serenity for your tension swatch as there is plenty of this in the kit, plus it’s a light shade which makes it easier to count the stitches and rows.
Any discrepancies in your tension could lead to shortages of yarn, especially if you knit looser than the given tension. So please take time to do this. Here are some tips about measuring tension:
the tension sample should be longer and wider than the stated tension, so it is advisable to cast on a minimum of 30 stitches and work a minimum of 40 rows
use a solid ruler rather than a tape measure to measure your stitches and rows
start and finish counting the stitches and rows in from the edges of the knitting and not from edge to edge
if your tension is too loose you will need to resample using a smaller metric size needle
if you tension is too tight you will need to resample using a larger metric size needle
if you need to change your needle size then you will need to change all of the other needles used in the project as well by the same number of sizes
stitch tension is more important then row tension, so if you are unable to match both to the recommended tension, choose the needle size that gives you the closest match.
One more thing I would suggest you do before you start knitting is to set up your Colour coder. You will find this in your kit, it’s a piece of card onto which you can tie samples of each of the yarns in your kit and write their colour names and shade numbers. This is such a handy tool to have while you are knitting and means you can easily check yarns against the pattern instructions, especially as some of them are very similar in colour. Watch out for Tide (037) and Neptune (038), and Ghost (642) and Pearl (590), which could easily be mistaken for each another.
It's also a good idea to keep each colour of yarn in a separate bag with either its ball-band or a note of which colour and shade number it is. Then you can be sure to pick up the correct colour and not risk knitting with the wrong one. If you use the wrong colour, then you could run short of yarn.
THE LUREX ON CONES AND THE SMALL BALLS OF KIDSILK HAZE HAVE NO BALL BANDS ON THEM. On page 2 of your mail-out there is a note on the far right-hand side of the page which tells you about these yarns and how they are to be used in the project. We packed them in a separate bag to the other yarns, with the beads and Colour coder, so you should be able to find them quite easily when you open your parcel.
You will always be knitting one end of Kidsilk Haze with one end of 3-ply Lurex (this is the Lurex on the cones and NOT on the small cards). In each kit we placed each ball of Kidsilk Haze on the cone of Lurex that it is knitted together with:
Gold Pearl: Light Gold (3-ply Lurex) knitted with Pearl (Kidsilk Haze). Pearl is a light biscuit colour.
Silver Ghost: Silver (3-ply Lurex) knitted with Ghost (Kidsilk Haze). Ghost is a light grey colour.
Turquoise Daisy: Turquoise (3-ply Lurex) knitted with Blue Daisy (Kidsilk Haze). Blue Daisy is a blue/green colour.
It might be a good idea to put each of these is a separate bag so that you don’t get them mixed up.
IT IS ADVISABLE TO WIND THE KIDSILK HAZE AND THE 3-PLY LUREX ONTO SEPARATE BOBBINS BEFORE YOU KNIT WITH THEM. Then hold one strand of each and knit them together as one yarn. It might be tempting to wind them onto one bobbin, but I would advise against this as they are very different in their structure and therefore, they will wind quite differently to each other. I used the plastic Pony bobbins for this, but any other types of bobbins are fine. It’s a good idea to fill them right up, even if you don’t need all of the yarn for the square you are knitting. The bobbins can be put to one side and used for other squares later on.
THE CARDS OF LUREX ARE A DIFFERENT WEIGHT TO THE LUREX ON THE CONES AND ARE DOUBLE-KNITTING. These will not be knitted with in this project, but instead they will be used for optional surface embroidery. This will be either Swiss darning or chain stitch.
IT IS VERY IMPORTANT THAT WE HAVE YOUR CORRECT CONTACT DETAILS ON FILE, SO PLEASE NOTIFY US IMMEDIATELY IF ANY OF THESE DETAILS ARE INCORRECT. This goes for both your email and postal addresses. Any discrepancies in your postal address can affect the speed at which your parcels are delivered to you, or at worst they might not arrive at all. And an incorrect email address will mean that you will not receive our emailed patterns or club updates. So please let Sue know as soon as possible if we need to revise any of these details for you.
IF YOU HAVE ANY QUERIES OR CONCERNS WHILST WORKING ON YOUR MYSTERY BLANKET, please contact Sue at sue@debbieabrahams.com and she will assist you. Sue may pass your email onto me if it is knitting query, or onto Jason if you need technical support. Throughout the project we will do our best to assist you in every way we can to ensure that your knitting experience is as smooth and enjoyable as possible. So do get in touch if you have a query, we are always here to help!
THE TITLE OF THE MYSTERY BLANKET remains a ‘mystery’ until you guess it and is something to think about as you are knitting your squares each month. With each instalment comes more clues as you work your way through the design. If you think you might know what it is, then send in your guess and we will let you know if you are right. However, if you are still guessing in November, it will be revealed in the final instalment.
As well as clues in the monthly squares, I also give you extra help with your guesses by giving you a clue in the blog. Here is the first clue for the title of this year’s Mystery Blanket. In each blog I will give you another letter to help you guess the title. This month the letter I am giving you is “E”:
_ _ ‘ _ / _ _ _ _ _ E _ / _ _ / _ _ E / _ _ _ _ _
Please send your guesses to Sue. There are no prizes for the correct answer – it is simply a a bit of fun each month. And if you do guess it right, with your permission we will include your name in the next blog.
THERE ARE THREE SQUARES TO KNIT THIS MONTH:
Square 8, Tranquility – multi-coloured wave pattern using Japanese short-row shaping with optional embroidered details (same for both options):
Square 15, Taurus (Option One) – fairisle pattern with textured stripes and slip-stitch beads:
Square 15, Taurus (Option Two) – slip-stitch pattern with textured stripes and slip-stitch beads:
Square 16, Celestial – moss stitch stripes (same for both options):
On each pattern page there is a list of Pattern notes and tips that are worth reading before you start to knit each square. These bits of advice will help you and give pre-warnings as to what to look out for in the pattern instructions. Also take note of the description under the title of each square as this tells you what the stitch structure is.
You can use the video demos to help you knit your squares. But here are a few extra tips to assist you:
SQUARE 8, TRANQUILITY: this first square in your February mail-out uses the technique of Japanese short-row shaping, and if you haven’t tried this before, you are in for a real treat!
Videos to watch for assistance with this square:
Square 8, Tranquility: Japanese short-row shaping
How to carry yarns up the side of the work
How to add Swiss darning to your knitting
This lovely fluid pattern is created by working and turning to create soft lozenge shapes and is a really fun square to knit. If you are new to it then I would advise that you watch my tech vid before you begin which demonstrates Rows 12 and 13. In my demo I show you how to turn the work, attach a marker, remove a marker and close a gap. This may sound quite challenging, but I guarantee that if you watch the vid you will be absolutely fine.
Just a few extra tips about this technique then before you make a start. You can carry Tide yarn up the side of the work for most of the square, but there are two times when you are instructed to cut off Tide and rejoin it. There is a tech vid that shows you a really neat way to take yarns up the side of the work and how to re-join a yarn at the beginning of a row.
When working the stitch after you’ve attached a marker, make sure that you hold the marker against the work and knit/purl the next stitch firmly so that the marker sits tight against the work. You will need three markers for this square.
When you remove the marker, pull firmly on the loop and make sure that it is not twisted as you place it on the left needle.
Remember to wind your Silver Lurex and Ghost yarns onto two separate bobbins and then you will find them much easier to knit with.
As well as watching the tech vid I would also advise that you read the Pattern notes and tips for this square which are on page 5 of the mail-out, where you will find more advice about how to knit this square.
If you look closely at the image on page 5, you will see that there is some embroidery along the top of the Electric Green lozenges. It is very subtle, but it just adds a hint of sparkle to the pattern. You need to use the Emerald Lurex for this, which is on a card, and the embroidery is Swiss darning. There is a tech vid for this if you need some assistance with the technique. This embroidery is, however, optional, so if you don’t want to add it, you don’t have to.
There are a few alternatives to Japanese short-row shaping, such as wrap and turn, and German short-rows. So if you are more comfortable using a different technique to knit this pattern, that is absolutely fine. As long as you get the same result, it does not matter how you knit it.
Have fun!
SQUARE 15, TAURUS (Option One): this is the first square where you will need to make a decision as to which option you want to knit. Option One is the trickier of the two because it has some fairisle in it. So, which one will you go for?...
Videos to watch for assistance with this square:
How to carry yarns up the side of the work
How to thread beads onto your yarn
How to bead, the slip-stitch method
How to knit fairisle
The square begins with a beaded stripe which uses the slip-stitch method of adding beads. This means that you need to thread them onto the yarn before you join it in. How many to thread on is listed on page 8 of the mail-out. On Row 6 you will slip alternate stitches, which on the next row is where you will knit the stitches in between where the beads are placed. The reason for doing this is to make the row much neater, and narrower too, which is important to achieve the correct length of the finished square.
You will also notice that there is a change to a smaller needle for the rows of garter stitch in the beaded stripes. This will keep the stitch tension the same as the rest of the square.
If you’ve not knitted fairisle before then this is a great opportunity to give it a go. There are three small sections of it in this square, all with the same pattern (see the chart on page 9), using Electric Green and Sapphire. If you need some guidance with fairisle there is a tech vid to help you this month. It is not specific to this square, but it shows you weaving in and stranding, which are the basic techniques used to knit fairisle patterns.
If you don’t want to knit this square then there is an alternative option…
SQUARE 15, TAURUS (Option Two): this is the easier alternative and uses the same colours as Option One.
Videos to watch for assistance with this square:
How to carry yarns up the side of the work
How to thread beads onto your yarn
How to bead, the slip-stitch method
This square has the same beaded stripes as Option One, but the fairisle is replaced with a textured stitch. For those of you who knitted the 2023 Mystery Blanket, it’s the same stitch pattern that I used for Bracken. But in this version I have added in some slip-stitch beads across the middle of the square. They are difficult to see on the image on page 10 as they are Indigo, but they add a subtle sparkle to the pattern.
The stitch pattern itself is very simple and involves slipping stitches and moving the yarn back and forth between the needles. So there is no tech vid for this, but if you read the written instructions carefully, you should be fine. You work two rows in each colour, alternating between Sapphire and Electric Green. Once you get familiar with the pattern repeat, it’s a really lovely one to knit.
SQUARE 16, CELESTIAL: the final square to knit this month has no options and is an easy all-over moss (seed) stitch pattern which graduates from soft pale colours of blue and silver to rich vibrant shades of blues and greens towards the top.
Videos to watch for assistance with this square:
How to carry yarns up the side of the work
Picking up stitches to begin a new square
Mattress stitch (horizontal)
The first thing to note about this square is the smaller needle that is used to knit it. Moss stitch (also known as seed stitch), is created by knitting one stitch and purling the next and repeating this across the whole row, and on every row. And because of the constant movement of the yarn, the tension is looser than stocking stitch, hence the smaller needle. If you find that the needle I have recommended is not achieving the correct tension and it is too loose, then try a smaller one - it is important that this square is knitted firmly so that it knits up to the same size as your other squares.
You can see in the image on page 1 that the colours graduate from the bottom of the square to the top, and moss stitch is a great way to achieve this as it softens the stripes. Once you’ve joined the first three colours in, you are rotating them every row until one of them is dropped and a new one is introduced. But essentially you are always working in a three-colour rotation. You just need to remember to change colour every row and not work two rows in one colour - which is quite easy to do so you’ll have to keep an eye on it.
Remember to wind Silver Ghost onto two separate bobbins before you begin – one of Silver Lurex and one of Kidsilk Haze Ghost. And you’ll have to do the same with Turquoise Daisy – that is one of Turquoise Lurex and one of Kidsilk Haze Blue Daisy. When your bobbins are wound, you are ready to go. So enjoy!
FOLLOW US AND JOIN IN ALL THE FRIENDLY BANTER ON OUR SOCIAL MEDIA PLATFORMS!
If you are not already a Ravelry member, then it is very easy (and free!) to join. Just follow the instructions on their website: http://www.ravelry.com
The Debbie Abrahams Mystery Knitters group on Facebook is another fun way to keep in touch with other members. It was set up a couple of years ago and has grown in size to over 500 members, so that’s well worth joining too.
We also have our own Facebook page where you will find regular updates on everything we are doing from knitting kits to workshops and events!
Instagram: debbieabrahams_knitting
Pinterest: debbieabrahams@debbieabrahamsk
Facebook: Debbie Abrahams Mystery Knitters
Facebook: Debbie Abrahams Handknits
Ravelry: Debbie Abrahams Handknits
THE MYSTERY CLUB MEETINGS AT ‘YARN LOFT’ IN NOTTINGHAM HAVE RESTARTED, SO COME ALONG AND JOIN US IF YOU CAN! If you live close to Nottingham and fancy a knit and natter while you knit up your blanket squares, then this is a great way to meet other members and share tips and advice. I attend the meetings and am on hand to help with any queries about your Mystery projects. We always have such a giggle and talk about all sorts of things – not always knitting related! And Doreen keeps us all going with hot drinks and cake – it’s a lot of fun!
Usually the meetings are held on the first Wednesday of the month, so the next one will be on the 6th March. Yarn Loft is at 118 Hucknall Road, Carrington, Nottingham, tel number 07825 702433, website: www.yarnloft.co.uk. Meetings are held between 4-6pm and to cover the costs of hosting the meeting there is a small sub to pay (£3.00), which can be paid to Doreen on the day.
I hope you will be able to join me!
ON FRIDAY 1st MARCH WE ARE LAUNCHING OUR 2024 MYSTERY CUSHION CLUB, and the opportunity for you to take part in a brand new Debbie knit-a-long! And the good news is that all 2024 Mystery Blanket Club members and 2023/24 Mystery Baby Blanket Club members who join will receive a discount off the cost of their membership. A unique discount code for this will be included in the emailed newsletter we will send you as soon as memberships are available to purchase. So keep an eye on your inbox!
The Mystery Cushion is a much smaller project than the blanket, lasting for five months from June to October. The theme is different to the Mystery Blanket but it works in the same way with a knitting kit sent out to members at the beginning of the project and monthly emailed patterns. I write a separate blog for the Mystery Cushion as well which will include knitting technique videos, so you can get all the help and support you need as you knit along.
Above: 2022 Mystery Cushion: Pure Nouveau
I never like to give away too much about a new Mystery project, but what I can tell you is that it is knitted in some of my most favourite Rowan yarns including Alpaca Soft DK and Felted Tweed. And it has oodles of beads in it – of course! - so it’s a super sparkly project knitted in luxuriously soft yarns. I will reveal a little more about it – including some hints about the colours – when we launch the sign-ups on 1st March.
In the lead up to the launch I will be posting each day on my Instagram an image of each of the thirteen cushions in my Mystery Cushion Club collection, with the first one dating back to 2011. So if you want to see the whole collection, make sure you are following me on Instagram and watch out for my daily posts, beginning on Saturday 2nd March.
PLEASE REMEMBER TO KEEP IN TOUCH AND SEND IN YOUR PICS AND STORIES ABOUT YOUR MYSTERY BLANKET KNITTING. It is alway great to hear from you and to see how you are getting on with your squares. And with your permission I will share your words and pics in the next blog. So please keep in touch and send them directly to me at debbie@debbieabrahams.com.
AND FINALLY, I AM THRILLED TO ANNOUNCE THE WINNER OF THE FIRST 2024 MYSTERY BLANKET CLUB PRIZE DRAW!!! Each month a member is picked at random to win a Debbie Abrahams prize. So it is worth reading right the way to the end of each blog to see if you are that lucky member!
PRIZE DRAW ONE (FEBRUARY): this month’s winner is member 40, Gillian Hanhart from London in the UK. Well done Gillian! Please choose a prize from the following selection:
Your choice of one of Debbie’s knitting kits up to the value of £30.00 (take a look at them in our online shop).
A £30 voucher towards a Debbie Abrahams Mystery Club membership: 2024 Mystery Cushion Club or 2025 Mystery Blanket Club.
A Mystery bag of five gifts!
We will notify Gillian to let her know the good news!
So now it’s time to settle yourself down in your comfiest chair and make a start on your first set of squares. I cannot tell you how excited I am about you embarking on this brand new knitting adventure with me. I hope that you enjoy knitting up the squares this month as much I loved designing them! Remember that you are part of a huge global knitting community and are never on your own. So reach out to those social media groups if you need some help or advice (or just want some friendly banter!), and remember that I am here too at the end of an email. Have fun everyone, and I will see you back here very soon at the beginning of March for Mail-Out 2! Debbie x
]]>
https://debbieabrahams.com/blogs/news/mystery-blanket-club-2024-post-2-march2024-01-03T00:00:00+00:002024-02-29T20:25:18+00:00Mystery Blanket Club 2024: post 2, MarchDebbie AbrahamsHELLO AND WELCOME TO THE SECOND INSTALMENT OF THE 2024 MYSTERY BLANKET CLUB! It was only two weeks ago that the club started, but in that short space of time everyone seems to have settled into the project really well, and I’ve seen on our social media platforms some lovely photos and enthusiastic comments about the progress made so far. So what a great start to this new KAL!
I am super excited this month because not only am I about to reveal the next four squares of the blanket to you, but sign-ups for my 2024 Mystery Cushion Club have opened, so there is a whole new knitting adventure for you to get excited about too. It is mentioned in my intro (see link below!), and I have also mentioned it in the written part of this blog. There is an Early Bird Special Offer, and as a Mystery Blanket Club member you get a discount on the membership as well as entry into our Free Prize Draw, plus a pair of ready-made socks! Sounds good? Then read on…
After my intro there are three new tech vids this month to help you with the March patterns, but we have also included the tech vids from the February blog in case you need a reminder of any of the other techniques that I have demonstrated so far:
NEW! Debbie’s March intro!
NEW! How to knit intarsia
NEW! How to cable
NEW! Square 1, Capricorn (Option Two)
Square 8, Tranquility: Japanese short-row shaping (February blog)
How to carry yarns up the side of the work (February blog)
How to add Swiss darning to your knitting (February blog)
How to thread beads onto your yarn (February blog
How to bead, the slip-stitch method (February blog)
How to bead, the hooking-in method (February blog)
How to knit fairisle (February blog)
Picking up stitches to begin a new square (February blog)
Mattress stitch (horizontal)
Mystery Blanket Club 2024 - Mailout 2
How To Knit Intarsia | MBC2024
How to Cable | MBC2024
How To Bead: The Hooking In Method | MBC2024
How to knit Square 1 Capricorn (Option Two) | MBC2024
Videos from February:
Square 8 Tranquility: Japanese Short-Row Shaping | MBC2024
How to carry yarns up the side of the work | MBC2024
How to add Swiss Darning to your Knitting | MBC2024
How to thread beads onto yarn | MBC2024
How to Bead: The Slip Stitch Method | MBC2024
How to knit Fairsle | MBC2024
Picking up stitches to begin a new square | MBC2024
Mattress Stitch (Horizontal) | MBC2024
IMPORTANT! TEAL AND CLEAR BEAD SHORTAGE IN YOUR KNITTING KIT! We sent out an email to all the members this week about the beads in your knitting kit. I only just realised after recording my intro vid for this month that you are going to run short of Teal and Clear beads and won’t have enough to complete all the March squares. Why has this happened?!? To be perfectly honest, I just don’t know as usually things like making sure you have enough yarn and beads in your kit is at the top of my priority list to check, so I apologise for this oversight which, hands up, falls completely on my lap.
In case you did not get the email from us, to put you in the picture, this is what it said:
“I have some important information to tell you about the beads in your knitting kit. I have just realised that you are not going to have enough Teal and Clear beads to complete the squares in your next mail which is going to be launched on Friday 1st March. This is because of a miscount of beads by me which I apologise for.
However, the good news is that because we now have all our beads back in stock, we are in the process of parcelling up the extra Teal and Clear beads that you need and will get them posted to you within the next couple of days.
For the UK members who ordered printed patterns, I have included the beads in your printed patterns envelope, so make sure that you fish them out before discarding the envelope.
Unfortunately the overseas printed patterns have already been posted so these beads are going to be sent in a small white jiffy bag. The overseas will take longer to arrive than the UK, but as they will be marked as Gift and No Value, they should sail through the postal system and arrive within good time.
There are some squares in Mail Out 2 which you can get straight on with before the extra beads arrive, they are Squares 1 and 2. So if you are eager to make a start, you can certainly do that. And all being good, the beads will be with you very soon.”
THE MARCH PATTERNS HAVE BEEN EMAILED TO ALL THE MEMBERS, so you should find this in your inbox. However, if you cannot see it then please check your Spam folder first before doing anything else as more often than not our emails end up in there. However, if after checking this you are still unable to find it, please contact Sue and she will check that we have your correct email details in our database.
THE PRINTED PATTERNS HAVE BEEN POSTED TO THE MEMBERS WHO OPTED FOR THEM, so if you have not received them yet, they will be with you very soon. If you did not sign up for printed patterns but have changed your mind, contact Sue and she will be able to set this up for you for an additional cost.
IF YOU ARE HAVING ANY TENSION ISSUES WITH YOUR SQUARES, THEN DON’T DESPAIR! There are a lot of different stitch structures in the blanket, and sometimes this means that there is a change of needle size or a different number of stitches to cast on to achieve the correct measurement of 18cm x 18cm. However, as we all knit differently, it isn’t unusual for this to not work out for everyone, so you might find that using the main needle size is achieving the correct tension, however some of the other needle size changes are not. Therefore, if this happens to you, it is important that you correct it by changing to a needle size that achieves the correct tension, and then make sure that you make this same needle size change again if the square is repeated.
It’s a good idea to jot down any changes you make while you are knitting, and the perfect place for this is in your mail out if you’ve got a printed copy, or if you are working digitally, in a notebook. That way you will have a record you can refer to as and when needed.
I HAVE BEEN ASKED A QUESTION ABOUT BLOCKING AND PRESSING. And it might be something that you are not sure about too, so I am going to clarify. If you work in strips then I would advise that you block each square as you knit it, rather than pressing the completed strip. Even though this is probably more time consuming, you will find that it is much easier to do it this way. And I think you get a better result too.
FOLLOWING AN EMAIL FROM ONE OF THE MEMBERS, I NEED TO GIVE YOU A BIT OF ADVICE ABOUT THE LUREX YARN. It is constructed as a chain and because of this, if you pull on the loose end of it the yarn will unravel, and it will continue unravelling unless you stop it.
So I would advise that every time you use it you knot the end when you begin and then knot the other end when you finish using it. Then it won’t unravel, and you will be a very happy knitter!
NOW FOR SOME SUPER EXCITING NEWS ABOUT THE LAUNCH OF MY 2024 MYSTERY CUSHION CLUB, WHICH IS NOW ON SALE IN OUR ONLINE SHOP! This year sees the launch of the fourteenth design in this collection, and with the few hints and tips I am going to give you (but not too many!), I hope that you decide to sign up and join me!
Over five fun-packed months of inspirational knitting using some of Rowan’s finest and most luxurious yarns including Alpaca Soft DK and Felted Tweed, you will have the opportunity to create your very own Mystery Cushion.
Above: the 2023 Mystery Cushion, Picnic Party!
If you’re new to the Mystery Cushion Club then it’s a smaller project than the blanket, beginning on 14th June and finishing mid-October. The theme is different to the Mystery Blanket, but it works in the same way with a knitting kit sent out to members at the beginning of the project and monthly emailed patterns. I write a separate blog for the Mystery Cushion as well which will include knitting technique videos, so you can get all the help and support you need as you knit along.
The knitting kit includes Rowan yarn, Debbie Abrahams Beads and buttons for fastening.
So what about some hints?!? If you like rich Autumnal colours with a hint of Vintage, then this could be the cushion you’ve always dreamed of knitting! Bold motifs are mixed with simple stripes and textured stitches, finished off with a sprinkling of sparkling beads and bronze stud details. The theme has several different strands to it, including a nod to one of the great masters of 20th century art…now there’s food for thought!
Discount and Early Bird offer! The good news is that because you are a 2024 Mystery Blanket Club member you get 5% discount off the cost of the basic membership whenever you decide to sign up before it begins in June. A unique discount code for this will be included in an emailed newsletter you will receive from us on the 1st March. However, if you do not receive it (or can’t find it), then no worries - send us a quick message and we will let you know what it is.
And in addition to the discount, if you are one of the first one hundred to purchase a membership you will receive some other amazing benefits:
Free pair of Debbie’s bespoke ready-made socks: receive a free pair of Debbie’s Winter Wonderland socks which were inspired by her 2019 Mystery Blanket design. They will be shipped in June with your knitting kit. Choose your pair from these three designs:
Winter Ball
Oh Tannenbaum!
Rockin’ Around
Free Prize Draw: in addition to this, everyone will be entered into a Free Prize Draw, with the chance to win one of five great prizes:
Prize 1: 2024 Mystery Cushion Club membership (we will refund what you paid in full)
Prize 2: 2024 Mystery Cushion Club set of printed patterns, five full-colour brochures in total (if you’ve added them to your order we will refund what you’ve paid in full)
Prize 3: 2024 Festive Mystery Knit Box (released in November)
Prize 4: A knitting kit of your choice up to the value of £40 from the selection on our website
Prize 5: Four packs of Debbie Abrahams Beads (you choose the colours and size).
There you go, oodles of reasons to get yourself signed up!
There will be a download option only (no knitting kit) for this club, which will enable you to use yarns and beads from your own stash to knit the cushion. The list of yarns and beads for the knitting kit will be released a week before the project begins so you can get yourself prepped and ready. The five sets of patterns will be emailed monthly from June to October.
To make things easier you can choose to spread the cost of your payment. If you don’t want to pay in one go you have the option to pay in 2-4 instalments using our Splitit payment plan. There are no admin fees for splitting your payment so you can choose whatever is easiest for you and your finances. This can be used for the full membership option with knitting kit, but not for the download pattern only option.
Feeling tempted?!? As with all my Mystery Clubs, memberships are limited and once they have sold out the Club will be closed. So don’t delay in getting yourself signed up, especially if you want to take advantage of our fabulous Early Bird offer! There are packages for UK, Europe and the World - it’s a global project and everyone is invited to join in!
These are the past thirteen designs. Take a look at them and I will leave you pondering over what I have in store for you this year...
THE TITLE OF THE MYSTERY BLANKET has been guessed by so many of you that I am going to create a separate blog for the correct guessers which I will post in a couple of days time. Someone said that the big giveaway was the word with the apostrophe, so if you are still not sure what it is, perhaps this tip will help you. And if not, then here is another letter in the puzzle clue. This month it’s the letter “R”:
_ _ ‘ _ / _ R _ _ _ E _ / _ _ / _ _ E / _ _ _ R _
Please send your guesses to Sue. There are no prizes for the correct answer – it is simply a a bit of fun each month. And if you do guess it right, with your permission we will include your name in the next blog. Good luck everyone!
Square 2, Cosmic – textured stripe pattern (same for both options):
Square 9, Solar – cable pattern with hooked-in beads (same for both options):
Square 29, Pisces (Option One) – fairisle pattern with textured stripes and slip-stitch beads:
Square 29, Pisces (Option Two) – slip-stitch pattern with textured stripes and slip-stitch beads:
On each pattern page there is a list of Pattern notes and tips that are worth reading before you start to knit each square. These bits of advice will help you and give pre-warnings as to what to look out for in the pattern instructions. Also take note of the description under the title of each square as this tells you what the stitch structure is.
You can use the video demos to help you knit your squares. But here are a few extra tips to assist you:
SQUARE 1, CAPRICORN (Option One): this is the first intarsia square in the blanket and gives you the opportunity to practice your intarsia skills or learn a new technique. It does not matter which option you choose to knit for this square.
Videos to watch for assistance with this square:
How to knit intarsia (NEW this month!)
There is a tech vid in this blog for intarsia which shows you the basics of this technique including how to join in a new colour and how to cross over the yarns to avoid gaps between colour changes. If you are new to the intarsia technique, then this is a good one to start with as it only uses two colours, and the motif is a pretty simple one to knit. My video shows me demonstrating on a generic piece of knitting, but by watching it you will see quite clearly the techniques you need to knit this square.
Although there are only two colours in this square, you will need to wind off more than two balls of yarn. This is because you should not carry colours across the back of the work (like you would do in fairisle). Intarsia is a single thickness multi-coloured piece of knitting, and yarns should only be carried a short distance and when it is absolutely necessary to do so, ie, carrying it across so that on the next row up it is in a better position to pick up and continue knitting with.
I used four bobbins of Utopia (remember the oval shape inside the curly twist at the end the symbol!), and three bobbins of Sapphire.
I prefer to wind my yarns onto bobbins as I find that separate balls of wool tend to get tangled up. But this is entirely your decision. Some knitters love bobbins (like me!), but others don’t and instead prefer separate balls or long strands of yarn, so you will need to decide for yourself which method suits you best for this square.
SQUARE 1, CAPRICORN (Option Two): if you don’t fancy intarsia then this alternative square is the one you will be knitting instead. It’s an all-over lacey stitch using two colours of yarn and two colours of beads. It does not matter which option you choose to knit for this square.
Videos to watch for assistance with this square:
Square 1, Capricorn (Option Two) (NEW this month!)
How to carry yarns up the side of the work (February blog)
How to bead, the hooking-in method (February blog)
When you look at the image of this square on page 8 of Mail Out 2, it might be difficult to see that it is a two-colour stripe pattern which alternates between Utopia and Neptune. The beads might be tricky to see too - they alternate across each beaded row.
The first thing to note is the smaller needle size that you change to after the first two rows. Then on Row 1 of the 8-row pattern repeat the number of stitches are increased from 41 to 53. Once you start the pattern repeat, these eight rows are repeated throughout the whole of the square.
There is a tech vid this month which shows you how to knit Row 2 – this is the trickier row where stitches are beaded and passed over each other to create the textured lacey stitch. You might be able to follow it from my written instructions, but if you want to reassure yourself that you are knitting it correctly, then the vid is there for you as a back-up.
I really enjoyed knitting this square and found it quite easy once I got going. Just keep an eye on the beads and make sure that you pick up the correct colour (so that they alternate), and remember to change the colour of yarn every two rows. Then hopefully you’ll enjoy knitting it as much as I did!
SQUARE 2, COSMIC: there are no options for this square so everyone is knitting this textured stripe pattern which combines two colours of Lurex with Soft Yak and Alpaca Soft.
Videos to watch for assistance with this square:
NEW! Square 1, Capricorn (Option Two)
Picking up stitches to begin a new square (February blog)
Mattress stitch (horizontal)
If you knitted Option Two for Square 1, Capricorn, then you’ll recognise the textured stripes in this square as they are the same as the Capricorn pattern but worked across six rows instead of eight. And this time they are knitted in the Lurex yarns, Silver Ghost and Turquoise Daisy. If you knitted Option One for Square 1, then there is a tech vid for these rows which shows you how to knit Row 2 – the trickier one – so be sure to give it a watch if you need some guidance.
In this stripe pattern it is not advisable to carry yarns up the side of the work as there are too many rows between the stripes. Instead I have instructed them to be cut off, but if you can, weave in the loose ends as you go to save darning them in later on.
SQUARE 9, SOLAR: this is the first cable square in the blanket, which combines cables with hooked-in beads and a pretty lace stitch, so there’s plenty to keep you busy!
Videos to watch for assistance:
NEW! How to cable
How to bead, the hooking-in method (February blog)
Picking up stitches to begin a new square (February blog)
Mattress stitch (horizontal) (February blog)
There are worded instructions and a chart for this square, however, for some of the rows on the chart you need to read and follow the worded instructions - these are the ones that are in green. You will see that under the chart on page 14 it says for one of the symbols to ‘see instructions in green for corresponding row’.
The lacey beaded pattern in this square is the same pattern I used in the 2023 Mystery Blanket, Square 23, Option Two. I created a tech vid for this square which includes a demonstration of how to knit these rows. It’s in the MBC23 June blog, here is the link to it:
You will find the explanation for c3b and c3f on page 23 of the March mail out. They are simple cables worked in pairs to create circular shaped textured patterns which resemble planets (now, there’s a clue to the theme!!!) There is also a tech vid in this blog for how to knit cables which shows you the basics. The demo is not specific to the cables in this square, but it gives you a general idea of what is involved. So if you’ve not knitted a cable before, this will guide you through the technique.
There’s quite a lot going on in this square, but if you focus on one row at a time you will soon get used to the pattern repeat, and hopefully you will really enjoy knitting it up (and perhaps guess the theme too if you haven’t done so already!).
SQUARE 29, PISCES (Option One): this is the fairisle option and is similar to Square 15, Taurus (Option One), but you don’t need to choose the same option for this square if you would prefer to knit the alternative one instead…
Videos to watch for assistance with this square:
How to carry yarns up the side of the work
How to thread beads onto your yarn
How to bead, the slip-stitch method
How to knit fairisle
If you knitted Option One for Square 1, Taurus, then it is very similar to this but there is a change to the fairisle pattern. Remember that there is a tech vid if you need a reminder of the fairisle technique and/or slip-stitch beading.
I received some feedback about the chart for Taurus, that it was too dark and difficult to see the two colours. So I decided to change this on the chart for Pisces, and used white for the background (which is Electric Green, as instructed in the key next to the chart on page 17). This makes it much easier to work from so hopefully you will find this change beneficial.
Don’t forget that the needle sizes change from 3.50mm to 2.50mm for the rows of garter stitch in the beaded stripes. This will keep the stitch tension the same as the rest of the square.
But if you don’t want to knit this square, there is an alternative option…
SQUARE 29, PISCES (Option Two): this is the easier alternative and uses the same colours as Option One.
Videos to watch for assistance with this square:
How to carry yarns up the side of the work
How to thread beads onto your yarn
How to bead, the slip-stitch method
If you knitted Option Two for Square 1, Taurus, then you will be familiar with this pattern as it is identical. However, if you knitted Option One, then this is a new square for you to get to grips with.
It has the same beaded stripes as Option One, but the fairisle is replaced with a textured stitch with Indigo hooked-in beads. The two-colour textured stitch pattern is very simple and involves slipping stitches and moving the yarn back and forth between the needles. There is no tech vid for this, but if you read the written instructions carefully, you should be fine. You work two rows in each colour, alternating between Sapphire and Electric Green.
ANNE SCULLION FROM ABERDEEN, UK, HAS BEEN IN TOUCH TO TELL US ABOUT HER VERY LOVELY KNITTED BASKET! This fabulous and very useful accessory is perfect for this year’s Mystery Blanket (for which you may or may not have guessed the theme!).
Anne says:“I couldn’t resist showing you this - I made this basket a good few years ago and it couldn’t be more perfect for this project! I felted it in the washing-machine - that was a bit nerve wracking! It was not made at a workshop, it was just something I fancied having a go at making. The original pattern was for a bag, but I saw someone adapt it into a basket, so I did that too. I even found a lovely blue fabric with little diamanté’s on it for the lining.”
I think that this is absolutely lovely and is perfect for keeping all your odds and ends safe and together in one place. I love the process of felting as it completely changes the quality of the knitted fabric and enables things like baskets and containers to be made out of it. Thanks for sharing this with us Anne, it’s encouraged me to delve into my stash and do some more felting myself!
MARY LEESON FROM LOUGHBOROUGH, UK, COULDN’T DECIDE WHICH OPTION TO KNIT FOR SQUARE 15, TAURUS, SO SHE CAME UP WITH THIS GENIUS IDEA! Take a look at what she did…
Mary says:“I love both options so much that I've knitted a hybrid version!”
What a brilliant idea Mary! I think it looks fabulous. And it avoided you having to decide which one to knit, so you got the best of both worlds!!! Do let us know what you come up with for Square 29, Pisces, in this month’s instalment…
IF YOU’VE ALWAYS FANCIED KNITTING THE VERY FIRST MYSTERY CUSHION IN MY COLLECTION, THEN AN UNOPENED KIT HAS COME UP FOR SALE. ‘Tribal Africa’ was the 2011 Mystery Cushion and was inspired by African art. It is knitted in Rowan Wool Cotton DK which was one of my all-time favourite Rowan yarns, but has long been discontinued. It was a beautiful yarn and I for one was very sad to see it go from the range. The kit contains all the yarn for the project plus the beads (no button fastenings were included in this kit).
If you are interested in purchasing it – maybe it’s the one Mystery Cushion that is missing from your collection?!? – then please let me know and I will put you in touch with the member who is selling it.
PLEASE REMEMBER TO KEEP IN TOUCH AND SEND IN YOUR PICS AND STORIES ABOUT YOUR MYSTERY BLANKET KNITTING. It is always a great joy to hear from you and to see how you are getting on with your squares. And with your permission I will share your words and pics in the next blog. So please keep in touch! Please send them directly to me at debbie@debbieabrahams.com.
FOLLOW US AND JOIN IN ALL THE FRIENDLY BANTER ON OUR SOCIAL MEDIA PLATFORMS!
If you are not already a Ravelry member, then it is very easy (and free!) to join. Just follow the instructions on their website: http://www.ravelry.com
The Debbie Abrahams Mystery Knitters group on Facebook is another fun way to keep in touch with other members. It was set up a couple of years ago and has grown in size to over 500 members, so that’s well worth joining too.
We also have our own Facebook page where you will find regular updates on everything we are doing from knitting kits to workshops and events!
Instagram: debbieabrahams_knitting
Pinterest: debbieabrahams@debbieabrahamsk
Facebook: Debbie Abrahams Mystery Knitters
Facebook: Debbie Abrahams Handknits
Ravelry: Debbie Abrahams Handknits
THE MYSTERY CLUB MEETINGS AT ‘YARN LOFT’ IN NOTTINGHAM ARE ALWAYS GREAT FUN! So if you live close to Nottingham and fancy meeting other members and having a knit and a natter for a couple of hours, then come along and join us at Doreen’s lovely shop. We meet up on the first Wednesday of the month between 4-6pm, and Doreen provides us with a hot drink and something sweet to eat while we knit our blanket squares.
We had the first meeting this year on the 7th February, and some of the ladies who came brought along their completed 2023 Mystery Blankets. Don’t they look wonderful!
Alison had been busy working on a Marie Wallin sweater (see below) – isn’t it gorgeous (and so very neat!). And she was wearing the most amazing sweater which she knitted in our Debbie Abrahams Light Merino DK yarn (Amethyst and Garnet). Wow! – I was totally bowled over by it (plus they are my all-time favourite colours!)
Yarn Loft is at 118 Hucknall Road, Carrington, Nottingham, tel number 07825 702433, website: www.yarnloft.co.uk. The next meeting is on Wednesday 6th March, and you are very welcome to join us.
To cover the costs of hosting the meeting there is a small sub to pay (£3.00), which can be paid to Doreen on the day.
I hope you will be able to join me!
AND FINALLY, LET’S FIND OUT WHO THE WINNER IS OF THE SECOND 2024 MYSTERY BLANKET CLUB PRIZE DRAW!!! Each month a member is picked at random to win a Debbie Abrahams prize. So it is worth reading right the way to the end of each blog to see if you are that lucky member!
PRIZE DRAW TWO (MARCH): this month’s winner is Member 9, Jane Ungemuth from Whittlesford in Cambridgeshire in the UK. Well done Jane! Please choose a prize from the following selection:
Your choice of one of Debbie’s knitting kits up to the value of £30.00 (take a look at them in our online shop).
A £30 voucher towards a Debbie Abrahams Mystery Club membership: 2024 Mystery Cushion Club or 2025 Mystery Blanket Club.
A Mystery bag of five gifts!
We will notify Jane to let her know the good news!
Now you’ve read my blog, watched my intro and taken lots of advice and tips on board, you are fully prepped and ready to make a start on this month’s squares. You’ve got four whole weeks to get these squares knitted so that should be plenty of time before I send out the third instalment at the beginning of April. There won’t be an intro from me next month as it’s the big reveal of the Mystery Baby Blanket Club on 1st April. However, you will be able to catch up with all the latest Mystery Blanket Club news here in my written blog, so make a note on your calendar to come back to the blog to find out all you need to know about the next part of this unique knitting journey. Until then, take care, eat a ton of chocolate (Happy Easter everyone!) and keep those needles clicking away, bye for now, Debbie x
]]>
https://debbieabrahams.com/blogs/news/mystery-baby-blanket-club-2023-24-post-52024-01-02T00:00:00+00:002024-01-31T12:37:53+00:00Mystery Baby Blanket Club 2023/24: Mail Out 5Debbie AbrahamsHELLO AND WELCOME TO THE FIFTH BLOG OF THE 2023/24 MYSTERY BABY BLANKET CLUB! So far it’s been a cold and wet start to the year, with only an occasional glimmer of sunshine, and consequently I find myself in a seemingly never-ending bout of a nasty cold, which I just can’t shake off. However, looking on the bright side, it does mean I can snuggle up all day on the sofa with my knitting which is by far the best comfort, so I am sure this will help me hugely on my road to recovery.
If you are feeling fine and ready for your next batch of squares, then I have five more for you to knit this month. There is an intro vid from me (recorded pre-cold virus!), which is followed by some extra tips and advice about the squares to ensure you are prepped and ready for this instalment. Plus there is news of some forthcoming product launches in our online shop, and the chance for you to have another guess of the title of the blanket. Have you guessed what it is yet?!?
There are no new tech vids this month, but if you need a reminder of any of the techniques in the squares, then here is where you will find them:
How to knit intarsia (MO1 blog)
Picking up stitches to knit the next square (MO1 blog)
Mattress stitch (horizontal) (MO1 blog)
How to carry yarns up the side of the work (MO1 blog)
How to knit fairisle (MO1 blog)
How to add Swiss darning to your knitting (MO1 blog)
How to cable (MO1 blog)
How to knit a bobble (MO1 blog)
How to add Chain stitch to your knitting (MO2 blog)
MAIL OUT 5 HAS BEEN EMAILED TO ALL THE MEMBERS ON 1ST FEBRUARY, so if you can’t see an email from us, check your Spam folder as this is sometimes where it ends up.
The printed patterns have been posted to both the overseas and UK members, with the overseas posted on 23rd January, and the UK on the 29th January.
BEFORE I TALK ABOUT THIS MONTH’S SQUARES, I JUST WANTED TO LET YOU KNOW ABOUT TWO NEW LAUNCHES THAT ARE HAPPENING VERY SOON…
ON THE 2ND FEBRUARY WE ARE LAUNCHING PRE-ORDERS FOR OUR MOTHER’S DAY MYSTERY KNIT BOXES. This is a great gift idea which we have been selling in our online shop for the past couple of years, and as they have been so popular, we have decided to offer them to you again.
Each box includes eight gifts which include beauty, something sweet, a knitting accessory, stationery and a brand new knitting kit from Debbie’s fashion accessory collection. Everything in the kit is a ‘mystery’, so I am not going to tell you anymore about the contents, but all of the items in the box are different to what we put in them last year so it’s a whole new collection of goodies to treat yourself (or someone else) to.
We have a limited number of 100 boxes, so we are taking pre-orders for them and will prioritise the customers on a first-come first-served basis. The boxes will be shipped week commencing the 26th February so that they arrive in time before Mother’s Day on Sunday 10th March 2024 (UK).
THIS YEAR I WILL BE LAUNCHING MY FOURTEENTH MYSTERY CUSHION CLUB WITH APPLICATIONS OPENING ON THE 1st OF MARCH! So if you fancy a smaller project than a blanket (which is just as much fun!), then maybe this is just what you need to knit your way through the warm summer months into the Autumn.
Over the years I have designed a large collection of ‘mystery’ cushions with themes varying from all sorts of things from 1980’s geometric patterns to designs inspired by the ancient ruins in Greece. If you follow us on Instagram then you will be able to see images of each of the previous thirteen Mystery Cushions which I will post day by day in the lead up to the launch of our sign-ups opening on the 1st March. So do keep your eye on that if you are interested to see the whole collection to date.
Above: 2023 Mystery Cushion, 'Picnic Party'.
The 2024 Mystery Cushion Club begins mid-June and runs for five months until October. If you signed up to this year’s Mystery Blanket or Mystery Baby Blanket Club, you will get a discount on your 2024 Mystery Cushion Club membership. A knitting kit will be sent to each member which will include premium Rowan yarns, Debbie Abrahams beads and fastenings.
In next month’s blog I will tell you more about this year’s design, but for now I will leave you pondering over this new adventure which hopefully you feel as excited as me about and will decide to be part of…
SO NOW FOR THE TITLE OF THE MYSTERY BABY BLANKET! Correct guesses have been few and far between since last month, with just one correct answer sent in. It was Katie Mason who got it right with the help of her husband Phil.
Katie says:“I am not a word person, so I gave the challenge to guess the title to my husband Phil, the brains of our outfit. With this month’s clues he thinks he got it (and he did Katie!). It’s been great to involve him in my hobby. Love the blanket so far and looking forward to seeing the rest of it!”
So if you are still trying to guess what it is, perhaps another letter in the puzzle might help (there aren’t too many more to go!). This month I’m giving you the letter “M”:
_ O W / I / _ _ O W / M Y / _ _ _ ‘ _
If you think you know what it is, please email sue at sue@debbieabrahams.com and if your guess is correct we will (with your permission) publish your name in the next Baby Blanket blog. With just a couple more months of the project left, it won’t be too long before the title is revealed. But why not have one more go?!?...
THESE ARE THE FIVE SQUARES TO KNIT IN MAIL OUT 5:
Square 6: Snuggle 2 – cable and bobble pattern:
Square 7: The Letter ‘A’ – striped pattern with fairisle letter motifs (two colourways):
Square 26: The Letter ‘K’ – intarsia letter motif:
Square 27: The Letter ‘G’– striped pattern with fairisle letter motifs (two colourways):
Square 28: ‘D’ is for Dog! – intarsia dog motif with contrast coloured bobbles (two colourways):
On each pattern page there is a list of Pattern notes and tips that are worth reading before you start to knit each square. These bits of advice give you a pre-warning of what to look out for, as well as some useful information about how to knit each square. In the following notes below I am going to give you a few extra tips about the squares so that you can knit them with complete confidence.
SQUARE 6, SNUGGLE 2: you’ll recognise this cable pattern from a previous mail out, but look closely and you'll see that it is slightly different, with stitches crossed to the front instead of to the back.
Tech vids to watch for assistance with this square:
Picking up stitches to knit the next square (MO1 blog)
Mattress stitch (horizontal) (MO1 blog)
How to cable (MO1 blog)
How to knit a bobble (MO1 blog)
In this cable pattern all the cables twist to the left, which is what happens when you hold the stitches to the front. On page 18 you will find the explanation for ‘c7f’ - it is worked so that the centre stitch of the cable stays in the centre as you cross the stitches over. It is a very regular repeat pattern with a self-coloured bobble knitted in the middle of each cable. It can sometimes be tricky to get the edge stitches of a cable neat, so make sure that you pull the yarn firmly when changing from knit to purl or purl to knit when working the stitches between the cables.
You can choose to work from worded instructions or from a chart for this square. If you are new to working from a cable chart then it is a good idea to check each row as you knit it against the worded instructions, just to make sure that you are following it correctly.
SQUARE 7, THE LETTER ‘A’: this square is in the same style as Squares 1 and 29, with fairisle letters knitted into bands between garter stitch and stocking stitch stripes.
Picking up stitches to knit the next square (MO1 blog)
Mattress stitch (horizontal) (MO1 blog)
How to carry yarns up the side of the work (MO1 blog)
How to knit fairisle (MO1 blog)
Having knitted a variation of this square a few times before, you should find this one quite straightforward to do. There’s just the right amount of fairisle to keep you motivated (but not overworked!), with simple stripes to knit in between.
There are two colour options for this square so make sure that you follow the correct instructions for the colourway you are knitting. The fairisle bands are identical for both colourways, but the colours in the stripes differ. Colourway 1 (Silver) is always written first with any changes for Colourway 2 (Rosy) written afterwards in brackets and bold.
SQUARE 26, THE LETTER ‘K’: this is the fifth large letter motif in the design and is knitted in Cream and Camel to match the letter ‘P’ from Mail Out 3.
Tech vids to watch for assistance with this square:
Picking up stitches to knit the next square (MO1 blog)
Mattress stitch (horizontal) (MO1 blog)
How to knit intarsia (MO1 blog)
This is an intarsia pattern, so you will need to wind off small balls (or bobbins) of yarn to knit each section of colour to achieve a single thickness multi-coloured fabric. My suggestion is to use three balls of Cream and two of Camel. With Cream being the background colour and therefore used in larger quantities than Camel, you could wind off just two bobbins of this colour and work from the ball of Cream for the third. This is what I did and it worked really well.
When you reach Chart Row 24 you can reduce the number down to one bobbin/ball of Camel and two of Cream, and then reintroduce the others again on Chart Row 26.
There is a half-page Notes section on page 11 which could be useful if you want to write down how you knitted this square, and on which rows you joined in the yarns.
SQUARE 27, THE LETTER ‘G’: this square is similar to Squares 9, 13 and 23 but this time you are knitting ‘G’s instead of ‘T’s, ‘F’s and ‘U’s.
Tech vids to watch for assistance with this square:
Picking up stitches to knit the next square (MO1 blog)
Mattress stitch (horizontal) (MO1 blog)
How to carry yarns up the side of the work (MO1 blog)
How to knit fairisle (MO1 blog)
This square is the fourth and final one in this set and should be one of the easier ones to knit this month as you’ll be familiar with the pattern. There are two colourways with the variations clearly visible in the images of the squares on page 12. Note that there are two charts (on page 13) – one for each of the two colourways. And if you are in any doubt, take a look at squares 9, 13 and 23 that you’ve already knitted as these are very similar to this square.
SQUARE 28: ‘D’ IS FOR DOG!: so here’s the cute square for this month, a jolly little dog who can’t wait for you to knit him – woof!
Tech vids to watch for assistance with this square:
Picking up stitches to knit the next square (MO1 blog)
Mattress stitch (horizontal) (MO1 blog)
How to knit intarsia (MO1 blog)
How to add Swiss darning to your knitting (MO1 blog)
How to add Chain stitch to your knitting (MO2 blog)
The dog is knitted using the intarsia technique, so it requires bobbins or small balls of wool to knit it. To cut down on the number of balls, I knitted the section in Silver/Vintage Pink minus the nose and mouth and embroidered these on afterwards using Swiss darning. Not only was this easier to do, but it made the nose and mouth sit slightly proud on the knitting which I think works well for these details on the dog’s face. So if you decide to do this you will need six bobbins to knit this square – two of Duckling, one of Silver/Vintage Pink, one of Puddle/Rosy and two of Taupe.
You might also want to Swiss-darn the letter ‘D’ depending on whether you think you can get it to look neater this way. I Swiss-darned all of the letters onto my squares, so I will continue to do this so that they all look the same.
Other things to watch out for are the few reverse stitches (knit on RS, purl on WS), around the nose. And there are two contrast-coloured bobbles as well to knit in. Two separate ends of Sea Green are purled on chart row 24 so that you have them in place to knit the bobbles on the next row up. If you need a reminder of how to knit a contrast coloured bobble, you can scroll back to my 2023 Mystery Blanket for some assistance: https://debbieabrahams.com/blogs/news/mystery-blanket-club-2023-post-1-february
THE MYSTERY CLUB MEETINGS AT ‘YARN LOFT’ IN NOTTINGHAM WILL RESTART THIS MONTH. So this is great news if you live close to Nottingham and fancy a knit and a natter while you knit up your blanket squares. Usually the meetings are held on the first Wednesday of the month, however, as we are launching the 2024 Mystery Blanket Club on the 16th February, I am going to talk to Doreen to see if we can schedule in the first meeting on Wednesday 21st. Within the next couple of weeks we will send an email all our members to see who is interested in attending. And then hopefully I will get to see some of you in a few weeks’ time. It will be the ideal opportunity to bring along your completed (or uncompleted!) 2023 Mystery Blanket to show to the group, as well as your Baby Blanket squares and the new squares for 2024 to knit.
Yarn Loft is at 118 Hucknall Road, Carrington, Nottingham, tel number 07825 702433, website: www.yarnloft.co.uk. Meetings are held between 4-6pm and to cover the costs of hosting the meeting there is a small sub to pay (£3.00), which can be paid to Doreen on the day.
I hope you will be able to join me!
FOLLOW US AND JOIN IN ALL THE FRIENDLY BANTER ON OUR SOCIAL MEDIA PLATFORMS!
If you are not already a Ravelry member, then it is very easy (and free!) to join. Just follow the instructions on their website: http://www.ravelry.com
The Debbie Abrahams Mystery Knitters group on Facebook is another fun way to keep in touch with other members. It was set up a couple of years ago and has grown in size to over 500 members, so that’s well worth joining too.
We also have our own Facebook page where you will find regular updates on everything we are doing from knitting kits to workshops and events!
Instagram: debbieabrahams_knitting
Pinterest: debbieabrahams@debbieabrahamsk
Facebook: Debbie Abrahams Mystery Knitters
Facebook: Debbie Abrahams Handknits
Ravelry: Debbie Abrahams Handknits
With just two more instalments to go after this, we are fast approaching the end of our Mystery Baby Blanket adventure for this year, but there is still plenty more in store with some new squares plus the edging to come. Next month you will complete two strips and will therefore be able to make a start on sewing them together, so I will include some hints and tips about that in the March blog. And if at this point you are still trying to guess the title, then all will be revealed in the final instalment in April, so that’s not too far away now! Have a great knitty February everyone and I’ll see you back here next month! Debbie, x
]]>
https://debbieabrahams.com/blogs/news/mystery-babyb-blanket-club-2023-post-4-mo42024-01-01T00:00:01+00:002024-01-01T00:30:48+00:00Mystery Baby Blanket Club 2023/24: post 4, Mail Out 4Debbie AbrahamsHAPPY NEW YEAR AND WELCOME TO THE FOURTH MBBC23 INSTALMENT! I hope that you have had a fabulous Christmas and are looking forward to a busy and creative 2024!
We managed to take some time off to spend with the family and are continuing to enjoy some downtime before Seth returns to school on the 4th January. And if you’re still on your hols too, then what better way to begin the new year than with a whole new batch of squares to knit!?! So settle down with some festive treats and a cuppa and indulge yourself in all that gorgeous yarn…
There is no intro from me this month and no new tech vids. But remember that all of these vids are available to view any time during the project if you need a helping hand:
How to knit intarsia (MO1 blog)
Picking up stitches to knit the next square (MO1 blog)
Mattress stitch (horizontal) (MO1 blog)
How to carry yarns up the side of the work (MO1 blog)
How to knit fairisle (MO1 blog)
How to add Swiss darning to your knitting (MO1 blog)
How to cable (MO1 blog)
How to knit a bobble (MO1 blog)
How to add Chain stitch to your knitting (MO2 blog)
MAIL OUT 4 HAS BEEN EMAILED TO ALL THE MEMBERS ON 1ST JANUARY, so make sure that you check your inbox for your latest batch of patterns.
The printed patterns for both overseas and UK members were posted just before the Christmas break on the 22nd December. So all being good with the postal systems around the world, they should be arriving with you soon.
IF YOU HAVEN’T MADE A NEW YEAR’S RESOLUTION THEN MAYBE THIS IS ONE YOU CAN MAKE (IF IT’S NOT TOO LATE!) – BLOCKING AND PRESSING! I talked about this in the first blog back in October, so hopefully you are all doing this as it really does finish the squares beautifully – and you will be so much happier! But in case you need a reminder of some of the key points about blocking and pressing, here is a summary of both techniques:
Blocking is the pinning out of your knitting, and, unless instructed otherwise, you should always pin it out with the wrong side facing upwards. Pin frequently along each edge, keeping all four edges as flat and even as possible. There is no need to use heat to press your squares. Much more preferable – and safer too – is cold water. So, if you have one available, fill up a plant spray bottle and use this to generously wet down the knitting, making sure that the water is dispersed right across the knitting from edge to edge. And then leave it to dry completely before removing the pins.
Pressing is the process of applying either heat or water to your knitting which relaxes the stitches and softens the fibres, resulting in a much more fluid and pleasant feeling fabric. After pressing you will find that your knitting drastically changes in quality and will feel beautiful and soft.
Blocking and pressing also helps the edges of the knitting stay flat rather than curling over, as is the tendency with most stitch structures.
Above: a Mystery Blanket square blocked out on a June Tailor blocking board.
I would suggest that you block and press your squares after you have knitted each one. I think it’s far easier to do this as you go along rather than leaving them all to the end. It also ensures that as you work through the squares, they are all knitting up to the correct measurements.
IF YOU FANCY A NEW YEAR SHOP WITH A GREAT DISCOUNT THEN KEEP AN EYE OUT FOR OUR ONLINE SALE WHERE YOU WILL FIND UP TO 35% OFF SELECTED LINES WHICH INCLUDE:
20% off all our DEBBIE ABRAHAMS BEADS:
Our sparkling beads are great to add to any project for a touch of glamour and we have a huge collection of over fifty beautiful colours in both sizes for you to choose from:
35% off all our DEBBIE ABRAHAMS LIGHT MERINO DK YARN:
You can pair up our beads with Debbie’s Merino Light DK yarn and make yourself something really wonderful in the new year. Choose any quantity from our collection of seven beautiful shades: Topaz, Coral, Serpentine, Turquoise, Garnet, Amethyst (above), and Tanzanite.
This UK produced yarn is lightweight double-knitting and is made from 100% wool. It is a great yarn for knitting and crocheting all sorts of projects from small accessories to garments.
STAR BUNDLE BUY!
For every five balls of Merino Light DK and one pack of beads purchased we will give you a Let It Snow Mitts free download pattern!
20% off FESTIVE MYSTERY BOXES:
If you didn’t grab yourself a Festive Mystery Box, then the good news is that we have a few left, but not for long! Each box contains ten ‘mystery’ gifts, which includes a new festive knitting kit using Rowan Yarns designed by Debbie.
20% offWINTER WONDERLAND SOCKS:
Our unique range of ready-to-wear Winter Wonderland socks are the perfect way to keep your feet warm instantly, and you can grab yourself a pair (or three!) to enhance your winter wardrobe. Choose from three designs: Rockin’ Around, Winter Ball and Oh Tannenbaum!
The sale will begin in a few days time, but we will send you an email as soon as it launches, so keep an eye on your inbox!
OUR FURRY FRIENDS GALLERY IS NOW LIVE ON OUR WEBSITE! So thank you to everyone who sent in their pics and words to create such a wonderful gallery of knit-happy pets! It was absolutely delightful to see all your gorgeous furry friends keeping you company as you knitted your way through the past year. You can find the Furry Friends Gallery in our blog, so pop across and have a peek if you want to see some really cute pics of cats and dogs enjoying all things knitting!
HAVE YOU MANAGED TO GUESS THE TITLE OF THE MYSTERY BABY BLANKET? The guessing game is over for Kelly Symons, Valerie McNulty and Helen Jackson who all got it right, so well done to all of you! But if you are still guessing then there are lots of clues in the squares you’ve knitted so far, plus here's another letter which might help as well. This month I’m giving you the letter “W”:
_ O W / I / _ _ O W / _ Y / _ _ _ ‘ _
If you think you know what it is, please email sue at sue@debbieabrahams.com and if your guess is correct we will (with your permission) publish your name in the next Baby Blanket blog. What a great start to 2024 that would be!
THESE ARE THE FIVE SQUARES TO KNIT IN MAIL OUT 4:
Square 4: Love You 2 – lace heart motif:
Square 5: The Letter ‘H’ – intarsia letter motif:
Square 11: The Letter ‘M’– striped pattern with fairisle letter motifs (two colourways):
Square 12: ‘I’ is for Ice Cream! – intarsia ice cream motif with a contrast coloured bobble (two colourways):
Square 13: The Letter ‘F’ – striped pattern with fairtisle letter motifs (two colourways):
On each pattern page there is a list of Pattern notes and tips that are worth reading before you start to knit each square. These bits of advice give you a pre-warning of what to look out for, as well as some useful information about how to knit each square. In the following notes below I am going to give you a few extra tips about the squares so that you can knit them with complete confidence.
SQUARE 4, LOVE YOU 2: we begin with a reknit of a previous square, but there is change to the colour – Camel is swapped for Taupe.
Tech vids to watch for assistance with this square:
Picking up stitches to knit the next square (MO1 blog)
Mattress stitch (horizontal) (MO1 blog)
How to knit a bobble (MO1 blog)
The heart motif is created by knitting basic lace stitches (K2tog, yf, skpo and sk2po) with a self-coloured bobble in the centre. The Abbreviations list on page 19 gives instructions for all these if you get stuck. But with the exception of sk2po, they are all commonly used in knitting patterns. There are a few variations of sk2po (one being s2kpo), but the one I have used results in the decreased stitches sitting vertically rather than on a slant.
You can choose to work from worded instructions or from a chart for this square. If you work from the chart, just make sure that you make the necessary needle size changes as given on page 7. They are for the moss stitch borders which frame the heart motif at the top and bottom of the square.
SQUARE 5, THE LETTER ‘H’: this large letter intarsia motif joins the ‘P’, ‘Y’ and ‘S’ you have already knitted so far and is knitted in the same colourway as ‘S’ - Ducking and Sea Green.
Tech vids to watch for assistance with this square:
Picking up stitches to knit the next square (MO1 blog)
Mattress stitch (horizontal) (MO1 blog)
How to knit intarsia (MO1 blog)
As with all of the other large letter motifs, it is important that the intarsia technique is used to knit this square, and not be tempted to carry yarns across the back of the work. So although it only uses two colours, I would suggest that you use five bobbins of yarn (or separate balls), split as follows: three of Duckling and two of Sea Green.
When you reach Chart Row 21 you can reduce the number down to two bobbins/balls of Duckling and one of Sea Green, and then reintroduce the others again on Chart Row 28.
If you scroll back to the Mail Out 1 blog, there is a tech vid for intarsia if you need a reminder of the technique. The key thing to remember is to cross the yarns over each other every time you change colour as this will prevent holes, thus creating a smooth transition from one colour to the next. This needs to be done every time you change colour.
There is a half-page Notes section on page 10 which could be useful if you want to write down how you knitted this square and on which rows you joined in the yarns.
SQUARE 11, THE LETTER ‘M’: this is the sister square to Square 25, but instead of knitting the letter ‘N', you are knitting the letter ‘M’.
Picking up stitches to knit the next square (MO1 blog)
Mattress stitch (horizontal) (MO1 blog)
How to carry yarns up the side of the work (MO1 blog)
How to knit fairisle (MO1 blog)
Two narrow bands of fairisle are divided between rows of striped garter stitch and stocking stitch. There are a few needle size changes which chop and change throughout the square, and these are essential to maintain an even tension - garter stitch has a looser stitch tension than stocking stitch and therefore requires a smaller needle, whereas fairisle has a tighter stitch tension and requires a larger needle. So although it might be a bit of a nuisance to keep changing over the needles, it is essential to do this when instructed to achieve the correct length and width.
There are two colour options for this square so make sure that you follow the correct instructions for the colourway you are knitting. Colourway 1 (Silver) is always written first with any changes for Colourway 2 (Rosy) written afterwards in brackets and bold.
SQUARE 12: ‘I’ IS FOR ICE CREAM: get your taste buds going this month with a blueberry (or bubblegum!) flavour ice cream, complete with a chocolate bobble!
Tech vids to watch for assistance with this square:
Picking up stitches to knit the next square (MO1 blog)
Mattress stitch (horizontal) (MO1 blog)
How to knit intarsia (MO1 blog)
How to add Swiss darning to your knitting (MO1 blog)
The ice cream is knitted using the intarsia technique and requires two bobbins of yarn (or separate balls) of Cream, one of Camel and one of Heavenly. There are textured stitches on the cone that you can see clearly on both images on page 13 and on the charts on page 14. It’s actually pretty straightforward to knit with no awkward shapes to have to deal with. And if you don’t fancy knitting in the three hearts and the letter ‘I’, then these can be added to the square afterwards using Swiss darning. If you decide to Swiss darn these details, block and press the square before doing the embroidery as it will make the surface of the knitting flatter to work on. You can also block and press it again after embroidering, if desired.
SQUARE 13, THE LETTER ‘F’: this square is similar to Squares 9 and 23 but this time you are knitting ‘F’s instead of ‘T’s and ‘U’s.
Tech vids to watch for assistance with this square:
Picking up stitches to knit the next square (MO1 blog)
Mattress stitch (horizontal) (MO1 blog)
How to carry yarns up the side of the work (MO1 blog)
How to knit fairisle (MO1 blog)
Having knitted squares similar to this twice before, this one should be familiar to you and therefore an easy one to knit. Just remember the needle size changes – there are three – to maintain a neat and even tension throughout the whole square.
FOLLOW US AND JOIN IN ALL THE FRIENDLY BANTER ON OUR SOCIAL MEDIA PLATFORMS!
If you are not already a Ravelry member, then it is very easy (and free!) to join. Just follow the instructions on their website: http://www.ravelry.com
The Debbie Abrahams Mystery Knitters group on Facebook is another fun way to keep in touch with other members. It was set up a couple of years ago and has grown in size to over 500 members, so that’s well worth joining too.
We also have our own Facebook page where you will find regular updates on everything we are doing from knitting kits to workshops and events!
Instagram: debbieabrahams_knitting
Pinterest: debbieabrahams@debbieabrahamsk
Facebook: Debbie Abrahams Mystery Knitters
Facebook: Debbie Abrahams Handknits
Ravelry: Debbie Abrahams Handknits
IT’S NOT TOO LATE TO SEND IN YOUR PHOTOS FOR THE MEMBERS GALLERY! This is an invitation to all of you to send in pics of your completed Debbie Abrahams projects (mystery and non-mystery projects are welcome!) and share your knitting achievements from the past year with knitters and makers worldwide. It is always such a joy for me to see what you’ve been creating over the past twelve months, and it is inspiring for others to see what is possible. So if you’ve got something to share, please send in your pics with a few words straight to me at debbie@debbieabrahams.com and I will be delighted to include your wonderful work in the Members Gallery later on this month. Please send your pics uncropped and in their ‘raw’ state as that makes it easier for me to make any necessary edits at my end. Thank you!
May I take this opportunity to wish you all a very Happy New Year and best wishes for a busy and super creative 2024! I love the start of a new year with the prospect of exciting new ventures, and of course there is plenty coming out of our design studio with the 2024 Mystery Blanket Club beginning soon and sign-ups for the 2024 Mystery Cushion Club opening up at the beginning of March. I have been working on some new kits too, plus we have some exciting knitting events and holidays being planned, so there’s plenty to keep you inspired and knit-happy throughout the next year! Have a fabulous New Year, wherever you are and whoever you are spending it with. And we’ll catch up again at the beginning of February, Debbie x
]]>
https://debbieabrahams.com/blogs/news/furry-fre2023-12-31T07:00:00+00:002023-12-31T07:00:00+00:00Furry Friends Gallery!Debbie AbrahamsHELLO AND WELCOME TO THE FURRY FRIENDS GALLERY! It’s always fun to see which furry friends have been keeping you company while you knit up your projects, and over the past few years these gorgeous pets have been snapped and sent in to be shared with everyone! So here they are, our best friends, helpers (and hinderers!)...
Violet sent in by Susan Cumming from Gainesville, Florida, USA:
“I couldn’t pass up the chance to send Violet’s photos for your gallery. The first is Violet on “Mars” in a glam shot taken at her Spa. Next is Violet relaxing on Deco Dreams. She is two years old now and has given up chasing yarn to sit by my side as I knit. Violet is a real treat, keeping me on my toes everyday. As is often said about Scotties: she is the Queen and I am her loyal subject!”
Lodger, Lovely Boy, Sweetie Pie, sent in by Andrea Surgeoner from Bude, Cornwall, UK:
“This magnificent beast adopted us at the beginning of the first lockdown. He had been living on the golf course, which is close to our house but, when the course closed for the lockdown and he no longer had golfers to feed him, he decided he’d like to come and live with us. He has excellent taste in sleeping places and is often to be found on one of your mystery blankets on our bed. He doesn’t have a name, and my husband insists that we shouldn’t name him as he isn’t ours. I think the cat would disagree. My husband calls him Cat but my friend Christina refers to him as the Lodger and I think that suits him very well. I’m also given to calling him Lovely Boy, Sweetie Pie, and things like that!”
Sebastian sent in by Catherine McDonald from Kettering, Tasmania:
“Sebastian is a bit of a star of the Facebook Mystery Blanket group, usually photographed with knitting displayed on his back!”
Orla & Flossie and Finan sent in by Catherine Pope from Nottingham, UK:
“Here are Orla (Border Terrier) and Flossie (cat) vying for attention with my knitting!
And this is Finan. He’s keen to get on the knitting support rota!”
Daisy Steiner sent in by Deborah Steiner from Yarmouth, Massachusetts, USA:
“This is Daisy Steiner!”
Abby sent in by Brynne Baruch from Lewes, Delaware, USA:
“Sometimes they just guard the knitting…your Precious Earth blanket under construction…"
Edward and Roo sent in by Jo Boraston from Canterbury, Kent, UK:
“Here is Edward helping me with my Mystery Blanket!
And here is Edward's Mum Roo. We have had them just over four years, Roo was only 6 months old when she had her kittens. We adopted the two of them together, her other two kittens were also rehomed as a pair. She’s not interested in my knitting today, although she has just stolen my seat!”
Lottie sent in by Phyllida Bardsley from Penrith, UK:
“This is my dog Lottie saying it’s time for a walk!”
Spot sent in by Jan Trapp from Mendota Heights, Minnesota, USA:
“Spot sits on my shoulders while I (try to!) knit!”
Chico sent in by Margaret Crompton from Southsea, UK:
“This is my three-year old Chihuahua, fresh from the groomers. He loves playing with wool if I inadvertently let it fall on the floor, and beads have to wait until he’s asleep. Otherwise he lets me get on with my knitting in between walks. This is my first Mystery Blanket and I’m loving it!”
Freddy sent in by Jane Mckeag from Las Vegas, Nevada, USA:
“Here is Freddy, lounging on handknits. It’s Janie Crow’s Norwegian pillow, a pillow from the Shetlands, and a bright Afghan with Noro wool. The other is a temperature blanket made with Felted Tweed using a Kaffe Fassett pattern. I was actually knitting my October squares with him at my side. I love this blanket and it’s much too nice for Freddy!”
Ollie and Theo sent in by Robyn Tommasini from Toronto, Ontario, Canada:
“Please meet Ollie. He’s one of my fur babies who likes to help me knit my blanket. He’s such a cuddle bug and loves to sit on my lap while I knit. He’s not thrilled however when the yarn tickles him. My other pup, Theo, likes to sit near me but doesn’t like to sit on me while I work.
I finally got my two furry bumpkins together on my blanket. Ollie is on the left and Theo is on the right. They are the best of buddies and like to interrupt my knitting whenever possible, especially Theo. He’ll bring me his dog toys to try to distract me and get me and Ollie to try to play. With Ollie, I need to hide my wool away because, like a cat, he’ll throw it around until it’s a knotted mess. Luckily he hasn’t got hold of any of my MB wool!”
Sammy sent in by Helen Jackson from Burnaby, British Columbia, Canada:
“Our wee 16-year-old cat Sammy, still loving this part the best!”
Sadly, Helen’s much-loved and cherished Sammy passed away recently, but she wanted to share some of these lovely pictures of Sammy enjoying all the wonderful things that she’s knitted over the years:
Bruno sent in by Barbara McKeown from Norwich, UK:
“Here’s Bruno and bug watching Wimbledon!”
Lani and Ruby sent in by Kelly Symons from Alexander, Arizona, USA:
“I just wanted to share with you my knitting support group that I have here at home. Lani the cat is always encouraging me to find more knitting time and of course she helps to unravel the yarn! She is a hot mess and totally has my heart!
But there is a bit of competition when it comes to my knitting time - Ruby the beagle is always ready to assist. Thank you for designing such beautiful blankets that allows us so many knitting hours together.”
Bruno sent in by Christine Thomas from Weston Super Mare, UK:
“My furry friends are a large number of teddy bears. I don't know whether these count but they always bring me joy on dark days. The attached photo shows Bruno who carries the scars from a number of fights. Bruno is jealously guarding the Bracken square as he has decided this pattern would be just the thing for a jaunty new waistcoat!”
It has been an absolute joy to share all these wonderful pics of your furry friends, so I want to send a big thank you to everyone who contributed to the gallery. I wish you and all your amazing pets the most fabulous 2024, and may it bring lots more happy hours of knitting alongside your loved ones!
]]>
https://debbieabrahams.com/blogs/news/mystery-baby-blanket-2023-post-3-mo32023-12-01T00:00:26+00:002023-12-01T00:01:32+00:00Mystery Baby Blanket 2023: post 3, Mail Out 3Debbie AbrahamsWELCOME TO THE THIRD INSTALMENT OF THE 2023 MYSTERY BABY BLANKET CLUB! The weather has taken a real turn here in the UK and this morning I woke up to clear blue skies and a thick frost. I love this time of year when winter begins to take hold and the whole landscape changes. It’s the perfect climate for knitting, and with five more squares to knit this month, what could be better than settling yourself in your most comfy chair, needles in hand, ready to make a start!
I’ve recorded an intro to this month’s blog which I hope you will tune into and give a listen before you read my blog. As well as talking about the squares and what this third instalment has in store for you, I have lots of other exciting things to tell you about, including some lovely gift ideas for the festive season. So simply click on the link below, sit back and enjoy!...
There are no new tech vids this month, but if you need a reminder of any of the techniques that you’ve come across so far, this handy list will help you to locate what you are looking for:
Debbie’s intro! (MO1 blog)
How to knit intarsia (MO1 blog)
Picking up stitches to knit the next square (MO1 blog)
Mattress stitch (horizontal) (MO1 blog)
How to carry yarns up the side of the work (MO1 blog)
How to knit fairisle (MO1 blog)
How to add Swiss darning to your knitting (MO1 blog)
How to cable (MO1 blog)
How to knit a bobble (MO1 blog)
How to add Chain stitch to your knitting (MO2 blog)
I SAID IN MY INTRO VID THAT THERE IS A LINK TO A PREVIOUS MYSTERY BLANKET BLOG FOR THE CABLE TECH VID, however, it is actually included in the first Mystery Baby Blanket blog, so you will find it in the tech vids in Mail Out 1
I ALSO SAID THAT THE CHAIN STITCH AROUND THE OWL’S EYES IS IN PUDDLE/ROSY, but it’s actually in Heavenly for both colourways. It’s the bobbles which are in Puddle/Rosy. So the pattern instructions are correct – it’s what I say that is wrong, oops!
MAIL OUT 3 HAS BEEN EMAILED TO ALL THE MEMBERS ON 1ST DECEMBER. So if you have not already checked your inbox, you should find it waiting in there for you.
The printed patterns for members who paid for them have been posted, with the overseas sent on the 22nd November and the UK on the 28th November. If you did not sign up for printed patterns but have changed your mind, contact Sue and she will be able to set this up for you for an additional cost.
Don’t forget that each month you can also download the patterns from your Debbie Abrahams account.
Under "MYSTERY CLUB DOWNLOADS" click "View all downloads"
Your latest available mail-outs will be visible here in PDF format to download
BEFORE I TALK TO YOU ABOUT THE SQUARES YOU ARE KNITTING THIS MONTH, I WANT TO TELL YOU ABOUT SOME GREAT FESTIVE GIFT IDEAS WHICH MIGHT SOLVE SOME OF THOSE HARD-TO-FIND THINGS ON YOUR SHOPPING LIST…
WINTER WONDERLAND READY-TO-WEAR SOCKS: I have teamed up with UK high-street sock designer, Julie Cox Queen of Socks, to create a set of three socks inspired by my 2019 Mystery Blanket, Winter Wonderland. They are machine-knitted in a fine gauge in premium super soft cotton, with a touch of sparkly metallic fibre to represent the sparkly beads in Winter Wonderland. So there’s no need to sit for hours knitting a pair of socks –put these straight on and your feet will be cosy and warm instantly! You can buy them individually or in bundles of two or three – the more you buy, the bigger discount you get.
Choose from three designs, (left to right): Rockin' Around, Winter Ball, Oh Tannenbaum!
FESTIVE MYSTERY KNIT BOXES: these have been selling fast but we have some left – but not for long! So if you fancy a treat for yourself (go on – you deserve it!), or you have a knitting friend you need to buy a gift for, then grab yourself one of our boxes before they sell out.
In each box there are ten gifts including beauty, home décor, something sweet to eat, knitting accessories and a new festive knitting kit using Rowan yarn designed by Debbie. The ‘mystery’ is that you don’t know what is in the box until you open it, so it really is a box full of surprises! (All boxes have the same contents).
Price: £69.95 (exc. Shipping).
FESTIVE KNITTING KITS – 10% OFF UNTIL 16TH DECEMBER: we have a fabulous offer at the moment on all our festive knitting kits, so you can grab yourself some seasonal home or fashion accessories at a reduced price. Whether it’s something for the festive table or an accessory to add to your winter wardrobe, there are many lovely sparkly things to choose from including our super soft Snowflake Cowl, Mini Festive Stockings, Let It Snow Mitts, Festive Bunting and Mini Festive Favour Bags. Here are a selection of the kits that are currently on offer:
BEADYKNITS CHRISTMAS TREE DECORATION: Jenny has been busy again making some wonderful festive decorations to add to her colourful handknit collection, and she is delighted to share with you her latest creation, this lovely Christmas Tree!
Jenny says:“My Christmas Tree Decoration is quick and easy to knit as the beads are threaded on so you can decorate the branches as you knit it! Adorn your own Christmas tree with this hand-made creation, hang it on a chair or give it as a gift to someone special.”
Kit price (kit makes two trees): £16.00 (exc. shipping which is calculated at point of order).
This kit is only available to purchase through BeadyKnits and not through the Debbie Abrahams website. To order your kit today, contact jenny@beadyknits.com to pay by Paypal. Or visit her shop on Etsy where you can purchase this kit and see all of the other lovely kits she has for sale: https://www.etsy.com/uk/shop/BeadyKnitsByJenny?
2024 MYSTERY BLANKET MEMBERSHIP: if this is something you’ve been meaning to do, then you have just one more month to get yourself signed up to next year’s Mystery Blanket. What could be better than having a whole knitting kit packed with gorgeous yarns and sparkly beads delivered to your doorstep, and patterns arriving in your inbox every month from February to November!
So what’s in store for 2024?
I am absolutely thrilled to be using my own bespoke Light Wool DK yarn again for this project which has been produced by the wonderful team at Laxtons in North Yorkshire, UK. I have combined it with a selection of my most favourite Rowan yarns including Felted Tweed, Alpaca Soft, Kidsilk Haze and Soft Yak. Vibrant shades of teal and ocean blue graduate into bold purples and pinks, which are softened with pale turquoise, dreamy lilac and blush pink laced with flecks of cool silver and pale gold. There are plenty of sparkling beads in it too!
The blanket design includes the techniques of intarsia, fairisle, lace, textured stitches, stripes and beads, offering you a feast of squares to knit up over ten months. And there will be a choice of two options - as there is this year - for the trickier squares (fairisle and intarsia), enabling both novice and experienced knitters to participate in this unique knitting experience.
My monthly tech vids have been extremely popular this year, so I am pleased to say that I will continue with them in a dedicated monthly blog so that you have all the help and support you need as you work your way through the forty-nine squares.
The club begins on 1st February 2024 and runs for ten months until November 2024.
The finished size of the blanket is approximately 135cm x 135cm.
What does my membership include?
Each member will receive a knitting kit which includes over forty balls of premium quality yarn, ten sets of emailed patterns (with the option to purchase additional printed patterns), Debbie Abrahams size 6 beads and a woven label. The kit will be posted in two halves with the first one delivered in February, followed by the second one in May.
NEW! Download pattern option
For the first time we are offering the ten sets of patterns as monthly downloads enabling you to use yarns and beads from your own stash to knit the blanket. The list of yarns and beads for the first part of the kit will be released a week before the project begins. If you decide to purchase the yarn and beads for the project yourself, the cost of all the materials, like for like, is approximately £340. We are unable to guarantee that all of the colours in my Light Merino DK yarn will be available to purchase so substitutes may have to be used.
Choose to spread the cost of your payment
For those who would prefer to pay in instalments we have an easy-to-use payment system in place called Splitit which enables you to make your payment between 2-4 months. This means you can secure your membership today with a deposit with nothing more to pay until next month. Simply select Splitit at checkout when you make your first payment and then your remaining payments will be taken automatically from your account.
How do I make my purchase?
It’s really easy. You just need to visit the shop on our website and there you will find the 2024 Mystery Blanket Club for sale. There are several options to choose from starting with the basic package which includes the full knitting kit and emailed monthly pattens. Or you can upgrade and add on printed patterns (UK and overseas), and/or Special Delivery (UK only). All overseas parcels are posted by Tracked International Delivery.
Memberships are limited and when they have sold out the club will be closed. The patterns are exclusive to members only, so if you want to be part of this unique knitting experience and don’t want to miss out on all the fun and excitement next year, pop across to our shop and get yourself signed up today. And then you’ll have peace of mind that you are onboard again for another great knitting adventure with me next year!
GUESSING THE TITLE OF THE MYSTERY BABY BLANKET IS PROVING TO BE A BIT OF A CHALLENGE THIS YEAR, AND CORRECT GUESSES HAVE BEEN FEW AND FAR BETWEEN! In the past month we have had no correct guesses sent in, so I am giving you another letter in the puzzle below in the hope that it might generate some ideas. The letter I am giving you this month is “Y”:
_ O _ / I / _ _ O _ / _ Y / _ _ _ ‘ _
Any ideas?!? With another letter revealed, perhaps you’ll have a fabulous lightbulb moment! If you do and you think you know what it is, please send your guesses to Sue at sue@debbieabrahams.com. And with your permission we will publish your name in the next Mystery Baby Blanket blog. Wouldn’t that be great!
THESE ARE THE FIVE SQUARES TO KNIT IN MAIL OUT 3:
Square 1: The Letter ‘V’ – striped pattern with fairisle letter motifs:
Square 2: Hug – cable pattern:
Square 3: ‘O’ is for Owl! – intarsia owl motif with chain stitch details:
Square 9: The Letter ‘T’ – striped pattern with fairisle letter motifs:
Square 10: The Letter ‘P’ – intarsia letter motif:
On each pattern page there is a list of Pattern notes and tips that are worth reading before you start to knit each square. These bits of advice give you a pre-warning of what to look out for, as well as some useful information about how to knit each square. In the following notes below I am going to give you a few extra tips about the squares so that you can knit them with complete confidence.
SQUARE 1, THE LETTER ‘V’: if you think back to the first mail out and Square 29, this one should ring a few bells as it is the same stripe pattern, but you are knitting ‘V’s instead of ‘Z’s.
Tech vids to watch for assistance with this square:
How to carry yarns up the side of the work (MO1 blog)
How to knit fairisle (MO1 blog)
There are several needle changes in this square, so make sure you watch out for them in the pattern instructions (they are in bold so you can see them more easily).
The stripe pattern is a simple one and combines stocking stitch stripes with garter stitch stripes. The trickier bits to knit are the two bands of fairisle. But if you’ve knitted Square 29 you will find that this is very similar. And if you need any advice about the fairisle technique then my tech vid is there to remind you of how to strand and weave in yarns.
There are two colourways for this square, but the fairisle chart is the same for both. You will find this on page 7 of Mail Out 3.
SQUARE 2, HUG: this cable pattern combines c4b and c4f to create a bulky, cosy cable that feels like a super big hug!
Tech vids to watch for assistance with this square:
Picking up stitches to knit the next square (MO1 blog)
Mattress stitch (horizontal) (MO1 blog)
How to cable (MO1 blog)
It says in the description of this square (under the title on page 8), that it is a cable and bobble pattern, but this is a typo – there are no bobbles – so you can ignore that and be sure that you’re not missing anything!
You are offered this pattern as both worded instructions and a chart, so feel free to choose whichever suits you best to work from. If you are new to cable charts and feel a little daunted by them, then this is the perfect opportunity to give it a go. It is a simple chart with minimal symbols and a strong pattern repeat which makes it easy to follow. And if you do find yourself in a pickle, you can check what you’re doing with the worded instructions which are written so that they correspond row by row with the chart.
I have added the explanation for ‘c4b’ (cable four stitches to the back) and ‘c4f’ (cable four stitches to the front), to the Abbreviations section towards the back of Mail Out 3 on page 19. It might look like a complicated cable pattern to knit but it’s actually very simple – both cables are worked side by side, right next to each other, with six rows between the twists. And if you are in any doubt, my tech vid which shows the basics of how to knit a cable, is there for your perusal.
SQUARE 3, ‘O’ IS FOR OWL!: this is the picture knit for this month and this little owl can’t wait for you to start knitting him! It gives you another chance to practice your intarsia skills, which must be getting good by now as this is your third intarsia square in the blanket.
Tech vids to watch for assistance with this square:
Picking up stitches to knit the next square (MO1 blog)
Mattress stitch (horizontal) (MO1 blog)
How to knit intarsia (MO1 blog)
How to add Swiss darning to your knitting (MO1 blog)
How to add Chain stitch to your knitting (MO2 blog)
So there’s a few things to think about here, including the textured stitches on the chest of the owl (which are represented in the chart by an ‘X’), the contrast-coloured bobbles for the eyes, and the embroidery. You are going to have to make the decision before you begin as to whether you are going to knit in the small details – feet, stars, moon, beak, ears and the letter ‘O’ – or whether you are going to embroider them on afterwards using Swiss darning. I decided to embroider mine as I found it easier and neater than knitting them in. But you need to do whatever is best for you and gives you the best result. I would recommend that if you decide to Swiss darn them, block and press the square before doing the embroidery as it will make the surface of the knitting flatter to work on. You can also block and press it again after embroidering, if desired.
One last thing I need to point out to you (and I mentioned it in my intro vid), is that you might notice a very small difference between the chart and the image of the Colourway 1 owl. On the chart on page 11 he has four horizontal Heavenly stitches for his left foot (it’s the right one as you look at the chart). However, on the image there are only three stitches, So there is one less stitch in my knitted square – ouch! It is the chart that is correct – I didn’t Swiss darn enough stitches – so be sure to follow this rather than the image of the square on page 10. My owl has a slightly deformed foot – oh dear! – but yours will be perfect – hurray!
SQUARE 9, THE LETTER ‘T’: stocking stitch stripes frame a fairisle pattern giving you the opportunity to try out some more fairisle within a small central section. This square is similar to Square 23 but this time you are knitting ‘T’s instead of ‘U’s.
Tech vids to watch for assistance with this square:
Picking up stitches to knit the next square (MO1 blog)
Mattress stitch (horizontal) (MO1 blog)
How to carry yarns up the side of the work (MO1 blog)
How to knit fairisle (MO1 blog)
There are two colour options for this square so make sure that you follow the correct instructions for the colourway you are knitting. Colourway 1 (Silver) is always written first with any changes for Colourway 2 (Rosy) written afterwards in brackets and bold.
On the striped section, stitches are transferred backwards and forwards onto the other needle so that you can pick up the yarn that is needed for the next stripe without the need to cut it and re-join it. If you are working on a circular needle then all you need to do is to slide the stitches to the other end of the needle and continue.
There are needle size changes in this square - smaller needles for the rows of garter stitch (the ridges that frame the fairisle section in the centre of the square), and larger needles for the fairisle. These needle size changes are important to maintain an even tension across the whole square, so don’t forget to change them over when instructed.
SQUARE 10, THE LETTER ‘P’: this intarsia pattern is the third over-sized letter in the blanket.
Tech vids to watch for assistance with this square:
Picking up stitches to knit the next square (MO1 blog)
Mattress stitch (horizontal) (MO1 blog)
How to knit intarsia (MO1 blog)
So you’ve already knitted a large ‘Y’ and ‘S’, and this month you’ve got ‘P’ to add to your large letter collection which is knitted using the same technique. As tempting as it may be, it is really important that you avoid carrying the yarns across the back of the work and knit this as pure intarsia, otherwise you could risk the work puckering and looking very uneven. I used two bobbins of Cream and also worked off the ball (so that’s three separate balls altogether), and two of Camel.
I cast on using the ball of Cream and then introduced the first bobbin of Camel on Chart row 6. And on this same row I introduced the first bobbin of Cream (for the right side of the letter, as you look at the chart). On Chart row 29 I introduced the second bobbin of Cream for the centre of the letter, and I also introduced the second bobbin of Camel.
There is a tech vid for intarsia if you need a reminder of the technique. The key thing to remember is to cross the yarns over every time you change colour as this will prevent holes, thus creating a smooth transition from one colour to the next. This needs to be done every time you change colour on both RS and WS rows.
There is a half-page Notes section on page 16 which could be useful if you want to write down how you knitted this square and on which rows you joined in the yarns.
IF YOU ENJOY SOCIAL MEDIA AND ARE NOT FOLLOWING US, THEN GET ON BOARD AND JOIN US ON OUR SOCIAL MEDIA PLATFORMS!
If you are not already a Ravelry member, then it is very easy (and free!) to join. Just follow the instructions on their website: http://www.ravelry.com
The Debbie Abrahams Mystery Knitters group on Facebook is another fun way to keep in touch with other members. It was set up a couple of years ago and has grown in size to over 650 members, so that’s well worth joining too.
We also have our own Facebook page where you will find regular updates on everything we are doing from knitting kits to workshops and events!
Instagram: debbieabrahams_knitting
Pinterest: debbieabrahams@debbieabrahamsk
Facebook: Debbie Abrahams Mystery Knitters
Facebook: Debbie Abrahams Handknits
Ravelry: Debbie Abrahams Handknits
OUR MYSTERY CLUB MEETINGS AT YARN LOFT IN NOTTINGHAM ARE PAUSING FOR A FEW MONTHS, BUT WILL RECOMMENCE IN FEBRUARY. Meetings take place at Doreen’s lovely knitting shop in Carrington, close to the city centre of Nottingham, called Yarn Loft. Doreen opens her doors on the first Wednesday of the month and keeps us going with hot drinks and light refreshments while we knit and chat for a couple of hours.
If you belong to any of my mystery clubs, then you are welcome to join us. It’s a great opportunity to meet other members and have a chat while cracking on with your squares. It’s a lot of a fun and we have a lot of giggles too! And if you have any questions about the mystery projects, I am on hand to answer any queries or help with techniques.
Our next meeting will be on Wednesday 7th February from 4pm - 6pm. Yarn Loft is at 118 Hucknall Road, Carrington, Nottingham, tel number 07825 702433, website: www.yarnloft.co.uk. To cover the costs of hosting the meeting there is a small sub to pay (£3.00), which can be paid to Doreen on the day.
In the new year I will send out an email to our Mystery Club databases, and if you are interested in joining us then a quick ‘yes!’ to me at debbie@debbieabrahams.com is enough to reserve a space for you. Whether you can make it to one or two meetings, or to all of them, we’d love you to come along and join in all the fun!
MEMBERS GALLERY AND FURRY FRIENDS! Thank you to everyone who has sent in photos and stories for our end of year/new year galleries. The Furry Friends Gallery (which is going to be such a lot of fun!), is launching imminently (I did say it would be November, but I’ve re-scheduled it for early December). But there is still time to send in pics of your Debbie Abrahams projects for the Members Gallery (mystery and non-mystery projects are welcome!). This is your chance to share your ‘Debbie’ knits globally with knitters and makers worldwide. It is always such a joy for me to see what you’ve been creating over the past twelve months, and it is inspiring for others to see what you've done too. So if you’ve got something to share, please send in your pics with a few words to me at debbie@debbieabrahams.com and I will be delighted to include your wonderful work in the Members Gallery in January. Please send your pics uncropped and in their ‘raw’ state as that makes it easier for me to make any necessary edits at my end. Thank you!
So as we begin the busy month of December I hope that you find enough time in between shopping, merrymaking and prepping for the big day to knit your Baby Blanket squares. The tips and advice in this blog will set you off in good stead so you can knit away confidently and create the most perfect squares for your blanket! I find knitting a great relief from the stresses of everyday life, so if you are feeling the strain of the festive season and need a break, grab your knitting bag and settle down with a square to knit and escape for a few hours. And if you feel the need for a treat, don’t forget to have a browse in our online shop where you can order something really special for yourself or a friend at the push of a button! So whatever you are doing and wherever you are in the world, I wish you all a peaceful and happy Christmas and look forward to seeing you back here in the new year! Take care everyone, love Debbie x]]>
https://debbieabrahams.com/blogs/news/mystery-baby-blanket-2023-post-2-mail-out-22023-11-01T00:00:01+00:002023-11-01T00:00:01+00:00Mystery Baby Blanket 2023: post 2, Mail Out 2Debbie AbrahamsHELLO AND WELCOME TO THE SECOND INSTALMENT OF THE MYSTERY BABY BLANKET CLUB! And with the clocks turned back here in the UK and the evenings drawing in, it’s the perfect time of year to cosy up on the sofa with your blanket squares and get knitting.
This month I have another five squares for you to knit, and there’s a good mixture of techniques to keep you on your toes including intarsia, lace, fairisle and some embroidery. There is no intro this month (I’ll be back at the beginning of December), but there is one new tech vid that you might find useful for Chain stitch. Plus of course you can whizz back and forth between the existing tech vids (listed below) if you need reminders of some of the other techniques.
This is a reminder of the techniques that were covered in the previous blog:
How to knit intarsia (post 1, MO1)
Picking up stitches to knit the next square (post 1, MO1)
Mattress stitch (horizontal) (post 1, MO1)
How to carry yarns up the side of the work (post 1, MO1)
How to knit fairisle (post 1, MO1)
How to add Swiss darning to your knitting (post 1, MO1)
How to cable (post 1, MO1)
How to knit a bobble (post 1, MO1)
Further on in this blog (when I talk about this month’s squares), you will find links back to previous blogs to help you with the contrast-coloured bobbles and decorative slip-stitch stripes that are in some of the squares this month.
MAIL OUT 2 WAS EMAILED TO ALL OF THE MEMBERS ON 1ST NOVEMBER, so check your inbox if you have not already done so and you should find it’s waiting for you in there. The printed patterns for those members who added this option to their package were posted on the following dates: overseas on the 30th October; UK on the 30th/31st October.
Unfortunately we had a delay to our print run due to a flood at the local printers we use, so the patterns for the overseas members are not going to arrive in time for the 1st of the month (I have written to each member to explain this). However, you have the digital version of the file so you could have a good read of the patterns and get yourself prepped before your brochure arrives. Or you could make a start some of the squares using the digital file.
THERE WERE SOME ADDENDUMS IN MAIL OUT 1 WHICH WE NOTIFIED YOU OF IN AN EMAIL. However, if you did not receive that email from us, these are the corrections:
Page 7, The Letter ‘Y’: in the key for the chart, Heavenly should read as, K on RS, P on WS (the whole chart is in stockinette stitch).
Page 9, The Letter ‘U’: in the key for the chart, Sea Green and Taupe should read as, K on RS, P on WS (the whole chart is in stockinette stitch).
Page 13, The Letter ‘Z’: in the key for the chart, Sea Green should read as, K on RS, P on WS (the whole chart is in stockinette stitch).
These corrections are also the on the Addendum page on our website, where each month I add to it any new amendments that are found in the Mystery mail outs. So it’s worth checking this before you start knitting the squares in my Mystery projects.
THE 2024 MYSTERY BLANKET IS STILL OPEN FOR SIGNING UP IF YOU FANCY TAKING ON A BRAND NEW CHALLENGE NEXT YEAR! We now have around 8 weeks left before the deadline for signing up, or when all the memberships sell out (which could be sooner). So if it’s something you’ve been meaning to do but have not got round to it, pop across to our online shop today to secure yourself a place. We welcome knitters from all over the world – it’s a truly global KAL! Choose from various options (additional printed patterns, and Special Delivery for UK members), and to make life a bit easier there is an option to spread your payment across several months.
Below: 2023 Mystery Blanket, The Enchanted Forest.
What’s in store for 2024?
I am absolutely thrilled to be using my own bespoke Light Wool DK yarn again for this project which has been produced by the wonderful team at Laxtons in North Yorkshire, UK. I have combined it with a few of my most favourite Rowan yarns including Felted Tweed, Alpaca Soft, Kidsilk Haze and Soft Yak. Vibrant shades of teal and ocean blue graduate into bold purples and pinks, which are softened with pale turquoise, dreamy lilac and blush pink laced with flecks of cool silver and pale gold. There are plenty of sparkling beads in it too!
The blanket design includes the techniques of intarsia, fairisle, lace, textured stitches, stripes and beads, offering you a feast of squares to knit up over ten months. And there will be a choice of two options - as there is this year - for the trickier squares (fairisle and intarsia), enabling both novice and experienced knitters to participate in this unique knitting experience.
My monthly tech vids have been extremely popular this year, so I am pleased to say that I will continue with these in a dedicated monthly blog so that you have all the help and support you need as you work your way through the forty-nine squares.
Above: 2022 Mystery Blanket, Deco Dreams.
The club begins on 1st February 2024 and runs for ten months until November 2024.
The finished size of the blanket is approximately 135cm x 135cm.
What does my membership include?
Each member will receive a knitting kit which includes over forty balls of premium quality yarn, ten sets of emailed patterns (with the option to purchase additional printed patterns), Debbie Abrahams size 6 beads and a woven label. The kit will be posted in two halves with the first one delivered in February, followed by the second one in May.
NEW! Download pattern option
For the first time we are offering the ten sets of patterns as monthly downloads enabling you to use yarns and beads from your own stash to knit the blanket. The list of yarns and beads for the first part of the kit will be released a week before the project begins. If you decide to purchase the yarn and beads for the project yourself, the cost of all the materials, like for like, is approximately £340. We are unable to guarantee that all of the colours in my Light Merino DK yarn will be available to purchase so substitutes may have to be used.
Choose to spread the cost of your payment
For those who would prefer to pay in instalments we have an easy-to-use payment system in place called Splitit which enables you to make your payment between 2-4 months. This means you can secure your membership today with a deposit with nothing more to pay until next month. Simply select Splitit at checkout when you make your first payment and then your remaining payments will be taken automatically from your account. If you choose this option you will still be included in the Early Bird Special Offer.
How do I make my purchase?
It’s really easy. You just need to visit the shop on our website and there you will find the 2024 Mystery Blanket Club for sale. There are several options to choose from starting with the basic package which includes the full knitting kit and emailed monthly pattens. Or you can upgrade and add on printed patterns (UK and overseas), and/or Special Delivery (UK only). All overseas parcels are posted by Tracked International Delivery.
If this sounds like an interesting project to indulge yourself in next year, then come and join me! I have a super theme lined up for next year with a bunch of fabulous squares to keep you busy for February to November. And with everything delivered to your door (and inbox!), what could be better than that!
NOW IT’S TIME TO FIND OUT HOW MANY PEOPLE HAVE GUESSED THE THEME OF THE MYSTERY BABY BLANKET! It must be a difficult one as we’ve only had three correct guesses sent in so far. Congratulations this month go to Jacqui Lund, Emma Raftery and Annie March, so well done to all of you!
There are clues in the squares – take a look at what you knitted so far and what is in the Mail Out 2 patterns – and there is the letter puzzle below to help you too.
This month the letter I am giving you is “O”:
_ O _ / I / _ _ O _ / _ _ / _ _ _ ‘ _
Please send your guesses to Sue at sue@debbieabrahams.com. There are no prizes for the correct answer, it’s just a bit of fun each month. But if you do send in a correct answer then with your permission we will publish your name in the next Mystery Baby Blanket blog. Thinking caps on everyone!
THESE ARE THE FIVE SQUARES TO KNIT IN MAIL OUT 2:
Square 28: ‘W’ is for Whale! – intarsia whale motif:
Above: Colourway 1.
Below: Colourway 2.
Square 15: The Letter ‘X’ – striped pattern with Swiss darned letter motifs:
Above: Colourway 1.
Below: Colourway 2.
Square 16: Love You – lace heart motif:
Square 25: The Letter ‘N’ – striped pattern with fairisle letter motifs:
Above: Colourway 1.
Below: Colourway 2.
Square 31: The Letter ‘S’ – intarsia letter motif:
On each pattern page there is a list of Pattern notes and tips that are worth reading before you start to knit each square. These bits of advice will help you with your knitting, pre-warning you what to look out for and giving you some useful information about how to knit the square.
In the following notes below I am going to give you a few extra tips about some of the squares.
SQUARE 8, ‘W’ IS FOR WHALE!: we begin this month with an intarsia motif, offered in two colourways.
Tech vids to watch for assistance with this square:
How to knit intarsia (post 1, MO1)
Picking up stitches to knit the next square (post 1, MO1)
Mattress stitch (horizontal) (post 1, MO1)
How to add Swiss darning to your knitting (post 1, MO1)
How to knit a bobble (post 1, MO1)
How to add chain stitch to your knitting (NEW this month!)
You will find some advice about the intarsia technique on page 17 of Mail Out 2, but the tech vid is also there for you if you need to see a demo. You knitted some intarsia in the first mail out – it was ‘The Letter S’ – so you’ve already had a go at intarsia before (and I am sure you did just fine!).
There are two colourways so you must choose the one that matches your kit – Silver (Colourway 1) or Rosy (Colourway 2). It is only Silver and Puddle, and Vintage Pink and Rosy that are swapped with each other. All the other colours in this square are the same.
Before I started to knit this square, I wound off two bobbins of Duckling and used the ball of Duckling to cast on. I used one bobbin each of Silver/Vintage Pink, Puddle/Rosy and Heavenly. On Chart Row 40 I introduced a short length of Heavenly yarn to use where the tail splits into two halves.
There is a contrast-coloured bobble which is knitted on Chart Row 15. But if you look carefully at the chart, you will see that the stitch below the bobble (Puddle for Colourway 1 and Rosy for Colourway 2), is purled in the contrast colour. So don’t forget to do this on Chart Row 14. The tech vid from the first Baby Blanket blog shows you how to knit a self-coloured bobble. So if you need guidance with how to knit a contrast-coloured bobble, this tech vid from the 2022 Mystery Blanket blog (February) will help you:
The letter ‘W’ in the top left-hand corner can be knitted in or Swiss-darned onto the square. I chose to Swiss darn mine. I did this for the Rocket in Mail Out 1, so I would suggest that you do the same as you did for that square too.
The three droplets of water are added to the completed square using Chain stitch, after it has been blocked and pressed. There is a new tech vid this month to help you with this technique. Try to imitate the shape of the droplets using the chart and the images as guides. If it helps, a fabric pen can be used to draw out the shapes onto the knitting before you start stitching. Just make sure it is a fabric pen (the one that disappears) rather than a felt-tip pen!
SQUARE 15, THE LETTER ‘X: stocking stitch, garter stitch and decorative slip-stitch stripes are combined with two bands of embroidered letters. It’s time to test out your Swiss-darning skills!
Tech vids to watch for assistance with this square:
How to carry yarns up the side of the work (post 1, MO1)
How to add Swiss darning to your knitting (post 1, MO1)
There are two colourways for this square, so make sure that you choose the correct one to match your kit.
If you look at the ‘X’s, you will see that they are in three colours. So this is why I Swiss-darned them rather than knitted them in. I always knit fairisle with just two colours in a row and very rarely do I use three colours as this can make the work really bulky. It is also important to embroider these letters rather than knit them in as the ‘X’s will look elongated and the whole square will be too long if they are knitted in. This is because fairisle extends the row count, thus making the stitches longer. So it’s embroidery for this square and no fairisle!
There is a decorative slip-stitch pattern in this square which I have used in several other projects – it’s one of my favourite stripe patterns! But if you have not come across this before, this tech vid from the 2022 Mystery Blanket blog (May) will help you. In the tech vid I am working with different colours, but the technique I use is the same:
The last thing to mention are the frequent needle size changes which are in bold so that you don’t miss them. They are important to do as the different stitch structures in this square will affect the tension and consequently the width of your knitting.
SQUARE 16, LOVE YOU: now it’s time for a bit of basic lace knitting with a pretty heart-shaped motif with a self-coloured bobble in that beautiful soft shade of Camel.
Tech vids to watch for assistance with this square:
Picking up stitches to knit the next square (post 1, MO1)
Mattress stitch (horizontal) (post 1, MO1)
How to knit a bobble (post 1, MO1)
This pattern is presented as both a chart and worded instructions, so you can choose to work from whichever format suits you best. You will find the chart overleaf on page 12.
The square is cast on (or stitches are picked up) using 3.25mm needles, and then you swap straight over to 2.50mm needles for the moss stitch border that is knitted all the way around the perimeter. Remember then to change back to 3.25mm needles on Row 6. These instructions are given in bold in the pattern instructions.
The lace stitches are very basic and easy to do. The only increase that is used is ‘yf’ (which is the same as ‘yo’). All of the increases are made between knit and knit stitches on RS rows only. Bring the yarn forward between the needles (so that it is at the front of the work, towards you), then keep it there as you knit the next stitch. The yarn will go over the needle (it might look a bit odd), but this is your increased stitch. When doing a ‘yf’ I always keep the yarn held pretty tightly as I take the yarn over the needle so that the eyelet is nice and neat.
If you need some guidance for ‘yf’, or any of the other abbreviations in this square, take a look at the Abbreviations on page 19 where you will find them clearly explained.
There is a tech vid for how to knit the self-coloured bobble in the first blog, so it is advisable to watch this if you need some guidance. There are many different types of bobbles, but these are created by working several times into one stitch, knitting the stitches, purling them, then casting them off.
SQUARE 25, THE LETTER ‘N’: garter stitch and stocking stitch stripes are combined with bands of fairisle in two colourways.
Picking up stitches to knit the next square (post 1, MO1)
Mattress stitch (horizontal) (post 1, MO1)
How to carry yarns up the side of the work (post 1, MO1)
How to knit fairisle (post 1, MO1)
This square is similar to Square 29 from Mail Out 1, but this time you are knitting the letter ‘N’ rather than ‘Z’.
There are two colour options for this square so make sure that you follow the correct instructions for the colourway you are knitting. Colourway 1 (Silver) is always written first with any changes for Colourway 2 (Rosy) written afterwards in brackets and bold.
If you need a reminder of the fairisle technique, then the tech vid from the first blog post will help you with this. It uses two colours in each row and there is a change of needle size to make (one size larger than your main needle size), to keep the width of the knitting the same as the rest of the square. There is also a needle size change for the garter stitch stripes (three sizes smaller than your main needle size), so watch out for them – they happen quite often! – to ensure a perfect piece of knitting!
SQUARE 31, THE LETTER ‘S’: your final square to knit this month is an intarsia letter!
Tech vids to watch for assistance with this square:
Picking up stitches to knit the next square (post 1, MO1)
Mattress stitch (horizontal) (post 1, MO1)
How to knit intarsia (post 1, MO1)
There is one colourway, so everyone is knitting the same square.
Before I started to knit this square, I wound off my bobbins so that I was prepped and ready before I cast on. I used two bobbins of Duckling plus the ball of Duckling yarn (which I cast on with), and two bobbins of Sea Green for the intarsia letter. Study the chart before you begin so that you are familiar with the shape you are knitting. I found this a really lovely letter to knit and hopefully you will enjoy it too!
Now you have all the tips and advice you need and can make a start on Mail Out 2 – have fun!
IF YOU ENJOY SOCIAL MEDIA THEN YOU MIGHT WANT TO JOIN THE VERY FRIENDLY AND HELPFUL GROUPS ON RAVELRY AND FACEBOOK. Here you will find a bunch of very welcoming and informative members who will be only too pleased to talk to you about your project. It is a great way to get help and answers if you get stuck and need some quick advice:
Instagram: debbieabrahams_knitting
Pinterest: debbieabrahams@debbieabrahamsk
Facebook: Debbie Abrahams Mystery Knitters
Facebook: Debbie Abrahams Handknits
Ravelry: Debbie Abrahams Handknits
OUR MONTHLY ‘MYSTERY’ MEETINGS IN NOTTINGHAM ARE TAKING A BREAK OVER THE NEXT COUPLE OF MONTHS. Our last meeting of the year is on Weds 1st November, and then we will resume again in February.
If you belong to any of my mystery clubs, then you are welcome to join us. It’s a great opportunity to meet other members and have a chat while cracking on with your squares. It’s a lot of a fun and we have a lot of giggles too! And if you have any questions about the mystery projects, I will be on hand to answer any queries or help with techniques.
The meetings begin at 4pm and run until 6pm. Yarn Loft is at 118 Hucknall Road, Carrington, Nottingham, tel number 07825 702433, website: www.yarnloft.co.uk. To cover the costs of hosting the meeting there is a small sub to pay (£3.00), which can be paid to Doreen on the day.
I will send out an email in the new year to all the members, and if you are interested in joining us, send me a quick reply and then I will email you a reminder each month. It would be great to see you there!
I hope that you have enjoyed reading this blog and are now feeling motivated and fully fired up to begin this month’s squares. The blog offers you a lot of help and advice but remember that the social media groups are a great source of support too – you are never alone in a Debbie Abrahams Mystery Club!
The design is slowly progressing and the ‘mystery’ is being revealed, bit by bit. So if this month’s squares trigger any ideas as to what the theme is, please don’t forget to email your answers to us, plus any other related stories or pictures you have – it is always great to hear from you and see how you are getting on.
So that’s it for now. It’s time to grab those knitting needles, get your yarns ready and get going! Have fun everyone, and I look forward to seeing you back here next month for Mail Out 3! Take care, Debbie, x
]]>
https://debbieabrahams.com/blogs/news/mystery-blanket-club-2023-post-10-november-the-final-instalment2023-11-01T00:00:01+00:002023-11-01T00:00:01+00:00Mystery Blanket Club 2023: post 10, November, THE FINAL INSTALMENT!Debbie AbrahamsWOW! HERE WE ARE AT THE FINISHING POST FOR THE 2023 MYSTERY BLANKET CLUB! After ten months of knitting up forty-nine squares, we have reached the end of another epic blanket adventure, and the title is finally revealed! We had a couple more correct guesses sent in over the past few weeks, but if you are still not sure what it is, then the guessing game is now over. Watch my intro vid below to find out what it is and read on to find out more about the final squares (and the edging) that you are knitting this month!
So it’s time to settle back in your most comfy chair with a cuppa and tune into my November intro. In my vid I talk about the inspiration behind the project and give you an insight into my design process, so it’s worth a watch before you grab your knitting needles…
The library of tech vids that have been in my blogs over the past ten months are listed here. The blogs will remain on our website indefinitely so that you can access them and all the tech vids whenever you need to.
This is a reminder of the techniques that were covered in all the previous blogs:
Square 8, Pixies & Nixies (both options): how to knit the decorative slip-stitch (February)
THE FINAL SET OF PRINTED PATTERNS HAVE BEEN POSTED TO THE MEMBERS WHO OPTED FOR THEM, with the overseas sent on Tuesday 24th October and the UK on Monday 30th October. I am hearing from some of the members that the patterns are arriving in the post after the 1st of the month, and if this has affected you then I apologise for the delay. Postal systems around the world differ so much in their speed and efficiency, and some arrive within a week, whilst others take 2-3 weeks to be delivered. If you are sitting waiting for your printed brochure to arrive then remember that you can always download the file and either work from the digital version or print off a few pages of it until your patterns arrive.
At this point in the blanket there are lots of things that need doing such as sewing in ends and sewing strips together so you could always get on with these tasks in the meantime.
THERE ARE NO PHOTOS OF THE COMPLETED OPTION TWO BLANKET IN THE NOVEMBER MAIL-OUT. However, I will be featuring it in a special 2023 Mystery Blanket blog later on this month. So make sure you hop back over to our website to take a look at what the completed alternative version looks like.
BEFORE I TALK ABOUT THE SQUARES YOU ARE KNITTING IN THIS FINAL INSTALMENT, I JUST WANT TO REMIND YOU THAT SIGN-UPS FOR THE 2024 MYSTERY BLANKET CLUB ARE OPEN, SO IF YOU HAVEN’T SIGNED UP YET, THERE IS STILL TIME! Now that this year’s blanket is coming to an end, you might be starting to think about your projects for next year. So if you want to continue with exciting monthly pattern instalments and all the fun of a ‘mystery’ KAL, then why not grab yourself a membership and get yourself on board? From the 1st February a brand new knitting adventure will begin, with new colours and yarns, and a totally different theme. What could be better than sitting back and waiting for that first parcel to arrive, full of gorgeous yarns in fabulous colours, and a brand new set of squares to knit up!?!
Below: 2020 Mystery Blanket, Our Precious Earth.
You’ve got until the 31st December to sign up, however, the Club will close as soon as all of the memberships are sold. So it’s best not to delay and get yourself onboard today so you don’t miss out!
What’s in store for 2024?
I am absolutely thrilled to be using my own bespoke Light Wool DK yarn again for this project which has been produced by the wonderful team at Laxtons in North Yorkshire, UK. I have combined it with a few of my most favourite Rowan yarns including Felted Tweed, Alpaca Soft, Kidsilk Haze and Soft Yak. Vibrant shades of teal and ocean blue graduate into bold purples and pinks, which are softened with pale turquoise, dreamy lilac and blush pink laced with flecks of cool silver and pale gold. There are plenty of sparkling beads in it too!
Above: a suggestion of the colour palette for the 2024 Mystery Blanket.
The blanket design includes the techniques of intarsia, fairisle, lace, textured stitches, stripes and beads, offering you a feast of squares to knit up over ten months. And there will be a choice of two options - as there is this year - for the trickier squares (fairisle and intarsia), enabling both novice and experienced knitters to participate in this unique knitting experience.
My monthly tech vids have been extremely popular this year, so I am pleased to say that I will continue with these in a dedicated monthly blog so that you have all the help and support you need as you work your way through the forty-nine squares.
The club begins on 1st February 2024 and runs for ten months until November 2024.
The finished size of the blanket is approximately 135cm x 135cm.
What does my membership include?
Each member will receive a knitting kit which includes over forty balls of premium quality yarn, ten sets of emailed patterns (with the option to purchase additional printed patterns), Debbie Abrahams size 6 beads and a woven label. The kit will be posted in two halves with the first one delivered in February, followed by the second one in May.
Below: 2009 Mystery Blanket, Arabian Nights.
NEW! Download pattern option
For the first time we are offering the ten sets of patterns as monthly downloads enabling you to use yarns and beads from your own stash to knit the blanket. The list of yarns and beads for the first part of the kit will be released a week before the project begins. If you decide to purchase the yarn and beads for the project yourself, the cost of all the materials, like for like, is approximately £340. We are unable to guarantee that all of the colours in my Light Merino DK yarn will be available to purchase so substitutes may have to be used.
Choose to spread the cost of your payment
For those who would prefer to pay in instalments we have an easy-to-use payment system in place called Splitit which enables you to make your payment between 2-4 months. This means you can secure your membership today with a deposit with nothing more to pay until next month. Simply select Splitit at checkout when you make your first payment and then your remaining payments will be taken automatically from your account. If you choose this option you will still be included in the Early Bird Special Offer.
How do I make my purchase?
It’s really easy. You just need to visit the shop on our website and there you will find the 2024 Mystery Blanket Club for sale. There are several options to choose from starting with the basic package which includes the full knitting kit and emailed monthly pattens. Or you can upgrade and add on printed patterns (UK and overseas), and/or Special Delivery (UK only). All overseas parcels are posted by Tracked International Delivery.
Memberships are limited and when they have sold out the club will be closed. So if you want to be part of this unique knitting experience and don’t want to miss out on all the fun and excitement next year, pop across to our shop and get yourself signed up today. And then you’ll have peace of mind that you are onboard again for another great knitting adventure with me next year. I can hardly wait for it to begin!
EARLY BIRD WINNERS! Thank you to everyone that signed up to the 2024 Mystery Blanket Club before the 30th September. If you got yourself signed up within the first month then you are eligible for lots of great Early Bird offers, including entry into the Prize Draw.
And I am delighted to announce today the winners of the Early Bird Prize Draw!
1st Prize:Joanna Taylor (member 65) from the UK: 2024 Mystery Blanket Club membership (for the package you’ve purchased, we will refund what you have paid in full).
2nd Prize: Jean Jeffcoate (member 222) from the UK: 2024 Mystery Cushion Club membership.
3rd and 4th Prizes: Beatriz Greuter (member 420) from Switzerland, and Christine Planchak (member 190) from the UK: set of 10 printed patterns for the 2024 Mystery Blanket Club
5th & 6th Prizes: Yvonne Hawkins (member 409) from New Zealand, and Carol Millman (member 407) from the USA: Mystery Festive Knit Box
7th & 8th Prizes: Linda Urwin (member 129) from the UK, and Julie Pacey (member 179) from the UK: knitting kit from a selection in our online shop (up to the value of £50)
9th & 10th Prizes: Frances Hourican (member 491) from the USA, and Karen Whittaker (member 90) from the UK: 4 packs of beads (colour/s of your own choice, size 8 or size 6)
Well done to all the winners! I will email each of you to confirm your prize and where to post it to (where applicable).
SO, IF YOU’VE WATCHED MY INTRO, YOU WILL KNOW WHAT THE TITLE IS OF THE 2023 MYSTERY BLANKET. We've had a couple more correct guesses, and this time (and for the final time!), the congrats go to Sandy Cerato and Marie Godin, so very well done to you!
But if you haven’t watched my intro, I can now reveal that the title of the 2023 Mystery Blanket is…..
T H E / E N C H A N T E D / F O R E S T
So, did you guess what the centre square was, or did it come as a complete surprise? There were many possibilities for this, but I opted for a fox as this is one of my favourite woodland creatures. It was a challenging animal to knit with all that beautiful fluffy white and chestnut coloured fur, wiry whiskers, and piercing eyes. But I think he contributes quite nicely to the overall theme of an enchanted forest with his roguish good looks and steely gaze. He is at the centre of the forest, keeping an eye on all the other creatures and watching you too! I hope you like him.
Thank you to everyone who joined in the fun and sent in their guesses. And well done to everyone who got it right! If you want to find out more about the blanket and hear about how my inspiration was turned into The Enchanted Forest, then scroll back to my intro vid and all will be revealed!
IN THIS FINAL INSTALMENT THERE ARE FOUR SQUARES TO KNIT, PLUS THE EDGING, with alternative options for all four of the squares:
Square 25, Sly Fox (Option One) – intarsia fox motif with hooked-in beads and embroidered details:
Square 26, Deadly Nightshade (Option One) – fairisle pattern with stripes, textured stitches and hooked-in and slip-stitch beads:
Square 26, Deadly Nightshade (Option Two) – striped pattern with textured stitches and slip-stitch beads:
Square 27, Butterfly (Option One) – intarsia butterfly with hooked-in beads and chain stitch details:
Square 27, Dragonfly 2 (Option Two) – cable pattern with hooked-in beads, contrast coloured bobbles and lace stitches:
Square 28, The Elves & Imps Are Back! (Option One) – fairisle pattern with stripes, textured stitches and hooked-in beads:
Square 28, The Elves & Imps Are Back! (Option Two) – textured pattern with stripes and hooked-in beads:
On each pattern page there is a list of Pattern notes and tips that are worth reading before you start to knit each square. These bits of advice will help you and give pre-warnings as to what to look out for in the pattern instructions. Also take note of the description under the title of each square as this tells you what the stitch structure is.
You can use the tech vids from previous blogs to help you knit your squares. But here are a few extra tips to assist you:
SQUARE 25, SLY FOX (Option One): this is the centre square, the one you’ve been waiting for! So will you opt for this, or the textured and beaded alternative? Now is your time to decide…
Videos to watch for assistance with this square:
How to pick up stitches along a cast-off edge (February blog)
How to pick up stitches along a cast-off edge using several colours (April blog)
Mattress stitch (horizontal) (February blog)
The intarsia technique (March blog)
How to bead, the hooking-in method (February blog)
How to add Swiss darning to knitting (March blog)
It does not matter which option you choose as it is the centre of the blanket – both will look fabulous! - so the choice is up to you.
There is a multi-colour cast on for this square, so if you need some guidance the tech vid from the April blog will help you with this. I worked out how many separate balls of yarn I would need for the whole square and prepped my bobbins before I made a start on it. I filled up my bobbins for the larger areas, but used lengths of yarn for the smaller areas, such as the eyes (Harvest) and the Ginger and Barn Red sections on his body – I found this easier to handle than a large bundle of bobbins.
There are four black beads in this square – two for his nose and two for his eyes. These are hooked in so no pre-threading is required.
Depending on how confident you are with your intarsia knitting skills, you can choose to knit in the outlines (mentioned in the third Pattern note and tip), or you can embroider them onto the knitting using Swiss darning. I chose to embroider them onto the knitting as not only did I find this easier and neater to do, but I like the slight raise to the surface of the knitting that the embroidered stitches give. I think it adds to both the look and the feel of the overall square. And as long as your Swiss-darning skills are pretty good, you can cover the stitches quite easily with the contrast-coloured yarns.
The final thing to mention is the whiskers which are embroidered onto the knitting using a basic running stitch. I am no expert on embroidery so this really is a simple stitch, just running the needle through the work creating long stitches. The chart and the image are there to guide you, but if you have a fabric pen (the one that disappears after a while), then you could draw them onto the knitting to give you guidelines. And that way you should get them right first time.
I really enjoyed knitting the fox and I think he makes a splendid centre square! But if you are looking for an alternative, you could consider Square 25, Option Two…
SQUARE 25, TOADSTOOL 3 (Option Two): this beaded stitch pattern has featured in the blanket a few times already, but here it is in a brand new, vibrant colourway!
Videos to watch for assistance with this square:
How to pick up stitches along a cast-off edge (February blog)
Mattress stitch (horizontal) (February blog)
How to bead, the hooking-in method (February blog)
If you’ve knitted this square before then you will know that this is the pattern with a variable stitch count, which varies between 61 and 59 stitches. I have included the count at the end of every row, so you can stay well on track. It’s a good idea to count the number of stitches at the end of every row after there have been increases or decreases made, just to make sure you haven’t missed any. I found the ‘M3’ towards the end of Rows 7 and 15 particularly difficult to remember, so watch out for these.
If you are unfamiliar with the abbreviations ‘s2kpo’ and ‘M3’, you will find the explanations for them on page 39 of your November mail out. The first one, ‘s2kpo’ is a double decrease, and ‘M3’ is a double increase. They are very easy to do, but it would be a good idea to check them out before you knit them as they might vary slightly in comparison to other patterns you may have worked on previously.
This square uses a smaller needle than the suggested main needle size of 3.50mm. So make sure you grab your 3.25mm needles and not the slightly larger ones!
If you have knitted all Option Two squares in this blanket, you will probably find that you won’t have enough of the Pumpkin yarn to knit the Colourway B edgings. Instructions for the edgings begin on page 28 of your November mail out, where you will find the choices for Colourway A and Colourway B. If you are not going to have enough Pumpkin yarn, then we have a few more balls of it that can be purchased directly from us (email sue@debbieabrahams.com). Alternatively, if you knitted the 2021 Mystery Blanket, One Thousand and One Nights, then you might have stashed away some of the left over Coral yarn from this project (you had a lot of it!), and this is basically the same colour as Pumpkin – you would not be able to tell the difference between them. So you could always use this yarn for the edgings. If you are unsure or in any doubt as to what to do, drop me a line and I will advise you.
It would be advisable to check the number of beads you have left too – you will need 80 Bronze, 32 Emerald and 31 Lime. Depending on the choices of squares you have made previously, you might find that you don’t have enough of some of them and therefore will have to substitute them for other colours. I think that a random selection of all the colours would look really fantastic. Why not give it a go?!? This is your opportunity to make this square unique and have a real play with the beads!
SQUARE 26, DEADLY NIGHTSHADE (Option One): you will recognise this square from the July mail out - it is exactly the same as Square 24.
Videos to watch for assistance with this square:
How to pick up stitches along a cast-off edge (February blog)
Mattress stitch (horizontal) (February blog)
Square 8, Pixies & Nixies (both options): how to knit the decorative slip-stitch (February blog)
How to bead, the hooking-in method (February blog)
How to carry yarns up the side of the work (February blog)
I would advise that you knit the same option that you knitted for Square 24 to keep the central part of the blanket balanced.
There is some transferring of stitches to do at certain points in the pattern (for example, after Rows 7-9), so it would be beneficial to use either double-pointed needles or a circular needle to knit this square.
There are several tech vids from previous blogs (see above) that you can take a look at if you need some assistance. Just be aware that these are for technical reference only as you are working with completely different colours of yarns and beads to those that are used in the vid.
SQUARE 26, DEADLY NIGHTSHADE (Option Two): this is the option you should knit it you knitted Option Two for Square 24.
Videos to watch for assistance with this square:
How to pick up stitches along a cast-off edge (February blog)
Mattress stitch (horizontal) (February blog)
Square 8, Pixies & Nixies (both options): how to knit the decorative slip-stitch (February)
How to knit the decorative loop stitch (February blog)
How to thread beads onto your yarn (March blog)
How to bead, the slip-stitch method (March blog)
How to bead, the hooking-in method (February blog)
How to carry yarns up the side of the work (February blog)
This mix of beaded stripes, decorative slip stitch patterns and exaggerated purl stitch should keep you on your toes all the way through this square. The techniques are actually all very straightforward – there is nothing too complicated here. And if you’ve knitted this square before, then you should sail through it. Enjoy!
SQUARE 27, BUTTERFLY (Option One): this is your final creature square who can’t wait to join all the others in the blanket!
Videos to watch for assistance with this square:
How to pick up stitches along a cast-off edge (February blog)
Mattress stitch (horizontal) (February blog)
The intarsia technique (March blog)
How to bead, the hooking-in method (February blog)
How to add Chain stitch to your knitting (March blog)
I would recommend that you opt for the same square you chose for Square 23, Option One, which was an intarsia Dragonfly.
The embroidery on this square (chain stitch), makes this square look busy and perhaps a little complicated, but the actual knitting of it is very straightforward. You will need several bobbins or small balls of yarn, remembering that each separate area of colour will need its own ball/bobbin. So you will need two of Clay (for the lower wings), three of the background colour, Harvest (I used two bobbins and the whole ball), two of Acorn (for the upper wings), and one of Ginger (for the butterfly’s body). The shapes of the wings are quite wide and large, so once you’ve joined in Clay (and Acorn further up), it’s just a case of keeping an eye on the chart as the stitches move inwards and outwards across the rows. Remember that if a yarn on the next row up has moved further out or in, you will need to carry it across the back of the work so that it is in a better position to pick up and use for the row above. Depending on the direction you are knitting (RS or WS row) and whether the stitches are moving in or out (to the left or to the right), you will need to move the yarn either on the row you are on (which is the row before) or on the row above. A careful check of each row before you begin it will help you to make that decision.
Below: how the back of the square looks...
There is some chain stitch embroidery to add to the knitting on the wings and for the two antenna. There are also some curly swirls at the top and bottom of the square. Use the chart and the image for colour and position. The embroidery is done freehand, so feel free to do your own thing in your own colours, if you so wish. But if you want to duplicate exactly what I have done, then a fabric pen would come in handy here – you can draw on your swirls, circles and antenna and embroider over the top of them. Just make sure it’s a fabric pen (that disappears) and not a felt-tip pen otherwise you might see the lines underneath the embroidery.
Just one last thing, the Velvet beads on the ends of the curly swirls are not knitted in, they are sewn on at the end of the chain stitch – just in case you were wondering why they are not shown on the chart.
SQUARE 27, DRAGONFLY 2 (Option Two): if you don’t fancy knitting the butterfly then you can opt for this beaded cable and bobble square instead.
Videos to watch for assistance with this square:
How to pick up stitches along a cast-off edge (February blog)
Mattress stitch (horizontal) (February blog)
Square 23, Dragonfly: Option Two (Rows 1-7) (June blog)
I would recommend that you opt for the same square you chose for Square 11, Option Two, which is the version with the cables twisting to the left (c5f).
There are two versions of Dragonfly (Option Two). For squares 23 and 39 the cables twist to the right (c5b), and for Dragonfly 2 (Option Two) they twist to the left. Everything else is the same.
SQUARE 28, THE ELVES & IMPS ARE BACK! (Option One): this square is similar to Square 22 from the March mail out, but the design has been turned upside down – similar to what I did for Squares 14 and 42.
Videos to watch for assistance with this square:
How to pick up stitches along a cast-off edge (February blog)
Mattress stitch (horizontal) (February blog)
Square 8, Pixies & Nixies (both options): how to knit the decorative slip-stitch (February blog)
How to bead, the hooking-in method (February blog)
How to carry yarns up the side of the work (February blog)
I would recommend that you choose the same option that you knitted for Square 22.
So for your final square this is a bit of a trip down memory lane. The stripes with the decorative slip-stitch are a repeat of what you knitted in several other squares in the blanket. And the fairisle section is almost the same as Square 22. It’s been turned upside down so it looks very similar to Square 22 but there is a slight difference.
There are three changes of needle sizes throughout this square, so just keep your eye on these as they will help to make your knitting super neat across all those different stitch patterns.
SQUARE 28, THE ELVES & IMPS ARE BACK! (Option Two): this is the easier option of the two and should match the choice that you made for Square 28.
Videos to watch for assistance with this square:
How to pick up stitches along a cast-off edge (February blog)
Mattress stitch (horizontal) (February blog)
Square 8, Pixies & Nixies (both options): how to knit the decorative slip-stitch (February blog)
How to knit the decorative loop stitch (February blog)
How to bead, the hooking-in method (February blog)
How to carry yarns up the side of the work (February blog)
As with Option One, there are several changes to needle sizes which will help to maintain a uniform width all the way to the top of the square. These are written in bold so that you don’t miss them.
I hope that you enjoy knitting up your final four squares!
WHEN YOU HAVE COMPLETED YOUR NOVEMBER SQUARES IT IS ADVISABLE TO KNIT TWO OF THE EDGINGS BEFORE YOU SEW THE FINAL STRIP INTO PLACE. In the Finishing and Edging instructions which begin on page 28 of your November mail out, you are advised to join strip 4 into the blanket after knitting the right-hand and left-hand edgings. This is because it will be much easier to pick up the stitches when the blanket is in two pieces, rather than picking them up when the blanket is one whole piece.
If you have knitted your squares separately then you will need to join them together first to create the final strip which is number 4 (Squares 22-28). If you haven’t joined together the squares for all the other strips, then you will need to do this now so that they are all completed.
The step-by step process for finishing the blanket is given for both options on page 28 of the November mail-out.
SO BEFORE WE TALK ABOUT JOINING STRIP 4 INTO THE BLANKET, LET’S FOCUS ON THE EDGINGS. There is one pattern for all four of them, but it is offered in two colourways, Colourway A and Colourway B. I did not title them ‘Option 1’ and ‘Option 2’ as which one you knit will depend on your choice of squares (especially if you mixed your options), and what yarns and beads you have left over.
Below: Colourway A edging.
Each edging is a garter stitch stripe with a decorative beaded stripe running through the middle of it, and they are mitred at each end. This will result in a perfect join at each corner when you sew them together to complete the blanket.
Below: Colourway B edging.
I have written some notes on page 28 about the colours of the beads and yarns used in the edgings. Each row in the edging uses approximately 2g of my Light Wool DK and 1g of Rowan Felted Tweed, so if you are worried that you may run short of any of the colours it is advisable to weigh your yarn (preferably on scientific scales), to make sure you have enough. And if you are going to run short, use other colours that you do have enough of. The same goes for the beads. Make sure that you have enough of each of the colours you are planning to use before you begin each edging. And if you find that you don’t have enough, you could consider alternating them (ie, Red, Gold, Red Gold, etc), or you could go wild and use a random selection. Your blanket will still look fabulous and a slight change to your edging will make it look even more unique!
In last month’s blog I told you what you would need to knit the edgings, but here is a reminder:
a circular 2.75mm (US 2) (UK 12) 100cm length needle
a circular 3.50mm (US 4) (UK n/a) 100cm length needle
one 3.50mm (US 4) (UK n/a) needle for casting off the stitches
In previous years I have recommended using two circular needles for each edging – one to pick up the stitches and the other to knit them onto (like knitting with two very long needles). However, my test knitters have assured me that this is unnecessary, and that one circular needle will do the job just as well.
Remember that if you have had to change your main needle size for this project, then you will need to make the same changes to the needles for the edgings.
You are instructed to swap needle sizes a few times when you knit the edgings. This is to ensure that the tension is maintained throughout the changes in stitch structure, so it is important to take notice of this if you want super neat edgings!
For both options, make sure that you cast off the stitches neatly and evenly as these are finished edges. The edgings are cast off using a 3.50mm straight needle (or circular), but you are advised to cast off using a larger needle than this if the cast-off edge is too tight.
FOR GUIDANCE AS TO HOW TO PICK UP STITCHES FOR THE EDGINGS YOU CAN USE THE LINK AT THE BEGINNING OF THIS BLOG WHICH TAKES YOU TO THE 2021 MYSTERY BLANKET BLOG. There you will find tech vids for picking up stitches along selvedge edges and cast-on and cast-off edges.
For each of the edgings I have advised how many stitches to pick up along the edge of each square, so it is essential that you read this very carefully and stick to it so you get the correct amount. This will involve some easing in along some of the squares (ie, picking up 46 stitches along a squares that has 60 rows). There is some advice below about how to do this. When I picked up my stitches I didn’t always get the number I needed first time round and sometimes I had to go back and forth several times to get it right. So don’t worry if this happens to you – it is quite normal and should be expected.
The Stitch and Row Reference diagrams on page 5 of the November mail show the number of stitches and rows in each square. So this is a really helpful reference to use while you are picking up the stitches.
These written notes about how to pick up the stitches and space them evenly may also be useful:
along a side/selvedge edge: usually the basic rule to follow here is to pick up 3 out of 4 stitches, however, this will not work with every square in this blanket as the row count is not always the same. So the best way to do this is to plan out the pick up along the edge of each square separately. Place markers at equal points of measurement along the edge of the square and then divide the total number of stitches you need to pick up by the number of sections you have marked out. For example, Square 45 has 46 stitches to pick up across 62 rows, so if you separate the edge into two sections of equal measurement you could pick up 31 stitches in each of the sections. My suggested technique for how to pick up stitches is as follows: with the right-side of the work facing, take the needle through the first gap between the bars (in the same place between the stitches that you inserted your needle for Mattress stitch, ie, between the edge stitch and the next stitch in). Loop the yarn around the needle and pull the new stitch through. Repeat this for all the stitches, skipping over some of the gaps when and if necessary to get the total number of stitches you need to pick up correct.
along a cast-on edge: usually the basic rule to follow here is to pick up every stitch. So with the right-side of the work facing, take the needle through the middle of the stitch just below the cast-off edge/above the cast-on edge. Loop the yarn around the needle and pull the new stitch through. Repeat this all the way along the edge, making sure that you pick up the correct number of stitches along the edge of each square. If the number of stitches is more or less than you have cast on (or cast off), then skip over stitches if there are too many, or pick up between stitches if you need more. As with the side/selvedge edges, if you do need to ease just make sure that they are spaced out evenly along each square. Also, remember that where the strips have been sewn together, one stitch from each edge of the squares are caught into the seam (apart from the first and last squares which have only one stitch caught in). But note that you are instructed to pick up one stitch on every seam between the squares.
WHEN YOU HAVE COMPLETED BOTH SIDE EDGINGS YOU CAN SEW STRIP 4 INTO THE BLANKET TO CREATE ONE BLOCK. Let’s begin with a quick reminder about sewing your squares and strips together.
In this blanket all of the squares are facing in the same direction (in some of the previous Mystery Blankets the squares were turned upside down or were positioned on their side). So this makes it much easier to sew together. All you need to watch out for is the number of rows, which as you know does vary from square to square. This means that some easing in will be required.
These instructions are based on taking the needle under 2 ‘bars’ at a time as demonstrated in the tech vid for vertical mattress stitch. To ease in a row, you will need to take your needle under one less bar on the side you are easing the extra row into.
Before we make a start, these are some extra tips on easing in rows:
Garter stitch rows have a tighter row tension than stocking stitch, so for every row of Garter stitch (which is two knit rows), ease these two rows into one stocking stitch row.
Slip-stitch beads (and slip-stitch patterns) have a tighter row tension than stocking stitch, so if you need to ease in some rows it is best to do this across beaded rows, taking the needle under more of the beaded rows than the stocking stitch rows.
Fairisle usually has a looser row tension than stocking stitch, so if you need to ease in some rows it is best to do this across fairisle rows, taking the needle under more of the stocking stitch rows than the fairisle rows.
For a square that has an all-over pattern, such as Square 10 Bracken, any easings need to be spread out evenly across the total number of rows (and not eased in all at one end or unevenly).
When there are two options on a square, I have given separate instructions for each option, so make sure that you check which one you need to follow for your choice of squares. If you have mixed your options then you might have to work out some of the easings yourself, but the piecing diagram on page 4 and the Chart for Stitch and Row Reference on page 5 will help you with this.
These are my guidelines and do not have to be followed if you prefer to use your own method and calculations.
SEW STRIP 3 (squares 15-21) TO STRIP 4 (squares 22-28)
Sew Square 15 (64 rows) to Square 22 (Option One) (65 rows): you need to ease 1 row of Square 22 (Option One) into Square 15.
Along the edge of Square 15 place a marker between Rows 32 and 33.
Along the edge of Square 22 (Option One) place a marker on Row 33.
Ease in 1 row across the whole length of the squares, making sure that the marker on Square 15 is matched to the marker on Square 22 (Option One).
Sew Square 15 (64 rows) to Square 22 (Option Two) (74 rows): you need to ease 10 rows of Square 22 (Option Two) into Square 15.
Along the edge of Square 15 place a marker between Rows 32 and 33.
Along the edge of Square 22 (Option Two) place a marker between Rows 37 and 38.
Ease in 10 rows as evenly as you can across the whole length of the squares, making sure that the marker on Square 15 is matched to the marker on Square 22 (Option Two).
Sew Square 16 (72 rows) to Square 23 (Option One) (59 rows): you need to ease 13 rows of Square 16 into Square 23 (Option One).
Along the edge of Square 16 place a marker between Rows 36 and 37.
Along the edge of Square 23 (Option One) place a marker on Row 30.
Ease in 13 rows as evenly as you can across the whole length of the squares, making sure that the marker on Square 16 is matched to the marker on Square 23 (Option One).
Sew Square 16 (72 rows) to Square 23 (Option Two) (63 rows): you need to ease 9 rows of Square 16 into Square 23 (Option Two).
Along the edge of Square 16 place a marker between Rows 36 and 37.
Along the edge of Square 23 (Option Two) place a marker on Row 32.
Ease in 9 rows as evenly as you can across the whole length of the squares, making sure that the marker on Square 16 is matched to the marker on Square 23 (Option Two).
Sew Square 17 (57 rows) to Square 24 (Option One) (77 rows): you need to ease 20 rows of Square 24 (Option One) into Square 17.
Along the edge of Square 17 place a marker on Row 29.
Along the edge of Square 10 place a marker on Row 39.
Ease in 20 rows as evenly as you can across the whole length of the squares, making sure that the marker on Square 17 is matched to the marker on Square 24 (Option One).
Sew Square 17 (57 rows) to Square 24 (Option Two) (86 rows): you need to ease 29 rows of Square 24 (Option Two) into Square 17.
Along the edge of Square 17 place a marker on Row 29.
Along the edge of Square 24 (Option Two) place a marker between Rows 43 and 44.
Ease in 29 rows as evenly as you can across the whole length of the squares, making sure that the marker on Square 17 is matched to the marker on Square 24 (Option Two).
Sew Square 18 (Option One) (77 rows) to Square 25 (Option One) (59 rows): you need to ease 18 rows of Square 18 (Option One) into Square 25 (Option One).
Along the edge of Square 18 (Option One) place a marker on Row 39.
Along the edge of Square 25 (Option One) place a marker on Row 30.
Ease in 18 rows as evenly as you can across the whole length of the squares, making sure that the marker on Square 18 (Option One) is matched to the marker on Square 25 (Option One).
Sew Square 18 (Option Two) (86 rows) to Square 25 (Option Two) (60 rows): you need to ease 26 rows of Square 18 (Option Two) into Square 25 (Option Two).
Along the edge of Square 18 (Option Two) place a marker between Rows 43 and 44.
Along the edge of Square 25 (Option Two) place a marker between Rows 30 and 31.
Ease in 26 rows as evenly as you can across the whole length of the squares, making sure that the marker on Square 18 (Option Two) is matched to the marker on Square 25 (Option Two).
Sew Square 19 (61 rows) to Square 26 (Option One) (77 rows): you need to ease 16 rows of Square 26 (Option One) into Square 19.
Along the edge of Square 19 place a marker on Row 31.
Along the edge of Square 26 (Option One) place a marker on Row 39.
Ease in 16 rows as evenly as you can across the whole length of the squares, making sure that the marker on Square 19 is matched to the marker on Square 26 (Option One).
Sew Square 19 (61 rows) to Square 26 (Option Two) (86 rows): you need to ease 25 rows of Square 26 (Option Two) into Square 19.
Along the edge of Square 19 place a marker on Row 31.
Along the edge of Square 26 (Option Two) place a marker between Rows 43 and 44.
Ease in 25 rows as evenly as you can across the whole length of the squares, making sure that the marker on Square 19 is matched to the marker on Square 26 (Option Two).
Sew Square 20 (72 rows) to Square 27 (Option One) (59 rows): you need to ease 13 rows of Square 20 into Square 27 (Option One).
Along the edge of Square 20 place a marker between Rows 36 and 37.
Along the edge of Square 27 (Option One) place a marker on Row 30.
Ease in 13 rows as evenly as you can across the whole length of the squares, making sure that the marker on Square 20 is matched to the marker on Square 27 (Option One).
Sew Square 20 (72 rows) to Square 27 (Option Two) (63 rows): you need to ease 9 rows of Square 20 into Square 27 (Option Two).
Along the edge of Square 20 place a marker between Rows 36 and 37.
Along the edge of Square 27 (Option Two) place a marker on Row 32.
Ease in 9 rows as evenly as you can across the whole length of the squares, making sure that the marker on Square 20 is matched to the marker on Square 27 (Option Two).
Sew Square 21 (63 rows) to Square 28 (Option One) (66 rows): you need to ease 3 rows of Square 28 (Option One) into Square 21.
Along the edge of Square 21 place a marker on Row 32.
Along the edge of Square 28 (Option One) place a marker between Rows 33 and 34.
Ease in 3 rows as evenly as you can across the whole length of the squares, making sure that the marker on Square 21 is matched to the marker on Square 28 (Option One).
Sew Square 21 (63 rows) to Square 28 (Option Two) (74 rows): you need to ease 11 rows of Square 28 (Option Two) into Square 21.
Along the edge of Square 21 place a marker on Row 32.
Along the edge of Square 28 (Option Two) place a marker between Rows 37 and 38.
Ease in 11 rows as evenly as you can across the whole length of the squares, making sure that the marker on Square 21 is matched to the marker on Square 28 (Option Two).
SEW STRIP 4 (squares 22-28) TO STRIP 5 (squares 29-35)
Sew Square 22 (Option One) (65 rows) to Square 29 (63 rows): you need to ease 2 rows of Square 22 (Option One) into Square 29.
Along the edge of Square 22 (Option One) place a marker on Row 33.
Along the edge of Square 29 place a marker on Row 32.
Ease in 2 rows as evenly as you can across the whole length of the squares, making sure that the marker on Square 22 (Option One) is matched to the marker on Square 29.
Sew Square 22 (Option Two) (74 rows) to Square 29 (63 rows): you need to ease 11 rows of Square 22 (Option Two) into Square 29.
Along the edge of Square 22 (Option Two) place a marker between Rows 37 and 38.
Along the edge of Square 29 place a marker on Row 32.
Ease in 11 rows as evenly as you can across the whole length of the squares, making sure that the marker on Square 22 (Option Two) is matched to the marker on Square 29.
Sew Square 23 (Option One) (59 rows) to Square 30 (72 rows): you need to ease 13 rows of Square 30 into Square 23 (Option One).
Along the edge of Square 23 (Option One) place a marker on Row 30.
Along the edge of Square 30 place a marker between Rows 36 and 37.
Ease in 13 rows as evenly as you can across the whole length of the squares, making sure that the marker on Square 23 (Option One) is matched to the marker on Square 30.
Sew Square 23 (Option Two) (63 rows) to Square 30 (72 rows): you need to ease 9 rows of Square 30 into Square 23 (Option Two).
Along the edge of Square 23 (Option Two) place a marker on Row 32.
Along the edge of Square 30 place a marker between Rows 36 and 37.
Ease in 9 rows as evenly as you can across the whole length of the squares, making sure that the marker on Square 23 (Option Two) is matched to the marker on Square 30.
Sew Square 24 (Option One) (77 rows) to Square 31 (61 rows) you need to ease 16 rows of Square 24 (Option One) into Square 31.
Along the edge of Square 24 (Option One) place a marker on Row 39.
Along the edge of Square 31 place a marker on Row 31.
Ease in 16 rows as evenly as you can across the whole length of the squares, making sure that the marker on Square 24 (Option One) is matched to the marker on Square 31.
Sew Square 24 (Option Two) (86 rows) to Square 31 (61 rows) you need to ease 25 rows of Square 24 (Option Two) into Square 31.
Along the edge of Square 24 (Option Two) place a marker between Rows 43 and 44.
Along the edge of Square 31 place a marker on Row 31.
Ease in 25 rows as evenly as you can across the whole length of the squares, making sure that the marker on Square 24 (Option Two) is matched to the marker on Square 31.
Sew Square 25 (Option One) (59 rows) to Square 32 (Option One) (77 rows) you need to ease 18 rows of Square 32 (Option One) into Square 25 (Option One).
Along the edge of Square 25 (Option One) place a marker on Row 30.
Along the edge of Square 32 (Option One) place a marker on Row 39.
Ease in 18 rows as evenly as you can across the whole length of the squares, making sure that the marker on Square 25 (Option One) is matched to the marker on Square 32 (Option One).
Sew Square 25 (Option Two) (60 rows) to Square 32 (Option Two) (86 rows) you need to ease 26 rows of Square 32 (Option Two) into Square 25 (Option Two).
Along the edge of Square 25 (Option Two) place a marker between Rows 30 and 31.
Along the edge of Square 32 (Option Two) place a marker between Rows 43 and 44.
Ease in 26 rows as evenly as you can across the whole length of the squares, making sure that the marker on Square 25 (Option Two) is matched to the marker on Square 32 (Option Two).
Sew Square 26 (Option One) (77 rows) to Square 33 (57 rows): you need to ease 20 rows of Square 26 (Option One) into Square 33.
Along the edge of Square 26 (Option One) place a marker on Row 39.
Along the edge of Square 33 place a marker on Row 29.
Ease in 20 rows as evenly as you can across the whole length of the squares, making sure that the marker on Square 26 (Option One) is matched to the marker on Square 33.
Sew Square 26 (Option Two) (86 rows) to Square 33 (57 rows): you need to ease 29 rows of Square 26 (Option Two) into Square 33.
Along the edge of Square 26 (Option Two) place a marker between Rows 43 and 44.
Along the edge of Square 33 place a marker on Row 29.
Ease in 29 rows as evenly as you can across the whole length of the squares, making sure that the marker on Square 26 (Option Two) is matched to the marker on Square 33.
Sew Square 27 (Option One) (59 rows) to Square 34 (72 rows): you need to ease 13 rows of Square 34 into Square 27 (Option One).
Along the edge of Square 27 (Option One) place a marker on Row 30.
Along the edge of Square 34 place a marker between Rows 36 and 37.
Ease in 13 rows as evenly as you can across the whole length of the squares, making sure that the marker on Square 27 (Option One) is matched to the marker on Square 34.
Sew Square 27 (Option Two) (63 rows) to Square 34 (72 rows): you need to ease 9 rows of Square 34 into Square 27 (Option Two).
Along the edge of Square 27 (Option Two) place a marker on Row 32.
Along the edge of Square 34 place a marker between Rows 36 and 37.
Ease in 9 rows as evenly as you can across the whole length of the squares, making sure that the marker on Square 27 (Option Two) is matched to the marker on Square 34.
Sew Square 28 (Option One) (66 rows) to Square 35 (64 rows): you need to ease 2 rows of Square 28 (Option One) into Square 35.
Along the edge of Square 28 (Option One) place a marker between Rows 33 and 34.
Along the edge of Square 35 place a marker between Rows 32 and 33.
Ease in 2 rows as evenly as you can across the whole length of the squares, making sure that the marker on Square 28 (Option One) is matched to the marker on Square 35.
Sew Square 28 (Option Two) (74 rows) to Square 35 (64 rows): you need to ease 10 rows of Square 28 (Option Two) into Square 35.
Along the edge of Square 28 (Option Two) place a marker between Rows 37 and 38.
Along the edge of Square 35 place a marker between Rows 32 and 33.
Ease in 10 rows as evenly as you can across the whole length of the squares, making sure that the marker on Square 28 (Option Two) is matched to the marker on Square 35.
IF YOU WANT TO LINE YOUR BLANKET THEN THIS ADVICE FROM JANE MCKEAG MIGHT COME IN USEFUL. And although I have never done this before myself, I think it would finish off the blanket beautifully – plus it would save having to sew in all those loose ends of yarn!
Each year I go back to Jane’s brilliant advice on how to line a blanket, (thank you Jane!), because her instructions are simple and straight forward and easy to follow. So, I am going to repeat the information she gave me some years ago in this blog to assist you if you decide to go down this route.
This is Jane’s advice:
“I’ve had several inquiries as to how to do the backing. So here’s some instructions on how I lined my 2016 Mystery Blanket, based on my quilting experience. It is the same process as preparing the multiple layers for quilting.
I used a good quilting flannel (by Moda Fabrics), which is 44 inches wide. I bought a 1 1/4 yard (45 inches), then machine washed and dried it. I turned an edge all around which I machine sewed. I then pinned it all around to the inner border edges, and hand sewed it in place using a blanket stitch (not necessary but somewhat decorative). I laid the whole thing flat, and used large safety pins at each intersection, pinning through both layers. I used two strands of yarn from the blanket and came up from the back and down to the back at each intersection (they don’t show on the front). Then each time I turned it over and double tied the strands with square knots and clipped them close. For the tying I worked from the outside in to make sure it would stay flat. It takes quite a bit of time to finish this way, but the blanket took quite a bit of time to knit! It’s totally worth the effort, in my opinion.”
WE’VE GOT SOME NEW KIT LAUNCHES COMING UP SOON WHICH YOU MIGHT WANT TO MAKE A NOTE OF IN YOUR DIARY (some of these dates have changed since they were last published).
Friday 3rd November: launch of two brand new Cowl kits –the 2021 Hell Bay project, Fraggle Rock in its original colourway and last year’s Festive Mystery Box project, Snowflake will be available to purchase for the first time as kits. A second colourway of the Fraggle Rock Cowl will be available in a few weeks’ time.
Friday 3rd November: our Festive Kits promotion begins, and you can grab yourself a kit at a discounted price for a limited period (offer excludes Festive Mystery Knit Boxes).
Friday 10th November: Debbie’s Winter Wonderland sock range! Choose from three ready-to-wear designs to keep your feet cosy and warm while looking super stylish this winter!
Friday 17h November: Festive Mystery Knit Boxes – the perfect idea for a gift or a treat for yourself. Debbie’s Mystery Box includes ten ‘mystery’ gifts including a brand-new festive knitting kit.
OUR REGULAR MEETINGS AT YARN LOFT IN NOTTINGHAM HAVE BEEN GREAT FUN, and our final meeting for the year is on Wednesday 1st November. I will be bringing along to the meeting my completed Mystery Blanket and Mystery Cushion. I can’t wait to see some of you there!
After the November meeting we are taking a break until the new year, then our meetings will resume from February. If you are interested in joining us for a couple of hours in the new year at Doreen’s gorgeous yarn shop, then drop me an email and I will send you a reminder a few days before each of the meetings: debbie@debbieabrahams.com
Yarn Loft is at 118 Hucknall Road, Carrington, Nottingham, tel number 07825 702433, website: www.yarnloft.co.uk. To cover the costs of hosting the meeting there is a small sub to pay (£3.00), which can be paid to Doreen on the day. Doors open from 4-6pm and all ‘mystery’ knitters are welcome!
I WILL BE CREATING A MEMBER’S GALLERY BLOG IN JANUARY TO CELEBRATE ALL THE BRILLIANT WORK THAT’S BEEN DONE THIS YEAR! So please send in photos of your completed 2023 Mystery Blankets and Cushions, and any other Debbie Abrahams projects you have knitted this year, together with a brief description, and I will include them. It’s time to show off all your hard work and be proud of your achievements! Please send all photos and stories to debbie@debbieabrahams.com
THE FURRY FRIENDS GALLERY WILL BE LIVE SOON! It’s been great fun seeing all your furry friends taking an interest in your ‘mystery’ knits! Thank you to everyone who has emailed me with their pictures and stories. I will be launching this very special gallery towards the end of November, so do pop back in a few weeks time to see all the wonderful cats and dogs who have helped (and hindered!) your knitting during the past ten months!
IF YOU DON’T FOLLOW US ON OUR SOCIAL MEDIA PLATFORMS THEN PLEASE COME AND JOIN US, and enjoy the messages and photos that are shared between myself and the members:
Instagram: debbieabrahams_knitting
Pinterest: debbieabrahams@debbieabrahamsk
Facebook: Debbie Abrahams Mystery Knitters
Facebook: Debbie Abrahams Handknits
Ravelry: Debbie Abrahams Handknits
AND FINALLY, IT’S TIME TO ANNOUNCE THE WINNER OF THE TENTH AND FINAL 2023 MYSTERY BLANKET CLUB PRIZE DRAW!!! Each month a member is picked at random to win a Debbie Abrahams prize. So it is worth reading right the way to the end of each blog to see if you are that lucky member!
PRIZE DRAW TEN (NOVEMBER): this month’s winner is member 445, Carrie Hatler from Coon Rapids, Minnesota in the USA. Well done Carrie! Please choose a prize from the following selection:
Your choice of one of Debbie’s knitting kits up to the value of £28.00 (excluding shipping) (take a look at them in our online shop).
A £25 voucher (or £25 refund) for a Debbie Abrahams Mystery Club membership: 2024 Mystery Blanket Club or 2024 Mystery Cushion Club.
A Mystery bag of five gifts!
We will notify Carrie to let her know the good news!
AND JUST IN CASE YOU WERE A WINNER THIS YEAR BUT HAVE NOT CLAIMED YOUR PRIZE, here is the list of all the winners from months 1-9. If your name is on the list and you haven’t claimed your prize then email Sue at sue@debbieabrahams.com and she will get it sorted for you:
February: Carol Clark (member 175, UK)
March: Katharine Henson (member 78, UK)
April: Genevieve Le Visage (member 359, FRANCE)
May: Michelle Lally (member 192, UK)
June: Catherine Slater (member 143, UK)
July: Gini Vanness (member 511, USA)
August: Natalie Keane (member 250, UK)
September: Christine Planchak (member 110, UK)
October: Patricia Sorrentino (member 554, USA)
So it’s time to wrap up this year’s Mystery Blanket with a final farewell. I always feel mixed emotions at the end of my KAL projects. I am thrilled to have completed the project after ten months of intensive knitting, but I will miss hearing about and seeing all the progress you are making with your own blankets. What I really love about this KAL are all the fabulous communities – both online and face-to-face – which the Mystery Blanket has generated. The monthly meetings at Yarn loft have been great fun, and when I read the comments and posts in the social media groups and see how much support there is out there and how generous you are with your tips and advice, it is truly inspirational! So thank you for being such fabulous members and for sticking with me right through to the end of the project. It’s the end of the 2023 Mystery Blanket, but a brand new knitting adventure will begin next year with a whole new set of challenges to keep you super busy, and I just can’t wait for it to start! So I wish you a super end to the year, enjoy your final set of squares and I look forward to seeing you in 2024! Take care everyone, Debbie, x
]]>
https://debbieabrahams.com/blogs/news/mystery-cushion-club-2023-post-5-october-the-final-instalment2023-10-15T00:00:00+01:002023-10-15T00:00:01+01:00Mystery Cushion Club 2023: post 5, October - THE FINAL INSTALMENT!Debbie AbrahamsWELCOME TO THE FINAL INSTALMENT OF THE 2023 MYSTERY CUSHION CLUB! So this is it, the end of another mystery knitting adventure and the reveal of the final piece of the puzzle. It’s been a busy five months with some challenging squares to knit. But all the effort will be worth it, and very soon you will have your own completed cushion to use and enjoy!
In this final blog, as well as all the latest club news, hints and tips, the cushion title will be revealed. You need to tune into my intro vid (which is just below) to find out what it is, plus I talk about the inspiration for the design, so it’s worth a watch. So why not pop on the kettle, get comfy and settle down to watch it before you start knitting. Then you’ll be prepped and ready to begin the final part of the project!
THIS IS A REMINDER OF THE TECH VIDS THAT ARE IN PREVIOUS BLOGS. You might find them useful if you need a reminder of some of the techniques that are used in the August squares:
How to cast on using several colours (June blog)
Square 1, Summer Cable: how to cross the yarns over when changing colour (June blog)
How to cable (June blog)
How to pick up stitches along a cast-off edge (to knit the next square)
How to thread beads onto your yarn (June blog)
How to bead, the slip-stitch method (June blog)
How to carry yarns up the side of the work (June blog)
Square 2, Pavlova: how to knit the frill (June blog)
How to add Swiss darning to your knitting (August blog)
Square 49: Flora, Option Two (September blog)
Mattress stitch (vertical) (September blog)
IF YOU’VE WATCHED MY INTRO VID THEN YOU WILL NOW KNOW THAT THE TITLE OF THIS YEAR’S MYSTERY CUSHION IS...
P I C N I C P A R T Y
Watch my vlog (link above) to find out more about the design. I talk about the theme and how it inspired this year’s Mystery Cushion!
THE FIFTH AND FINAL SET OF PATTERNS WERE EMAILED TO ALL THE MEMBERS ON 15TH OCTOBER, so you should have an email from us with a link to Mail Out 5. Remember though that you can also download this file directly from your Debbie Abrahams account.
The printed patterns were posted to overseas members on the 4th October and to the UK members on the 12th October. If they have not yet arrived, then they are on their way and should be with you soon.
THE FINAL PANEL YOU ARE KNITTING THIS MONTH TO COMPLETE YOUR MYSTERY CUSHION IS...
UPPER BACK PANEL:Picnic Party! – chevron stripe pattern with buttonhole band:
Here are some helpful tips which are worth a read before you begin…
UPPER BACK PANEL, Picnic Party!: this brightly coloured panel uses seven out of the eight colours in the cushion and is an all-over chevron stitch stripe with contrasting stripes of garter stitch.
This tech vid will help you with this square:
How to carry yarns up the side of the work (June blog)
Due to the number of stitches in this panel, it might be easier to knit it on a circular needle.
The Upper Back Panel is knitted separately and then joined to the Front Panel by a three-needle cast-off. It begins with the buttonhole band which is knitted in a simple two-colour garter stitch stripe.
There are six buttonholes which are created by casting off stitches and then casting them back on, on the following row. I have a great tip for getting a really neat finish to buttonholes which you can see if you follow the link below. This tech vid is from a previous Mystery Cushion blog (2021) and demonstrates a 3-stitch cast-off buttonhole worked in stocking stitch. In Picnic Party, the buttonholes are 4 stitches wide and worked in garter stitch. However, if you watch the tech vid you will be see the nifty little ‘wrap’ that is worked before casting on the final stitch - this is what makes the top edge of the buttonhole really neat. Just remember that when knitting your buttonholes for Picnic Party, you are knitting all the stitches, casting off 4 stitches for each buttonhole, and casting them back on knitwise.
After the buttonhole band there is a change to a larger size needle for the start of the chevron stitch stripe. Your buttonhole band will have a straight edge at this point, but after you’ve worked a few rows of the chevron pattern the edge will start to change to a gentle ‘wave’. The chevron pattern is a very simple 2-row pattern repeat and it is created by balancing pairs of increases with pairs of decreases. On Row 1 of the pattern, the increases are created by ‘inc 1’ (knit into the front and back of the stitch), and the decreases are skpo (slip one stitch, knit one stitch, pass the slipped stitch over and off the needle). Row 2 is really easy, you are simply purling back across all the stitches.
There are three blocks of two-colour stripes, separated by garter stitch stripes. When working each block, carry the unused colour up the side of the work. Summer, which is used for the garter stitch stripes, will need to be cut off after each striped section is completed (as instructed in the pattern).
After Row 54 you are instructed on page 8 of your mail out to transfer the stitches onto the other needle (this is quick and easy if you are using a circular!) so that the RS is facing again. You then knit 5 rows in total using Summer yarn before cutting it off.
Leaving this to one side, you then return to the Front Panel and pick up 124 stitches along the top (cast-off edge), following the instructions on page 8 for guidance.
When this is completed you are instructed to transfer the stitches back onto the other needle so that the RS is facing. And then you are ready to join it to the Upper Back Panel by working a 3-needle cast-off. If you are unsure how to do this, follow the link below to a tech vid from a previous Mystery Cushion blog (2022) which will guide you through the technique:
FINISHING INSTRUCTIONS ARE ON PAGE 8 OF THE OCTOBER MAIL OUT. Before sewing the Lower Back Panel into place you will need to sew the side seams of the Upper Back Panel to the Front Panel.
I began sewing the Upper Back Panel to the Front Panel beginning at the top (where it has been joined to the Front Panel), finishing at the buttonhole edge. The buttonholes should line up (or be very close to) the centre of the Front Panel, so that’s the middle of Squares 2 and 7. This image shows where the buttonhole-band meets the Front Panel to give you some guidance:
I used Mattress stitch to sew together all my side seams and I would advise that you use any of the colours for this - choose whichever colour you have plenty of. It doesn’t matter which one you use as Mattress stitch is an invisible seam and it won’t be seen.
Next sew the Lower Back Panel into place, beginning at the bottom edge and finishing at the garter stitch edging at the top. The tension of the squares on the front panel will be slightly different to the Lower Back Panel so make sure that you ease the two pieces of knitting together evenly, finishing with the upper edge tucked right under the Upper Back Panel.
I would suggest that you mark out the position of six buttons on the Lower Back Panel before sewing them on. You need to make sure that they correspond to the buttonholes on the Upper Back Panel. You can use the images of the completed cushion in the mail out to help you position them. I started and finished with a pink button, but you can place yours in whichever sequence you want.
Finally, you need to stuff your cushion-cover with a pad. It is advisable to take your completed cushion-cover to the shop when you purchase your pad to check that you choose the right size. I used a 45cm x 35cm cushion-pad for my cushion-cover, however, if you did not match the recommended tension in the pattern instructions then you might find that you need either a bigger or smaller pad than this. But that won’t matter – your cushion-cover will look stunning whatever size pad you use!
After you’ve completed all these steps your 2023 Mystery Cushion is finished and ready to enjoy! Well done for getting to the end of this year’s project, it’s a fabulous achievement and you should feel very proud of yourself for completing such a challenging piece of work!
SO AS ONE PROJECT COMES TO AN END, YOU MIGHT BE THINKING ABOUT WHAT YOU CAN KNIT NEXT. AND WHAT BETTER THAN ANOTHER MYSTERY KAL! MEMBERSHIPS ARE OPEN NOW FOR OUR2024 MYSTERY BLANKET CLUB! So if you’ve enjoyed this five-month mystery project, why not consider taking on a bigger challenge…it’s twice the fun and you get twice the amount of time to knit it in.
What’s in store for 2024?
I am absolutely thrilled to be using my own bespoke Light Wool DK yarn again for this project which has been produced by the wonderful team at Laxtons in North Yorkshire, UK. I have combined it with a few of my most favourite Rowan yarns including Felted Tweed, Alpaca Soft, Kidsilk Haze and Soft Yak. Vibrant shades of emerald green, teal and ocean blue graduate into bold purples and pinks, which are softened with pale turquoise, dreamy lilac and blush pink, laced with flecks of cool silver and pale gold. There are plenty of sparkling beads in it too!
The blanket design includes the techniques of intarsia, fairisle, lace, textured stitches, stripes and beads, offering you a varied selection of squares to knit up over ten months. And there will be a choice of two options - as there is this year - for the trickier squares (fairisle and intarsia), enabling both novice and experienced knitters to participate in this unique knitting experience.
My monthly tech vids have been extremely popular this year, so I am pleased to say that I will continue with these in a dedicated monthly blog so that you have all the help and support you need as you work your way through the forty-nine squares.
The club begins on 1st February 2024 and runs for ten months until November 2024.
The finished size of the blanket is approximately 135cm x 135cm.
What does my membership include?
Each member will receive a knitting kit which includes over forty balls of premium quality yarn, ten sets of emailed patterns (with the option to purchase additional printed patterns), Debbie Abrahams size 6 beads and a woven label. The kit will be posted in two halves with the first one delivered in February, followed by the second one in May.
NEW! Download pattern option
For the first time we are offering the ten sets of patterns as monthly downloads enabling you to use yarns and beads from your own stash to knit the blanket. The list of yarns and beads for the first part of the kit will be released a week before the project begins. If you decide to purchase the yarn and beads for the project yourself, the cost of all the materials, like for like, is approximately £340. We are unable to guarantee that all of the colours in my Light Merino DK yarn will be available to purchase so substitutes may have to be used.
Choose to spread the cost of your payment
For those who would prefer to pay in instalments we have an easy-to-use payment system in place called Splitit which enables you to make your payment between 2-4 months. This means you can secure your membership today with a deposit with nothing more to pay until next month. Simply select Splitit at checkout when you make your first payment and then your remaining payments will be taken automatically from your account. If you choose this option you will still be included in the Early Bird Special Offer.
How do I make my purchase?
It’s really easy. You just need to visit the shop on our website and there you will find the 2024 Mystery Blanket Club for sale. There are several options to choose from starting with the basic package which includes the full knitting kit and emailed monthly pattens. Or you can upgrade and add on printed patterns (UK and overseas), and/or Special Delivery (UK only). All overseas parcels are posted by Tracked International Delivery.
Memberships are limited and when they have sold out the club will be closed. So if you want to be part of this unique knitting experience and don’t want to miss out on all the fun and excitement next year, pop across to our shop and get yourself signed up today. And then you’ll have peace of mind that you are onboard again for another great knitting adventure with me next year. I can hardly wait for it to begin!
WE’VE GOT SOME NEW KIT LAUNCHES COMING UP SOON WHICH YOU MIGHT WANT TO MAKE A NOTE OF IN YOUR DIARY (some of these dates have changed since they were last published).
Friday 20th October: Cowl kit promotion –the 2021 Hell Bay project, Fraggle Rock in its original colourway and last year’s Festive Mystery Box project, Snowflake (see below) will be available to purchase for the first time as kits. A second colourway of the Fraggle Rock Cowl will be available in a few weeks’ time.
Friday 10th November: Festive Mystery Knit Boxes – the perfect idea for a gift or a treat for yourself. Debbie’s Mystery Box includes ten mystery gifts including a brand-new festive knitting kit.
Friday 18th November: our festive kits promotion begins, and you can grab yourself a kit at a discounted price for a limited period (offer excludes Festive Mystery Knit Boxes).
IF YOU ARE NOT FOLLOWING US ON SOCIAL MEDIA THEN YOU CAN JOIN US TODAY! Not only will our posts keep you up to date with all our latest news, but the lovely, friendly communities out there are a great place meet up virtually to get help and advice for your project whilst enjoying some good humoured banter!
Ravelry: Debbie Abrahams Handknits
Facebook: Debbie Abrahams Mystery Knitters
Facebook: Debbie Abrahams Handknits (our own FB page)
Instagram: debbieabrahams_knitting
Pinterest: debbieabrahams@debbieabrahamsk
OUR MYSTERY CLUB MEETINGS ARE HELD ON THE FIRST WEDNESDAY OF THE MONTH, so if are able to get yourself over to Carrington in Nottingham, you are very welcome to join us in Doreen’s fabulous yarn store, Yarn Loft, for a couple of hours of knit and chat.
Our next gathering is on Wednesday 1st November and I will be bringing with me my completed 2023 Mystery Blanket and Mystery Cushion, which I am so excited to be able to take out of the house for the first time after hiding them away all year! We meet between 4-6pm at Yarn Loft, 118 Hucknall Road, Carrington, Nottingham, tel number 07825 702433, website: www.yarnloft.co.uk. To cover the costs of hosting the meeting there is a small sub to pay (£3.00), which can be paid to Doreen on the day.
Just send a quick email to me at debbie@debbieabrahams.com to let me know you are coming, and we will make sure that we have a cuppa ready for you!
I write a report of the meetings in the Mystery Blanket blog, so if you check out the October blog, you can read all about what we got up to at the most recent meeting. It was a lot of fun, as always!
MEMBERSHIPS FOR THE 2024 MYSTERY CUSHION CLUB OPEN IN MARCH. But don’t worry as we will send you all an email to let you know as soon as it is launched. I’ve already made a start on the design and am very excited about what I have planned – a totally different theme, colour palette and yarns! So if you fancy it, keep an eye on your inbox in the Spring and you can get yourself signed up for another exciting mystery KAL!
MEMBER GALLERY! At the end of this year I will be creating a Gallery of the member’s work on my website which gives you the chance to showcase your completed projects. I welcome all ‘Debbie ‘ Mystery’ projects (old and new!) plus any other projects of mine that you have made this year. I plan to put it live on my blog at the beginning of January, so that gives you a few months to get them finished and photographed. Please send your photos and comments (a few words – or a lot! – would be lovely!) directly to me at: debbie@debbieabrahams.com and with your permission I will include your work in the blog.
I want to finish by thanking you all for your amazing enthusiasm and commitment throughout the whole of this project. There’s nothing better for me than to hear that your projects are progressing so well and to see the enjoyment it brings you. It’s been a pleasure having you on board, and I hope that you have enjoyed your mystery KAL experience as much I enjoyed designing it. Whether it’s been a steep learning curve or a bit of a breeze, there’s always something new to learn along the way! Enjoy your Picnic Party! Take care, Debbie, x
]]>
https://debbieabrahams.com/blogs/news/mystery-blanket-2023-post-9-october2023-10-13T11:17:09+01:002023-10-13T11:17:09+01:00Mystery Blanket 2023: post 9, OctoberDebbie AbrahamsWELCOME TO THE PENULTIMATE INSTALMENT OF THE 2023 MYSTERY BLANKET! Apologies that this blog is launching mid-month, but the past few weeks have been extremely busy with two of my Mystery clubs coming to an end, a new Mystery club beginning and alongside that I’ve been out and about running workshops. So all in all it’s been a bit crazy! However, I’ve managed to find a few quiet hours today to catch up with you, so hopefully you will find some time in between all your knitting to take a rest and catch up with me!
The opening image is of all the lovely ladies and gentlemen who joined me in September for a fabulous knitting workshop break in Scotland. You can read more about that later in the blog and find out what we knitted during our stay at Lochside.
There is no intro vid from me this month, but I will return at the beginning of next month (yikes, that’s only about two weeks away!), for the reveal of this year’s Mystery Blanket. There are no new tech vids, so after a reminder of what is already out there for you to access, I’ll get straight on with all the news and advice for this month’s squares.
This is a reminder of the techniques that were covered in previous blogs:
Square 8, Pixies & Nixies (both options): how to knit the decorative slip-stitch (February)
How to carry yarns up the side of the work (February)
How to pick up stitches along a cast-off edge (February)
Mattress stitch (horizontal) (February)
How to cable (February)
How to knit a contrast-coloured bobble (February)
Square 16, Forager: how to knit the exaggerated decorative purl stitch (February)
Understanding lace stitches (March)
How to thread beads onto your yarn (March)
How to bead, the slip-stitch method (March)
The intarsia technique (March)
How to add Chain stitch to your knitting (March)
How to add Swiss darning to knitting (March)
How to pick up stitches along a cast-off edge using several colours (April)
Square 23, Dragonfly: Option Two (Rows 1-7) (June)
Square 49, Flora (Option Two) (September)
Mattress stitch (vertical) (September)
THE PRINTED PATTERNS HAVE BEEN POSTED TO THE MEMBERS WHO OPTED FOR THEM, with the overseas sent on Thursday 21st September and the UK on Wednesday 27th September. I am hearing from some of the members that the patterns are arriving in the post after the 1st of the month, and if this has affected you then I apologise for the delay.
Postal systems around the world differ so much in their speed and efficiency, and some arrive within a week, whilst others take 2-3 weeks to be delivered. If you are sitting waiting for your printed brochure to arrive then remember that you can always download the file and either work from the digital version or print off a few pages until your patterns arrive. At this point in the blanket there are lots of things that need doing such as sewing in ends and sewing strips together so you could always get on with these tasks in the meantime.
SIGN-UPS FOR THE 2024 MYSTERY BLANKET CLUB ARE OPEN SO IF YOU HAVEN’T SIGNED UP YET, THERE IS STILL TIME! Our sign-up deadline is 31st December, however, the Club will close as soon as all of the memberships are sold. So it’s best not to to delay and get yourself onboard today!
What’s in store for 2024?
I am absolutely thrilled to be using my own bespoke Light Wool DK yarn again for this project which has been produced by the wonderful team at Laxtons in North Yorkshire, UK. I have combined it with a few of my most favourite Rowan yarns including Felted Tweed, Alpaca Soft, Kidsilk Haze and Soft Yak. Vibrant shades of teal and ocean blue graduate into bold purples and pinks, which are softened with pale turquoise, dreamy lilac and blush pink laced with flecks of cool silver and pale gold. There are plenty of sparkling beads in it too!
The blanket design includes the techniques of intarsia, fairisle, lace, textured stitches, stripes and beads, offering you a feast of squares to knit up over ten months. And there will be a choice of two options - as there is this year - for the trickier squares (fairisle and intarsia), enabling both novice and experienced knitters to participate in this unique knitting experience.
My monthly tech vids have been extremely popular this year, so I am pleased to say that I will continue with these in a dedicated monthly blog so that you have all the help and support you need as you work your way through the forty-nine squares.
The club begins on 1st February 2024 and runs for ten months until November 2024.
The finished size of the blanket is approximately 135cm x 135cm.
What does my membership include?
Each member will receive a knitting kit which includes over forty balls of premium quality yarn, ten sets of emailed patterns (with the option to purchase additional printed patterns), Debbie Abrahams size 6 beads and a woven label. The kit will be posted in two halves with the first one delivered in February, followed by the second one in May.
NEW! Download pattern option
For the first time we are offering the ten sets of patterns as monthly downloads enabling you to use yarns and beads from your own stash to knit the blanket. The list of yarns and beads for the first part of the kit will be released a week before the project begins. If you decide to purchase the yarn and beads for the project yourself, the cost of all the materials, like for like, is approximately £340. We are unable to guarantee that all of the colours in my Light Merino DK yarn will be available to purchase so substitutes may have to be used.
Choose to spread the cost of your payment
For those who would prefer to pay in instalments we have an easy-to-use payment system in place called Splitit which enables you to make your payment between 2-4 months. This means you can secure your membership today with a deposit with nothing more to pay until next month. Simply select Splitit at checkout when you make your first payment and then your remaining payments will be taken automatically from your account. If you choose this option you will still be included in the Early Bird Special Offer.
How do I make my purchase?
It’s really easy. You just need to visit the shop on our website and there you will find the 2024 Mystery Blanket Club for sale. There are several options to choose from starting with the basic package which includes the full knitting kit and emailed monthly pattens. Or you can upgrade and add on printed patterns (UK and overseas), and/or Special Delivery (UK only). All overseas parcels are posted by Tracked International Delivery.
Memberships are limited and when they have sold out the club will be closed. So if you want to be part of this unique knitting experience and don’t want to miss out on all the fun and excitement next year, pop across to our shop and get yourself signed up today. And then you’ll have peace of mind that you are onboard again for another great knitting adventure with me next year. I can hardly wait for it to begin!
SO, THIS IS YOUR LAST CHANCE TO HAVE A GO AT GUESSING THE TITLE. We have had one more correct guess, and this time the congrats go to Robyn Tommasini, so very well done to you!
With almost all of the letters revealed, the last one I am going to give you before the reveal of the title next month might just trigger the correct answer. Let’s see…
This month the letter (and final letter) I am giving you is... “C”:
T H _ / _ N C H A N T _ D / _ O R _ S T
Most of you have already guessed it, but if you are still unsure, here’s your opportunity to give it one more go. So what do you think?!? Email your answer to sue@debbieabrahams.com and if you are right, with your permission we will publish your name in the final blog. Good luck everyone!
THERE ARE FIVE SQUARES TO KNIT THIS MONTH, with alternative options for four of the squares:
Square 5, Goblin – cable pattern with slip-stitch beads (same for both options):
Square 6, Hawthorn (Option One) – fairisle pattern with stripes, textured stitches and hooked-in beads:
Square 6, Hawthorn (Option Two) – textured pattern with stripes and hooked-in beads:
Square 7, Flora 2 (Option One) – intarsia flower motifs with hooked-in beads and Swiss darned and chain stitch details:
Square 7, Flora 2 (Option Two) – textured pattern with mini cables and hooked-in beads:
Square 13, Deer (Option One) – intarsia deer with slip-stitch beads and Swiss darned and chain stitch details :
Square 14, The Pixies & Nixies Are Back! (Option One) – fairisle pattern with stripes, textured stitches and hooked-in beads:
Square 14, The Pixies & Nixies Are Back! (Option Two) – textured pattern with stripes and hooked-in beads:
On each pattern page there is a list of Pattern notes and tips that are worth reading before you start to knit each square. These bits of advice will help you and give pre-warnings as to what look out for in the pattern instructions. Also take note of the description under the title of each square as this tells you what the stitch structure is.
You can use the tech vids from previous blogs to help you knit your squares. But here are a few extra tips to assist you:
SQUARE 6, GOBLIN: this is a repeat of a square you have knitted previously, it was in Mail Out 6 which was not too long ago, so hopefully you will remember the techniques. But if not then these tech vids will help you.
Videos to watch for assistance with this square:
How to pick up stitches along a cast-off edge (February blog)
Mattress stitch (horizontal) (February blog)
How to cable (February blog)
How to thread beads onto your yarn (March blog)
How to bead, the slip-stitch method (March blog)
The beads are threaded on for this square, so take care to thread them on in the correct order. The instructions for this are on page 6 of your October mail out.
You can work from worded instructions or from a chart. If you have not knitted this square from a chart before then maybe give it a go this time. On the chart you can see very clearly on which rows the cables are worked, where the beads are placed and where the stitches are worked through the backs of the loops. And if you get stuck or are unsure about how to read a row, then you can reference the same row in the worded instructions which will spell out what you need to do.
SQUARE 6, HAWTHORN (Option One): this is a square you will be familiar with as it is the same as Square 44 and similar to Squares 2 and 48 from previous mail outs.
Videos to watch for assistance with this square:
How to pick up stitches along a cast-off edge (February blog)
Mattress stitch (horizontal) (February blog)
Square 8, Pixies & Nixies (both options): how to knit the decorative slip-stitch (February blog)
How to bead, the hooking-in method (February blog)
How to carry yarns up the side of the work (February blog)
This is the original version that you knitted way back in April, it has Barn Red stripes rather than Ginger (which replaced Barn Red in squares 2 and 48).
It is advisable to choose the same option that you knitted for Square 44 to keep the design balanced.
SQUARE 6, HAWTHORN (Option Two): in this square the fairisle panels in Option One are replaced with a textured, beaded decorative stitch.
Videos to watch for assistance with this square:
How to pick up stitches along a cast-off edge (February blog)
Mattress stitch (horizontal) (February blog)
Square 8, Pixies & Nixies (both options): how to knit the decorative slip-stitch (February)
How to knit the decorative loop stitch (February blog)
How to bead, the hooking-in method (February blog)
How to carry yarns up the side of the work (February blog)
As with Option One, I would advise that you choose the same option that you chose for Square 44.
I think the biggest challenge with this square is probably remembering the needle size changes which can be easily missed – especially as you’ve knitted this square before and might only glance at the pattern as you are working through it rather than reading every row. They are in the pattern to keep the width of the square uniform when other stitch structures are being knitted. They swap between 2.50mm, 3.00mm and 3.50mm and are hi-lighted in the instructions to draw your attention to them.
SQUARE 7, FLORA (Option One): this square is very similar to Square 49 from last month’s mail out. However, if you look closely you will see that it is a mirror-image and therefore not identical.
Videos to watch for assistance with this square:
How to pick up stitches along a cast-off edge (February blog)
How to pick up stitches along a cast-off edge using several colours (April blog)
Mattress stitch (horizontal) (February blog)
The intarsia technique (March blog)
How to bead, the hooking-in method (February blog)
How to add Swiss darning to knitting (March blog)
How to add Chain stitch to your knitting (March blog)
It would be wise to choose the same option that you knitted for Square 49 as this will keep the top corners of the blanket symmetrical (and you know how much I love symmetry!).
As with Square 49, you need to use several separate balls of yarn (or bobbins) to knit this square, remembering that it is a single thickness multi-coloured piece of knitting so carrying yarns across the back should only be done when absolutely necessary.
After knitting this square you will need to block and press it before adding the embroidery. If you chose to do your own colours of embroidery on Square 49 (which I suggested in the previous blog), then you could do the same again here. And if you prefer, they could be different to each other just to give it a unique twist!
SQUARE 7, FLORA (Option Two): this is the alternative square to knit which replaces intarsia with a textured stitch.
Videos to watch for assistance with this square:
How to pick up stitches along a cast-off edge (February blog)
Mattress stitch (horizontal) (February blog)
How to bead, the hooking-in method (February blog)
Square 49, Flora, Option Two (Rows 5 and 7)
I have had some feedback on this square that it is a tricky one to knit. However, I also know that there are some of you out there who enjoy a challenge. Both options are an investment of time (and patience!), but they are worth it and will finish off the top corners of your blanket beautifully!
Just one last thing to mention about this square is the needle size. It is one metric size smaller than the main needle and this is important otherwise your square will knit up too wide and too long. So make sure that you grab the right needles before you begin.
SQUARE 13, DEER (Option One): this is a new square and a new creature to challenge your intarsia skills!
Videos to watch for assistance with this square:
How to pick up stitches along a cast-off edge (February blog)
How to pick up stitches along a cast-off edge using several colours (April blog)
Mattress stitch (horizontal) (February blog)
The intarsia technique (March blog)
How to thread beads onto your yarn (March blog)
How to bead, the slip-stitch method (March blog)
How to add Chain stitch to your knitting (March blog)
How to add Swiss darning to knitting (March blog)
I would recommend that you opt for the same square you chose for Square 37, Option One, which was Wise Old Owl.
As with all intarsia patterns, the key to success is in the preparation. So take time before you cast on to study the chart and work out how many small balls or bobbins of yarn you need. I have been asked how to gauge the amount yarn for an area of colour, however this is a tricky one to answer as it is dependant on the weight of yarn and your own tension. What you want to avoid is running out of yarn halfway through one section, so my method is to fill up each bobbin and then I know I will have enough for that section, and anything left over can be used for other areas or for other squares. Oddments and lengths can also come in useful for embroidery or for sewing together the squares, so be sure never to throw anything away until the project is completed.
If you need a reminder about how to pick up stitches to begin the square using several colours, you can go back to the April blog where you will find a tech vid for this. But if you are casting on rather than picking up stitches, you could take a look at the tech vid from the 2021 Mystery Cushion Club which shows how you do this:
There is some chain stitch embroidery to add to the knitting around the eyes using Blackberry yarn, and there are glints of Simply White in the eyes too which can be Swiss darned. In the Pattern notes and tips on page 22 I give more details about the embroidery including the colours to be used. So have a read of this, especially if you find it difficult to see all of these details on the image and chart.
SQUARE 13, TOADSTOOL (Option Two): if you knitted Option Two for squares 9, 37 and 41 then you will be familiar with this all-over textured, beaded stitch. It’s a really fun square to knit and is the choice to make if you don’t want to knit intarsia.
Videos to watch for assistance with this square:
How to pick up stitches along a cast-off edge (February blog)
Mattress stitch (horizontal) (February blog)
How to bead, the hooking-in method (February blog)
This is the square with a variable stitch count. So it’s a good idea to count the number of stitches at the end of every row after there have been increases or decreases made, just to make sure you haven’t missed any.
Don’t forget that this square uses a smaller needle than the suggested main needle size of 3.50mm. So make sure you grab your 3.25mm needles and not the slightly larger ones!
SQUARE 14, THE PIXIES & NIXIES ARE BACK! (Option One): this square is the same as Square 42 from Mail Out 7.
Videos to watch for assistance with this square:
How to pick up stitches along a cast-off edge (February blog)
Mattress stitch (horizontal) (February blog)
Square 8, Pixies & Nixies (both options): how to knit the decorative slip-stitch (February blog)
How to bead, the hooking-in method (February blog)
How to carry yarns up the side of the work (February blog)
I would recommend that you choose the same option that you knitted for Square 42. This is most probably the same choices you made for Squares 8 and 36.
There are several changes to needle sizes throughout this pattern, and the bold type will draw your attention to them. The largest of the needles is 3.75mm and this is needed for the fairisle section towards the top of the square. This jump up in a needle size from the main one will help to keep your fairisle neat and even. But you will also need to make sure that when stranding yarns across the back of the work the stitches are spread to the correct width on the needle to avoid puckering.
SQUARE 14, THE PIXIES & NIXIES ARE BACK! (Option Two): this is the easier option of the two and should match the choice that you made for Square 42.
Videos to watch for assistance with this square:
How to pick up stitches along a cast-off edge (February blog)
Mattress stitch (horizontal) (February blog)
Square 8, Pixies & Nixies (both options): how to knit the decorative slip-stitch (February blog)
How to knit the decorative loop stitch (February blog)
How to bead, the hooking-in method (February blog)
How to carry yarns up the side of the work (February blog)
As with Option One, there are several changes to needle sizes which will help to maintain a uniform width all the way to the top of the square. These are written in bold so that you don’t miss them.
When you’ve completed all these squares it’s time to put the flags out because you’ve completed another strip! And if you want to get ahead, you could start work on getting some more of your strips sewn together. So if you are ready for that, here we go…
LET’S BEGIN WITH A QUICK REMINDER ABOUT SEWING YOUR SQUARES AND STRIPS TOGETHER. Ifyou have knitted your squares separately then you will need to join them together first to create strips 1, 2 and 3 (these are the three vertical rows of squares on the left side of the Piecing diagram on page 4 (Squares 1-7, 8-14 and 15-21). If you need some guidance with this, check out the tech vid in the February blog for horizontal mattress stitch which demonstrates this technique.
Once you have your three strips completed you can make a start. This is a guide to how to sew the squares together using Mattress stitch. It is important to note that these are my suggestions as to how to sew together the squares, but please feel free to use your own method and sequence if preferred.
In this blanket all of the squares are facing in the same direction (in some of the previous Mystery Blankets the squares were turned upside down or were positioned on their side). So this makes it much easier to sew together. All you need to watch out for is the number of rows, which as you know does vary from square to square. This means that some easing in will be required.
These instructions are based on taking the needle under 2 ‘bars’ at a time as demonstrated in the tech vid for vertical mattress stitch. To ease in a row, you will need to take your needle under one less bar on the side you are easing the extra row into.
Before we make a start, these are some extra tips on easing in rows:
Garter stitch rows have a tighter row tension than stocking stitch, so for every row of Garter stitch (which is two knit rows), ease these two rows into one stocking stitch row.
Slip-stitch beads (and slip-stitch patterns) have a tighter row tension than stocking stitch, so if you need to ease in some rows it is best to do this across beaded rows, taking the needle under more of the beaded rows than the stocking stitch rows.
Fairisle usually has a looser row tension than stocking stitch, so if you need to ease in some rows it is best to do this across fairisle rows, taking the needle under more of the stocking stitch rows than the fairisle rows.
For a square that has an all-over pattern, such as Square 10 Bracken, any easings need to be spread out evenly across the total number of rows (and not eased in all at one end or unevenly).
When there are two options for a square, I have given separate instructions for each option, so make sure that you check which one you need to follow for your choice of squares. If you have mixed your options then you will have to work out some of the easings yourself, but the piecing diagram on page 4 will help you with this.
These are my guidelines and do not have to be followed if you prefer to use your own method and calculations.
SEW STRIP 1 (squares 1-7) TO STRIP 2 (squares 8-14)
Sew Square 1 (Option One) (60 rows) to Square 8 (Option One) (66 rows): you need to ease 6 rows of Square 8 (Option One) into Square 1.
Along the edge of Square 1 (Option One) place a marker between Rows 30 and 31.
Along the edge of Square 8 (Option One) place a marker between Rows 33 and 34.
Ease in 6 rows as evenly as you can across the whole length of the squares, making sure that the marker on Square 1 (Option One) is matched to the marker on Square 8 (Option One).
Sew Square 1 (Option Two) (69 rows) to Square 8 (Option Two) (74 rows): you need to ease 5 rows of Square 8 (Option Two) into Square 1 (Option Two).
Along the edge of Square 1 (Option Two) place a marker on Row 35.
Along the edge of Square 8 (Option Two) place a marker between Rows 37 and 38.
Ease in 5 rows as evenly as you can across the whole length of the squares, making sure that the marker on Square 1 (Option Two) is matched to the marker on Square 8 (Option Two).
Sew Square 2 (Option One) (60 rows) to Square 9 (Option One) (60 rows): there are no rows to ease in.
Along the edge of Square 2 (Option One) place a marker between Rows 30 and 31.
Along the edge of Square 9 (Option One) place a marker between Rows 30 and 31.
There are no rows to ease in, just make sure that the marker on Square 2 is matched to the marker on Square 9.
Sew Square 2 (Option Two) (82 rows) to Square 9 (Option Two) (60 rows): you need to ease 22 rows of Square 2 (Option Two) into Square 9 (Option Two).
Along the edge of Square 2 (Option Two) place a marker between Rows 41 and 42.
Along the edge of Square 9 (Option Two) place a marker between Rows 30 and 31.
Ease in 22 rows as evenly as you can across the whole length of the squares, making sure that the marker on Square 2 (Option Two) is matched to the marker on Square 9 (Option Two).
Sew Square 3 (62 rows) to Square 10 (85 rows): you need to ease 23 rows of Square 38 into Square 31.
Along the edge of Square 3 place a marker between Rows 31 and 32.
Along the edge of Square 10 place a marker on Row 43.
Ease in 23 rows as evenly as you can across the whole length of the squares, making sure that the marker on Square 3 is matched to the marker on Square 10.
Sew Square 4 (Option One) (66 rows) to Square 11 (Option One) (60 rows): you need to ease 6 rows of Square 4 (Option One) into Square 11 (Option One).
Along the edge of Square 4 (Option One) place a marker between Rows 33 and 34.
Along the edge of Square 11 (Option One) place a marker between Rows 30 and 31.
Ease in 6 rows as evenly as you can across the whole length of the squares, making sure that the marker on Square 4 (Option One) is matched to the marker on Square 11 (Option One).
Sew Square 4 (Option Two) (82 rows) to Square 11 (Option Two) (63 rows): you need to ease 19 rows of Square 4 (Option Two) into Square 11 (Option Two).
Along the edge of Square 4 (Option Two) place a marker between Rows 41 and 42.
Along the edge of Square 11 (Option Two) place a marker on Row 32.
Ease in 19 rows as evenly as you can across the whole length of the squares, making sure that the marker on Square 4 (Option Two) is matched to the marker on Square 11 (Option Two).
Sew Square 5 (61 rows) to Square 12 (85 rows): you need to ease 24 rows of Square 12 into Square 5.
Along the edge of Square 5 place a marker on Row 31.
Along the edge of Square 12 place a marker on Row 43.
Ease in 24 rows as evenly as you can across the whole length of the squares, making sure that the marker on Square 5 is matched to the marker on Square 12.
Sew Square 6 (Option One) (66 rows) to Square 13 (Option One) (60 rows): you need to ease 6 rows of Square 6 (Option One) into Square 13 (Option One).
Along the edge of Square 6 (Option One) place a marker between Rows 33 and 34.
Along the edge of Square 13 (Option One) place a marker between Rows 30 and 31.
Ease in 6 rows as evenly as you can across the whole length of the squares, making sure that the marker on Square 6 (Option One) is matched to the marker on Square 13 (Option One).
Sew Square 6 (Option Two) (82 rows) to Square 13 (Option Two) (60 rows): you need to ease 22 rows of Square 6 (Option One) into Square 13.
Along the edge of Square 6 (Option Two) place a marker between Rows 41 and 42.
Along the edge of Square 13 (Option Two) place a marker between Rows 30 and 31.
Ease in 22 rows as evenly as you can across the whole length of the squares, making sure that the marker on Square 6 (Option Two) is matched to the marker on Square 13 (Option Two).
Sew Square 7 (Option One) (60 rows) to Square 14 (Option One) (66 rows): you need to ease 6 rows of Square 14 (Option One) into Square 14 (Option One).
Along the edge of Square 7 (Option One) place a marker between Rows 30 and 31.
Along the edge of Square 14 (Option One) place a marker between Rows 33 and 34.
Ease in 6 rows as evenly as you can across the whole length of the squares, making sure that the marker on Square 7 (Option One) is matched to the marker on Square 14 (Option One).
Sew Square 7 (Option Two) (63 rows) to Square 14 (Option Two) (74 rows): you need to ease 11 rows of Square 14 (Option Two) into Square 7 (Option Two).
Along the edge of Square 7 (Option Two) place a marker on Row 32.
Along the edge of Square 14 (Option Two) place a marker between Rows 37 and 38.
Ease in 11 rows as evenly as you can across the whole length of the squares, making sure that the marker on Square 7 (Option Two) is matched to the marker on Square 14 (Option Two).
SEW STRIP 2 (squares 8-14) TO STRIP 3 (squares 15-21)
Sew Square 8 (Option One) (66 rows) to Square 15 (64 rows): you need to ease 2 rows of Square 8 (Option One) into Square 15.
Along the edge of Square 8 (Option One) place a marker between Rows 33 and 34.
Along the edge of Square 15 place a marker between Rows 32 and 33.
Ease in 2 rows as evenly as you can across the whole length of the squares, making sure that the marker on Square 8 (Option One) is matched to the marker on Square 15.
Sew Square 8 (Option Two) (74 rows) to Square 15 (64 rows): you need to ease 10 rows of Square 8 (Option Two) into Square 15.
Along the edge of Square 8 (Option Two) place a marker between Rows 37 and 38.
Along the edge of Square 15 place a marker between Rows 32 and 33.
Ease in 10 rows as evenly as you can across the whole length of the squares, making sure that the marker on Square 8 (Option Two) is matched to the marker on Square 15.
Sew Square 9 (Option One) (60 rows) to Square 16 (72 rows): you need to ease 12 rows of Square 16 into Square 9 (Option One).
Along the edge of Square 9 (Option One) place a marker between Rows 30 and 31.
Along the edge of Square 16 place a marker between Rows 36 and 37.
Ease in 12 rows as evenly as you can across the whole length of the squares, making sure that the marker on Square 9 (Option One) is matched to the marker on Square 16.
Sew Square 9 (Option Two) (60 rows) to Square 16 (72 rows): you need to ease 12 rows of Square 16 into Square 9 (Option Two).
Along the edge of Square 9 (Option Two) place a marker between Rows 30 and 31.
Along the edge of Square 16 place a marker between Rows 36 and 37.
Ease in 12 rows as evenly as you can across the whole length of the squares, making sure that the marker on Square 9 (Option Two) is matched to the marker on Square 16.
Sew Square 10 (85 rows) to Square 17 (57 rows): you need to ease 28 rows of Square 10 into Square 17.
Along the edge of Square 10 place a marker on Row 43.
Along the edge of Square 17 place a marker on Row 29.
Ease in 28 rows as evenly as you can across the whole length of the squares, making sure that the marker on Square 10 is matched to the marker on Square 17.
Sew Square 11 (Option One) (60 rows) to Square 18 (Option One) (77 rows): you need to ease 17 rows of Square 18 (Option One) into Square 11 (Option One).
Along the edge of Square 11 (Option One) place a marker between Rows 30 and 31.
Along the edge of Square 18 (Option One) place a marker on Row 39.
Ease in 17 rows as evenly as you can across the whole length of the squares, making sure that the marker on Square 11 (Option One) is matched to the marker on Square 18 (Option One).
Sew Square 11 (Option Two) (63 rows) to Square 18 (Option Two) (86 rows): you need to ease 23 rows of Square 18 (Option Two) into Square 11 (Option Two).
Along the edge of Square 11 (Option Two) place a marker on Row 32.
Along the edge of Square 18 (Option Two) place a marker between Rows 43 and 44.
Ease in 23 rows as evenly as you can across the whole length of the squares, making sure that the marker on Square 11 (Option Two) is matched to the marker on Square 18 (Option Two).
Sew Square 12 (85 rows) to Square 19 (61 rows): you need to ease 24 rows of Square 12 into Square 19.
Along the edge of Square 12 place a marker on Row 43.
Along the edge of Square 19 place a marker on Row 31.
Ease in 24 rows as evenly as you can across the whole length of the squares, making sure that the marker on Square 12 is matched to the marker on Square 19.
Sew Square 13 (Option One) (60 rows) to Square 20 (72 rows): you need to ease 12 rows of Square 20 into Square 13 (Option One).
Along the edge of Square 13 (Option One) place a marker between Rows 30 and 31.
Along the edge of Square 20 place a marker between Rows 36 and 37.
Ease in 12 rows as evenly as you can across the whole length of the squares, making sure that the marker on Square 13 (Option One) is matched to the marker on Square 20.
Sew Square 13 (Option Two) (60 rows) to Square 20 (72 rows): you need to ease 12 rows of Square 20 into Square 13 (Option Two).
Along the edge of Square 13 (Option Two) place a marker between Rows 30 and 31.
Along the edge of Square 20 place a marker between Rows 36 and 37.
Ease in 12 rows as evenly as you can across the whole length of the squares, making sure that the marker on Square 13 (Option Two) is matched to the marker on Square 20.
Sew Square 14 (Option One) (66 rows) to Square 21 (63 rows): you need to ease 3 rows of Square 14 (Option One) into Square 21.
Along the edge of Square 14 (Option One) place a marker between Rows 33 and 34.
Along the edge of Square 21 place a marker on Row 32.
Ease in 3 rows as evenly as you can across the whole length of the squares, making sure that the marker on Square 14 (Option One) is matched to the marker on Square 21.
Sew Square 14 (Option Two) (74 rows) to Square 21 (63 rows): you need to ease 11 rows of Square 14 (Option Two) into Square 21.
Along the edge of Square 14 (Option Two) place a marker between Rows 37 and 38.
Along the edge of Square 21 place a marker on Row 32.
Ease in 11 rows as evenly as you can across the whole length of the squares, making sure that the marker on Square 14 (Option Two) is matched to the marker on Square 21.
FOR THE FINAL MAIL OUT YOU WILL NEED CIRCULAR NEEDLES TO KNIT THE EDGINGS. So it would be a good idea to get yourself prepped and ready for it before the final mail out is sent to you. You will need:
a circular 2.75mm (US 2) (UK 12) 100cm length needle
a circular 3.50mm (US 4) (UK n/a) 100cm length needle
one 3.50mm (US 4) (UK n/a) needle for casting off the stitches.
If you have had to change your main needle size for this project, then you will need to make the same changes to the needles for the edgings.
WE’VE GOT SOME NEW KIT LAUNCHES COMING UP SOON WHICH YOU MIGHT WANT TO MAKE A NOTE OF IN YOUR DIARY (some of these dates have changed since they were last published).
Friday 20th October: Cowl kit promotion –the 2021 Hell Bay project, Fraggle Rock in its original colourway and last year’s Festive Mystery Box project, Snowflake will be available to purchase for the first time as kits. A second colourway of the Fraggle Rock Cowl will be available in a few weeks’ time.
Friday 10th November: Festive Mystery Knit Boxes – the perfect idea for a gift or a treat for yourself. Debbie’s Mystery Box includes ten mystery gifts including a brand-new festive knitting kit.
Friday 18th November: our Festive Kits promotion begins, and you can grab yourself a kit at a discounted price for a limited period (offer excludes Festive Mystery Knit Boxes).
TOWARDS THE END OF SEPTEMBER I HEADED UP TO THE LOCHSIDE SPA HOTEL IN SCOTLAND WITH SUE FOR AN INSPIRED MINDS WORKSHOP, where we were joined by 27 very excited knitters – many of which were Mystery Blanket Club members (past and present!). This was a new location for our workshops – we’d never ventured across the English border before! - but it ticked all the boxes with fabulous food, an amazing workshop room with stunning views of the Loch, very comfortable accommodation and a great team who looked after us superbly well.
Inspired Minds is an events company that is co-owned by Jane and Andy Crowfoot and me. We set it up to run regular knitting and crochet workshops and holidays across the UK and have been in business together for the past ten years. Jane looks after the crocheters and I look after the knitters. Sometimes we run joint workshops and others are knit or crochet only. This workshop was knit only and run by me (and Sue).
It was a global event with knitters flying in from several different countries to join in the fun. Sandra and Johan travelled from Sweden, Georgia and John, Mary-Beth, Sarah and Mary travelled all the way from the USA, Zita and Theo joined us from the Netherlands, and Allison Kingsbury came over from Germany! It was fantastic to have people from so many different backgrounds come together to knit.
Apart from indulging in fine food, enjoying the beautiful scenery and meeting other knitters, I designed a project for the participants to keep them busy during their stay. The Lochside Scarf was an exploration of colour in an end-to-end chevron stitch pattern. It combined nine colours of Rowan Felted Tweed with two of my Light Wool DK colours in a stripe that graduated from greens through to yellows and browns, purples and greys, before returning to greens again. And of course there were some beads in it too!
Each participant was given a kit, but I brought many extra colours with me that could be swapped in and out to create a more personal palette. Most people stuck to using the colours in the kit, but it was exciting to see some very different colourways being knitted up as well, with some opting to change all of the colours in the kit, whilst others added in a shot of another colour or two every now and then, just to give it an extra bit of spice! I was absolutely thrilled with all the progress that was made, everyone did so well!
It was a fabulous few days together and the only downside was when we had to go home – we all wished we could have stayed longer! However, the good news is that we are planning to return there next year and are in the process of sorting out some dates. So as soon as they are confirmed we will be sure to let you know. Just make sure that you are signed up to our Inspired Minds news alerts by visiting our website: www.inspiredminds-uk.com
Above: Trish with her completed Lochside Scarf!
We always mail out to our Inspired Minds database first before we contact our own databases. And usually these events sell out very quickly. So if you have not signed up to Inspired Minds yet, it would be a really good idea to do it now.
TOWARDS THE BEGINNING OF SEPTEMBER I ENJOYED A COUPLE OF HOURS WITH KERRY, ALISON, MARY AND VANESSA WHO JOINED ME AT YARN LOFT OUR REGULAR MYSTERY MEETING. I was very impressed to see how well the ladies were keeping up with the project, and many more rows were knitted while we were there (and not too many undone!).
Below, left to right: Kerry, Alison and Vanessa crack on with their blanket squares.
Doreen kept us going with hot drinks and cake, and there was much happy banter too as we knitted our way through the two hours. Guesses were made at what the centre square of the blanket might be…maybe a unicorn, or possibly a squirrel? Or could it be a fairy? Of course I said nothing – I’m certainly not going to give the game away this close to the end! But it was interesting to hear all the ideas. I wonder if anyone was right!?!...
Above, left to right: Mary and Kerry enjoy a bit of banter while knitting.
Our next meeting at Yarn Loft is on Wednesday 1st November which coincides with the launch of the final instalment. So after months of hiding it away, I will be bringing the blanket to the meeting with me. It begins from 4pm and runs until 6pm. Yarn Loft is at 118 Hucknall Road, Carrington, Nottingham, tel number 07825 702433, website: www.yarnloft.co.uk. To cover the costs of hosting the meeting there is a small sub to pay (£3.00), which can be paid to Doreen on the day.
Just send a quick email to me at debbie@debbieabrahams.com to let me know you are coming and we will make sure that we reserve a space for you!
IF YOU DON’T FOLLOW US ON OUR SOCIAL MEDIA PLATFORMS THEN PLEASE COME AND JOIN US, and enjoy the messages and photos that are shared between myself and the members:
Instagram: debbieabrahams_knitting
Pinterest: debbieabrahams@debbieabrahamsk
Facebook: Debbie Abrahams Mystery Knitters
Facebook: Debbie Abrahams Handknits
Ravelry: Debbie Abrahams Handknits
BEFORE THE PENULTIMATE PRIZE DRAW, I HAVE A FEW MEMBER STORIES TO SHARE WITH YOU, STARTING WITH ANNABEL CASEY FROM BANBURY IN OXFORDSHIRE (UK) WHO WAS OVERJOYED TO HAVE COMPLETED A PROJECT SHE BEGAN IN ITALY WITH ME LAST YEAR. Annabel joined me for a week at the glorious Watermill in Posara where we spent the week knitting the Tessera Bag. By the sounds if it she was over the moon to get it completed!
Annabel says:“FINALLY I finished my Tessera bag! Actually, I finished the knitting a week or two ago and it has been languishing in a basket awaiting lining and finishing. Typically I sat down to it today and finished it within an hour… Strap lined with grosgrain ribbon to stop it stretching and the bag with a remnant of curtain fabric. Really pleased with it - great pattern!”
It really is a huge relief to get a WIP completed so that you can move on with new projects. It is especially great to see a workshop project finished as I know how hard it is to keep the momentum going after the event. So well done Annabel, it looks stunning, and I LOVE the strap lined with grosgrain – what a super idea!
YOU MIGHT REMEMBER A FEW MONTHS AGO ALL THE WONDERFUL HATS THAT DAPHNE CAVANAH FROM WADEBRIDGE IN CORNWALL (UK) MADE AND SHARED WITH US. I was thrilled to hear that more hats have been knitted since then, including these two lovely creations.
Above: Hat #36
Below: Hat #37
Daphne says:“I thought you might like to see my two latest creations, hats #36 & #37. This is the first time I have been inspired to add some beads. Hat #37 is called Corn Snakes Cornucopia! and is going to the lady who loves snakes. She has rescued a few where they have escaped their homes and freaked out the owners of their chosen new homes!
If anyone needs to see the simple graphs I have made, they can email me and I will send them over.
And here are two more hats, #38 Water Lily Pond (eat your heart out Monet!), and #39 Moody Skies over Moorland. I hope you like them. You can see the Mystery Blanket influences weaving their way through my creative processes!
Above: Hat #38
Below: Hat #39
I’ve just had this photo sent to me from Pennsylvania. The hats are travelling far and wide! The lady wearing the hat is Lina, she is a talented woman in many ways. Check out her Facebook page, Lina Badaszewski, her garden was what inspired the design.
I have been enjoying my MBC23 immensely and look forward to picking up my printed patterns from my son when I am up in Devon next on 8th. My printer only prints black and white, not very helpful with all the colours in use. I have now signed up for MBC24! Thank you again for inspiring me with my knitting!”
Wow Daphne! What beautiful hats, and it’s so good to see them out and about and being worn in such faraway places! It’s lovely to hear about your inspiration for your designs. And thanks for offering to share your charts too. If anyone is interested please let me know and I will put you in contact with the lovely Daphne!
THE LAST MEMBER STORY THIS MONTH COMES FROM ALEX TREIBER WHO LOVES IN BURLINGTON IN ONTARIO (CANADA). Alex has found a super way to finish off her chain stitch embroidery, which results in an invisible join. This is what she suggests:
Alex says:“I have a tip you might like to share. I wasn't happy with the way I was finishing my little chain stitch circles, by just doing a sort of stab stitch after the last chain to return the needle and wool to the wrong side. That left a little blip that was visible.
I'm not an embroiderer, but it occurred to me that I could finish the chain circle by joining my last stitch to my first stitch in the same way as duplicate stitch, i.e. looping the thread of the last stitch through the two "legs" of the first chain. This creates a circle that has no visible beginning or ending.
I hope you like this tip! Now I am really happy with all the little circles!”
This is an excellent tip Alex, and I am sure it will be tried by anyone who is struggling to get their chain stitch circles looking perfect. I’ve tried it too and it works brilliantly. Thanks so much for sharing!
THE FURRY FRIENDS GALLERY WILL BE LIVE SOON! I did originally say it would be launched in October, but I am pushing this back to November after the Mystery Blanket has finished. So if you have any fun photos of your nearest and dearest cuddly companions, then there is still time to send them in. Send your pics and a few words directly to me at debbie@debbieabrahams.com and they will be shared in this very special blog in a few weeks’ time!
AND FINALLY, IT’S TIME TO ANNOUNCE THE WINNER OF THE NINTH 2023 MYSTERY BLANKET CLUB PRIZE DRAW!!! Each month a member is picked at random to win a Debbie Abrahams prize. So it is worth reading right the way to the end of each blog to see if you are that lucky member!
PRIZE DRAW NINE (OCTOBER): this month’s winner is member 554, Patricia Sorrentino from Tampa, Florida in the USA. Well done Patricia! Please choose a prize from the following selection:
Your choice of one of Debbie’s knitting kits up to the value of £28.00 (take a look at them in our online shop).
A £25 voucher (or £25 refund) for a Debbie Abrahams Mystery Club membership: 2024 Mystery Blanket Club or 2024 Mystery Cushion Club.
A Mystery bag of five gifts!
We will notify Patricia to let her know the good news!
So here we are, almost at the end of our 2023 Mystery Blanket adventure, with just four squares (and the edgings) left to do. Next month the centre square will be revealed as well as the title of the blanket. So next month’s blog will be a bit of a bumper edition, with the inspiration for the project discussed as well as tips and advice for those final few squares.
After an unusually warm start to October, the weather here is beginning to turn and today it’s beautiful - the sky is clear blue and the air is icy. This is my favourite time of the year and it’s perfect weather for knitting! Wherever you are knitting your blanket squares, whether it is sunny and hot or cold and icy, I wish you a fabulous October, and look forward to seeing you again in a couple of weeks’ time for the final instalment. I just can’t wait, can you?!? Debbie x
]]>
https://debbieabrahams.com/blogs/news/mystery-baby-blanket-club-2023-post-1-mail-out-12023-09-30T23:58:14+01:002023-09-30T23:58:14+01:00Mystery Baby Blanket Club 2023: post 1, Mail Out 1Debbie AbrahamsWELCOME TO THE 2023 MYSTERY BABY BLANKET CLUB! I ran my first Mystery Baby Blanket a few years ago, so this is the second one in the series. If you have taken part in one of my mystery clubs before, you will find that this club runs in exactly the same way. But if you are completely new to all of this, then it would be a good idea to listen to my intro and read this blog from beginning to end to ensure that you are prepped and ready for your first instalment.
A new blog will be launched on our website at the beginning of each new instalment, so this is the place to come every month before you start knitting your squares. Each blog will include tips and tricks about the squares you are knitting so that you can get the best out of your Mystery Baby Blanket adventure!
In addition to the written blog there will be knitting technique demonstrations included in the blogs which will help you learn new skills or master your existing ones. You will find all the tech vids for this month below, beginning with my intro. This month there are eight tech vids:
Debbie’s intro!
How to knit intarsia
Picking up stitches to knit the next square
Mattress stitch (horizontal)
How to carry yarns up the side of the work
How to knit fairisle
How to add Swiss darning to your knitting
How to cable
How to knit a bobble
THE MYSTERY BABY BLANKET CLUB IS A GLOBAL PROJECT and this year we have knitters signed up from all over the world including Australia, New Zealand, USA, Canada, France, Netherlands, Germany, Belgium, Iceland, Ireland and the UK. I would like to say a big thank you ‘hello’ to each and everyone of you - it’s going to be a fantastic adventure!...
YOU HAVE ALL BEEN GIVEN A UNIQUE MEMBERSHIP NUMBER, so please can you quote it in any correspondence to us. We can locate your details such as postal address and email much more quickly if we have your number, and this means that your query will be dealt with more efficiently. Your membership number was included in the confirmation email we sent to you when you signed up to the club.
IT IS VERY IMPORTANT THAT WE HAVE YOUR CORRECT CONTACT DETAILS ON FILE, SO PLEASE NOTIFY US IMMEDIATELY IF ANY OF THESE DETAILS ARE INCORRECT. This goes for both your email and postal addresses. Any discrepancies in your postal address can affect the speed at which your parcel and/or printed patterns are delivered to you, or at worst they might not arrive at all. And an incorrect email address will mean that you will not receive our emailed patterns or club updates. So please let Sue know as soon as possible if we need to revise any of these details for you (especially if you move house).
ALL OF THE KNITTING KITS HAVE NOW BEEN POSTED, so if you have not received your parcel yet it will be with you very soon. We have a tracking number for all the overseas members, so if you would like us to email it to you just let us know. And if you have any worries about your parcel then you can contact Sue at: sue@debbieabrahams.com and she will do her best to help you.
When you receive your parcel, please can you check the contents of it against the list on page 2 of Mail Out 1. And if anything is missing, please let us know immediately and we will post it to you.
When you placed your order for this club you opted for a colourway - Silver or Rosy. However, if you have received the incorrect colourway, please let us know as soon as you can and we will check your order: sue@debbieabrahams.com
IN YOUR KNITTING KIT THERE IS A LUXURY WOVEN GIFT BAG, which could be used to keep your yarns in while you are knitting the project. Alternatively, if your completed blanket is going to be given away as a gift then you could use it as a gift bag. Either way round I hope you find it useful!
YOU WILL ALSO FIND IN YOUR KNITTING KIT A SMALL COLOURED ENVELOPE, and inside it you will find your woven label for the blanket. It has the title of the blanket on it, so if you want to keep this a secret put it in a safe place and open it when you have guessed it correctly (or given up and want to know what it is!).
MAIL OUT 1 HAS BEEN EMAILED TO ALL THE MEMBERS ON 1ST OCTOBER. If you cannot see it in your inbox, then check your Spam folder as our email might be sitting in there unread.
Members that paid for printed patterns will receive them each month in a separate card-backed envelope. If you did not sign up for printed patterns but have changed your mind, contact Sue and she will be able to set this up for you for an additional cost.
All members, including the printed pattern members, will be emailed the remaining mail outs each month from November - April.
EACH MONTH, IN ADDITION TO YOUR EMAILED PATTERNS, YOU WILL BE ABLE TO DOWNLOAD THE FILE FROM YOUR ACCOUNT ON OUR WEBSITE. This is a quick guide to how you can do this:
Under "MYSTERY CLUB DOWNLOADS" click "View all downloads"
Your latest available mail-outs will be visible here in PDF format to download
PLEASE NOTE THAT THE COLOURS IN THE MAIL-OUTS MIGHT NOT BE COMPLETELY ACCURATE TO THE COLOUR OF THE ACTUAL YARNS – both in the printed paperwork and in the digital files – so please be aware of this when working each square. We have done our best to make sure that the colours are as accurate as possible, however some discrepancies might occur. So it is always best to read the name and shade numbers of the colours rather than going by the photographs of the knitting and the graphics in the mail-outs.
THE PIECING DIAGRAMS ON PAGE 4 OF MAIL OUT 1 SHOW WHERE THE SQUARES ARE POSITIONED IN THE BLANKET. There are two diagrams – one for Colourway 1 (Silver) and one for Colourway Two (Rosy). Each month the new squares will be added to these diagrams so that you can see how the overall design is progressing.
ON THE PENULTIMATE PAGE OF EACH MAIL OUT YOU WILL FIND THE ABBREVIATIONS. This will be updated each month with any new additions to the list, so make sure that you always check out the latest one for any recent updates.
IT IS ADVISABLE, ALTHOUGH NOT NECESSARY, TO WORK IN VERTICAL STRIPS. Not only does this make it easier to keep track of which squares are which - there will be some repeats - but it also means less finishing off at the end of the project as you will only have five strips to sew together instead of thirty-five individually knitted squares. Over the seven months you will be sent the squares in such a way that they can be knitted in strips, so this is what I advise you do. Instructions are included in the patterns for this, it’s done by picking up stitches along the cast-off edge of a square to begin the next one in the strip. And if you’re not sure how to do this, there’s a tech vid this month to help you. For more advice about this read the info on page 3 of Mail Out 1. You’ll find it on the right-hand side of the page under the heading Working in vertical strips.
If you decide to knit the squares separately then you will need to sew them together to create strips. I recommend Mattress stitch (horizontal) for this, and there is a tech vid in this blog to assist you with this technique.
SOME OF THE SQUARES IN THE BLANKET HAVE A SECOND COLOUR OPTION. So you will need to follow the instruction for the colourway that you are knitting - that will be either Colourway 1 (Silver), or Colourway 2 (Rosy). The instructions for both colourways are written within the same pattern, but when there is a change to them, Colourway 1 is written first with Colourway 2 in brackets and bold. You can read more about this on page 3 of Mail Out 1.
BLOCKING AND PRESSING THE SQUARES IS VERY IMPORTANT, and although it’s not everyone’s favourite task, it really should be done if you want to create a professional looking blanket. Blocking the squares ensures that they are all a uniform size, which in turn will make joining them together so much easier to do. You might find that you have to ease some of them in or stretch them out to get them to the same measurements as other squares. Alternatively, other squares may block out quite easily with no easing in or out required.
If your individual squares are measuring slightly bigger or smaller than the recommended size of 14cm x 14cm, then this should not be a problem either. But you will need to decide on what size you are going to block them all to and stick to this throughout the whole blanket.
Blocking is the pinning out of your knitting, and, unless instructed otherwise, you should always pin it out with the wrong side facing upwards. Pin frequently along each edge, keeping all four edges as flat and even as possible. There is no need to use heat to press your squares. Much more preferable – and safer too – is cold water. So, if you have one available, fill up a plant spray bottle and use this to generously wet down the knitting, making sure that the water is dispersed right across the knitting from edge to edge. And then leave it to dry completely before removing the pins.
Pressing is the process of applying either heat or water to your knitting which relaxes the stitches and softens the fibres, resulting in a much more fluid and pleasant feeling fabric. After pressing you will find that your knitting drastically changes in quality and will feel beautiful and soft.
Blocking and pressing also helps the edges of the knitting stay flat rather than curling over, as is the tendency with most stitch structures.
I would suggest that you block and press your squares after you have knitted each one. I think it’s far easier to do this as you go along rather than leaving them all to the end. It also ensures that as you work through the squares they are all knitting up to the correct measurements.
I MENTIONED EARLIER ON HOW IMPORTANT GOOD PREPARATION IS BEFORE YOU START KNITTING, so here are a few things I would suggest you do before you make a start on your blanket.
First of all, have a good read of Mail Out 1 and familiarise yourself with the contents. The patterns are laid out in exactly the same way each month, so once you get familiar with them and how the patterns are written, they should be easy to follow.
On page 3 of Mail Out 1 there is lots of general information about the project including information about tension/gauge. It is very important that you test your tension before you start knitting.
The tension for this project is 25 stitches and 34 rows to 10cm (4in) measured over stocking stitch using 3.25mm needles.
I would suggest that you use Cream for your tension sample as you will have plenty of this in your kit.
Any discrepancies in your tension could lead to shortages of yarn, especially if you knit looser than the given tension. So please take time to do this. Here are some tips about measuring tension:
the tension sample should be longer and wider than the stated tension, so it is advisable to cast on a minimum of 30 stitches and work a minimum of 40 rows
use a solid ruler rather than a tape measure to measure your stitches and rows
start and finish counting the stitches and rows in from the edges of the knitting and not from edge to edge
if your tension is too loose you will need to resample using a smaller metric size needle
if you tension is too tight you will need to resample using a larger metric size needle
if you need to change your needle size then you will need to change all of the other needles used in the project as well by the same number of sizes
stitch tension is more important then row tension, so if you are unable to match both to the recommended tension, choose the needle size that gives you the closest match.
One more thing I would suggest you do before you start knitting is to set up your Colour coder. You will find this in your kit, it’s a piece of card onto which you can tie samples of each of the yarns and write their colour names and shade numbers. This is a very handy tool to have while you are knitting and means you can easily check yarns against the pattern instructions, especially as some of them are similar in colour.
It's also a good idea to keep each colour in a separate bag with either its ball-band or a note of which colour and shade number it is. Then you can be sure to pick up the correct colour and not risk knitting with the wrong one. If you use the wrong colour then you could run short of yarn.
NOBODY LIKES AN ERROR IN A KNITTING PATTERN, BUT UNFORTUNATELY SOMETIMES THEY DO HAPPEN DESPITE RIGOROUS TEST KNITS AND CHECKS. When an error is reported I check it and once it is confirmed I list it in the ‘Addendum’ section on the website. It can be accessed through a link at the bottom of the Homepage. I would advise that you check this before you start knitting each square just in case anything has been found. It could save you a lot of time.
IF YOU HAVE ANY QUERIES OR CONCERNS WHILST WORKING ON YOUR MYSTERY BLANKET, please contact Sue at sue@debbieabrahams.com and she will assist you. If it is a knitting query Sue will pass it onto me to answer, or onto Jason if you need technical support. Throughout the project we will do our best to assist you in every way we can to ensure that your knitting experience is as smooth and enjoyable as possible. So please do get in touch if you have a query, we are always here to help!
GUESSING THE TITLE OF THE MYSTERY BABY BLANKET is a bit fun, and each month, here in the blog, you will be given clues to help you guess what it is. As well as clues in the monthly squares, I will give you some extra help with a "letter" quiz, and in each blog I will give you another letter to help you. This month the letter I am giving you is “I”:
_ _ _ / I / _ _ _ _ / _ _ / _ _ _ ‘ _
Please send your guesses to Sue at sue@debbieabrahams.com. There are no prizes for the correct answer – but wouldn’t it be good if you got it right!?! And if you do, with your permission, we will publish your name in the next Mystery Baby Blanket blog.
THESE ARE THE FIVE SQUARES TO KNIT IN MAIL OUT 1:
Square 22: The Letter ‘Y’ – intarsia letter motif:
Square 23: The Letter ‘U’ – striped pattern with fairisle letter motifs:
Colourway 1: Silver
Colourway 2: Rosy
Square 24: ‘R’ is for Rocket! – intarsia rocket motif:
Colourway 1: Silver
Colourway 2: Rosy
Square 29: The Letter ‘Z’ – striped pattern with fairisle letter motifs:
Colourway 1: Silver
Colourway 2: Rosy
Square 30: Snuggle – cable and bobble pattern:
On each pattern page there is a list of Pattern notes and tips that are worth reading before you start to knit each square. These bits of advice will help you with, pre-warning you what to look out for and giving you some useful information about how to knit the square. In the following notes below I am going to give you a few extra tips about some of the squares, which should help you a bit more with your knitting.
SQUARE 22, THE LETTER ‘Y’: so we begin with intarsia, and the opportunity for anyone that is new to this technique to give it a go!
Tech vid to watch for assistance with this square:
How to knit intarsia
You will find some advice about the intarsia technique on page 17 of Mail Out 1, but basically it means that you are using separate balls of yarn to knit each section of colour. I decided to use bobbins to wind my yarns onto as I find they help keep them organised and my tension neat and even.
Before I started to knit this square I wound off two bobbins of Duckling and two bobbins of Heavenly. I cast on using the ball of Duckling and then introduced the first bobbin of Heavenly on Chart row 6. And on this same row I introduced the first bobbin of Duckling (for the right side of the letter, as you look at the chart). On Chart row 29 I introduced the second bobbin of Duckling for the centre of the letter where it splits into two. Then on Chart row 32 I introduced the second bobbin of Heavenly. The letter splits into two 'branches' on Chart row 29, but I think it is fine to carry the existing bobbin of Heavenly across the Ducking stitches in the middle of the letter on Chart rows 29-31.
You may choose to work slightly different to what I have suggested, however, it is important that however you approach it, you keep the carrying across of yarns at the back of the work to a minimum, only carrying them across when it is absolutely necessary. You are creating a single-thickness fabric, so double thickness fabric is a no-no!
The tech vid shows how to join in a new colour on a RS row, however, in this square you will be joining in colours on both RS and WS rows. The technique is the same as on a RS row, but you are purling rather than knitting. Lay the yarn you are joining in over the right-hand needle so that it is in the way of the working yarn, and as you purl with the working colour, the new colour will be held in place, ready for you to use for the next stitch.
There is a half-page Notes section on page 7 which might be useful if you want to write down how you knitted this square and on which rows you joined in the yarns.
SQUARE 23, THE LETTER ‘U’: stocking stitch stripes frame a central fairisle pattern which gives you the opportunity to try out this colour-knitting technique within a small section.
Tech vids to watch for assistance with this square:
Picking up stitches to knit the next square
Mattress stitch (horizontal)
How to carry yarns up the side of the work
How to knit fairisle
You will find some advice about the fairisle technique on page 17 of Mail Out 1. It is very different to the intarsia technique - instead of winding off small balls for separate areas of colour, two colours are used on each row and the unused colour is carried across the back of the work.
There are two colour options for this square so make sure that you follow the correct instructions for the colourway you are knitting. Colourway 1 (Silver) is always written first with any changes for Colourway 2 (Rosy) written afterwards in brackets and bold.
On the striped section, stitches are transferred backwards and forwards onto the other needle so that you can pick up the yarn that is needed for the next stripe without the need to cut it and rejoin it. If you are working on a circular needle then all you need to do is slide the stitches to the other end of the needle and continue.
There are needle size changes in this square - smaller needles for the rows of garter stitch (the ridges that frame the fairisle section in the centre of the square), and larger needles for the fairisle. These needle size changes are important to maintain an even tension across the whole square, so don’t forget to change them over when instructed.
SQUARE 24, ‘R’ IS FOR ROCKET: this cute picture knit is the first of six in the blanket and has Swiss darned details that can be knitted in rather than embroidered.
Tech vids to watch for assistance with this square:
Picking up stitches to knit the next square
Mattress stitch (horizontal)
How to knit intarsia
How to add Swiss darning to your knitting
This is a little bit trickier to knit than Square 22, but it follows the same rules of intarsia which means winding off separate balls of yarn for each area of colour. There are some textured stitches too on the main section of the rocket, and these are indicated on the chart by an ‘X’.
You can choose to knit in the coloured ‘stars’, the letter ‘R’ and the outlines in Duckling on the rocket, or Swiss darn them afterwards. In the images of the squares on page 10, I knitted in the stars on Colourway 1 and embroidered them on Colourway 2. On both of these squares I embroidered the letter ‘R’. I would recommend that if you decide to Swiss darn these details, block and press the square before doing the embroidery as it will make the surface of the knitting flatter and thus easier to work on. If desired, you can also block and press it again after embroidering.
SQUARE 29, THE LETTER ‘Z’: garter stitch and stocking stitch stripes are combined with sections of fairisle.
Tech vids to watch for assistance with this square:
How to knit fairisle
How to carry yarns up the side of the work
As with Square 23, you can use the tech vids and the notes about fairisle on page 17 of Mail Out 1 to help you with this square.
There are two colour options for this square so make sure that you follow the correct instructions for the colourway you are knitting. Colourway 1 (Silver) is always written first with any changes for Colourway 2 (Rosy) written afterwards in brackets and bold.
Just make sure that you watch out for the changes in needle size which happen throughout the square. These changes will help keep your square the same width all the way from the bottom to the top.
SQUARE 30, SNUGGLE: Mail Out 1 concludes with a cable and bobble square in Heavenly for both colourways. The cables all twist the same way, with a bobble knitted in the centre of each of them.
Tech vids to watch for assistance with this square:
Picking up stitches to knit the next square
Mattress stitch (horizontal)
How to cable
How to knit a bobble
This pattern is presented as both a chart and worded instructions, so you can choose to work from whichever format suits you best. If you have not knitted from a chart before this would be a great opportunity to give it a go. The key below the chart tells you what all the symbols mean, so as long as you keep track of which row you are on and follow the symbols for the row you are knitting, you should be fine. You begin at the bottom right-hand corner of the chart for your first RS row (Row 1), and work all RS rows from right to left, and all WS rows from left to right.
You will find the explanation for ‘c7b’ (cable seven stitches to the back), in the Abbreviations section towards the back of Mail Out 1 on page 19. The central stitch is kept in the centre while the three stitches either side of it are crossed over. So if you have not knitted this type of cable before (a cable with an odd number of stitches and a central stitch), then read the explanation very carefully. Like any new technique, after repeating it a few times you should get the hang of it.
It can be tricky to keep the edges of cables neat, but if you pull firmly on the yarn when you change from a knit to a purl stitch (ie, on stitches 3-4 on the chart), this will help.
There is a tech vid for how to knit the bobbles, so it is advisable to watch this if you need some guidance. There are many different types of bobbles, but these are created by working several times into one stitch, knitting the stitches, purling them, then casting them off.
Now you have read all the tips and advice, you are ready to get going on your first set of squares - have fun!
IF YOU ENJOY SOCIAL MEDIA THEN YOU MIGHT WANT TO JOIN THE VERY FRIENDLY AND HELPFUL GROUPS ON RAVELRY AND FACEBOOK. Here you will find a bunch of very welcoming and informative members who will be only too pleased to chat to you about your project. It is a great way to get help and answers if you get stuck and need some quick advice.
If you are not already a Ravelry member, then it is very easy (and free!) to join. Just follow the instructions on their website: http://www.ravelry.com
The Debbie Abrahams Mystery Knitters group on Facebook is another fun way to keep in touch with other members. It was set up a couple of years ago and has grown in size to over 500 members, so that’s well worth joining too.
We also have our own Facebook page where you will find regular updates on everything we are doing from knitting kits to workshops and events!
Instagram: debbieabrahams_knitting
Pinterest: debbieabrahams@debbieabrahamsk
Facebook: Debbie Abrahams Mystery Knitters
Facebook: Debbie Abrahams Handknits
Ravelry: Debbie Abrahams Handknits
ALTERNATIVELY, IF YOU LIVE IN THE NOTTINGHAMSHIRE AREA YOU MIGHT WANT TO JOIN ME AT A ‘MYSTERY’ CLUB MEETING. Meetings take place at a delightful knitting shop in Carrington, close to the city centre of Nottingham, called Yarn Loft. It is owned by Doreen who looks after us with hot drinks and light refreshments while we knit and chat for a couple of hours.
If you belong to any of my mystery clubs, then you are welcome to join us. It’s a great opportunity to meet other members and have a chat while cracking on with your squares. It’s a lot of a fun and we have a lot of giggles too! And if you have any questions about the mystery projects, I will be on hand to answer any queries or help with techniques.
The meetings begin at 4pm and run until 6pm. Yarn Loft is at 118 Hucknall Road, Carrington, Nottingham, tel number 07825 702433, website: www.yarnloft.co.uk. To cover the costs of hosting the meeting there is a small sub to pay (£3.00), which can be paid to Doreen on the day.
Just send a quick email to me at debbie@debbieabrahams.com to let me know you are coming and we will make sure that we reserve a space for you!
Thank you for taking the time to read my blog, and hopefully all the tips and advice will steer you with great success through your first set of squares. Beginning a brand new project is always so exciting, and for the next seven months I promise to keep you busy and motivated with lots of interesting patterns to knit! We love to hear from our members, so if you have any photos or stories about your baby blanket that you would like to share with the other members, please send them into us and we will include them in the next blog – we always love to hear from you! I don’t want to hold you up any longer so I am going to sign of now so that you can start knitting. And remember that if you need any help or support along the way, please get in touch with us and we will do all we can to assist you. Until we meet up again next month, take care, enjoy the squares and have a fabulous October! Debbie x
]]>
https://debbieabrahams.com/blogs/news/mystery-cushion-club-2023-post-4-september2023-09-15T00:00:00+01:002023-09-15T00:00:00+01:00Mystery Cushion Club 2023: post 4, SeptemberDebbie AbrahamsHELLO AND WELCOME TO THE PENULTIMATE INSTALMENT OF THE 2023 MYSTERY CUSHION CLUB! After three months of working on this project we now find ourselves heading swiftly towards the end, with the Front Panel revealed in its entirety and all the fun of the back panels about to begin. This month you are going to knit the Lower Back Panel which is a beaded multi-coloured stripe. It’s a simple stripe pattern with enough detail to keep you focused but with a repeat that is easy to remember.
There are no new tech vids this month, but if you need assistance with sewing your front panel squares and/or strips together, then you will find some links to tech vids from previous Mystery Blankets further on in this blog.
So let’s begin with my intro vlog. I didn’t get to see you in August as I was out and about with the family enjoying some time off around the UK. But the school holidays are over now and I’m back to work and ready to tell you all about this month’s instalment, so here goes!...
THIS IS THE REMINDER OF THE TECH VIDS THAT ARE IN PREVIOUS BLOGS. You might find them useful if you need a reminder of some of the techniques that are used in the September squares:
How to cast on using several colours (June blog)
Square 1, Summer Cable: how to cross the yarns over when changing colour (June blog)
How to cable (June blog)
How to pick up stitches along a cast-off edge (to knit the next square)
How to thread beads onto your yarn (June blog)
How to bead, the slip-stitch method (June blog)
How to carry yarns up the side of the work (June blog)
Square 2, Pavlova: how to knit the frill (June blog)
How to add Swiss darning to your knitting (August blog)
THE FOURTH SET OF PATTERNS WERE EMAILED TO ALL THE MEMBERS ON 15TH SEPTEMBER, so you should have an email from us with a link to Mail Out 4. Remember though that you can also download this file directly from your Debbie Abrahams account.
The printed patterns were posted to overseas members on the 7th September and to the UK members on the 12th September. If they have not yet arrived, then they are on their way and should be with you soon.
THANK YOU TO EVERYONE WHO HAS SIGNED UP TO THE 2024 MYSTERY BLANKET CLUB! We have had a tremendous response to our Early Bird Special Offer and have already sold over half of the memberships in the first few weeks. If this is something you are interested in participating in, then there is still time to take advantage of our special offer before it expires at the end of September. With the cushion so near to completion, it’s time to start thinking about future projects. So why not come on board and give it a go?
If you’ve missed our emails about this new knitting adventure, then here is some information about it with a few hints about the colour palette and the theme - but not too much, after all, it is a ‘mystery’!
What’s in store for 2024?
I am absolutely thrilled to be using my own bespoke Light Wool DK yarn again for this project which has been produced by the wonderful team at Laxtons in North Yorkshire, UK. I have combined it with a few of my most favourite Rowan yarns including Felted Tweed, Alpaca Soft, Kidsilk Haze and Soft Yak. Vibrant shades of emerald green, teal and ocean blue graduate into bold purples and pinks, which are softened with pale turquoise, dreamy lilac and blush pink, laced with flecks of cool silver and pale gold. There are plenty of sparkling beads in it too!
The blanket design includes the techniques of intarsia, fairisle, lace, textured stitches, stripes and beads, offering you a varied selection of squares to knit up over ten months. And there will be a choice of two options - as there is this year - for the trickier squares (fairisle and intarsia), enabling both novice and experienced knitters to participate in this unique knitting experience.
My monthly tech vids have been extremely popular this year, so I am pleased to say that I will continue with these in a dedicated monthly blog so that you have all the help and support you need as you work your way through the forty-nine squares.
The club begins on 1st February 2024 and runs for ten months until November 2024.
The finished size of the blanket is approximately 135cm x 135cm.
What does my membership include?
Each member will receive a knitting kit which includes over forty balls of premium quality yarn, ten sets of emailed patterns (with the option to purchase additional printed patterns), Debbie Abrahams size 6 beads and a woven label. The kit will be posted in two halves with the first one delivered in February, followed by the second one in May.
Below: a glimpse of the 2024 colour palette...
NEW! Download pattern option
For the first time we are offering the ten sets of patterns as monthly downloads enabling you to use yarns and beads from your own stash to knit the blanket. The list of yarns and beads for the first part of the kit will be released a week before the project begins. If you decide to purchase the yarn and beads for the project yourself, the cost of all the materials, like for like, is approximately £340. We are unable to guarantee that all of the colours in my Light Merino DK yarn will be available to purchase so substitutes may have to be used.
Early Bird Special Offer!
Take advantage of our Early Bird Special Offer for everyone who signs up before the 30th September (23:59pm):
5% off the cost of the membership (knitting kit option only)*
A free download for a cushion pattern to complement the Mystery Blanket (emailed to the members towards the end of the project)
10% discount voucher for a single transaction in our online shop**
Entry into our Prize Draw with ten gifts up for grabs!
1st Prize: 2024 Mystery Blanket Club membership (for the package you’ve purchased, we will refund what you have paid in full)
2nd Prize: 2024 Mystery Cushion Club membership
3rd and 4th Prizes: Set of 10 printed patterns for the 2024 Mystery Blanket Club
5th & 6th Prizes: Mystery Festive Knit Box
7th & 8th Prizes: Knitting kit from a selection in our online shop (up to the value of £50)
9th & 10th Prizes: 4 packs of beads (colour/s of your own choice, size 8 or size 6)
*the 5% discount does not apply to the purchase of the 2024 Mystery Blanket download pattern only option.
**excludes Mystery products.
Winners of the Prize Draw will be notified by email on the 1st November.
Below: the 2020 Mystery Blanket, Our Precious Earth.
Choose to spread the cost of your payment
For those who would prefer to pay in instalments we have an easy-to-use payment system in place called Splitit which enables you to make your payment between 2-4 months. This means you can secure your membership today with a deposit with nothing more to pay until next month. Simply select Splitit at checkout when you make your first payment and then your remaining payments will be taken automatically from your account. If you choose this option you will still be included in the Early Bird Special Offer.
How do I make my purchase?
It’s really easy. You just need to visit the shop on our website and there you will find the 2024 Mystery Blanket Club for sale. There are several options to choose from starting with the basic package which includes the full knitting kit and emailed monthly pattens. Or you can upgrade and add on printed patterns (UK and overseas), and/or Special Delivery (UK only). All overseas parcels are posted by Tracked International Delivery.
Memberships are limited and when they have sold out the club will be closed. So if you want to be part of this unique knitting experience and don’t want to miss out on all the fun and excitement next year, pop across to our shop and get yourself signed up today. And then you’ll have peace of mind that you are onboard again for another great knitting adventure with me next year. I can hardly wait for it to begin!
SO BEFORE YOU CAN MAKE A START ON KNITTING THE LOWER BACK PANEL, YOU WILL NEED TO SEW YOUR FRONT PANEL SQUARES TOGETHER. This is something that you may have already done as I mentioned it in the August blog. However, if you haven’t, then this needs to be done now.
If you have knitted your squares separately then you will need to sew them together to create three separate strips. I would suggest that you use Mattress stitch for this as it gives a really neat result. Here is a link to a tech vid for horizontal Mattress stitch from a previous blanket blog (August 2022) which you might find helpful (scroll down a bit and you will see it): https://debbieabrahams.com/blogs/news/mystery-blanket-club-2022-post-6-august
When your squares are sewn together in strips, the next task it to sew the strips together to create one block. I would use Mattress stitch for this as well, but this time it is a vertical seam rather than a horizontal seam. You will find a tech vid for this in the same link as above: https://debbieabrahams.com/blogs/news/mystery-blanket-club-2022-post-6-august
Here are some extra tips about sewing the strips together. It is important to note that these are my suggestions, so please feel free to use your own method if preferred.
Not all of the squares in the Front Panel have the same number of rows so you will need to ease some of them in. These instructions are based on taking the needle under 2 ‘bars’ at a time as demonstrated in the tech vid for vertical mattress stitch. To ease in a row, you will need to take your needle under one less bar on the side you are easing the extra row into.
Before we make a start, these are some extra tips on easing in rows:
Garter stitch rows have a tighter row tension than stocking stitch, so for every row of Garter stitch (which is two knit rows), ease these two rows into one stocking stitch row.
Slip-stitch beads (and slip-stitch patterns) have a tighter row tension than stocking stitch, so if you need to ease in some rows it is best to do this across beaded rows, taking the needle under more of the beaded rows than the stocking stitch rows.
For a square that has an all-over pattern, such as Square 3, Knotted Rug, any easings need to be spread out evenly across the total number of rows (and not eased in all at one end or unevenly).
Here goes!
SEW STRIP 1 (squares 1-3) TO STRIP 2 (squares 4-6)
Sew Square 1 (42 rows) to Square 4 (45 rows): you need to ease 3 rows of Square 4 into Square 1.
Along the edge of Square 1 place a marker between Rows 21 and 22
Along the edge of Square 4 place a marker on Row 23.
Ease in 3 rows as evenly as you can across the whole length of the squares, making sure that the marker on Square 1 is matched to the marker on Square 4.
Sew Square 2 (51 rows) to Square 5 (41 rows): you need to ease 10 rows of Square 2 into Square 5.
Along the edge of Square 2 place a marker on Row 26.
Along the edge of Square 5 place a marker on Row 21.
Ease in 10 rows as evenly as you can across the whole length of the squares, making sure that the marker on Square 2 is matched to the marker on Square 5.
Sew Square 3 (43 rows) to Square 6 (45 rows): you need to ease 2 rows of Square 6 into Square 3.
Along the edge of Square 3 place a marker on Row 22.
Along the edge of Square 6 place a marker on Row 23.
Ease in 2 rows as evenly as you can across the whole length of the squares, making sure that the marker on Square 3 is matched to the marker on Square 6.
SEW STRIP 2 (squares 4-6) TO STRIP 3 (squares 7-9)
Sew Square 4 (45 rows) to Square 7 (43 rows): you need to ease 2 rows of Square 4 into Square 7.
Along the edge of Square 4 place a marker on Row 23.
Along the edge of Square 7 place a marker on Row 22.
Ease in 2 rows as evenly as you can across the whole length of the squares, making sure that the marker on Square 4 is matched to the marker on Square 7.
Sew Square 5 (41 rows) to Square 8 (51 rows): you need to ease 10 rows of Square 8 into Square 5.
Along the edge of Square 5 place a marker on Row 21.
Along the edge of Square 8 place a marker on Row 26.
Ease in 10 rows as evenly as you can across the whole length of the squares, making sure that the marker on Square 5 is matched to the marker on Square 8.
Sew Square 6 (45 rows) to Square 9 (42 rows): you need to ease 3 rows of Square 6 into Square 9.
Along the edge of Square 6 place a marker on Row 23.
Along the edge of Square 9 place a marker between Rows 21 and 22.
Ease in 3 rows as evenly as you can across the whole length of the squares, making sure that the marker on Square 6 is matched to the marker on Square 9.
Ta-dah! Your Front Panel is completed! Now you are ready to knit this month’s panel…
THIS IS THE PANEL YOU ARE KNITTING THIS MONTH. There is just one to do…
LOWER BACK PANEL:Sorbet – stripe pattern with slip stitch beads:
Here are some helpful tips which are worth a read before you begin…
LOWER BACK PANEL, SORBET: this pattern combines brilliant white stocking stitch stripes with colourful beaded and garter stitch stripes to create a fresh-looking panel that is good enough to eat (now there’s a clue to the title!).
These tech vids will help you with this square:
How to thread beads onto your yarn (JUNE blog)
How to bead, the slip-stitch method (JUNE blog)
How to carry yarns up the side of the work (JUNE blog)
To begin this square you will need to pick up stitches along the cast-on edge of the Front Panel. There are specific instructions for this on page 7 of the September Mail Out, but this tech vid from a previous blanket blog (November 2021) may also help you with picking up the stitches. In the vid I refer to a blanket edging, however, the technique demonstrated is the same for the cushion: https://debbieabrahams.com/blogs/news/mystery-blanket-club-2021-post-10-november-the-final-instalment
There are two needle sizes needed for this panel, so make sure that you make the changes when instructed in the pattern instructions. This will keep your rows of garter stitch super neat, so it’s important to do.
You might find that it’s actually easier to use a circular needle to knit this panel as it has a large number of stitches which are easier to handle if they are spread out rather than bunched up on a straight needle (unless you are using extra long straight knitting needles). Oh, and I have just noticed that in the third Pattern note and tip on page 6 (when I talk about a circular needle), I say that stitches are transferred from one needle to another, but this is an error - there is no transferring of stitches - so please ignore this comment.
Due to the number of colour changes, there will be a lot of loose ends up the side of the work, so it’s really up to you what you do with them. They can be sewn in, or woven in as you knit, but alternatively you could leave them loose. This might be a complete no-no for some of you, but it’s worth thinking about. When the completed cushion-cover is put onto a pad then these ends will never be seen. (Only you will know, and I am sure you can keep a secret!). If you do decide to do this, then just make sure that all of the loose ends are secured with a knot so that they don’t undo. A simple double knot will suffice and won’t be too bulky.
Block and press the Lower Back Panel but do not sew it down into place. The Upper Back Panel will be sewn into place first so that the Lower Back Panel can be tucked underneath it at the top edge.
WE’VE GOT SOME NEW KIT LAUNCHES COMING UP, AND HAVE MADE A CHANGE TO THE DATE OF ONE OF THEM (since the previous blog):
Friday 13th October: Cowl kit promotion –the 2021 Hell Bay project, Fraggle Rock in two colourways and last year’s Festive Mystery Box project, Snowflake will be available to purchase for the first time as kits.
Friday 3rd November: Festive Mystery Knit Boxes – the perfect idea for a gift or a treat for yourself. Debbie’s Mystery Box includes ten mystery gifts including a brand-new festive knitting kit.
Friday 10th November: our festive kits promotion begins, and you can grab yourself a kit at a discounted price for a limited period (offer excludes Festive Mystery Knit Boxes).
Below: the Fraggle Rock Cowl.
IF YOU ARE NOT FOLLOWING US ON SOCIAL MEDIA THEN YOU CAN JOIN US TODAY! Not only will our posts keep you up to date with all our latest news, but the lovely, friendly communities out there are a great place meet up virtually to get help and advice for your project whilst enjoying some good humoured banter!
Ravelry: Debbie Abrahams Handknits
Facebook: Debbie Abrahams Mystery Knitters
Facebook: Debbie Abrahams Handknits (our own FB page)
Instagram: debbieabrahams_knitting
Pinterest: debbieabrahams@debbieabrahamsk
IF YOU LIVE IN EAST MIDLANDS AND CAN GET YOURSELF OVER TO NOTTINGHAM, THEN YOU ARE WARMLY WELCOMED TO JOIN US AT YARN LOFT IN CARRINGTON TO ENJOY A COUPLE OF HOURS OF MYSTERY CLUB KNITTING. There was no meeting held in August due to the Summer holidays, but the monthly meetings are back on now, with our next gathering on Wednesday 4th October. We meet between 4-6pm at Yarn Loft, 118 Hucknall Road, Carrington, Nottingham, tel number 07825 702433, website: www.yarnloft.co.uk. To cover the costs of hosting the meeting there is a small sub to pay (£3.00), which can be paid to Doreen on the day.
Just send a quick email to me at debbie@debbieabrahams.com to let me know you are coming, and we will make sure that we have a cuppa ready for you!
I write a report of the meetings in the Mystery Blanket blog, so if you take a look at the October blog (live on 1st October), you will be able to read all about what we got up to at the September meeting. It was a lot of fun, as always!
SO, FINALLY FOR THIS BLOG, YOU HAVE ONE LAST CHANCE TO GUESS THE TITLE OF THE MYSTERY CUSHION BEFORE THE REVEAL NEXT MONTH. We have had a couple more correct guesses, so congrats this month go to Judith Hart and Ruth Simmons! However, if you are still trying to guess what it is, here is one last clue which might be just what you need to get it right… the final letter I am giving you is ‘’I”: _ I _ N I _ / _ A _ T _
If you have any idea what it is, then please send in your guess to Sue at sue@debbieabrahams.com and she will hopefully be saying a big ‘well done’ to you. And if not, then you’ll have to wait until the October blog when the ‘mystery’ will be revealed in the final instalment!
We are so close to the end of the project now (doesn’t it feel good!), with the front panel completed and just the back panels to knit. And for those of you who have not kept up, it doesn’t matter at all, there are no time limits for this project, and the blogs and tech vids will remain where they are for whenever you need them. So there is no rush, take your time and enjoy the experience!
This is my busiest time of the year with new projects on the table and plans being made for next year’s workshops and events. This week I have been getting myself prepped and ready for my Inspired Minds workshop at Lochside in Scotland which takes place later on this month. I am so excited that some of you are going to join me there for what will be a fabulous few days of eating, drinking, relaxing and knitting. We have ladies (and men) travelling from all over the world, so it’s going to be a truly global event. I just need to get the workshop project completed (I’m almost there!), and then I’m all set!
So that’s it for this month! Have a super September and I look forward to seeing you back here on the 15th October for the final instalment and the big reveal! Until then, take care, Debbie, x
]]>
https://debbieabrahams.com/blogs/news/mystery-blanket-club-2023-post-8-september2023-09-01T07:00:00+01:002023-09-01T07:54:49+01:00Mystery Blanket Club 2023: post 8, SeptemberDebbie AbrahamsHELLO & WELCOME TO THE EIGHTH INSTALMENT OF THE 2023 MYSTERY BLANKET CLUB! We have been out and about keeping Seth entertained for the past few weeks, and after a trip to Legoland, a week in Devon and another week in Whitby, I am just about ready for our little lad to go back to school so that I can crack on with all the wonderful new projects I have planned for the next twelve months.
I love this time of year the most as it’s always so exciting to be sourcing new inspiration and working on new designs. At the moment I am firmly focused on the 2024 Mystery Blanket (which you can sign up to now!) and I have the design for the 2024 Mystery Cushion in progress too. So I can promise you that there is a lot to get excited about over the forthcoming weeks and months!
There is no intro vid from me this month as my tech team is taking a much-earned break over the summer, and my days at home in between gallivanting up and down the UK have been few and far between. However, you can still catch up with all my latest news about the club, including tips and advice about how to sew together your completed strips (yes, it’s time to get your sewing needles out!), a great technique from member Maria Didonna about how to splice yarns together, and there’s information too about what I have store for you in my brand new 2024 Mystery Blanket Club plus news of a great Early Bird Special Offer if you sign up before the end of September!
So to begin with there are two tech vids this month - one which will guide you through the stitch pattern for Square 49, Option Two, and one shows you how to sew up using Mattress stitch.
This is a reminder of the techniques that were covered in previous blogs:
Square 8, Pixies & Nixies (both options): how to knit the decorative slip-stitch (February)
How to carry yarns up the side of the work (February)
How to pick up stitches along a cast-off edge (February)
Mattress stitch (horizontal) (February)
How to cable (February)
How to knit a contrast-coloured bobble (February)
Square 16, Forager: how to knit the exaggerated decorative purl stitch (February)
Understanding lace stitches (March)
How to thread beads onto your yarn (March)
How to bead, the slip-stitch method (March)
The intarsia technique (March)
How to add Chain stitch to your knitting (March)
How to add Swiss darning to knitting (March)
How to pick up stitches along a cast-off edge using several colours (April)
Square 23, Dragonfly: Option Two (Rows 1-7) (June)
THE PRINTED PATTERNS HAVE BEEN POSTED TO THE MEMBERS WHO OPTED FOR THEM, with the overseas sent on Tuesday 22nd August and the UK on Saturday 26th August. I apologise if some of the overseas patterns are received a little late as it was tight for time to get them printed and shipped in the few days I had at home in August. However, they are on their way and should be with you soon. But if you want to make a start on a square before your patterns arrive, I suggest that you knit either Square 34 Forager or Square 48 Hawthorn 2 as they are exactly the same as Squares 16 and 2 respectively, from previous mail outs.
I HAVE NOTICED AN ERROR IN THE DESCRIPTION OF TWO OF THE SQUARES IN THE SEPTEMBER MAIL OUT. This doesn’t affect the instructions for these squares, but just to clarify, Square 49, Flora (Option One) is intarsia flower motifs (not leaf), and Square 49, Flora (Option Two) has hooked-in beads (and not slip-stitch).
SIGN-UPS FOR THE 2024 MYSTERY BLANKET CLUB ARE NOW OPEN - YIPPEE! - SO YOU CAN GET YOURSELF ONBOARD TODAY FOR MY NEXT GLOBAL BLANKET KAL! Can you believe that this is blanket number seventeen in my Mystery Blanket Club collection!?! We have had a terrific response to our launch which was a week ago, and have already sold over half of the memberships. So thank you to everyone that has signed up so far. You should have received an emailed newsletter from us on the 25th August inviting you to join. But just in case you missed it, here is everything you need to know (or rather, what I am going to let you know!), about my brand new design. So here goes…
What’s in store for 2024?
I am absolutely thrilled to be using my own bespoke Light Wool DK yarn again for this project which has been produced by the wonderful team at Laxtons in North Yorkshire, UK. I have combined it with a few of my most favourite Rowan yarns including Felted Tweed, Alpaca Soft, Kidsilk Haze and Soft Yak. Vibrant shades of teal and ocean blue graduate into bold purples and pinks, which are softened with pale turquoise, dreamy lilac and blush pink laced with flecks of cool silver and pale gold. There are plenty of sparkling beads in it too!
Above: the machines in action at Laxtons Ltd.
The blanket design includes the techniques of intarsia, fairisle, lace, textured stitches, stripes and beads, offering you a feast of squares to knit up over ten months. And there will be a choice of two options - as there is this year - for the trickier squares (fairisle and intarsia), enabling both novice and experienced knitters to participate in this unique knitting experience.
Below: a glimpse of the colour palette...
My monthly tech vids have been extremely popular this year, so I am pleased to say that I will continue with these in a dedicated monthly blog so that you have all the help and support you need as you work your way through the forty-nine squares.
The club begins on 1st February 2024 and runs for ten months until November 2024.
The finished size of the blanket is approximately 135cm x 135cm.
What does my membership include?
Each member will receive a knitting kit which includes over forty balls of premium quality yarn, ten sets of emailed patterns (with the option to purchase additional printed patterns), Debbie Abrahams size 6 beads and a woven label. The kit will be posted in two halves with the first one delivered in February, followed by the second one in May.
NEW! Download pattern option
For the first time we are offering the ten sets of patterns as monthly downloads enabling you to use yarns and beads from your own stash to knit the blanket. The list of yarns and beads for the first part of the kit will be released a week before the project begins. If you decide to purchase the yarn and beads for the project yourself, the cost of all the materials, like for like, is approximately £340. We are unable to guarantee that all of the colours in my Light Merino DK yarn will be available to purchase so substitutes may have to be used.
Below: Mystery Blanket 2021, One Thousand & One Nights.
Early Bird Special Offer!
Take advantage of our Early Bird Special Offer for everyone who signs up before the 30th September (23:59pm):
5% off the cost of the membership (knitting kit option only)*
A free download for a cushion pattern to complement the Mystery Blanket
10% discount voucher for a single transaction in our online shop**
Entry into our Prize Draw with ten gifts up for grabs!
1st Prize: 2024 Mystery Blanket Club membership (for the package you’ve purchased, we will refund what you have paid in full)
2nd Prize: 2024 Mystery Cushion Club membership
3rd and 4th Prizes: Set of 10 printed patterns for the 2024 Mystery Blanket Club
5th & 6th Prizes: Mystery Festive Knit Box
7th & 8th Prizes: Knitting kit from a selection in our online shop (up to the value of £50)
9th & 10th Prizes: 4 packs of beads (colour/s of your own choice, size 8 or size 6)
*the 5% discount does not apply to the purchase of download patterns.
**excludes Mystery products.
Winners of the Prize Draw will be notified by email on the 1st November.
Choose to spread the cost of your payment
For those who would prefer to pay in instalments we have an easy-to-use payment system in place called Splitit which enables you to make your payment between 2-4 months. This means you can secure your membership today with a deposit with nothing more to pay until next month. Simply select Splitit at checkout when you make your first payment and then your remaining payments will be taken automatically from your account. If you choose this option you will still be included in the Early Bird Special Offer.
Below: Mystery Blanket 2020: Our Precious Earth.
How do I make my purchase?
It’s really easy. You just need to visit the shop on our website and there you will find the 2024 Mystery Blanket Club for sale. There are several options to choose from starting with the download pattern only option (no knitting kit), followed by the basic package which includes the full knitting kit and emailed monthly pattens. Or you can upgrade and add on printed patterns (UK and overseas), and/or Special Delivery (UK only). All overseas parcels are posted by Tracked International Delivery.
Memberships are limited and when they have sold out the club will be closed. So if you want to be part of this unique knitting experience and don’t want to miss out on all the fun and excitement next year, pop across to our shop and get yourself signed up today. And then you’ll have peace of mind that you are onboard again for another great knitting adventure with me next year. I can hardly wait for it to begin!
WITH JUST TWO MORE INSTALMENTS TO GO BEFORE THE MYSTERY BLANKET IS REVEALED, MOST OF YOU HAVE GUESSED THE TITLE. Our most recent correct guessers are Maria Didonna, Cynthia Wenden, Laura Jacobs and Giovanna Maria Ledda, so congratulations to all of you for getting it right! However, for those of you who are still trying to work out what it is, here is another letter to help you. There aren’t many letters left, so this might do the trick, let’s see…
This month the letter I am giving you is... “N”:
T H _ / _ N _ H A N T _ D / _ O R _ S T
The whole title is almost spelt out now, so I am sure you’ll get it this time. If you think you know what it is, send in your answer to Sue at sue@debbieabrahams.com and she will let you know if you are right - and if you’re not then you have one more chance after this to get it right. Fingers crossed everyone!
THERE ARE SIX SQUARES TO KNIT THIS MONTH, with alternative options for three of the squares:
Square 11, Frog (Option One) – intarsia frog motif with hooked-in beads and chain stitch details:
Square 11, Dragonfly 2 (Option Two) – cable pattern with hooked-in beads, contrast-coloured bobbles and lace stitches:
Square 12, Bluebells 2 – three-colour stripe slip-stitch pattern (same for both options):
Square 34, Forager – striped pattern with rows of contrast-coloured exaggerated purl stitch (same for both options):
Square 35, Blackcurrants – cable pattern with contrast-coloured bobbles (same for both options):
Square 48, Hawthorn 2 (Option One) – fairisle pattern with stripes, textured stitches and hooked-in beads:
Square 48, Hawthorn 2 (Option Two) – textured pattern with stripes and hooked-in beads:
Square 49, Flora (Option One) – intarsia flower motifs with hooked-in beads and Swiss-darned and chain stitch details:
Square 49, Flora (Option Two) – textured pattern with mini cables and hooked-in beads:
On each pattern page there is a list of Pattern notes and tips that are worth reading before you start to knit each square. These bits of advice will help you and give pre-warnings as to what look out for in the pattern instructions. Also take note of the description under the title of each square as this tells you what the stitch structure is.
You can use the tech vids from previous blogs to help you knit your squares. But here are a few extra tips to assist you:
SQUARE 11, FROG (Option One): this is a new creature to add to the ones you’ve already knitted, and hopefully he will make a great addition to your blanket!
Videos to watch for assistance with this square:
How to pick up stitches along a cast-off edge (February blog)
Mattress stitch (horizontal) (February blog)
The intarsia technique (March blog)
How to bead, the hooking-in method (February blog)
How to add Chain stitch to your knitting (March blog)
I would recommend that you choose the same option that you knitted for Square 39 as this will maintain symmetry and balance in the overall design.
There are only two colours used to knit the frog - Harvest and Acorn - but there are several colours used for the chain stitch embroidery. It is best to get this square blocked and pressed before you add the embroidery to it as this will give you a nice flat surface to work on. You could go freestyle with this if you so wish or stick to what you see on the chart - the decision is completely up to you!
The Velvet beads on the ends of the curly swirls are sewn on rather than knitted in, and are not shown on the chart. The Sienna, Emerald and Black beads are hooked into the work as you knit the square.
SQUARE 11, DRAGONFLY 2 (Option Two): if you don’t fancy knitting Frog then you can opt for this beaded cable and bobble square instead.
Videos to watch for assistance with this square:
How to pick up stitches along a cast-off edge (February blog)
Mattress stitch (horizontal) (February blog)
Square 23, Dragonfly: Option Two (Rows 1-7) (June blog)
As mentioned for Option One, I would recommend that you choose the same option that you knitted for Square 39.
This is a busy square with several different techniques combined together. However, if you’ve already knitted this before it’s simply a trip down memory lane. Just make sure that you get yourself nice and comfy as it might take you some time to knit - but it will be well worth it!
SQUARE 12, BLUEBELLS 2: this square is similar to Square 40, Bluebells which you knitted a couple of months ago in July. But there’s a slight change to the colours to give it a subtly different look.
Videos to watch for assistance with this square:
How to pick up stitches along a cast-off edge (February blog)
Mattress stitch (horizontal) (February blog)
How to carry yarns up the side of the work (February blog)
Chestnut and Elfin remain where they are in this square, but Leaf is swapped out for Acorn. Remember that after all three yarns are joined in they are carried up the side of the work, so there are very few loose ends in this square, which is great news is you don’t like sewing in ends!
SQUARE 34, FORAGER: you will need to think right back to Mail Out 1 when you first knitted this square. It’s an exact repeat of it and completes the set of four Forager squares in the blanket.
Videos to watch for assistance with this square:
How to pick up stitches along a cast-off edge (February blog)
Mattress stitch (horizontal) (February blog)
How to carry yarns up the side of the work (February blog)
Square 16, Forager: how to knit the exaggerated decorative purl stitch (February blog)
Because you’ve already knitted this square three times before (including a variation of it), this should be a nice easy knit and one you can sit back and enjoy!
SQUARE 35, BLACKCURRANTS: this square should look familiar, but it’s been recoloured and given a new name…
Videos to watch for assistance with this square:
How to pick up stitches along a cast-off edge (February blog)
Mattress stitch (horizontal) (February blog)
How to cable
How to knit a contrast-coloured bobble
This square is similar to Square 15, Chestnuts from Mail Out 1, but Chestnut has been swapped for Blackberry. That is actually the only change that has been made, but doesn’t it look different?
If preferred, you can opt to knit the contrast-coloured bobbles in self-colour instead of using Barn Red and Maple. So I would recommend that you check what you did for Square 15 and repeat that some choice.
You are given both worded instructions and a chart for this square, so you can choose whichever one you prefer to work from. The colours for the bobbles are in colour on the chart, but they might be difficult to see so I have also included initials for them under each bobble, BR is Barn red and M is Maple. Just be wary of the Barn Red yarn as Felted Tweed can be quite fragile, and under duress could break. So when you tighten the bobbles pull gently but firmly on this yarn to avoid this from happening.
You will notice that some of the stitches are worked through the back of the loop (K1tbl and P1tbl). This twists the stitches and makes them tighter neater. It will crisp up the edges of the cables and make them look much neater, so make sure that you remember to do this when instructed.
SQUARE 48, HAWTHORN 2 (Option One): this is same as Square 2 from Mail Out 5.
Videos to watch for assistance with this square:
How to pick up stitches along a cast-off edge (February blog)
Mattress stitch (horizontal) (February blog)
Square 8, Pixies & Nixies (both options): how to knit the decorative slip-stitch (February blog)
How to bead, the hooking-in method (February blog)
How to carry yarns up the side of the work (February blog)
If you chose Option One for Square 2, then I would recommend that you choose Option One for this square.
Hawthorn from Mail Out 3 used Barn Red in place of Ginger. But make sure for this square you use Ginger (the same as Square 2). These two Felted Tweed yarns are quite similar in colour, so make sure that you check the ball band and pick up the correct one.
SQUARE 48, HAWTHORN 2 (Option Two): this is your alternative option to knit if you don’t fancy Option One, and should be the same choice that you made for Square 2.
Videos to watch for assistance with this square:
How to pick up stitches along a cast-off edge (February blog)
Mattress stitch (horizontal) (February blog)
Square 8, Pixies & Nixies (both options): how to knit the decorative slip-stitch (February)
How to knit the decorative loop stitch (February blog)
How to bead, the hooking-in method (February blog)
How to carry yarns up the side of the work (February blog)
This is the last time you will knit Hawthorn 2, but if you look at the piecing diagram, there might be one more Hawthorn square to knit…but you’ll have to wait another month to see!
SQUARE 49, FLORA (Option One): this is the second brand new square this month - stylized flowers in rich, dark shades Swiss-darned details, swirls of embroidery and hooked-in beads. Go for this option if you fancy a bit of a challenge and some more intarsia.
Videos to watch for assistance with this square:
How to pick up stitches along a cast-off edge (February blog)
How to pick up stitches along a cast-off edge using several colours (April blog)
Mattress stitch (horizontal) (February blog)
The intarsia technique (March blog)
How to bead, the hooking-in method (February blog)
How to add Swiss darning to knitting (March blog)
How to add Chain stitch to your knitting (March blog)
You can choose either option for this square as it won’t be affected by any of the other choices you have made so far. So perhaps have a good look at the chart and see what you think…
You will need to use several separate balls of yarn (or bobbins) to knit this square, remembering that it is a single thickness multi-coloured piece of knitting so carrying yarns across the back should only be done when absolutely necessary.
I decided to use white for the background colour of the chart instead of Shadow as this made the floral motifs and the chain stitch embroidery easier to see. The colour names for the chain stitch have been added to the chart as well.
The Lime beads on the Ginger flower are hooked in, and keep an eye out for the single Indigo bead in the middle of this flower, which is also hooked in. There is a Lime bead sewn onto the end of each of the three stamens on the Mulberry flower which might be difficult to see on the image (and they are not shown on the chart).
The outlines on the petals are Swiss-darned and should be added to the square after it has been blocked and pressed. You may, however choose to knit in these details instead, which is perfectly okay if you don’t fancy embroidering them. There is Blackberry Swiss-darning on the Barn Red and Mulberry flowers, Mulberry on the Ginger flower, and Acorn on the Blackberry flower.
You could have a lot of fun with this one and swap the colours of the embroidery and beads around if you so wish. I did quite a few variations of this square and played about with the embroidery until I decided on this combination. But there is nothing stopping you from having a play too!
SQUARE 49, FLORA (Option Two): if you don’t fancy intarsia you can go for this option instead and knit a brand new square that combines together crossed and twisted stitches with hooked-in beads and cables.
Videos to watch for assistance with this square:
How to pick up stitches along a cast-off edge (February blog)
Mattress stitch (horizontal) (February blog)
How to bead, the hooking-in method (February blog)
NEW THIS MONTH! Square 49, Flora, Option Two (Rows 5 and 7)
There are some tricky new stitches in this pattern which you might need some assistance with, so take a look at the new tech vid in this blog which shows you the following: T2R, T2L, C2R and C2L. They basically cross stitches over and move them across the work in a diagonal line, but some of the stitches are worked through the back of the loop and some are worked through the front. So a quick look at the tech vid might be a good idea to ensure that you are knitting them all correctly.
There is quite a lot going on in this square, especially on Row 1 where there are cables, crossed stitches and beads to hook in. But take your time, read the pattern carefully, row by row, and you will be fine. Some of the rows took me a long time to complete, but the end result is lovely and worth the investment of time.
You can choose to work from either worded instructions or a chart, or you can work from both, if preferred. The chart on page 30 has a lot of symbols on it, so be sure that you read them correctly from the key below it. I also want to point out that P1tbl which is only on one side of the floral shape, is correct (in other words it should not be duplicated on the opposite side).
One last thing to mention is that this square uses a smaller needle than the recommended main needle size of 3.50mm. This is necessary to ensure that this square knits up to the same size as all the others in the blanket.
WITH THREE STRIPS COMPLETED AFTER THIS INSTALMENT, YOU COULD GET AHEAD AND SEW SOME OF THEM TOGETHER. If you decide to make a start on this, these useful tips will guide you through the process.
If you have knitted your squares separately then you will need to join these together first to create strips 5, 6 and 7 (these are the three vertical rows of squares on the right side of the Piecing diagram on page 4 (Squares 29-35, 36-42 and 43-49). If you need some guidance with this, check out the tech vid in the February blog for horizontal mattress stitch which demonstrates this technique.
Once you have your three strips completed you can make a start. This is a guide to how to sew the squares together using Mattress stitch. It is important to note that these are my suggestions as to how to sew together the squares, but please feel free to use your own method and sequence if preferred.
In this blanket all of the squares are facing in the same direction (in some of the previous Mystery Blankets the squares were turned upside down or were positioned on their side). So this makes it much easier to sew together. All you need to watch out for is the number of rows, which as you know does vary from square to square. This means that some easing in will be required.
These instructions are based on taking the needle under 2 ‘bars’ at a time as demonstrated in the tech vid for vertical mattress stitch. To ease in a row, you will need to take your needle under one less bar on the side you are easing the extra row into.
Before we make a start, these are some extra tips on easing in rows:
Garter stitch rows have a tighter row tension than stocking stitch, so for every row of Garter stitch (which is two knit rows), ease these two rows into one stocking stitch row.
Slip-stitch beads (and slip-stitch patterns) have a tighter row tension than stocking stitch, so if you need to ease in some rows it is best to do this across beaded rows, taking the needle under more of the beaded rows than the stocking stitch rows.
Fairisle usually has a looser row tension than stocking stitch, so if you need to ease in some rows it is best to do this across fairisle rows, taking the needle under more of the stocking stitch rows than the fairisle rows.
For a square that has an all-over pattern, such as Square 10 Bracken, any easings need to be spread out evenly across the total number of rows (and not eased in all at one end or unevenly).
When there are two options on a square, I have given separate instructions for each option, so make sure that you check which one you need to follow for your choice of squares. If you have mixed your options then you might have to work out some of the easings yourself, but the Chart for Stitch and Row Reference on page 5 will help you with this.
These are my guidelines and do not have to be followed if you prefer to use your own method and calculations.
SEW STRIP 5 (squares 29-35) TO STRIP 6 (squares 36-42)
Sew Square 29 (63 rows) to Square 36 (Option One) (66 rows): you need to ease 3 rows of Square 36 (Option One) into Square 29.
Along the edge of Square 29 place a marker on Row 32.
Along the edge of Square 36 (Option One) place a marker between Rows 33 and 34.
Ease in 3 rows as evenly as you can across the whole length of the squares, making sure that the marker on Square 29 is matched to the marker on Square 36 (Option One).
Sew Square 29 (63 rows) to Square 36 (Option Two) (74 rows): you need to ease 11 rows of Square 36 (Option Two) into Square 29.
Along the edge of Square 29 place a marker on Row 32.
Along the edge of Square 36 (Option Two) place a marker between Rows 37 and 38.
Ease in 11 rows as evenly as you can across the whole length of the squares, making sure that the marker on Square 29 is matched to the marker on Square 36 (Option Two).
Sew Square 30 (72 rows) to Square 37 (Option One) (59 rows): you need to ease 13 rows of Square 30 into Square 37 (Option One).
Along the edge of Square 30 place a marker between Rows 36 and 37.
Along the edge of Square 37 (Option One) place a marker on Row 30.
Ease in 13 rows as evenly as you can across the whole length of the squares, making sure that the marker on Square 30 is matched to the marker on Square 37 (Option One).
Sew Square 30 (72 rows) to Square 37 (Option Two) (60 rows): you need to ease 12 rows of Square 30 into Square 37 (Option Two).
Along the edge of Square 30 place a marker between Rows 36 and 37.
Along the edge of Square 37 (Option Two) place a marker between Rows 30 and 31.
Ease in 12 rows as evenly as you can across the whole length of the squares, making sure that the marker on Square 30 is matched to the marker on Square 37 (Option Two).
Sew Square 31 (61 rows) to Square 38 (85 rows): you need to ease 24 rows of Square 38 into Square 31.
Along the edge of Square 31 place a marker on Row 31.
Along the edge of Square 38 place a marker on Row 43.
Ease in 24 rows as evenly as you can across the whole length of the squares, making sure that the marker on Square 31 is matched to the marker on Square 38.
Sew Square 32 (Option One) (72 rows) to Square 39 (Option One) (59 rows): you need to ease 13 rows of Square 32 (Option One) into Square 39 (Option One).
Along the edge of Square 32 (Option One) place a marker between Rows 36 and 37.
Along the edge of Square 39 (Option One) place a marker on Row 30.
Ease in 13 rows as evenly as you can across the whole length of the squares, making sure that the marker on Square 32 (Option One) is matched to the marker on Square 39 (Option One).
Sew Square 32 (Option Two) (86 rows) to Square 39 (Option Two) (63 rows): you need to ease 23 rows of Square 32 (Option Two) into Square 39 (Option Two).
Along the edge of Square 32 (Option Two) place a marker between Rows 43 and 44.
Along the edge of Square 39 (Option Two) place a marker on Row 32.
Ease in 23 rows as evenly as you can across the whole length of the squares, making sure that the marker on Square 32 (Option Two) is matched to the marker on Square 39 (Option Two).
Sew Square 33 (57 rows) to Square 40 (85 rows): you need to ease 28 rows of Square 40 into Square 33.
Along the edge of Square 33 place a marker on Row 29.
Along the edge of Square 40 place a marker on Row 43.
Ease in 28 rows as evenly as you can across the whole length of the squares, making sure that the marker on Square 33 is matched to the marker on Square 40.
Sew Square 34 (72 rows) to Square 41 (Option One & Option Two) (60 rows): you need to ease 12 rows of Square 34 into Square 41 (Option One & Option Two).
Along the edge of Square 34 place a marker between Rows 36 and 37.
Along the edge of Square 41 (Option One & Option Two) place a marker between Rows 30 and 31.
Ease in 12 rows as evenly as you can across the whole length of the squares, making sure that the marker on Square 34 is matched to the marker on Square 41 (Option One & Option Two).
Sew Square 35 (64 rows) to Square 42 (Option One) (66 rows): you need to ease 2 rows of Square 42 (Option One) into Square 35.
Along the edge of Square 35 place a marker between Rows 32 and 33.
Along the edge of Square 42 (Option One) place a marker between Rows 33 and 34.
Ease in 2 rows as evenly as you can across the whole length of the squares, making sure that the marker on Square 35 is matched to the marker on Square 42 (Option One).
Sew Square 35 (64 rows) to Square 42 (Option Two) (74 rows): you need to ease 10 rows of Square 42 (Option Two) into Square 35.
Along the edge of Square 35 place a marker between Rows 32 and 33.
Along the edge of Square 42 (Option One) place a marker between Rows 37 and 38.
Ease in 10 rows as evenly as you can across the whole length of the squares, making sure that the marker on Square 35 is matched to the marker on Square 42 (Option Two).
SEW STRIP 6 (squares 36-42) TO STRIP 7 (squares 43-49)
Sew Square 36 (Option One) (66 rows) to Square 43 (Option One) (60 rows): you need to ease 6 rows of Square 36 (Option One) into Square 43 (Option One).
Along the edge of Square 36 (Option One) place a marker between Rows 33 and 34.
Along the edge of Square 43 (Option One) place a marker between Rows 30 and 31.
Ease in 6 rows as evenly as you can across the whole length of the squares, making sure that the marker on Square 36 (Option One) is matched to the marker on Square 43 (Option One).
Sew Square 36 (Option Two) (74 rows) to Square 43 (Option Two) (69 rows): you need to ease 5 rows of Square 36 (Option Two) into Square 43 (Option Two).
Along the edge of Square 36 (Option Two) place a marker between Rows 37 and 38.
Along the edge of Square 43 (Option Two) place a marker on Row 35.
Ease in 5 rows as evenly as you can across the whole length of the squares, making sure that the marker on Square 36 (Option Two) is matched to the marker on Square 43 (Option Two).
Sew Square 37 (Option One) (59 rows) to Square 44 (Option One) (66 rows): you need to ease 7 rows of Square 44 (Option One) into Square 37 (Option One).
Along the edge of Square 37 (Option One) place a marker on Row 30.
Along the edge of Square 44 (Option One) place a marker between Rows 33 and 34.
Ease in 7 rows as evenly as you can across the whole length of the squares, making sure that the marker on Square 37 (Option One) is matched to the marker on Square 44 (Option One).
Sew Square 37 (Option Two) (60 rows) to Square 44 (Option Two) (82 rows): you need to ease 22 rows of Square 44 (Option Two) into Square 37 (Option Two).
Along the edge of Square 37 (Option Two) place a marker between Rows 30 and 31.
Along the edge of Square 44 (Option Two) place a marker between Rows 41 and 42.
Ease in 22 rows as evenly as you can across the whole length of the squares, making sure that the marker on Square 37 (Option Two) is matched to the marker on Square 44 (Option Two).
Sew Square 38 (85 rows) to Square 45 (62 rows): you need to ease 23 rows of Square 38 into Square 45.
Along the edge of Square 38 place a marker on Row 43.
Along the edge of Square 45 place a marker between Rows 31 and 32.
Ease in 23 rows as evenly as you can across the whole length of the squares, making sure that the marker on Square 38 is matched to the marker on Square 45.
Sew Square 39 (Option One) (59 rows) to Square 46 (Option One) (66 rows): you need to ease 7 rows of Square 46 (Option One) into Square 39 (Option One).
Along the edge of Square 39 (Option One) place a marker on Row 30.
Along the edge of Square 46 (Option One) place a marker between Rows 33 and 34.
Ease in 7 rows as evenly as you can across the whole length of the squares, making sure that the marker on Square 39 (Option One) is matched to the marker on Square 46 (Option One).
Sew Square 39 (Option Two) (63 rows) to Square 46 (Option Two) (82 rows): you need to ease 19 rows of Square 46 (Option Two) into Square 39 (Option Two).
Along the edge of Square 39 (Option Two) place a marker on Row 32.
Along the edge of Square 46 (Option Two) place a marker between Rows 41 and 42.
Ease in 19 rows as evenly as you can across the whole length of the squares, making sure that the marker on Square 39 (Option Two) is matched to the marker on Square 46 (Option Two).
Sew Square 40 (85 rows) to Square 47 (61 rows): you need to ease 24 rows of Square 40 into Square 47.
Along the edge of Square 40 place a marker on Row 43.
Along the edge of Square 47 place a marker on Rows 31.
Ease in 24 rows as evenly as you can across the whole length of the squares, making sure that the marker on Square 40 is matched to the marker on Square 47.
Sew Square 41 (Option One) (60 rows) to Square 48 (Option One) (66 rows): you need to ease 6 rows of Square 48 (Option One) into Square 41 (Option One).
Along the edge of Square 41 (Option One) place a marker between Rows 30 and 31.
Along the edge of Square 48 (Option One) place a marker between Rows 33 and 34.
Ease in 6 rows as evenly as you can across the whole length of the squares, making sure that the marker on Square 41 (Option One) is matched to the marker on Square 48 (Option One).
Sew Square 41 (Option Two) (60 rows) to Square 48 (Option Two) (82 rows): you need to ease 22 rows of Square 48 (Option Two) into Square 41 (Option Two).
Along the edge of Square 41 (Option Two) place a marker between Rows 30 and 31.
Along the edge of Square 48 (Option Two) place a marker between Rows 41 and 42.
Ease in 22 rows as evenly as you can across the whole length of the squares, making sure that the marker on Square 41 (Option Two) is matched to the marker on Square 48 (Option Two).
Sew Square 42 (Option One) (66 rows) to Square 49 (Option One) (60 rows): you need to ease 6 rows of Square 42 (Option One) into Square 49 (Option One).
Along the edge of Square 42 (Option One) place a marker between Rows 33 and 34.
Along the edge of Square 49 (Option One) place a marker between Rows 30 and 31.
Ease in 6 rows as evenly as you can across the whole length of the squares, making sure that the marker on Square 42 (Option One) is matched to the marker on Square 49 (Option One).
Sew Square 42 (Option Two) (74 rows) to Square 49 (Option Two) (63 rows): you need to ease 11 rows of Square 42 (Option Two) into Square 49 (Option Two).
Along the edge of Square 42 (Option Two) place a marker between Rows 37 and 38.
Along the edge of Square 49 (Option Two) place a marker on Row 32.
Ease in 11 rows as evenly as you can across the whole length of the squares, making sure that the marker on Square 42 (Option Two) is matched to the marker on Square 49 (Option Two).
IF YOU’VE ENJOYED KNITTING A BEADYKNITS PROJECT, OR YOU ARE NEW TO THEM AND ARE EAGER TO HAVE A GO, then Jenny has been busy designing a lovely new case which she is thrilled to tell you about…
Jenny says:“My Persian Case is the perfect place to store away all your bits and bobs, whether it’s your knitting odds and ends or your small personal possessions. The fairisle sections and the beaded details give you the perfect opportunity to try out these two techniques. And with a simple construction and an easy to sew in lining with a magnetic clasp fastening, it’s the ideal project to add to your creative makes this Autumn!”
The finished size of the case is approximately 20cm x 23cm and the kit includes all the materials that you need to make it, including Debbie Abrahams beads, a magnetic clasp and lining fabric.
Kit price: £29.95 (+ shipping costs which are calculated upon order).
To find out more contact Jenny at jenny@BeadyKnits.com or visit her Etsy shop: BeadyKnitsbyJenny
Please note that BeadyKnits kits are not available to purchase in our Debbie Abrahams Ltd online store.
THE NEXT ‘MYSTERY’ MEET UP AT YARN LOFT IN NOTTINGHAM IS ON WEDNESDAY 6TH SEPTEMBER. It will be lovely to catch up with the local ladies after a break in August. The meeting begins from 4pm and runs until 6pm. Yarn Loft is a fabulous yarn store on 118 Hucknall Road, Carrington, Nottingham, tel number 07825 702433, website: www.yarnloft.co.uk. To cover the costs of hosting the meeting there is a small sub to pay (£3.00), which can be paid to Doreen on the day.
Just send a quick email to me at debbie@debbieabrahams.com to let me know you are coming and we will make sure that we reserve a space for you!
IF YOU DON’T FOLLOW US ON OUR SOCIAL MEDIA PLATFORMS THEN PLEASE COME AND JOIN US, and enjoy the messages and photos that are shared between myself and the members:
Instagram: debbieabrahams_knitting
Pinterest: debbieabrahams@debbieabrahamsk
Facebook: Debbie Abrahams Mystery Knitters
Facebook: Debbie Abrahams Handknits
Ravelry: Debbie Abrahams Handknits
I HAVE A GREAT TIP FROM ONE OF THE MEMBERS TO SHARE WITH YOU. Maria Didonna from Bloomingdale in Illinois, USA, has sent in this great tip and step-by-step photos for splicing together wool yarns. She has been using it in her Mystery Blanket and consequently managed to cut down on the amount of loose ends - which is always a bonus! This is her tip:
Maria said:“I use this technique every time I run out of yarn in the middle of a row. This technique only works with natural fibers. I have felted or spliced yarn that is up to 65% wool. At 65 % it’s trial and error, but wool that is 75% or more works great.
Step one - take the two ends of yarn that needs to be felted together and with a sharp needle pull apart the ends.
Step two - take the two ends to the sink and run them hot water. Lay the two ends on top of each other, wet with hot water and add a dab of soap (any liquid soap is fine). Wet them again with hot water and roll them in the palm of your hands.
NOTE: I like to twist the two ends of yarn in my fingers first and then in the palm of my hands. Keep rolling until you see that the thread has combined. It can be tested by tugging on each end of the thread. If it doesn’t combine add more hot water to them and roll them in the palm of your hands again. The friction from your hands and the soap will felt the threads.”
This is a really great tip Maria, so thanks for it sharing it with us! And your photos are a fabulous help too and show very clearly how this is done. It’ something that I can’t wait to try out myself, and I am sure that some of the other members will give it a go too!
ONE LAST THING BEFORE THE WINNER OF THE SEPTEMBER PRIZE DRAW IS ANNOUNCED… I JUST WANT TO DO A QUICK SHOUT OUT FOR A MYSTERY BLANKET KIT. It’s a bit of a long shot as this one goes back fourteen years (!) but if anyone has a 2009 Arabian Nights knitting kit that they are willing to sell, I have a lady who is eager to purchase it. (Kits can be sold in their entirety with all the yarn and beads and embellishments included. The selling on of the patterns for the blankets is however, prohibited). Please contact me directly at debbie@debbieabrahams.com if you are able to help with this request and I will put you in touch with the prospective buyer.
Below: Mystery Blanket 2009, Arabian Nights.
AND FINALLY, IT’S TIME TO ANNOUNCE THE WINNER OF THE EIGHTH 2023 MYSTERY BLANKET CLUB PRIZE DRAW!!! Each month a member is picked at random to win a Debbie Abrahams prize. So it is worth reading right the way to the end of each blog to see if you are that lucky member!
PRIZE DRAW EIGHT (SEPTEMBER): this month’s winner is member 110, Christine Planchak from Harrogate, North Yorkshire in the UK. Well done Christine! Please choose a prize from the following selection:
Your choice of one of Debbie’s knitting kits up to the value of £28.00 (take a look at them in our online shop).
A £25 voucher (or £25 refund) for a Debbie Abrahams Mystery Club membership: 2024 Mystery Blanket Club or 2024 Mystery Cushion Club.
A Mystery bag of five gifts!
We will notify Chistine to let her know the good news!
Now it’s time to make a start on your September squares, and with all the tips and advice this month you should be in good stead for a very enjoyable and stress-free four weeks of knitting. For those of you who have signed up to the Mystery Baby Blanket Club, your parcels are being prepped for shipping, so you will have a whole new knitting adventure to begin very soon - how exciting! And with just eight more squares left of this project, your 2023 Mystery Blanket journey is almost over. But if you’ve enjoyed it and are up for another one, don’t forget to get yourself signed up for 2024 and enjoy all the benefits of our Early Bird Special Offer if you jump on board before the end of September!
It’s back to school in our household for the start of a brand new year for Seth, and that’s always a signal to me that it’s time to get cracking with all my new projects. So without further ado, I am going to sign off now and wish you all a fabulous September. Have fun everyone and keep those needles clicking until I see you back here at the beginning of October for the penultimate instalment (I can’t believe that I am saying that!), Debbie x]]>
https://debbieabrahams.com/blogs/news/mystery-cushion-club-2023-post-3-august2023-08-15T00:00:00+01:002023-08-15T09:06:49+01:00Mystery Cushion Club 2023: post 3, AugustDebbie AbrahamsWELCOME TO THE AUGUST INSTALMENT OF THE 2023 MYSTERY CUSHION CLUB! We are about to begin the third instalment of this year’s project, and things are really starting to get exciting now as the final three squares for the front panel are revealed! If you’re going away on holiday or planning a few days away during the summer break, then this is the perfect project to take with you and will keep your crafting hands busy and happy while you relax and enjoy your time away. Just make sure that you take all the needles, yarns and beads with you that you need for the squares you are knitting, and don’t forget to pack your August mail out too!
We are out and about this summer visiting several different places within the UK with little time spent at home. So there is no intro vlog from me this month, but there is one new tech vid to help you with this month’s squares:
How to add Swiss darning to your knitting
THIS IS THE REMINDER OF THE TECH VIDS THAT ARE IN PREVIOUS BLOGS. You might find them useful if you need a reminder of some of the techniques that are used in the August squares:
How to cast on using several colours (June blog)
Square 1, Summer Cable: how to cross the yarns over when changing colour (June blog)
How to cable (June blog)
How to pick up stitches along a cast-off edge (to knit the next square)
How to thread beads onto your yarn (June blog)
How to bead, the slip-stitch method (June blog)
How to carry yarns up the side of the work (June blog)
Square 2, Pavlova: how to knit the frill (June blog)
THE SECOND SET OF PATTERNS WERE EMAILED TO ALL THE MEMBERS ON 15TH AUGUST, and if you follow the link in the email, it will take you straight to the August mail out. This file can also be downloaded from your Debbie Abrahams account on our website.
The printed patterns (for those who paid for them), were posted to overseas members on the 7th August and to the UK members on the 11th August.
THIS IS A FINAL REMINDER THAT SIGN-UPS FOR THE 2023 MYSTERY BABY BLANKET CLUB CLOSE AT THE END OF THIS MONTH. So if you want to participate in this brand new KAL, you have just two weeks left to get yourself signed up. We will start posting the kits to members at the beginning of September, starting with the overseas, so that everyone is ready to begin knitting the first squares on the 1st October. So there’s really not long to go before all the excitement of a new knitting adventure begins!
Here is a quick summary of what I have in store for you…
The project is knitted in Rowan Baby Cashsoft Merino, which is a mixture of merino wool, acrylic microfiber and cashmere. It is beautifully soft and has a luxurious handle, making it the perfect choice for a baby blanket. It is machine washable.
There are two colour options to choose from. The base palette includes soft green, camel, butter yellow, taupe, cream and faded denim, and to complete it there is a choice of either:
Grey/Silver
or
Rose/Candy
The kit for this blanket will be available to buy in our online shop from 1st June 2024 when the Club has finished, but there are lots of reasons to sign up now and grab yourself a membership. By joining the club you will benefit from:
10% off the cost of the membership (£139.50 + shipping after discount)
10% discount voucher for a single transaction in our online shop*
Free fabric gift bag (by Paper Mirchi)
A dedicated blog and technical support throughout the project
The opportunity to knit the blanket before anyone else!
*excludes Mystery products.
Each member will receive a knitting kit which includes over fifteen balls of Rowan Baby Cashsoft Merino yarn, seven sets of emailed patterns (with the option to purchase additional printed patterns), a fabric gift bag and a woven label. The finished size of the blanket is approximately 72cm x 98cm.
The blanket design includes the techniques of intarsia, fairisle, lace, textured stitches and stripes, offering you an exciting variety of squares to knit up over seven months. (There will be no beads or embellishments in this blanket).
Above: 2019 Mystery Baby Blanket Club, Love You to the Moon & Back.
If you would prefer to pay in instalments you can use our online payment system Splitit, which enables you to make your payment over two, three or four months - you choose what suits you best. Simply select this option at checkout when you make your first payment and then your remaining payments will be taken automatically from your account. It’s that easy!
You have until the end of August to get yourself signed up to the Mystery Baby Blanket Club before it begins on 1st October. We are signing up members from all over the world, so wherever you are, why not come and join me!
SIGN-UPS FOR THE 2024 MYSTERY BLANKET CLUB BEGIN AT THE END OF THIS MONTH ON FRIDAY 25TH AUGUST, so mark this date on your calendar if you want to grab yourself a place on next year’s ‘mystery’ KAL! We are running an Early Bird offer for everyone who signs up before the end of September, and details of this will be emailed to you in a newsletter on the 25th. So keep an eye on your inbox!
I never like to give away a lot of advance information about the Mystery Blanket design, but I am going to give you a sneeky peek of the colours I am using. Not all of the yarns you see in this image are confirmed, but they give you a good idea of the colour palette. It’s a vibrant mixture of deep blues, purples and teals with shots of hot pink, combined with a generous scattering of glitter and sparkle. The yarns are cosy and beautifully soft, creating a dreamy blanket that will be the perfect cuddle-buddy through those cold winter months. Interested? Then watch out for our newsletter which will drop into your inbox on launch day to find out more…
Since the Mystery Blanket Club began way back in 2008, it has sold out before our end of December deadline. So if you fancy being part of the club next year, it’s a good idea to get your membership signed and sealed early on to guarantee your place. You don’t need to pay in full upfront, if preferred you can use our payment plan which enables you to spread your payment across 2-4 months - the decision is up to you. But everyone who signs up within the first month will be entitled to the Early Bird offer, so whatever you choose to do, you won’t miss out.
THESE ARE THE THREE SQUARES YOU ARE KNITTING THIS MONTH. There are three front panel squares - two familiar and one new…
FRONT PANEL, Square 3:Knotted Rug 2 – striped textured stitch with eyelets:
FRONT PANEL, Square 5:Polka Dots & Flowers – embroidered floral motifs with slip-stitch beads and sewn on decorative buttons:
FRONT PANEL, Square 6:Al Fresco 2! – decorative stripe with hooked-in beads:
These useful tips are worth a read before you begin…
SQUARE 3, KNOTTED RUG 2: you knitted this square last month, but in a different colourway. Summer and Blushes stay as they are, but Pear is swapped out for Fav Denims. If you need a reminder of how to knit this stitch you can check out the tech vid for it which is in the July blog:
How to carry yarns up the side of the work (JUNE blog)
Remember to make the needle size change after the cast on/pick up and Next Row (WS) to 3.25mm, which reverts back to the smaller needle for the last row and cast off. This is important to do otherwise your square will knit up too tightly and consequently will be smaller than the other squares in the front panel.
SQUARE 5, POLKA DOTS & FLOWERS: this is a new square and the focal point of the front panel block. The knitting of it is relatively easy - it’s basically stocking stitch with a scattering of slip-stitch beads. But there is a lot of embroidery on top of the stitches (Swiss darning) which might take you some time to do, but it will be worth it. And there’s buttons to sew on too.
These tech vids will help you with this square:
How to pick up stitches along a cast-off edge (to knit the next square) (JUNE blog)
How to thread beads onto your yarn (JUNE blog)
How to bead, the slip-stitch method (JUNE blog)
How to add Swiss darning to your knitting (NEW! August blog)
The image on page 8 has been cropped on the left and right edges, so you cannot see all of the embroidered floral motifs. However, there is another image of it on page 9 which does show the whole of this square, so use this for reference if needed.
It is advisable to block and press the square before you add the embroidery. This will relax the stitches making then flatter and neater, and therefore easier to embroider.
I used two lengths of yarn for each motif and worked the two petals on the left-hand side with one length and the two petals on the right-hand side with the second length. To limit the number of loose ends I used both ends of the yarn to embroider each side. It might be worth having a good think about how you are going to do this before you make a start. And then when you find a good method that works for you, repeat it for each motif.
The buttons (the smaller ones in the kit) are sewn on last using the embroidery silks in the kit. The colours to use for this are listed on page 9 - you are told what colour button to sew on and what colour embroidery silk to use. But feel free to mix this up a bit if you want and use whatever combinations you prefer. This is your opportunity to go off-piste if you fancy it!
SQUARE 6, AL FRESCO 2!: this is a variation of Square 4 which was in Mail Out 1 in June.
These tech vids from previous blogs might be helpful if you need a reminder of some of the techniques used in this square:
How to carry yarns up the side of the work (June blog)
How to bead, the hooking-in method (June blog)
So what are the differences between Square 4 and Square 6? There are changes to both the colours of the yarn and to the beads. Fuchsia and White remain the same, but Pear is swapped out for Fav Denims. And although the colours of the beads in this square are the same as in Square 4, the sequence of them is different. So read the instructions very carefully and don’t use Square 4 to work from. You need to use the instructions for this square which are on pages 10 and 11.
AFTER YOU HAVE COMPLETED THIS MONTH’S SQUARES, THE FRONT PANEL WILL BE COMPLETED, so the next task is to sew them together to create one block. I will include instructions and tech vids for this in the fourth mail out next month. However, if you want to crack on and get ahead, you can do this now.
I would recommend using Mattress stitch for sewing together your strips. Here are some tips on the technique if you have not tried it before.
If you have knitted your squares separately you will need to sew them together to create three strips. Then before you start sewing together the three strips it is advisable to make a note of the number of rows in each square. Then you will be able to work out where you need to ease in rows if one square has more rows in it than another.
This is how Mattress stitch works vertically:
Vertical (to sew together your strips): with right sides facing and with two strips sitting next to each other, take the needle from the back to the front of the work under two bars at a time, inserting the needle under the bar between the edge stitch and the next stitch in. To keep the edges level at the bottom, begin by taking the needle under the first bar of the first square (the one on the left), then take the needle under the first bar and the next one up (two bars) of the second square (the one on the right). After this take the needle under two bars on each side, zig-zagging back and forth between the two strips, and making sure that your needle always goes back into the same gap between the bars each time you take it under the bars.
So how do you ease in rows? You can do this quite simply using Mattress stitch by taking the needle under one bar instead of two whenever you need to ease. If there is just one row to be eased, I would advise that you do this in the middle of the square. However, if with other squares there are more rows to ease in then you can repeat this as many times as required along the edge that needs to be eased in, dividing the number of easings as equally as possible along the seam.
THERE WILL BE SOME NEW KIT AND PRODUCT LAUNCHES IN OUR ONLINE SHOP SOON, SO HERE ARE SOME DATES THAT YOU MIGHT WANT TO POP IN YOUR DIARY…
Friday 25th August: Mystery Blanket 2024 launch!
Friday 15th September: Cowl kit promotion –the 2021 Hell Bay project, Fraggle Rock in two colourways and last year’s Festive Mystery Box project, Snowflake will be available to purchase for the first time as kits.
Below: Fraggle Rock cowl.
Above: Snowflake cowl.
Friday 3rd November: Festive Mystery Knit Boxes – the perfect idea for a gift or a treat for yourself. Debbie’s Mystery Box includes ten mystery gifts including a brand-new festive knitting kit.
Friday 10th November: our festive kits promotion begins, and you can grab yourself a kit at a discounted price for a limited period (offer excludes Festive Mystery Knit Boxes).
Above: Mini Festive Stockings.
IF YOU ARE NOT FOLLOWING US ON SOCIAL MEDIA THEN YOU CAN JOIN US TODAY! Not only will our posts keep you up to date with all our latest news, but the lovely, friendly communities out there are a great place meet up virtually to get help and advice for your project whilst enjoying some good humoured banter!
Ravelry: Debbie Abrahams Handknits
Facebook: Debbie Abrahams Mystery Knitters
Facebook: Debbie Abrahams Handknits (our own FB page)
Instagram: debbieabrahams_knitting
Pinterest: debbieabrahams@debbieabrahamsk
YARN LOFT IN CARRINGTON, NOTTINGHAM, IS THE PLACE TO BE IF YOU WANT TO MEET UP (FOR REAL!) WITH OTHER MEMBERS AND ENJOY A COUPLE OF HOURS OF KNITTING IN A VERY LOVELY YARN SHOP. There is no meeting scheduled for August, so our next gathering is on Wednesday 6th September between 4-6pm at Yarn Loft, 118 Hucknall Road, Carrington, Nottingham, tel number 07825 702433, website: www.yarnloft.co.uk. To cover the costs of hosting the meeting there is a small sub to pay (£3.00), which can be paid to Doreen on the day.
Just send a quick email to me at debbie@debbieabrahams.com to let me know you are coming and we will make sure that we have a cup of tea and a cake ready for you!
SO HAVE YOU GUESSED THE TITLE OF THE MYSTERY CUSHION YET? IF NOT THEN HERE’S YOUR CHANCE TO HAVE ANOTHER GO! We’ve had a some more correct guesses, so congrats go out to Catherine Pope, Nicola Farr, Jackie Wilcock, Reena Patel, Anne Applin and Phyll Bardsley! For those of you who are still guessing, maybe another letter will help trigger some ideas… this month the letter I am giving you is ‘T’: _ _ _ N _ _ / _ A _ T _
If you think you know what it is, please email your answer to Sue at sue@debbieabrahams.com to see if you are right. And if you are then with your permission, we will include you in the list of correct guessers in the September blog. Good luck everyone!
So here we are with the Front Panel revealed, leaving just the two back panels to knit before your Mystery Cushion is completed. After this month we are on the downward slope, and before you know it you will sitting back and enjoying your new creation - won’t that be amazing!?! We always love to hear from you, so don’t forget to keep in touch with us and send in any stories, ideas or pics you have of your ‘mystery’ knitting and with your permission we’ll include them in the next blog. I’d like to wish all of you a super summer and hope that wherever you are in the world, your Mystery knitting is continuing to keep you happy and busy! Until next month, take care, Debbie x
]]>
https://debbieabrahams.com/blogs/news/mystery-blanket-club-2023-post-7-august2023-08-01T00:00:11+01:002023-08-01T00:00:11+01:00Mystery Blanket Club 2023: post 7, AugustDebbie AbrahamsWELCOME TO THE SEVENTH INSTALMENT OF THE 2023 MYSTERY BLANKET CLUB! The summer holidays are underway here in the UK and I am looking forward to some time away with the family in between working on my Autumn/Winter projects. And if you have planned any time away, you’ll probably be keen to take your knitting with you. So this month there are another six squares to knit, which should be enough to keep you going alongside any other exciting things you are working on at the moment.
This month's blog begins with an intro vid, so it would be a good idea to tune in and give it a listen before you start knitting your August squares. Following on after that is my written blog which has even more news and updates. So make sure you give that a good read too. Time to pop the kettle on maybe…
There are no new tech vids this month, just my intro, so here goes!...
This is a reminder of the techniques that were covered in previous blogs:
Square 8, Pixies & Nixies (both options): how to knit the decorative slip-stitch (February)
How to carry yarns up the side of the work (February)
How to pick up stitches along a cast-off edge (February)
Mattress stitch (horizontal) (February)
How to cable (February)
How to knit a contrast-coloured bobble (February)
Square 16, Forager: how to knit the exaggerated decorative purl stitch (February)
Understanding lace stitches (March)
How to thread beads onto your yarn (March)
How to bead, the slip-stitch method (March)
The intarsia technique (March)
How to add Chain stitch to your knitting (March)
How to add Swiss darning to knitting (March)
How to pick up stitches along a cast-off edge using several colours (April)
Square 23, Dragonfly: Option Two (Rows 1-7) (June)
THE PRINTED PATTERNS HAVE BEEN POSTED TO THE MEMBERS WHO OPTED FOR THEM, with the overseas sent on Thursday 20th July and the UK on Thursday 27th July.
WHEN THERE IS AN OPTION IN THE BLANKET SQUARES, IT IS IMPORTANT TO LOOK BACK AT YOUR PREVIOUS CHOICES AS THEY MAY AFFECT SOME OF YOUR FUTURE CHOICES. You will notice that when I talk about the squares in the blog (and in my intro vid this month), when there is an option I have started to recommend which one, if any, you should choose. This is based on the previous squares you have knitted and is important to follow if you want symmetry in your overall blanket design. It’s how I prefer to work - I’m not good at random! However, if this is something that really does not bother you then feel free to choose whatever takes your fancy, regardless of what you’ve knitted before. I’m not brave enough for that, but if you are then go for it!
WHEN TO HOOK IN A BEAD, WHEN TO SLIP STITCH A BEAD? This is the question, and one that I have been asked a lot recently. Why do I hook in some beads and use the slip stitch technique for others? Is there a difference and does it really matter which one is used? The answer to that is pretty simple - yes, in most cases it does matter. And this is why.
The slip stitch technique condenses down the row tension, which if you think about it makes perfect sense as you are slipping each stitch where a bead is placed, so these stitches are not actually knitted. Whereas the hooking-in technique extends the row tension as stitches are pulled off the needle and stretched when the beads are hooked in. So this is the first reason I would give - it affects row tension, and the more beads in a square, the more significant the difference is.
Above: hooked-in beading.
Another reason is to do with the bead pattern and how closely together the beads are positioned. If you use the hooking-in technique you can add in beads next to each other on every stitch and every row, if you so wish, making it ideal for outlines, diagonals and horizontal and vertical lines. However, this is impossible to do using the slip stitch technique as you need at least one stitch and one row between each bead, so this technique reduces the scope of what you can do.
Above: slip-stitch beading.
So if you are thinking about changing the technique that you are instructed to use in a beaded pattern, think very carefully about it. On Square 41, Toadstools (Option One) this month, it doesn’t really matter which technique you use for any of the beads because they are scattered randomly on the toadstools. But for the second option, Square 41, Toadstool, it does matter as there is an overall beaded repeat pattern and a lot of beads.
It is always safest to use the technique I have instructed in the pattern, but if you are keen to use a different technique, just bear these things in mind before you start knitting.
SIGN-UPS FOR THE 2024 MYSTERY BLANKET CLUB BEGIN AT THE END OF THIS MONTH ON FRIDAY 25TH AUGUST, so mark this date clearly on your calendar if you want to grab yourself a place on next year’s ‘mystery’ KAL! We are running an Early Bird offer for everyone who signs up before the end of September, and details of this will be emailed to you in a newsletter on launch day. So keep an eye on your inbox!
I am not going to go into any great detail now about the blanket design - I’m saving this for the launch - but I am going to give you a sneeky peek of the colours I am using. Not all of the yarns you see in this image are confirmed, but they give you a good idea of the colour palette. It’s a vibrant mixture of deep blues and purples with shades of teal and shots of hot and cool pink, combined with a generous scattering of glitter and sparkle. The yarns are cosy and beautifully soft, creating a dreamy blanket that will be the perfect cuddle-buddy through those cold winter months. Interested? Then watch out for our newsletter which will drop into your inbox on the 25th August to find out more…
Since the Mystery Blanket Club began way back in 2008, it has sold out before our end of December deadline. So if you fancy being part of the club next year, it’s a good idea to get your membership signed and sealed early on to guarantee your place. You don’t need to pay in full upfront, if preferred you can use our payment plan which enables you to spread your payment across 2-4 months at no extra cost - the decision is up to you. But everyone who signs up within the first month will be entitled to the Early Bird offer, so whatever you choose to do, you won’t miss out.
Above: a flavour of the colour palette for 2024...
That’s all I am going to say for now. I’ll leave you mulling over those colours until launch day on the 25th August when more about the project will be revealed...
THERE IS NOW UNDER A MONTH TO GET YOURSELF ON BOARD FOR THE 2023 MYSTERY BABY BLANKET CLUB. The first MBBC was launched in 2019 and was a lot of fun, so I can’t wait to get this brand new project underway at the beginning of October. I just love everything about baby blankets, from the cute motifs and patterns to the challenges of designing a blanket without any beads - which as you can imagine is quite a task for me! And working again with the gorgeously soft and luxurious Rowan Baby Cashsoft Merino has been an absolute dream. It knits up so beautifully and is especially good for stitch definition, so be prepared for lots of lovely textured patterns as well as intarsia motifs and pretty fairisles. I think that both you and baby are going to love this!
Above: 2019 Mystery Baby Blanket Club, Love You to the Moon and Back.
Here is a summary of what’s in store…
The project is knitted in Rowan Baby Cashsoft Merino, which is a mixture of merino wool, acrylic microfiber and cashmere. It is beautifully soft and has a luxurious handle, making it the perfect choice for a baby blanket. It is machine washable.
The blanket is made up from thirty-five squares that are pieced together to create one block. Each square is 13cm x 13cm in size resulting in a completed blanket that measures approximately 72cm x 98cm.
There are two colour options to choose from. The base palette includes soft green, camel, butter yellow, taupe, cream and faded denim, and to complete it there is a choice of either:
Grey/Silver
or
Rose/Candy
The kit for this blanket will be available to buy in our online shop from 1st June 2024 when the Club has finished, but there are lots of reasons to sign up now and grab yourself a membership. By joining the club you will benefit from:
10% off the cost of the membership (£139.50 + shipping after discount)
10% discount voucher for a single transaction in our online shop*
Free fabric gift bag (by Paper Mirchi)
A dedicated blog and technical support throughout the project
The opportunity to knit the blanket before anyone else!
*excludes Mystery products.
Each member will receive a knitting kit which includes over fifteen balls of Rowan Baby Cashsoft Merino yarn, seven sets of emailed patterns (with the option to purchase additional printed patterns), a fabric gift bag and a woven label. The finished size of the blanket is approximately 72cm x 98cm.
The blanket design includes the techniques of intarsia, fairisle, lace, textured stitches and stripes, offering you an exciting variety of squares to knit up over seven months. (There will be no beads or embellishments in this blanket).
If you would prefer to pay in instalments you can use our online payment system Splitit, which enables you to make your payment over two, three or four months - you choose what suits you best. Simply select this option at checkout when you make your first payment and then your remaining payments will be taken automatically from your account. It’s that easy!
You have until the end of August to get yourself signed up to the Mystery Baby Blanket Club before it begins on 1st October. We are signing up members from all over the world, so wherever you are, why not come and join me!
WE ARE NOW GETTING VERY CLOSE TO THE END OF OUR GUESSING GAME! AND WITH ONE MORE LETTER THIS MONTH AND SIX MORE SQUARES REVEALED, IT’S BECOMING VERY OBVIOUS…ISN’T IT? We had no more correct guesses this month, so for those of you who are still guessing, here is another clue. This month the letter I am giving you is... “S”:
T H _ / _ _ _ H A _ T _ D / _ O R _ S T
With another letter revealed, are you having one of those fabulous lightbulb moments?!? If you think about the squares and the names of them, what do they make you think of? After this month you have just two more chances to guess the title before it is revealed in the November blog. So will you get it right before then? If you think you know what it is, send in your answer to Sue at sue@debbieabrahams.com and she will let you know if you are right - and fingers crossed that you are this time!
THERE ARE SIX SQUARES TO KNIT THIS MONTH, with alternative options for four of the squares, so you’ve got some decisions to make:
Square 4, Wolfsbane (Option One) – fairisle pattern with stripes, textured stitches and hooked-in beads:
Square 4, Wolfsbane (Option Two) – textured pattern with stripes and hooked-in beads:
Square 21, Autumn Cable 2 – cable pattern with slip-stitch beads (same for both options):
Square 32, Butterflies (Option One) – fairisle pattern with stripes, textured stitches and hooked-in and slip-stitch beads:
Square 32, Butterflies (Option Two) – striped pattern with textured stitches and slip-stitch beads:
Square 33, Thicket 2 – lace pattern with hooked-in beads (same for both options):
Square 41, Toadstools (Option One) – toadstool motifs with hooked-in beads and slip-stitch beads and chain stitch details:
Square 42, The Pixies & Nixies are Back! (Option One) – fairisle pattern with stripes, textured stitches and hooked-in beads:
Square 42, The Pixies & Nixies are Back! (Option Two) – fairisle pattern with stripes, textured stitches and hooked-in beads:
On each pattern page there is a list of Pattern notes and tips that are worth reading before you start to knit each square. These bits of advice will help you and give pre-warnings as to what look out for in the pattern instructions. Also take note of the description under the title of each square as this tells you what the stitch structure is.
You can use the tech vids from previous blogs to help you knit your squares. But here are a few extra tips to assist you:
SQUARE 4, WOLFSBANE (Option One): this is the same as Square 46, so we begin this month with a bit of revision. But if you need a reminder of any of the techniques, then the tech vids in previous blogs are there for you to dip into.
Videos to watch for assistance with this square:
How to pick up stitches along a cast-off edge (February blog)
Mattress stitch (horizontal) (February blog)
Square 8, Pixies & Nixies (both options): how to knit the decorative slip-stitch (February blog)
How to bead, the hooking-in method (February blog)
How to carry yarns up the side of the work (February blog)
I would recommend that you choose the same option that you knitted for Square 46. At the end of the day it’s up to you. But if you want balance and symmetry in your design, then play safe and choose the same option.
SQUARE 46, WOLFSBANE (Option Two): this second option for Square 4 is exactly the same as the second option for Square 46.
Videos to watch for assistance with this square:
How to pick up stitches along a cast-off edge (February blog)
Mattress stitch (horizontal) (February blog)
Square 8, Pixies & Nixies (both options): how to knit the decorative slip-stitch (February)
How to knit the decorative loop stitch (February blog)
How to bead, the hooking-in method (February blog)
How to carry yarns up the side of the work (February blog)
As mentioned for Option One, I would recommend that you choose the same option that you knitted for Square 46.
SQUARE 21, AUTUMN CABLE 2: this is a variation of Square 29 which you knitted way back in March, but the colour of the yarn and beads are different, and there is a change to the twist of the cables too.
Videos to watch for assistance with this square:
How to pick up stitches along a cast-off edge (February blog)
Mattress stitch (horizontal) (February blog)
How to cable (February blog)
How to thread beads onto your yarn (March blog)
How to bead, the slip-stitch method (March blog)
So what’s different about Autumn Cable 2? The most noticeable difference is that Pumpkin has been swapped out for Elfin. And if you look closely the beads are Velvet instead of Lime. But something you may not notice straight away is the direction of the cables, which twist to the right instead of to the left. This is because you are knitting c7b with the stitches held on a cable needle at the back of the work.
The tech vid for cables does not show you c7b, but it does show you how a cable is knitted. So you just need to apply the same technique to what you are beingn shown (that is, crossing over two sets of stitches), replacing the number of stitches shown in the demo with seven stitches in each cable.
Remember that some of the stitches are worked through the back of the loop (K1tbl and P1tbl) which twists them making them tighter and neater. This is shown on the chart on page 11 by a forward slant. You can see clearly on the chart where they occur which is on the outside edges of each cable. And note that within the cable instruction itself (c7b), stitches continue to be worked through the back of the loop. You will find the abbreviation for c7b explained on page 35.
SQUARE 32, BUTTERFLIES (Option One): you will recognise this square from your May instalment because it is identical to it. There are two options, so this is the second decision you will need to make this month about which option to knit.
Videos to watch for assistance with this square:
How to pick up stitches along a cast-off edge (February blog)
Mattress stitch (horizontal) (February blog)
How to thread beads onto your yarn (March blog)
How to bead, the slip-stitch method (March blog)
How to carry yarns up the side of the work (February blog)
Square 8, Pixies & Nixies (both options): how to knit the decorative slip-stitch (February blog)
How to bead, the hooking-in method (February blog)
If you take a look at the Piecing Diagram for Option One on page 4, you will see that this square is the same as Square 18. So I would recommend that you choose the same option if you want to maintain symmetry in the overall design.
On the image you can see there are black beads for the eyes, but you may remember from before that they are not on the chart - they are knitted in on the row after it, on Row 44. These beads are hooked into the knitting, but the beads in the Maple and Pasture stripes use the slip-stitch technique. So this square gives you the opportunity to enjoy both bead knitting techniques.
Just a gentle reminder to change needle size when instructed as this will help to make the stripes extra neat, and keep the fairisle pattern uniform in width to the rest of the square. There is a change down to 2.75mm needles for the stripes and a change up to 3.75mm needles for the fairisle (with 3.50mm used in between!).
SQUARE 32, BUTTERFLIES (Option Two): this second option for Square 32 is exactly the same as the second option for Square 18.
Videos to watch for assistance with this square:
How to pick up stitches along a cast-off edge (February blog)
Mattress stitch (horizontal) (February blog)
How to thread beads onto your yarn (March blog)
How to bead, the slip-stitch method (March blog)
How to carry yarns up the side of the work (February blog)
Square 8, Pixies & Nixies (both options): how to knit the decorative slip-stitch (February blog)
Square 16, Forager: how to knit the exaggerated decorative purl stitch (February blog)
If you went for Option Two before, then you’ve already knitted the exaggerated purl stitch, decorative stitch stripes and beaded stripes, so this should be quite an easy one for you to knit. You might even be able to pop on the tv or radio while you work on this square - just keep your eye on those needle changes and make sure that you thread the correct beads onto the correct colour yarn!
SQUARE 33, THICKET 2: do you recognise this lace stitch pattern? It’s the same as Square 17 from the March instalment but it’s been given a totally different look in a warmer colourway.
Videos to watch for assistance with this square:
How to pick up stitches along a cast-off edge (February blog)
Mattress stitch (horizontal) (February blog)
Understanding lace stitches (March blog)
How to bead, the hooking-in method (February blog)
This is the lace pattern that has the variable stitch count and means that you will have an increased number of stitches - 49 stitches - at the end of all right side rows, and the same number you cast on - 44 stitches - at the end of all wrong side rows (as you can see above). I have written at the end of each row how many stitches you should have on the needle, so it’s wise to keep a close check on this. Undoing lace is not the easiest of tasks, so if you do miss a yarn over (increase) or a decrease, hopefully you will only need to back up by a row or two.
The beads used in this square are Gold and Bronze, and they are hooked in on both right side and wrong side rows. They sit in diagonal lines of four which alternate between the two colours as you work up the square.
SQUARE 41, TOADSTOOLS (Option One): this is the brand new square this month - a group of intarsia toadstools with beads and chain stitch embroidery - so there's plenty to keep you busy!
Videos to watch for assistance with this square:
How to pick up stitches along a cast-off edge (February blog)
How to pick up stitches along a cast-off edge using several colours (April blog)
Mattress stitch (horizontal) (February blog)
The intarsia technique (March blog)
How to bead, the hooking-in method (February blog)
How to thread beads onto your yarn (March blog)
How to bead, the slip-stitch method (March blog)
How to add Chain stitch to your knitting (March blog)
This is the sister square to Square 9, Toadstool, so I would advise that you choose the same option as this one. It is intarsia which means winding off smaller balls of yarn (or using yarn bobbins) to knit each separate section of colour. So even though it might be tempting to carry the background yarn of Acorn across the back of the toadstools, I would recommend that you don’t do this as it could affect tension and the knitting could pucker. You want to create a nice flat, even piece of knitting, this is achieved by using the intarsia technique throughout the whole of the square.
The black beads are hooked in and the Velvet and Bronze beads are knitted in using the slip stitch technique. There are Velvet beads on the Ginger toadstool, and Black and Bronze beads on the other two toadstools.
The small, embroidered circles around some of the Black and Bronze beads are added to the knitting after it has been blocked and pressed. You can see which colours to use on the chart on page 21, it’s a mixture of Ginger, Pasture and Barn Red. However, this is where you could go off-piste if you want and use whatever colours you want - you don’t even have to embroider around the same beads as me. These are toadstools after all, and no one toadstool is identical to another. So if you like, yours can be different too!
There is some chain stitch on the lower edge of each toadstool, which is not shown on the chart, so you will need to refer to the image on page 20 for guidance. I used Shadow on the Ginger toadstool, Pasture on the Barn Red toadstool and Barn Red on the Shadow toadstool, but again, you can use whatever colours you want. This is your opportunity to personalise your square if you want to, and make it unique!
SQUARE 41, TOADSTOOL (Option Two): so if you don’t fancy intarsia, you can go for this option instead and knit an all-over textured stitch with hooked-in beads. There is no pre-threading to do so you can get going on this straight away!
Videos to watch for assistance with this square:
How to pick up stitches along a cast-off edge (February blog)
Mattress stitch (horizontal) (February blog)
How to bead, the hooking-in method (February blog)
If you chose Option Two for squares 9 and 37 then you’ve knitted this stitch pattern before. I would advise that you choose the same option that you chose for Square 9 so that you have the same square in a diagonal across the blanket (Square 9 and Square 41). However, your choice does not have to be the same as what you chose for Square 37.
Like Square 33, Thicket 2, this square has a variable stitch count, and the number of stitches you should have at the end of each row is written in the pattern. So it’s a good idea to check this as you go along. The pattern is created by doing a multiple increase into one stitch (M3) and double stitch decreases over a 16-row pattern repeat which results in the number alternating between 61 stitches and 59 stitches.
Remember that this square uses a smaller needle than the recommended main needle size of 3.50mm. This is necessary to ensure that it knits up to the same size as all the other squares in the blanket.
SQUARE 42, THE PIXIES & NIXIES ARE BACK! (Option One): this square is similar to Squares 8 and 36, but you will notice a few differences…
Videos to watch for assistance with this square:
How to pick up stitches along a cast-off edge (February blog)
Mattress stitch (horizontal) (February blog)
Square 8, Pixies & Nixies (both options): how to knit the decorative slip-stitch (February blog)
How to bead, the hooking-in method (February blog)
How to carry yarns up the side of the work (February blog)
I would recommend that you choose the same option that you knitted for Square 8. This is most probably the same choice you made for Square 36. So looking at the Piecing Diagram on page 4, it won’t come as any surprise that you’ll be asked to make the same choice for Square 14 later on in the project. This is not giving the ‘mystery’ away as you’ve probably already made a good guess at what some of those final squares are going to be - remember, symmetry?!? And if you’re thinking the way I think then you’ll no doubt be right!
So what is the difference between this square and Squares 8 and 36? Basically the design has been turned upside down, so it’s a mirror image. This means that you begin the square with those multi-coloured stripes, and you finish at the top with the fairisle panel. So it has the same patterns in it, they are just the other way up. And as you’ve already knitted Squares 8 and 36, this one should be no problem at all!
SQUARE 42, THE PIXIES & NIXIES ARE BACK! (Option Two): this is the easier option of the two and should match the choice that you made for Square 8.
Videos to watch for assistance with this square:
How to pick up stitches along a cast-off edge (February blog)
Mattress stitch (horizontal) (February blog)
Square 8, Pixies & Nixies (both options): how to knit the decorative slip-stitch (February blog)
How to knit the decorative loop stitch (February blog)
How to bead, the hooking-in method (February blog)
How to carry yarns up the side of the work (February blog)
I’ve done a similar thing to this option and turned the design upside down. So you begin with the stripes and end with the decorative loop stitch at the top. It is no different to what you knitted for this option for Squares 8 and 36, it’s just the other way up. But remember that if you need a reminder of any of the techniques - especially the decorative loop stitch - there are several tech vids in previous blogs that you can scroll back to for guidance.
And that's your six squares for this month - enjoy!
I HAD A FABULOUS TIME AT THE MONTHLY MEETING AT YARN LOFT IN JULY! It was lovely to be able to catch up with a very excitable group of ladies and to see their progress with the blanket. To see the squares on the needles and the enthusiasm with which they were being knitted was truly rewarding for me. And as usual we had some good laughs too as stories were told and tips and advice were exchanged. It was such good fun!
Above: (left to right), Carol, Mary and Kerry discuss their blanket squares.
It always amazes me how quickly those two hours pass by, but that’s probably because of the continuous banter - if you want a couple of quiet hours knitting, this is not the place to be! Subjects ranged from what to do with ends of yarns to whether we preferred charts to words, and somehow we got onto whether it is legal to take a snake for a walk - please don’t ask how we got onto that! It was a couple of hours of very bizarre but hugely entertaining conversation.
Doreen was there on duty to look after us and made us cups of tea and coffee with a slice of cake (thanks Doreen!), which kept us all going. Quite surprisingly I don’t think that anyone made a major error with their knitting this time, which is pretty amazing considering how much we laughed and talked. So much progress was made by all, and everyone went home with more on their needles than they started with - which is always a bonus!
Below: (left to right), Jan, Vanessa and Shelly crack on with their blanket squares.
There is no meeting in August because of the summer holidays, so we will resume our monthly meetings in September. If you live within reach of Nottingham and are interested in coming along to our next meeting on Wednesday 6th September, the fun begins from 4pm and runs until 6pm. We meet at Yarn Loft, 118 Hucknall Road, Carrington, Nottingham, tel number 07825 702433, website: www.yarnloft.co.uk. To cover the costs of hosting the meeting there is a small sub to pay (£3.00), which can be paid to Doreen on the day.
Just send a quick email to me at debbie@debbieabrahams.com to let me know you are coming and we will make sure that we reserve a space for you!
I HAD THE ABSOLUTE PLEASURE TO TUTOR TWO WORKSHOPS IN JULY AND IT WAS LOVELY TO MEET SOME OF YOU AT THEM! The Woolly Wanderers in the West Midlands invited me back to Sutton Coldfield for a repeat of a workshop that we ran last year at Claire Bolton’s house. She very kindly gave up her beautiful home for the workshop where fourteen of us gathered together for the day to knit. My sister Jenny of BeadyKnits (some of you may have bought her kits?) came with me to assist, and she spent the day looking after sales while I ran the workshop.
Each participant was given a kit for a purse project. It was a smaller version of the Chic Case which is available as a kit in a larger size in our online shop. Everyone got on with it really well, and with Claire providing the hot drinks and biscuits and the participants contributing to a superb buffet lunch, a wonderful day was had by all!
Above: the Chic Purse that the ladies knitted up during the workshop.
Many of the ladies in this group are Mystery Blanket Club members and have been members for many years. So there was lots of talk, amongst other things, about this year’s blanket, and it was lovely to hear how they were getting on with it.
Sue Webster had a very special cake made for her 80th birthday and she brought along this picture of it. Can you see what the lady is knitting? It’s the 2021 Mystery Blanket, One Thousand & One Nights! Isn’t it amazing! I thought it was wonderful and such a unique idea for a cake. The detail on the blanket is incredible!
At the end of the day Claire was exhausted. She had been such a wonderful host and looked after us all so well. Here she is relaxing in her very comfortable rocking chair at the end of the day. Thanks so much Claire, we all had a fabulous time!
Above: Claire enjoying a well deserved rest!
Straight after that, Jen and I hopped in the car and made our way over to Norfolk for our next workshop on Saturday with the Norfolk Knitting Group, run by Jean Gosling. I have been running workshops for this group for many years - it must be nearing twenty? So it was lovely to see so many familiar faces at the Barnham Broom Village Hall on Saturday morning.
Above: the group working away on their projects.
We knitted a different project this time, a small purse project called Reminisce (Summer). You may have seen (or purchased) the Reminisce Case which is a recent addition to our online shop. It’s the project that I ran in France a couple of months ago for Sue Culligan. But for this workshop I scaled it down in size and recoloured it in blue, yellow and green to give it a completely different look.
Above: the Reminisce Summer Purse project.
A buffet lunch always works so well, and with everyone bringing a platter along we enjoyed a wonderful day of knitting, eating, chatting and catching up with each other. Everyone made a good start on the project, and although no one completed it while we were there, it didn’t matter. We all had a wonderful day together and everyone went home with something on the needles to keep them busy over the rest of the weekend.
Below: we had lots of kits for sale at the workshop...
Thank you to the Norfolk ladies and especially to Jean for another great workshop. See you again next year!
THERE IS ONE VERY LOVELY MEMBER STORY TO SHARE WITH YOU THIS MONTH, AND IT’S FROM GILL BIRCH FROM ATHERTON IN QUEENSLAND, AUSTRALIA. Gill was over the moon to learn that her Retrospective Mystery Blanket won first prize in a local show. This is what Gill had to say:
“I thought you might be interested to know that I entered one of your blankets in the local country show. It won first in its category and went on to win Best Knitting award! Woo-hoo!”
This is fabulous news, and quite rightly so that it won first prize. It has been knitted beautifully and I am sure that it was much admired by everyone who saw it. Who knows, it may have even inspired others to take up the knitting needles and have a go themselves. Thanks for sharing this with us Gill, it is lovely news!
THANK YOU SO MUCH FOR ALL THE WONDERFUL PICS YOU’VE SENT IN OF YOUR FURRY FRIENDS! It is so lovely to see who is keeping you company while you knit up your mystery projects. I am still collecting them in so there is time to email me your pics if you want to add to the gallery. I am planning to launch this in October, so if you want to send something in before then, that would be great. Remember to include the name of your pet (or pets) and a little bit of information about them. What a great gallery we will have to look forward to!
IF YOU DON’T FOLLOW US ON OUR SOCIAL MEDIA PLATFORMS THEN PLEASE COME AND JOIN US, and enjoy the messages and photos that are shared between myself and the members:
Instagram: debbieabrahams_knitting
Pinterest: debbieabrahams@debbieabrahamsk
Facebook: Debbie Abrahams Mystery Knitters
Facebook: Debbie Abrahams Handknits
Ravelry: Debbie Abrahams Handknits
BEFORE THE AUGUST PRIZE DRAW, I JUST WANT TO DO A QUICK SHOUT OUT FOR A MYSTERY BLANKET KIT. If anyone has a 2020 Our Precious Earth knitting kit that they are willing to sell, I have a lady who is desperate to purchase it and knit it. (Kits can be sold in their entirety with all the yarn and beads and embellishments included. The selling on of the patterns for the blankets is however, prohibited). Please contact me directly at debbie@debbieabrahams.com if you are able to help with this request and I will put you in touch with the prospective buyer.
Below: the 2020 Mystery Blanket, Our Precious Earth.
AND FINALLY, IT’S TIME TO ANNOUNCE THE WINNER OF THE SEVENTH 2023 MYSTERY BLANKET CLUB PRIZE DRAW!!! Each month a member is picked at random to win a Debbie Abrahams prize. So it is worth reading right the way to the end of each blog to see if you are that lucky member!
PRIZE DRAW SEVEN (AUGUST): this month’s winner is member 250, Natalie Keane from Ryde, Isle of Wight in the UK. Well done Natalie! Please choose a prize from the following selection:
Your choice of one of Debbie’s knitting kits up to the value of £28.00 (take a look at them in our online shop).
A £25 voucher towards a Debbie Abrahams Mystery Club membership: 2023 Mystery Baby Blanket Club, 2024 Mystery Cushion Club or 2024 Mystery Blanket Club.
A Mystery bag of five gifts!
We will notify Natalie to let her know the good news!
So with the summer holidays in full swing and the promise of some sunshine here in the UK (soon please!), I am looking forward to a more relaxed month ahead before the Autumn begins and the studio gets busy again. I never go anywhere without my knitting so it will be coming with me on all my travels - you never know when the opportunity might arise to get your knitting needles out and get a precious few rows done! Wherever you are spending your summer and whatever you are doing, I wish you a peaceful and happy time. And if you get the chance to take some snaps of your knitting out and about with you, please send in your pics and I will include them in the next blog.
There won’t be an intro vlog from me next month as we are going to be away for much of August, however there will be a written blog to read with all the usual news, tips, advice and updates. So if you have a spare ten minutes, please come back to this space at the beginning of September to catch up with me and all the latest club news. And before that, remember to keep an eye out for the 2024 Mystery Blanket launch on the 25th August - I can hardly wait, can you?!? Take care everyone, Debbie, x
]]>
https://debbieabrahams.com/blogs/news/mystery-cushion-club-2023-post-2-july2023-07-15T00:00:03+01:002023-07-15T00:00:03+01:00Mystery Cushion Club 2023: post 2, JulyDebbie AbrahamsHELLO EVERYONE AND WELCOME TO THE JULY INSTALMENT OF THE 2023 MYSTERY CUSHION CLUB! Thanks for joining me today and for taking the time to catch up with all the latest Mystery Cushion news! With the summer here in the UK trying very hard to get going, Wimbledon almost over and the long school holidays about to begin, your Mystery Cushion knitting is the perfect knitting companion to tuck away in your bag and keep you busy this summer!
Your three July squares are for the front panel - there are two that you will recognise and one new one. But before you make a start on them, let’s begin by taking a look at my intro and having a read of my blog, both of which have important information and tips and advice that will help you to knit your squares.
The new tech vid this month is:
Square 7: Knotted Rug (how to knit Row 1) (It says Row 2 in the title, but it is actually Row 1).
THIS IS THE REMINDER OF THE TECH VIDS THAT ARE IN THE JUNE BLOG. They are a really helpful resource if you need assistance with any of the techniques that are used in the July Squares, and can be accessed at any time throughout the duration of the project (and beyond!):
How to cast on using several colours
Square 1, Summer Cable: how to cross the yarns over when changing colour
How to cable
How to pick up stitches along a cast-off edge (to knit the next square)
How to thread beads onto your yarn
How to bead, the slip-stitch method
How to carry yarns up the side of the work
Square 2, Pavlova: how to knit the frill
How to bead, the hooking-in method
THE SECOND SET OF PATTERNS WERE EMAILED TO ALL THE MEMBERS ON 15TH JULY, so you should find an email from us in your inbox with a link to the July file. If it has not arrived then it is advisable to check your Spam folder first before contacting us as this is where our emails tend to end up if they don’t make it to your inbox.
The printed patterns (for those who paid for them), were posted to overseas members on the 5th July and to the UK members on the 13th July.
Don’t forget that you can also download your pattern files from your account on our website.
I HAVE HAD A QUESTION ABOUT WHERE TO PURCHASE THE 45CM X 35CM PAD INSERT FOR THE COMPLETED CUSHION COVER. They are available from many places in the UK including John Lewis, Dunelm or from online retailers Amazon, Ebay and Etsy.
However, I have little information I can give you about buying them outside of the UK. So if anyone knows of a company overseas that sells these size cushion pads, please write in and let me know and I will share it in the next blog. We have a lot of members in the US, and that is where the initial query came from. So a contact in the USA would be very helpful - plus anywhere else in Europe or the World, thank you!
SO FAR NO ERRORS HAVE BEEN REPORTED IN THE MYSTERY CUSHION PATTERNS (phew!), (apart from the typo about the number of balls of White and Fuchsia in your kit - is everyone aware of this now?). However, this is a quick reminder to check out the Addendum page on our website before you start knitting each square just in case there are any corrections, and then you can make a note of them on your own set of patterns. Unfortunately they do sometimes occur, but as soon as they are reported and verified we add them to the Addendum page on our website. Doing this quick check before you make a start on each square could save you valuable time, so it’s well worth doing. You can access the Addendum page by scrolling to the bottom of the Homepage and clicking on the link.
AND THIS IS ANOTHER REMINDER, THIS TIME ABOUT OUR SOCIAL MEDIA PLATFORMS, which can be hugely beneficial if you want to keep up to date with all my latest news or join a Debbie Abrahams group:
Ravelry: Debbie Abrahams Handknits
Facebook: Debbie Abrahams Mystery Knitters
Facebook: Debbie Abrahams Handknits (our own FB page)
Instagram: debbieabrahams_knitting
Pinterest: debbieabrahams@debbieabrahamsk
The Facebook and Ravelry groups are great communities to be part of, especially if you are out there knitting on your own and need a bit of advice or encouragement. They are brilliant for technical support too and there are many very experienced knitters in both groups who are only too happy to help with queries about the projects. They are both free to join and a lot of fun to be part of, so why not join today!?!
YARN LOFT IN CARRINGTON, NOTTINGHAM, HOLDS MONTHLY ‘MYSTERY’ MEETINGS. Doreen first opened the doors of her lovely knitting shop and welcomed in Mystery Blanket members in April, and since then we have had several very enjoyable meetings. And now the Mystery Cushion Club has begun, she is inviting you too to join us if you can. Our most recent meeting was on the 12th July and a report about that meeting will be included in the August Mystery Blanket blog. So make sure you check it out when it is live to hear what went on - it was, as always a very fun couple of hours!
There is no meeting scheduled for August, so our next gathering is on Wednesday 6th September between 4-6pm at Yarn Loft, 118 Hucknall Road, Carrington, Nottingham, tel number 07825 702433, website: www.yarnloft.co.uk. To cover the costs of hosting the meeting there is a small sub to pay (£3.00), which can be paid to Doreen on the day.
Just send a quick email to me at debbie@debbieabrahams.com to let me know you are coming and we will make sure that we have a cup of tea and a cake ready for you!
IF YOU FANCY TREATING YOURSELF TO A YARN PURCHASE, MY OWN BRANDED MERINO LIGHT DK YARN IS ON SALE FOR A WEEK. But our special discounted offer ends on the 21st July, so you will need to nip over to our online shop before then if you want to take advantage of it. For a limited time we are selling it for just £2.90 a ball (rrp: £4.50). So that’s a huge saving and beats the price of our special offer packs of 5 and 10 balls.
This is the yarn that was used in the 2021 Mystery Blanket, One Thousand & One Nights. It’s a lightweight double-knitting yarn (23 sts and 32 rows to 10cm) and knits up on 3.75mm needles. It knits up beautifully with Rowan Felted Tweed as it is the same gauge, and can be used for Felted Tweed patterns or any others that have a similar gauge.
You can choose any combination of any number of balls from the seven vibrant colours we have on offer:
Happy yarn buying everyone!
THERE’S NOT LONG TO GO BEFORE THE START OF THE 2023 MYSTERY BABY BLANKET CLUB, AND IF YOU HAVE NOT SIGNED UP TO IT YET, THERE IS STILL TIME. Memberships are on sale in our online shop, but with the closing date fast approaching (the 31st August), you will need to make your decision soon.
This is a reminder of what I have in store for you if you decide to take on the challenge and join me…
The project is knitted in Rowan Baby Cashsoft Merino, which is a mixture of merino wool, acrylic microfiber and cashmere. It is beautifully soft and has a luxurious handle, making it the perfect choice for a baby blanket. It is machine washable.
There are two colour options to choose from. The base palette includes soft green, camel, butter yellow, taupe, cream and faded denim, and to complete it there is a choice of either:
Grey/Silver
or
Rose/Candy
The kit for this blanket will be available to buy in our online shop from 1st June 2024 when the Club has finished, but there are lots of reasons to sign up now and grab yourself a membership. By joining the club you will benefit from:
10% off the cost of the membership (£139.50 + shipping after discount)
10% discount voucher for a single transaction in our online shop*
Free fabric gift bag (by Paper Mirchi)
A dedicated blog and technical support throughout the project
The opportunity to knit the blanket before anyone else!
*excludes Mystery products.
Each member will receive a knitting kit which includes over fifteen balls of Rowan Baby Cashsoft Merino yarn, seven sets of emailed patterns (with the option to purchase additional printed patterns), a fabric gift bag and a woven label. The finished size of the blanket is approximately 72cm x 98cm.
Above: the 2020 Mystery Baby Blanket Club, Love you to the Moon & Back.
The blanket design includes the techniques of intarsia, fairisle, lace, textured stitches and stripes, offering you an exciting variety of squares to knit up over seven months. (There will be no beads or embellishments in this blanket).
If you would prefer to pay in instalments you can use our online payment system Splitit, which enables you to make your payment over two, three or four months - you choose what suits you best. Simply select this option at checkout when you make your first payment and then your remaining payments will be taken automatically from your account. It’s that easy!
You have until the end of August to get yourself signed up to the Mystery Baby Blanket Club before it begins on 1st October. We are signing up members from all over the world, so wherever you are, why not come and join me!
GET YOUR CALENDARS AT THE READY AS THERE’S ONE VERY IMPORTANT DATE TO PENCIL IN, AND THAT’S FRIDAY 26TH AUGUST WHEN WE WILL BE OPENING SIGN-UPS FOR THE 2024 MYSTERY BLANKET CLUB! There will be an Early Bird special offer for everyone who signs up before 30th September, and with limited memberships, it would be wise to book your place early to secure your place. To date we have sold out every Mystery Blanket Club since we began way back in 2008!
This will be the seventeenth design in my Mystery Blanket collection and looking back at the past sixteen years there have been a variety of subjects covered from the Basilicas in Assisi to the Olympic Games! I always choose a completely different theme to the previous year, which in turn gives you a whole new set of challenges, as well as an exciting new colour palette to work with. So what do you think might be in store for 2024? Any ideas?!?...
Above: the 2020 Mystery Blanket Club, Our Precious Earth.
I am always very secretive about the new Mystery Blanket - it is a ‘mystery’ after all! But what I can tell you is that I am absolutely buzzing about what I have in store for you next year! At the moment I am consulting with a UK spinner as to what he can make for me. This is always such an exciting part of the process, especially when we start putting colour palettes together. I am going to use my own branded yarn which will be 100% wool, combined with some of Rowan’s most popular yarns from their collection, including Felted Tweed and Kidsilk Haze. As always it is a ‘mystery’, but in next month’s blog I will give you a few clues as to the theme and colour palette, just to get you thinking…
Sign-ups will begin on the 26th August with a special Early Bird offer which will run for the first month. So you’ve got plenty of time to make up your mind, but if you secure your membership before the end of September you can take advantage of our fabulous Early Bird offer, the details of which will be released when the memberships are on sale.
If you would prefer to spread the cost of your membership then you can opt for our instalment plan and spread your payment over several months. Or you can simply pay in one go, the decision is up to you. But everyone who signs up within the first month will be entitled to the Early Bird offer, so whatever you choose to do, you won’t miss out.
Sounds intriguing? You can find out more by reading the August Mystery Blanket blog on the 1st August or the next Mystery Cushion blog on the 15th August to find out more!
THESE ARE THE SQUARES YOU ARE KNITTING THIS MONTH. There are three front panel squares, two are variations of previous squares and there's one new one...
FRONT PANEL, Square 7: Knotted Rug – striped textured stitch with eyelets:
FRONT PANEL, Square 8: Pavlova 2 – beaded stripes with knitted-in frills:
FRONT PANEL, Square 9: Summer Cable 2 – intarsia cable:
These useful tips are worth a read before you begin…
SQUARE 7, KNOTTED RUG: this is a brand new square, and it’s a lovely one to knit - interesting, colourful but easy to do once you get the hang of the 4-row pattern repeat. And there’s tech vids to help you too:
Square 7: Knotted Rug (how to knit Row 1) (NEW TECH VID!)
How to carry yarns up the side of the work (JUNE blog)
The first thing I am going to point out is the change to the main needle size for this square. It uses a larger needle than the usual one, which is one metric size bigger (3.25mm instead of 3.00mm). So make sure that after casting on and working the first wrong side row, you change to those larger needles to knit the rest of the square (or until the last row).
The tech vid guides you through the trickiest row, which is Row 1. And once you’ve knitted this row, the only other row that has stitch interest is Row 3 - and this is simply a repeat of what you did on Row 1, with a slight adjustment to the position of the pattern repeat. All wrong side rows are purled.
It always seems the more natural thing to do to change colour at the beginning of a right-side row. However, in this square all the colour changes happen at the beginning of wrong side rows. This might seem a bit weird at first - it took me some time to get used to it! But once you’re in the swing of it, it just flows. All you’ve got to make sure is that you pick up the correct colour each time. The three colours rotate in the same order, Blushes, Pear, Summer, Blushes, Pear, Summer, and so on. So just keep your eye on this as you work your way up the square.
The only other thing that I think is worth mentioning is to remember that on Row 1 the bracketed instruction begins with a ‘yf’ (which by the way, is the same as ‘yo’), and there is no ‘yf’ at the end of the bracket:
But on Row 3 there is no ‘yf’ at the beginning of the bracketed instruction, however there is one at the end. So they swap round:
This might seem pretty straightforward to follow, but I did catch myself a couple of times doing an extra ‘yf’ that I then had to go back and undo. So this is something to keep a close eye on. Maybe count your stitches at the end of Rows 1 and 3 and their subsequent repeats to keep a check on it.
SQUARE 8, PAVLOVA 2: you knitted a variation of this square last month, but in this version there is a change to the colour of the yarns - Pear is swapped out for Fav Denims.
Videos to watch for assistance with this square:
How to pick up stitches along a cast-off edge (to knit the next square) (JUNE blog)
Square 2, Pavlova: how to knit the frill (JUNE blog)
How to thread beads onto your yarn (JUNE blog)
How to bead, the slip-stitch method (JUNE blog)
How to carry yarns up the side of the work (JUNE blog)
This square begins with the knitting of three separate frills which are knitted in on rows 15 and its two subsequent repeats. These are identical to the frills that you knitted for Square 2.
Watch out for all the needle size changes - they swap from 2.25mm to 3.00mm and are essential to maintain the width of the square. Garter stitch (knit on right side and wrong side rows) elongates stitch tension widthways, so these rows will not sit as neatly if you don’t use the smaller needle size for them. Garter stitch does the opposite to row tension though, it condenses it down, so that is why there are more rows in this square compared to others in the front panel.
SQUARE 9, SUMMER CABLE: this is a variation of a square that you also knitted last month but there is a change to both the colours and the cable stitch - Fav Denims is swapped out for Pear, and the cables twist to the right instead of to the left.
These tech vids from the June blog will assist you with knitting this square:
How to pick up stitches along a cast-off edge (to knit the next square) (JUNE blog)
Square 1, Summer Cable: how to cross the yarns over when changing colour (JUNE blog)
How to cable (JUNE blog)
This square can be either picked up from the cast-off edge of Square 8, or it can be cast on and knitted separately. If you opt for picking up the stitches then you need to pick them up in the colour sequence as instructed on page 10. Use the same technique as shown in the June tech vid, How to pick up stitches along a cast-off edge, but you will need to adapt it to pick up stitches rather than casting them on. The yarns are joined in using exactly the same technique that I demonstrate in that vid - ie, laying them across the needle and catching them in on the stitch before they are needed. You’ll probably find it easier to do this rather than casting on a separate square as you have a firm edge to pick up along which I found enabled me to keep better control of the bobbins - so it’s much less stressful!
Remember that the yarns are crossed over at each colour change on the RS of the work to create those vertical dotted lines. This is the opposite to how you would usually cross them over in intarsia. And if you need a bit of guidance with this there is a tech vid in the June blog which shows you how to do this. To get a neat colour change, pull each of the yarns firmly as you cross them over and give them an extra tug after they have been worked.
Above: Mary's Summer Cable 2 square with the markers in place.
Mary who test knits the Mystery Cushion found it helpful to insert a balloon marker into the work on the cable rows. This way she could keep a check on how many rows she had knitted between the cables - there’s nothing more disheartening than cabling on the wrong row! This might be something that you find helpful too. The markers that Mary used are especially good as they are fine and slip through the knitting easily, but any markers can be used for this as long as they are the clip type that can be opened and added to the knitting.
Having knitted this pattern before you should find it fairly easy to do. It’s a great way to practice two techniques at the same time - intarsia and cables. Have fun!
AND FINALLY FOR THIS MONTH, IT’S TIME TO HAVE ANOTHER GUESS AT THE TITLE OF THE MYSTERY CUSHION! We’ve had a few correct guesses, but not many so far. The second word seems to be the easier of the two to guess - many of you have got this right. But it’s the first word that is proving to be the tricky one. For Graham Cossons (the recently retired husband of Alison who was thrilled to get it right!), Tania Ashton-Jones, Lyn Fitzsimons and Maria Wilkinson, the guessing game is over, so well done to all four of you for getting it right within the first month. But for the rest of you, here is another clue in the letter puzzle. This month the letter I am giving you is ‘N’: _ _ _ N _ _ / _ A _ _ _
If you think you know what it is, please email your answer to Sue at sue@debbieabrahams.com to see if you are right. And if you are then with your permission, we will include you in the list of correct guessers in the August blog. And if you are not, then it’s time to guess again!
Maybe after knitting this month’s squares, you will have that light bulb moment and guess the title of the cushion! And if you think you know what it is, be sure to write in and let us know. We always love to hear from you, so any stories and pics of you and your ‘mystery’ knitting are always welcome! You’ve got four weeks to knit up this month’s squares before part three is revealed, so that should give you plenty of time to get them completed and might leave you with some hours to spare to get on with other projects too. And if you fancy starting something new, don’t forget about our special yarn offer which ends on the 21st July. You could grab yourself a bargain if you’re quick! Until next month, take care and very happy knitting to you all! Debbie, x]]>
https://debbieabrahams.com/blogs/news/mystery-blanket-club-2023-post-6-july2023-07-01T00:00:02+01:002023-07-01T10:11:31+01:00Mystery Blanket Club 2023: post 6, JulyDebbie AbrahamsHELLO AND WELCOME TO THE SIXTH INSTALMENT OF THE 2023 MYSTERY BLANKET CLUB! And as the weather warms up here in the UK and we can enjoy some glorious sunshine, your blanket squares are the perfect companion to keep you busy through the summer months. They’re just the right size to pack in your suitcase if you are going away on vacation, or maybe they’ll accompany you in the garden if you fancy a spot of knitting outdoors. Just be sure to take everything you need with you so that you can knit your July squares without any hold-ups!
This month is a read-only blog so there is no intro vid from me and there are no new tech vids. But if you need any technical guidance for the squares you are knitting this month, you can locate the techniques in the list of blogs below and scroll back to the one you need. There are now eighteen tech vids that you can access as and when needed.
This is a reminder of the techniques that have been covered in previous blogs:
Square 8, Pixies & Nixies (both options): how to knit the decorative slip-stitch (February)
How to carry yarns up the side of the work (February)
How to pick up stitches along a cast-off edge (February)
Mattress stitch (horizontal) (February)
How to cable (February)
How to knit a contrast-coloured bobble (February)
Square 16, Forager: how to knit the exaggerated decorative purl stitch (February)
Understanding lace stitches (March)
How to thread beads onto your yarn (March)
How to bead, the slip-stitch method (March)
The intarsia technique (March)
How to add Chain stitch to your knitting (March)
How to add Swiss darning to knitting (March)
How to pick up stitches along a cast-off edge using several colours (April)
Square 23, Dragonfly: Option Two (Rows 1-7) (June)
THE PRINTED PATTERNS HAVE BEEN POSTED TO THE MEMBERS WHO OPTED FOR THEM, with the overseas shipped on Wednesday 21st June and the UK on Thursday 29th June. We are finding that most of our overseas post is arriving a little bit quicker than usual to some destinations, so fingers crossed your patterns will arrive with you very soon if you have not already got them.
IT’S ALWAYS A GOOD IDEA TO CHECK OUT THE ADDENDUM PAGE ON OUR WEBSITE BEFORE YOU START KNITTING A SQUARE. When an error is reported to us (which we don’t like to hear but we need to know about), then it is added to the list.
On Square 2, Hawthorn 2, both options (pages 7 and 10 of the June mail out), I omitted to include picking up instructions from Square 1, Option Two. I only got one query about this, so I am assuming that everyone else who has knitted this square sorted it out for themselves. But if this square is still on your to-do list, then this is the correction:
Pages 7 & 10, Hawthorn 2 (both options): the picking up instructions should read as: Option One, pick up and knit 45 sts along the cast-off edge of Square 1; Option Two, pick up and knit 45 stitches along the cast-off edge of Square 1 as follows: [pick up 15 stitches, miss 1 stitch] twice, pick up 15 stitches.
There is a second correction on page 27 of the June mail out for Square 27, Wolfsbane, Option Two. This one concerns when to cut off a yarn (or not to!) Apologies if you have knitted this square and did cut it off and then had to rejoin it. It isn’t the worst thing that could happen, but it means you would have had a couple of extra ends to sew in.
Page 27, Wolfsbane (Option Two): do not cut off Clay after Row 32 as it is needed again on Row 33.
We do several stringent checks of the patterns each month before they are signed off, but unfortunately there are still some things that slip through the net. We are very much aware of how frustrating this is for you, however, a quick check of our Addendum page before you begin knitting each square will alert you to anything that has been reported and give you the reassurance that it is correct or has been corrected. So it would be a good idea to make this your first port of call as it could save you valuable time.
IT'S ALWAYS GREAT FUN COMING UP WITH THE NAMES OF THE SQUARES FOR THE BLANKET, but some of them - particularly those with two options - have caused a bit of confusion. So I am going to talk about how I name them so that there’s no more ‘mystery’!
So let’s begin with a colour variation of a square, such as Square 31 Foliage, and Square 19 Foliage 2. If the square is a repeat but there are changes to either the stitch pattern or the colours of the yarn and/or the beads, then the square shares the same name but the second version is renamed as ‘2’. Another example of this is Square 16 and Square 30 which are Forager and Forager 2.
Above:Square 16, Forager.
Below: Square 30, Forager 2.
There is one exception to this rule and it’s in the July mail out - Square 40 Bluebells. This is actually the same as Squares 10 and 38, Bracken and Bracken 2, but recoloured. However, when I was knitting this square all I could see were bluebells, so I decided to rename this square completely. And I think it really suits it, don’t you?
So what about a square that has two options? Both options for Square 23 are called Dragonfly. However, for Square 39 Snail, the second option for this square is also called Dragonfly. This is because it is exactly the same as Option Two for Square 23 Dragonfly with no changes at all. So will there be a version ‘2’ for Dragonfly Option Two at some point? You’ll have to wait and see! But at least now if there is, you’ll know why!
THE DESIGN FOR THE 2024 MYSTERY BLANKET CLUB IS ALREADY WELL UNDERWAY, and I am absolutely buzzing about what I have in store for you next year! The design process of each blanket is lengthy and spans across 8-9 months from the initial idea and research through to the completed design. At the moment I am consulting with the spinner as to what he can make for me. This is always such an exciting part of the process, especially when we start sourcing fibres and putting colour palettes together.
Above: the machines in action at Laxtons Limited in Yorkshire, UK.
I am going to use my own branded yarn which will be 100% wool, combined with some of Rowan’s most popular yarns from their collection, including Felted Tweed and Kidsilk Haze. As always it is a ‘mystery’, but in next month’s blog I will give you a few clues as to the theme and colour palette, just to get you thinking…
Above: Mystery Blanket Club 2022, One Thousand & One Nights.
Sign-ups will begin towards the end of August with a special Early Bird offer which will run for the first month. This might seem early to be signing up for a project that begins in 2024, however, I have to get my yarn order confirmed well in advance and therefore need an approximate idea of how many of you are going to sign up to the club. You’ve got plenty of time to make up your mind, but if you secure your membership before the end of September you can take advantage of our fabulous Early Bird offer, the details of which will be released when the memberships are on sale. If you would prefer to spread the cost of your membership then you can opt for our instalment plan and spread your payment over several months. Or you can simply pay in one go, the decision is up to you. But everyone who signs up within the first month will be entitled to the Early Bird offer, so whatever you choose to do, you won’t miss out.
Below: Mystery Blanket Club 2009, Arabian Nights.
This will be the seventeenth design in my Mystery Blanket collection and looking back at the past sixteen years there have been a variety of subjects covered from the Basilicas in Assisi to the Olympic Games! Here they are in numerical order from 2008-2023. What do you think might be in store for 2024? Any ideas?!?...
2008: In the Country
2009: Arabian Nights
2010: Beneath the Sea
2011: House of Aphrodite
2012: A Celebration of Sport
2013: Nordic Adventure
2014: Back to the Country
2015: Perugian Perspectives
2016: A French Romance
2017: Retrospective
2018: Casa Battlo
2019: Winter Wonderland
2020: Our Precious Earth
2021: One Thousand and One Nights
2022: Deco Dreams
2023: ?????
2024: ?????
WE STILL HAVE SOME MEMBERSHIPS AVAILABLE FOR MY 2023 MYSTERY BABY BLANKET CLUB, WITH JUST TWO MONTHS TO GO BEFORE THE SIGNING UP PERIOD ENDS. So if you’ve had the fabulous news that there’s a new little person on the way, then you might be interested in this brand new KAL. It will follow the same format as the Mystery Blanket Club but with seven monthly instalments instead of ten. It begins on 1st October 2023.
If you decide to take on the challenge and join me, this is a reminder of what I have in store for you…
The project is knitted in Rowan Baby Cashsoft Merino, which is a mixture of merino wool, acrylic microfiber and cashmere. It is beautifully soft and has a luxurious handle, making it the perfect choice for a baby blanket. It is machine washable.
There are two colour options to choose from. The base palette includes soft green, camel, butter yellow, taupe, cream and faded denim, and to complete it there is a choice of either:
Rose/Candy
or
Grey/Silver
Above: Rose/Candy.
Below: Grey/Silver.
When the club has finished the kit for this blanket will be available to buy in our online shop from 1st June 2024, but there are lots of reasons to sign up now and grab yourself a membership. By joining the club you will benefit from:
10% off the cost of the membership (£139.50 + shipping after discount)
10% discount voucher for a single transaction in our online shop*
Free fabric gift bag (by Paper Mirchi)
A dedicated blog and technical support throughout the project
The opportunity to knit the blanket before anyone else!
*excludes Mystery products.
Each member will receive a knitting kit which includes over fifteen balls of Rowan Baby Cashsoft Merino yarn, seven sets of emailed patterns (with the option to purchase additional printed patterns), a fabric gift bag and a woven label. The finished size of the blanket is approximately 72cm x 98cm.
Above: Mystery Baby Blanket 2020, Love You To The Moon & Back.
The blanket design includes the techniques of intarsia, fairisle, lace, textured stitches and stripes, offering you an exciting variety of squares to knit up over seven months. (There will be no beads or embellishments in this blanket).
If you would prefer to pay in instalments you can use our online payment system Splitit, which enables you to make your payment over two, three or four months - you choose what suits you best. Simply select this option at checkout when you make your first payment and then your remaining payments will be taken automatically from your account. It’s that easy!
You have until the end of August to get yourself signed up to the Mystery Baby Blanket Club before it begins on 1st October. We are signing up members from all over the world, so wherever you are, why not come and join me!
AS YOU CAN SEE FROM THE LETTER PUZZLE BELOW, A LOT OF LETTERS HAVE ALREADY BEEN REVEALED, AND WITH ANOTHER LETTER THIS MONTH, YOU MIGHT JUST GET IT! We’ve had one more correct guess, and this time it’s from Sophie Houston, so well done for getting it right!
But for those of you who are still guessing, here is another clue. This month the letter I am giving you is... “R”:
T H _ / _ _ _ H A _ T _ D / _ O R _ _ T
Any ideas?!? If you are still struggling to guess what it is after this month’s clue then you have three more chances after this before the title is revealed in the November blog. So will you get it before then? Why not have a go and send in your answer to Sue at sue@debbieabrahams.com and she will let you know if you are right. And won’t it be great if you are!
THERE ARE SIX SQUARES TO KNIT THIS MONTH, with alternative options for two of the squares:
Square 19, Foliage – lace pattern with hooked-in beads (same for both options):
Square 20, Forager 2 – striped pattern with rows of contrast-coloured exaggerated purl stitch (same for both options):
Square 24, Deadly Nightshade (Option One) – fairisle pattern with stripes, textured stitches and hooked-in and slip-stitch beads:
Square 24, Deadly Nightshade (Option Two) – striped pattern with textured stitches and slip-stitch beads:
Square 39, Snail (Option One) – snail motif with hooked-in beads and Swiss darned and chain stitch details:
Square 39, Dragonfly (Option Two) – cable pattern with hooked-in beads, contrast-coloured bobbles and lace stitches:
Square 40, Bluebells – three-colour stripe slip-stitch pattern (same for both options):
Square 47, Goblin – cable pattern with slip-stitch beads (same for both options):
On each pattern page there is a list of Pattern notes and tips that are worth reading before you start to knit each square. These bits of advice will help you and give pre-warnings as to what look out for in the pattern instructions. Also take note of the description under the title of each square as this tells you what the stitch structure is.
You can use the tech vids from previous blogs to help you knit your squares. But here are a few extra tips to assist you:
SQUARE 19, FOLIAGE 2: last month you knitted this square using Elfin yarn and Emerald and Lime beads. In this variation of the square, these are swapped out for Maple yarn and Bronze and Red beads.
Videos to watch for assistance with this square:
How to pick up stitches along a cast-off edge (February blog)
Mattress stitch (horizontal) (February blog)
How to bead, the hooking-in method (February blog)
Understanding lace stitches (March blog)
If you worked from the worded instructions before and want to give the chart a go instead this time, you’ll find it on page 7.
This is the lace stitch pattern that has the abbreviation P2togtbl and it is a bit tricky to do as you need to purl stitches together through the back of the loop. However, with a bit of determination it can be done. And if you need a reminder of how to do it, check out my lace tech vid in the March blog and I will guide you through it.
I’ve just noticed that on page 19 this square is called ‘Foliage’ and not ‘Foliage 2’ - apologies for the typo. Following on from my discussion earlier on in this blog about how I name the squares, this should be ‘Foliage 2’. It is named correctly on page 2 of the mail out.
SQUARE 20, FORAGER 2: this is exactly the same as Square 30 which you knitted in the April instalment.
Videos to watch for assistance with this square:
How to pick up stitches along a cast-off edge (February blog)
Mattress stitch (horizontal) (February blog)
Square 16, Forager: how to knit the exaggerated decorative purl stitch (February blog)
How to carry yarns up the side of the work (February blog)
This is the third time you have knitted this stitch pattern so it should be a breeze. But there is a tech vid for it in the February blog if you need any reminders.
SQUARE 24, DEADLY NIGHTSHADE (Option One): this is the first square that you will need to make a decision about this month. It has a similar stitch pattern to Square 32, Butterflies, but there are changes to the colours and to the fairisle section in the centre of the square.
Videos to watch for assistance with this square:
How to pick up stitches along a cast-off edge (February blog)
Mattress stitch (horizontal) (February blog)
Square 8, Pixies & Nixies (both options): how to knit the decorative slip-stitch (February blog)
How to bead, the hooking-in method (February blog)
How to carry yarns up the side of the work (February blog)
It does not matter which option you choose to knit as it will not be affected by any of the choices you have made so far. So go for whichever version you feel like knitting this month. If you have not tried fairisle before then this is a great opportunity to try it out - it’s only a small segment, 9 rows in total. But if you knitted Option One for square 32 and maybe fancy trying out the alternative stitch pattern this time round, then go for Option Two.
There is some transferring of stitches to do at certain points in the pattern (for example, after Rows 7-9), so it would be beneficial to use either double-pointed needles or a circular needle to knit this square.
There are several tech vids from previous blogs that you can take a look at if you need some assistance. Just be aware that these are for technical reference only as you are working with completely different colours of yarns and beads to those that are used in the vid.
SQUARE 24, DEADLY NIGHTSHADE (Option Two): like Option One, this square is very similar to Square 32, Butterflies, Option Two, but there are changes to the colours of the yarn and the beads.
Videos to watch for assistance with this square:
How to pick up stitches along a cast-off edge (February blog)
Mattress stitch (horizontal) (February blog)
Square 8, Pixies & Nixies (both options): how to knit the decorative slip-stitch (February)
How to knit the decorative loop stitch (February blog)
How to bead, the hooking-in method (February blog)
How to carry yarns up the side of the work (February blog)
I always find it fascinating how a change to the colour palette can result in a totally different look and feel to a square. In Butterflies the combination of Ginger, Chestnut, Pasture and Leaf with Red beads creates a warm, Autumnal feel, conjuring up images of a pleasant walk through the woods on a sunny afternoon. However in this square, Elfin, Mulberry and Barn Red give it a completely different look which is dramatically cooler and thus generates a completely different feel. Daytime moves into nighttime when the wood is dark and all you can hear is the hoot of an owl as solitary creatures move around in the undergrowth. This is what I think about when I look at these two squares. But we all interpret colours differently and connect them to different things and experiences. So I wonder what they make you think of?...
SQUARE 39, SNAIL (Option One): so this is the second choice you will need to make this month, and it’s the one to go for if you fancy a bit of intarsia!
Videos to watch for assistance with this square:
How to pick up stitches along a cast-off edge (February blog)
How to pick up stitches along a cast-off edge using several colours (April blog)
Mattress stitch (horizontal) (February blog)
The intarsia technique (March blog)
How to bead, the hooking-in method (February blog)
How to add Chain stitch to your knitting (March blog)
How to add Swiss darning to knitting (March blog)
You’ve got a free reign here over which option to choose as it will not be affected by any of your previous choices. So perhaps it would be a good idea to look closely at the pattern first to see what it entails. The body and shell of the snail are knitted using the intarsia technique so you will need to separate your yarn into small balls - three of Harvest (remember that you need to knit each section using a separate ball), one of Clay and one of Leaf. These are pretty easy shapes to knit with no real tricky bits to contend with. All of the finer details are embroidered on afterwards using a combination of chain stitch and Swiss darning. If you want to improve your existing intarsia skills or are a complete novice, this would be the ideal introduction. So why not give it a try?
The Sienna beads on the body are hooked in so you don’t necessarily have to stick to the colour that I used. You could use whichever colour or colours you want and decide this as you go along. That’s the beauty of this technique - no pre-threading!
Most of the embroidery is shown on the chart with the exception of the outline of the shell. Part of it is shown, beginning on chart row 25, but it ends on chart row 18 at which point you will need to use the image for guidance to complete it. We stopped the symbols on the chart here as they would have made the edges of the shell too difficult to see. An extra thing to notice about this embroidery is that it changes from Barn Red to Ginger on chart row 13. This is not a necessary change and you might prefer to stick with Barn Red. But I rather liked the subtle variation in colour, so see what you think!
You could knit in the Simply White stitches along the edge of the snail’s body, but I found it easier to embroider them on afterwards. They are shown on the chart as Swiss-darned stitches represented by a white square with a black circle.
The embroidered curly swirls and the stalks for the eyes are finished off with a sewn-on bead - Black for the eyes and Velvet for the swirls. These are not shown on the chart so you will need to use the image for guidance.
You could have a bit of fun with this one, changing the colours of the embroidery and the beads if you so wish. Or if you prefer to stick with how it is, that’s fine too. It’s your choice!
SQUARE 23, DRAGONFLY (Option Two): this is the alternative square to knit, and it is exactly the same as Option Two for Square 23, Dragonfly.
Videos to watch for assistance with this square:
How to pick up stitches along a cast-off edge (February blog)
Mattress stitch (horizontal) (February blog)
Square 23, Dragonfly: Option Two (Rows 1-7) (June blog)
Have a really good think about this one. If you knitted Option One for Square 23, Dragonfly, you don’t need to knit Option One for this square. But later on I will advise you that you should knit the same options you chose for Square 11 and Square 27. So this is something you need to consider when making your choice for this square.
If this is the first time you’ve knitted this, then I would recommend that you watch the tech vid in the June blog as it covers all the techniques you need. I work on a reduced number of stitches in my demo but I demonstrate enough of each row for you to get a good grasp of what to do. It’s well worth a watch before you begin so that there are no unexpected surprises and you are fully prepped and ready to go!
SQUARE 40, BLUEBELLS: You should recognise this square from a previous one you’ve knitted a couple of times before, but it’s been recoloured and renamed - Bracken has been transformed into Bluebell wood!
Videos to watch for assistance with this square:
How to pick up stitches along a cast-off edge (February blog)
Mattress stitch (horizontal) (February blog)
How to carry yarns up the side of the work (February blog)
This square should be one of the easier ones to knit this month as it’s a repeat of the stitch pattern for Squares 10 and 38, Bracken and Bracken 2. Leaf and Chestnut from Square 10 are kept in, but Maple is swapped out for Elfin. With just that one change to the colours, I think the transformation is quite incredible! It gives it a completely different feel and look - it's out with the dried up, crunchy bracken, and in with a carpet of spectacular pretty bluebells! Enjoy your walk through the woodland!
SQUARE 47, GOBLIN: this is a new cable pattern with stitches held to the back and to the front in pairs and opposite each other to create a circular textured effect.
Videos to watch for assistance with this square:
How to pick up stitches along a cast-off edge (February blog)
Mattress stitch (horizontal) (February blog)
How to cable (February blog)
How to thread beads onto your yarn (March blog)
How to bead, the slip-stitch method (March blog)
Instructions for threading on Emerald and Velvet beads are on page 24 and need to be followed carefully so that the beads are added to the knitting in the correct order. These might be difficult to see on the chart on page 26, but basically they alternate, beginning at the bottom with Velvet, Emerald, Velvet, Emerald, Velvet, and then on the next row up they swap to Emerald, Velvet, Emerald, Velvet, Emerald. This sequence is repeated to the top of the square. You might be able to see the beads more clearly on the image on page 24.
The abbreviations for c4f and c4b are explained on page 30. Be aware that some of the stitches in these cables are worked through the back of the loops which twists them and neatens them up. These are always the two stitches that sit on the outer edges of the cables.
This is a straightforward cable to knit. Just keep an eye on those cable twists and make sure that the stitches are crossed in the correct direction each time - that is one cable to the back and then one to the front in pairs each time you knit a cable row.
THE MONTHLY MEETINGS AT YARN LOFT IN NOTTINGHAM ARE STILL GOING STRONG! And in June I was joined by a lovely group of very excited ladies who chatted and knitted non-stop for the couple of hours we spent together.
From left to right around the table are Vanessa, Shelley, Carol, Claire, Alison, Kerry, Mary and Jan.
It’s a great opportunity to get together with other knitters in a gorgeous yarn shop, and as well as cracking on with knitting blanket squares, the banter is always varied and interesting - and this meeting was no exception! We talked about all sorts of things from twins to naked ramblers (yes, you heard that right). And I don’t think we stopped laughing for the whole time we were there! The only downside was that some errors were made and cables crossed in the wrong direction (oh dear Alison!). But I think it was worth it. Knitting can be undone and reknitted, but you can’t recapture precious moments of golden banter!
As you can see the ladies really got stuck into their squares. It was so rewarding for me to see how well they were getting on with the project, and interesting as well to hear their thoughts - which of the squares were their favourites and which ones were liked the least? Bracken seems to be a firm favourite, as are the small sections of fairisle in Hawthorn and Wolfsbane. But Thicket had a mixed reaction with votes for and against. Maybe it’s all those decreases on the wrong side of the work which are a bit tricky to do?
If you live within reach of Nottingham and are interested in coming along to our next meeting it's on Wednesday 12th July. Doreen opens her doors from 4pm and we finish at 6pm. We meet at Yarn Loft, 118 Hucknall Road, Carrington, Nottingham, tel number 07825 702433, website: www.yarnloft.co.uk. To cover the costs of hosting the meeting there is a small sub to pay (£3.00), which can be paid to Doreen on the day.
If you fancy coming along, just send a quick email to me at debbie@debbieabrahams.com to let me know, and we will make sure that we have a cup of tea and a cake ready for you!
IF YOU’VE GOT ANY PICS OF YOUR FURRY FRIENDS ASSISTING WITH YOUR MYSTERY BLANKET (OR CUSHION) KNITTING, then send them into us and we will include them in a later blog. A few have been sent in already, but I know there are more of you out there who knit-a-long with your favourite companions by your side - or in some cases, all over your knitting! It’s always good to hear from you, so please share your stories and pics with us!
IF YOU DON’T FOLLOW US ON OUR SOCIAL MEDIA PLATFORMS THEN COME AND JOIN US, and enjoy the messages and photos that are shared between myself and the members:
Instagram: debbieabrahams_knitting
Pinterest: debbieabrahams@debbieabrahamsk
Facebook: Debbie Abrahams Mystery Knitters
Facebook: Debbie Abrahams Handknits
Ravelry: Debbie Abrahams Handknits
AND FINALLY, IT’S YOUR CHANCE TO WIN BIG WITH THE SIXTH 2023 MYSTERY BLANKET CLUB PRIZE DRAW!!! Each month a member is picked at random to win a Debbie Abrahams prize. So it is worth reading right the way to the end of each blog to see if you are that lucky member!
PRIZE DRAW SIX (JULY): this month’s winner is member 511, Gini Vanness from Springdale in Arizona, USA. Well done Gini! Please choose a prize from the following selection:
Your choice of one of Debbie’s knitting kits up to the value of £28.00 (take a look at them in our online shop).
A £25 voucher towards a Debbie Abrahams Mystery Club membership: 2024 Mystery Cushion Club; 2023 Mystery Baby Blanket Club or 2024 Mystery Blanket Club.
A Mystery bag of five gifts!
We will notify Gini to let her know the good news!
Thanks for tuning in this month and I hope that after a good read of this blog you feel fully prepped and ready to tackle the July squares. As we pass the midway point of the project there are an increased number of repeat squares to knit each month. However, there are also plenty of new ones in store to keep you feeling inspired and motivated - the adventure is far from over yet! So enjoy your knitting, keep in touch with your stories and pics, and have another stab at the title if you haven’t already guessed it - you’ve got three more chances to go until the big reveal! I’ve got a busy month ahead and am looking forward to getting stuck into some new projects including the 2024 Mystery Blanket and Cushion, so I’d better sign off and crack on! Take care everyone and see you next month for all the latest Mystery Blanket Club news, Debbie, x
]]>
https://debbieabrahams.com/blogs/news/mystery-cushion-club-2023-post-1-june2023-06-16T00:00:00+01:002023-06-16T08:52:25+01:00Mystery Cushion Club 2023: post 1, JuneDebbie AbrahamsHELLO ALL MY LOVELY MEMBERS AND WELCOME TO THE FIRST INSTALMENT OF THE 2023 MYSTERY CUSHION CLUB! I would like to begin by saying a big thank you to everyone who has signed up to the club this year. Many of you are Mystery Blanket members, but there are lots of new knitters on board too, so if this is your first KAL with me, I guarantee that you are in for a bundle of fun over the next five months! This is a global knitting club and I am delighted to welcome members from Australia, New Zealand, USA, Canada, Malaysia, France, Germany, the Netherlands, Poland, Switzerland, Sweden, Ireland and the UK!
From every membership sold we donated £5 of the profit to the mental health charity, Mind, and we are delighted to let you know that we collected a total of £1250! So thank you to everyone who signed up to the club and supported this charity. Your contributions will go towards helping raise awareness of mental health issues, giving vital support to those who need it.
Each month I write a dedicated blog for the Mystery Cushion which includes an intro from me, tech vids to assist you with your knitting, and plenty of hints and tips about the project. So I suggest that each month before you start knitting your squares you come here and have a read and a listen so that you are fully prepared for the month ahead.
Some of the tech vids have been created specifically for this project and show how to knit rows within the squares. And some of them are generic and demo the techniques on a sample square or using sample yarn.
This month you have three squares to knit which include beads, intarsia cables, stripes and frills. So there’s plenty to keep you busy while you knit your way through the rest of June and into July.
So, let’s make a start, beginning with my intro vid and nine tech vids to help you with this month’s knitting techniques:
How to cast on using several colours
Square 1, Summer Cable: how to cross the yarns over when changing colour
How to cable
How to pick up stitches along a cast-off edge (to knit the next square)
How to thread beads onto your yarn
How to bead, the slip-stitch method
How to carry yarns up the side of the work
Square 2, Pavlova: how to knit the frill
How to bead, the hooking-in method
ALL OF THE KNITTING KITS HAVE BEEN POSTED, so if you have not received your kit yet, it is on its way to you. As mentioned in my intro, we had a slight delay with one of the yarns being delivered to us late. However, as soon as we received it my postal team sprang into action and got the overseas parcels packed and off to the post office, about a week ahead of the UK. I have heard that many of you have received your parcels, but for those of you who are still waiting, please bear with us. Once they leave the UK they are in the hands of the international postal services, so we are unable to control the speed at which they are delivered. We have a tracking number for each overseas parcel, and we can give that to you upon request. Just email me at debbie@debbieabrahams.com and I will email it to you.
When you receive your kit it is a good idea to check the contents against the list on page 2 of your June mail out. And if anything is missing, let us know straight away and we will send you what you need. You should have received an email from us which pointed out an error in the list of yarns. So just in case you missed it, in the kit there is 1 ball of Fuchsia (shade 455) and 2 balls of White (shade 465), and not the other way round. This information has been corrected in the digital file you have been sent, but unfortunately it is incorrect in the printed patterns.
FOR THE MEMBERS WHO PAID FOR PRINTED PATTERNS, these have been posted to you in a separate card-backed envelope and if you have not already received them, they should arrive very soon. We aim to have them delivered to you by the middle of the month, but apologies if they are a little late. Again, we are at the mercy of the global postal services, and some countries are less efficient than others at delivering mail. But we will do our best to get them to you on time. Overseas patterns are posted by standard Airmail so unfortunately there is no tracking number for them.
THE PATTERNS HAVE BEEN EMAILED TO EVERYONE ON 16th JUNE, but you can also download them from your account on our website:
Under "MYSTERY CLUB DOWNLOADS" click "View all downloads"
Your latest available mail-outs will be visible here in PDF format to download
From July - October (the remaining four months), the patterns will be emailed to everyone on the 15th of the month, and on that date they will be available to download from your account as well.
PLEASE LET US KNOW IF YOU DON’T RECEIVE THE EMAILED PATTERNS – it might be because we have made an error with your email address in our database, which we can correct immediately. But sometimes our emails go into a spam folder instead of the inbox, so please make sure that you check this before contacting us.
These are some trouble-shooting steps that you can take to make sure that you are set up correctly to receive our Mailchimp newsletters:
add our “From” email address to your email contact list or address book
check any spam filter settings to be sure that your content isn't being flagged
find the email in your spam folder (if this is the case), and mark it as “Not Spam” or “Not Junk”. This will help register that our content is safe for receiving into your inbox
If you do not receive the June patterns from us then please try some or all of these checks. And if you need further help then please contact Sue at: sue@debbieabrahams.com and we will investigate further.
BEFORE YOU START KNITTING IT WOULD BE A GOOD IDEA TO READ THROUGH THE WHOLE MAIL OUT SO THAT YOU ARE FULLY PREPARED. On page 3 there is some handy information about tension, construction, the finished size of the cushion-cover and blocking and pressing. More information about how to knit a tension square and how to block and press is included in this blog, but the information on this page in the mail out will give you an overall idea of how it all works.
IN EACH INSTALMENT ON PAGE 4 YOU ARE GIVEN A PIECING DIAGRAM WHICH SHOWS YOU WHICH SQUARES YOU ARE KNITTING and where they are positioned in the design. The Front Panel of the cushion-cover is constructed from nine rectangular blocks which are worked in three separate strips and then pieced together. The Back Panel is knitted in two halves – an Upper Back Panel and a Lower Back Panel.
As we progress through each month, images will be added to the diagrams, which will enable you to see how the design is developing.
THERE IS A TIPS AND TECHNIQUES SECTION IN YOUR MAIL-OUT, it is at the back of the June mail out on pages 13-14, and it includes important information about the intarsia and fairisle techniques, knitting with beads and embroidery on knitted fabric.
On page 15 there is an Abbreviations list which gives you an explanation of all the abbreviations that are used in the patterns. Keep an eye on this list each month as it will be updated when there is a new abbreviation in the patterns.
PLEASE NOTE THAT THE COLOURS IN THE MAIL-OUTS MIGHT NOT BE COMPLETELY ACCURATE TO THE COLOUR OF THE ACTUAL YARNS – both in the printed paperwork and in the digital files. We have done our very best to make sure that the colours are as accurate as possible, however some discrepancies may occur in the images and on the charts. Therefore, it is always best to read the name and shade number of the colours rather than going by the photographs of the knitting.
LOOK OUT FOR THE LITTLE COLOURED ENVELOPE IN YOUR KIT! –this has your woven label inside it. The label has the name of the cushion on it, so if you don’t want to spoil the surprise it would be best to put this in a safe place until you have guessed the theme.
YOU HAVE A COLOUR CODER IN YOUR PARCEL and it is important that you use it to identify the colours in the cushion. The shade numbers on the ball–bands correspond to those stated in the patterns, beside which I have written the Rowan name for each colour. If you do not use the correct colour for the square you are knitting then you may run out of some of the yarns, so please take some time to set up your colour coder to avoid getting the colours mixed up.
Tie a small amount of each yarn onto the colour coder and write the name of each yarn and its shade number beside it. And then remember to keep your colour coder near to you at all times when you are knitting so that you can make sure you have picked up the correct colours to work with!
THERE ARE TWO PACKS OF BRIGHTLY COLOURED BUTTONS IN YOUR KIT - a pack of large striped and polka dot ones, and a pack of smaller polka dot buttons. The larger buttons are for the fastening on the back, and the smaller ones will be used for decoration.
IT IS ADVISABLE NOT TO PURCHASE YOUR CUSHION INSERT UNTIL YOU HAVE COMPLETED KNITTING THE CUSHION COVER as the finished size of it will depend on your own tension. If your tension differs from what I achieved, then it will result in the cushion-cover knitting up slightly bigger or smaller than the size I have quoted in the pattern instructions. The recommended size is 45cm x 35cm.
NOBODY LIKES AN ERROR IN A KNITTING PATTERN (LEAST OF ALL ME), but unfortunately they do occur sometimes, despite a stringent test knit and several checks before the patterns are signed off. I can assure you that we do our very best to make sure that the patterns are correct. But if anything needs to be corrected, we always list it in the Addendums on our website and send you an email to alert you to it.
It would be a really good idea to check the Addendum page before you knit each square, and that way you will be aware of anything before you make a start. Scroll down to the bottom of the homepage and you will find a link to it there.
REMEMBER THAT YOU ARE NEVER ON YOUR OWN IN A DEBBIE ABRAHAMS MYSTERY CLUB, and you can always get in touch if you have any queries. Please send your correspondence to Sue at sue@debbieabrahams.com and she will either answer it herself or forward it onto me.
You might also be interested to know that there are a few groups set up on social media for my mystery clubs:
Ravelry: Debbie Abrahams Handknits
Facebook: Debbie Abrahams Mystery Knitters
Facebook: Debbie Abrahams Handknits (our own FB page)
The groups on there are a lovely bunch of very positive and enthusiastic knitters who are only too happy to pass on any help or advice if you get stuck with your Mystery Cushion knitting. So if you haven’t already joined these groups, then why not put that on your to-do list today!?! They are all free to join and a lot of fun to be part of.
I have an Instagram and a Pinterest page too. So, if you want to keep an eye on all the latest news about the Club and Debbie Abrahams Handknits, please follow us on our social media platfoms. It’s a great way to keep up with what is happening!
Instagram: debbieabrahams_knitting
Pinterest: debbieabrahams@debbieabrahamsk
I COUNT MYSELF VERY LUCKY TO HAVE A WONDERFUL YARN SHOP AT THE END OF MY ROAD, and Doreen who owns Yarn Loft very kindly invited me to hold Mystery Club meetings there once a month. So if you live within reach of Nottingham and fancy meeting up with other members for a couple of hours for a chat and a knit, why not pop along to the next meeting. We have already had three meetings so far this year, and they have been so much fun! Both Mystery Blanket and Mystery Cushion members are very welcome to attend.
Our next meeting is on Wednesday 12th July between 4-6pm at Yarn Loft, 118 Hucknall Road, Carrington, Nottingham, tel number 07825 702433, website: www.yarnloft.co.uk. To cover the costs of hosting the meeting there is a small sub to pay (£3.00), which can be paid to Doreen on the day.
Just send a quick email to me at debbie@debbieabrahams.com to let me know you are coming and we will make sure that we have a cup of tea and a cake ready for you!
SO LET’S TALK NEXT ABOUT SOMETHING VERY IMPORTANT - HOW TO KNIT A TENSION SWATCH, which is essential to do before you start knitting your first set of squares.
The tension for this project is 25 stitches and 36 rows to 10cm (4in) measured over stocking stitch using 3.00mm needles and using Rowan Summerlite DK yarn.
I would suggest that you use Coral Blush (shade 467) for your tension sample as you will have plenty of this in your kit. (If you’ve already knitted a tension square using a different yarn, don’t worry, you can always undo the tension swatch if the yarn is needed).
Any discrepancies in your tension could lead to shortages of yarn, especially if you knit looser that the given tension. So please take time to do this. Here are some tips about measuring tension:
the tension swatch should be longer and wider than the stated tension, so it is advisable to cast on a minimum of 35 stitches and work a minimum of 46 rows
block and press your tension swatch so that the stitches are fully relaxed
use a solid ruler rather than a tape measure to measure your stitches and rows
start and finish counting the stitches and rows in from the edges of the knitting and not from edge to edge
if your tension is too loose you will need to resample using a smaller metric size needle
if you tension is too tight you will need to resample using a larger metric size needle
if you need to change your needle size then you will need to change all of the other needles used in the project as well by the same number of sizes
stitch tension is more important then row tension, so if you are unable to match both to the recommended tension, choose the needle size that gives you the closest match.
Keep your tension swatch to one side, just in case you need to reference it while you are knitting.
BLOCKING AND PRESSING YOUR SQUARES IS ALSO VERY IMPORTANT, and if you want a professional look to your cushion-cover, then this will go a long way to help achieve it. Blocking your squares ensures that they are all a uniform size which will make the joining of them together so much easier to do. You might find that you have to ease some of them in or out to get them to the same measurements as other squares, but this is fine - I had to do this with some of mine and they all blocked to the same size. If your individual squares measure slightly bigger or smaller than 15cm x 11.5cm, then this should not be a problem. But you will need to decide on what size you are going to block them all to and stick to this throughout the whole cushion front panel.
Blocking is the pinning out of your knitting, and, unless instructed otherwise, you should always pin it out with the wrong side facing upwards. Pin frequently along each edge, keeping all four edges as flat and even as possible. There is no need to use heat to press your squares. Much more preferable – and much safer too! – is cold water. So, if you have one available, fill up a plant spray bottle and use this to generously wet down the knitting, making sure that the water is dispersed right across the knitting from edge to edge. And then simply leave it to dry completely before removing the pins.
Pressing is the process of applying either heat or water to your knitting which relaxes the stitches and softens the fibres, resulting in a much more fluid and softer feeling fabric.
Blocking and pressing also helps the edges of the knitting stay flat rather than curling over, as is the tendency with most stitch structures.
I would suggest that you block and press your front panel squares after you have knitted each one. I think it’s far easier to do this as you go along rather than leaving them all to the end. It also ensures that as you work through them, they are all knitting up to the correct measurements.
SO, WHICH SQUARES ARE YOU KNITTING THIS MONTH? There are three front panel squares to knit, and these useful tips are worth a read before you begin…
FRONT PANEL, Square 1: Summer Cable – intarsia cable:
FRONT PANEL, Square 2:Pavlova – beaded stripes with knitted-in frills:
FRONT PANEL, Square 4:Al Fresco! – decorative stripe with hooked-in beads:
So here we go…
SQUARE 1, SUMMER CABLE: so we begin with an intarsia cable in two colours. Can you see the vertical dotted lines between each colour change? This is created by crossing the yarns over on the right side of the work. And if you need any assistance with this or any of the other techniques in this square, then there are three tech vids you can watch for guidance:
How to cast on using several colours
Square 1, Summer Cable: how to cross the yarns over when changing colour
How to cable (this is a generic cable demo and does not show the actual cable pattern you are knitting for this square)
This might seem a steep mountain to climb for your first square, however, once you get the hang of the intarsia technique, it really is quite simple. If you have knitted intarsia before but not tried it in a cable pattern, then this is something new for you to try - and that’s always a good thing, isn’t it?!? And if intarsia is completely new to you, then this is a wonderful way to learn the basics of it.
After casting on in the colour sequence (as specified on page 6), there is a WS row followed by an increase row. The increase is a ‘m1’ which I demonstrate in a tech vid. It’s worth checking that you are doing this right as there are several different ways to increase. This is the one where you pick up the horizontal bar between the stitches and knit into the back of it.
It is essential that the yarns are crossed over at each colour change on the RS of the work to create those vertical dotted lines you can see in the image above. This is the opposite to how you would usually cross them over in intarsia. There is a tech vid which shows this really clearly, so do give it a watch before you start knitting if you are unsure of this technique. To get a really neat colour change, pull each of the yarns firmly as you cross them over and give them an extra tug after they have been worked.
After the increase row there is another wrong side row and then you can work from either the worded instructions on page 7, or from the chart on page 8. Both give you the same result so choose whichever one you prefer, or you could work from both if you want to.
SQUARE 2, PAVLOVA: this very pretty square has three frills which are knitted separately then joined in as you work up the square. There is some slip stitch beading too, so if you’ve never knitted with beads before, this is your chance to try it out.
Videos to watch for assistance with this square:
How to pick up stitches along a cast-off edge (to knit the next square)
Square 2, Pavlova: how to knit the frill
How to thread beads onto your yarn
How to bead, the slip-stitch method
How to carry yarns up the side of the work
Before you cast on for this square, you are instructed to knit the three frills. This is probably the trickiest bit of this pattern, so there is a tech vid to watch for guidance. If you were a member of the 2021 Mystery Blanket Club, ‘One Thousand and One Nights’, then you would have come across knitted frills in this project. This is the same technique and involves casting on a greater number of stitches which are then rapidly reduced down, thus creating a frilly edge to the knitting. You will find the instruction for this at the bottom of page 9. Cast on with Cantaloupe then cut this off and change to White - don’t continue with Cantaloupe (which is what I did a couple of times!). After this tricky row there is a row with a few more decreases, and then you knit a complete row using White before cutting off the yarn. You need to make three of these frills.
To begin the square, you need to either cast it on separately, or pick up 41 stitches along the cast-off edge of Square 1. If you are unsure about how to do pick up stitches, check out my tech video – it shows you where to pick up the stitches and how to ‘miss’ a stitch (Square 1 has 42 stitches and Square 2 has 41 stitches).
So, should you opt for casting on stitches or picking them up? I would recommend that you pick them up as the square will have much better definition with the corners and edges sitting lovely and neat and straight, resulting in a very professional and neat looking front panel. However, if this isn’t for you, you can sew them together instead.
If you have not knitted with beads before using the slip-stitch technique, then there is a tech vid to assist you with this. But beware, it gets incredibly addictive and before you know it your world will be filled with beads! I love knitting with beads, it is so fun and easy to do, and it’s a great way to introduce extra colours into your knitting. I know you’re just going to love it too!
On Row 15 you are instructed to knit in the frills, and this is repeated twice more in this square. This technique is similar to a three-needle cast/bind-off, but you don’t cast off the stitches, instead you knit the two sets of stitches together but leave them on the needle. There is no tech vid for this, but the instructions are straightforward, and it may well be a technique that you’ve used before in other projects.
SQUARE 4, AL FRESCO!: in this square you get the opportunity to try out the other beaded technique, which is hooked-in beading. The beaded motifs are alternated with a fancy stripe pattern.
Videos to watch for assistance with this square:
How to carry yarns up the side of the work
How to bead, the hooking-in method
The first thing to point out here are the multiple needle sizes that are needed for this square. The changes between different sizes are essential to keep the stitches super neat as you swap between the beaded sections and the stripes.
On Row 5 you are instructed to knit stitches in alternate colours (Fuchsia and Pear) while hooking-in beads. To stop your yarns from tangling round each other, pick one yarn up from on top and the other from below and keep this consistent across the row - this is actually basic fairisle knitting. If you don’t keep this ‘over and under’ system going then it is not disastrous, but your yarns will be tangled together.
To create the decorative stripe effect, it is essential that the Pear yarn is carried on top of the Fuchsia yarn across the whole of row 5 (and when this same row is repeated throughout the square). If you don’t do this then it will be disastrous and you won’t get the same effect with the loops of Pear yarn on the front of the work.
This square might take you some time to do - hooked-in beading can be slow, especially if you are new to it. But the effect will be lovely, and what a great feeling of achievement you will have when it is completed!
So take a deep breath and off you go! And just think, when you’ve finished this square, you can sit back and relax and wait for next month’s instalment as you would have completed all your knitting for this month. Enjoy!
AND FINALLY FOR THIS MONTH, IT’S TIME TO HAVE A GUESS AT THE TITLE OF THE MYSTERY CUSHION! Each month I am going to give you a letter which is in the title. Then if you think you know what it is, drop us a line and we will let you know if you are right. There are clues in the patterns, the colours of the yarns and the embellishments - what do polka dots and stripes remind you of? Any ideas?
This month the letter I am giving you is ‘A’: _ _ _ _ _ _ / _ A _ _ _
If you think you know what it is, please email your answer to Sue at sue@debbieabrahams.com to see if you are right. And if you are then with your permission we will include you in the list of correct guessers in the July blog. And if you are not, then it’s time to guess again!
So this is it then, the start of a brand new KAL and five months of blissful knitting! Thank you for tuning in and taking the time to read (and listen to) this blog. Hopefully the tips and advice will guide you successfully through this month’s squares but remember that we are always here if you need us - just ping us a message or an email. We always love to hear from you, so please send in any stories or pics of your mystery knitting and with your permission we will share it in the next blog. And don’t forget to send in your guesses for the title too! I’m off now to soak up some of this glorious sunshine and knit ‘Al Fresco!’. Maybe you’ll do the same…take care everyone and have fun, Debbie, x
]]>
https://debbieabrahams.com/blogs/news/mystery-blanket-club-2022-post-5-june2023-06-01T12:42:55+01:002023-06-02T16:59:21+01:00Mystery Blanket Club 2023: post 5, JuneDebbie AbrahamsWELCOME TO THE FIFTH INSTALMENT OF THE 2023 MYSTERY BLANKET CLUB! And as we make a start on the June squares we are already halfway through this year’s KAL. There are some familiar squares to knit this month as well as some new ones, so there’s plenty to keep you inspired and busy over the next four weeks!
In this month’s blog, as well as all the latest news about the Club, you can read about the May Mystery Meeting at Yarn Loft in Nottingham, there is some exciting news about a new kit promotion, some lovely stories from the members, and you can read and see pics about my recent knitting holiday to France. There are also a couple of teasers on the front cover of the June patterns, can you spot them?!?
So let’s begin by taking a look at my June intro which has lots of tips and useful information about the squares you are knitting this month. This is followed by a new tech vid for Square 23, Option Two which is worth checking out if you decide to opt for this square.
This is a reminder of the techniques that were covered in previous blogs:
Square 8, Pixies & Nixies (both options): how to knit the decorative slip-stitch (February)
How to carry yarns up the side of the work (February)
How to pick up stitches along a cast-off edge (February)
Mattress stitch (horizontal) (February)
How to cable (February)
How to knit a contrast-coloured bobble (February)
Square 16, Forager: how to knit the exaggerated decorative purl stitch (February)
Understanding lace stitches (March)
How to thread beads onto your yarn (March)
How to bead, the slip-stitch method (March)
The intarsia technique (March)
How to add Chain stitch to your knitting (March)
How to add Swiss darning to knitting (March)
How to pick up stitches along a cast-off edge using several colours (April)
THE PRINTED PATTERNS HAVE BEEN POSTED TO THE MEMBERS WHO OPTED FOR THEM, with the overseas shipped on Friday 26th May and the UK on the 30th May. As I explained in my intro, I posted the overseas patterns as soon as I arrived back home from France, so please accept my apologies if you don’t receive them by the 1st June, but they are on their way and should be with you soon.
I NEED TO TELL YOU ABOUT A SMALL ERROR IN THE JUNE PATTERNS, which you may (or may not) notice when you knit Square 2, Hawthorn (both options). It’s in the picking up instructions on pages 7 and 10 where it says to pick up along the cast-off edge of Square 43. This is of course incorrect, you are picking up along the cast-off edge of Square 1.
I have listed these corrections on the Addendum page on our website:
IF YOU WATCHED MY INTRO VID THEN YOU WOULD HAVE HEARD ME TALK ABOUT THE MULBERRY YARN IN YOUR SECOND PARCEL, so I just want to clarify what you need to be aware of. We think that there are twenty parcels - most probably all overseas - that have a ball of Rowan Kid Classic in shade 894 Mulberry in them, instead of the ball of yarn you should have which is Rowan Alpaca Soft DK in shade 207 Mulberry. The two balls of yarn look very similar in colour and size, however, the feel of them is quite different. Kid Classic has mohair in it and is consequently a hairier, coarser yarn, whereas Alpaca Soft is much smoother and softer. Kid Classic is a lightweight aran yarn, so it is thicker than Alpaca Soft which is double-knitting weight. So before you start knitting with your second ball of Mulberry, please can you check it very carefully. And if it is Kid Classic, please let us know straight away and we will send you the correct ball of Alpaca Soft DK. We do not want the other ball back from you, so you can keep hold of it. Just make sure you put it in your stash and don’t use it in your Mystery Blanket! In the June patterns there is a square that uses only Mulberry, so it is really important that you make sure you have the correct yarn for this square, and of course for all the others in the blanket that also use Mulberry. Please email Sue at sue@debbieabrahams.com if you have any concerns and she will sort it out for you.
WHILE WE ARE TALKING ABOUT THE CONTENTS OF YOUR KIT, I just want to clarify one other thing, and that is that you should only have one ball of Simply White and one ball of Barn Red in your whole knitting kit. We sent out an email last month with a list of the contents of your second kit, and mistakenly included Simply White and Barn Red. So just to be clear, you were sent one ball of each of these yarns in your first parcel, but there were none in your second parcel. Apologies for any confusion this may have caused.
A FEW MEMBERS HAVE CONTACTED ME ABOUT SQUARE 1/43, FALLING LEAVES, OPTION TWO, where there appears to have been some confusion over the instructions for Row 1. So just to make it clear I will explain how it should be read. Inside the square brackets there is an instruction to ‘(K1, yf) 3 times and K1’. This is all worked into one stitch only, and not two stitches. That is why there is no comma between ‘3 times’ and ‘and K1’. If you follow this, then you will end up with the correct number of stitches at the end of the row.
AS I MENTIONED EARLIER ON, I HAVE JUST COME BACK FROM A FABULOUS WEEK AWAY IN FRANCE, where I was joined by twelve knitters - some familiar faces, some new, and some Mystery Blanket Club members too! We enjoyed a lovely week together at a gite in Bercloux in the Charente-Maritime region of France, which is about an hour and a half car journey north of Bordeaux. I have been tutoring knitting holidays for Sue Culligan (Knitting Holidays In France) for the past sixteen years, and sadly this is her last year of running them.
Below: (left to right), Sue Culligan, Marion and me.
So we all made the most of our time there, eating the most wonderful homecooked food, drinking wine, knitting and visiting the local towns of Cognac, Saintes and St Jean D’Angely where we explored the quaint old streets and got some much-needed retail therapy.
I designed this tablet case called ‘Reminisce’ for the ladies to knit while they were there, which was a recolour of a project that I ran for our Inspired Minds workshop at Nunsmere Hall Hotel. The project was created to celebrate ten years since the launch of the book ‘Kaleidoscope’ which I co-wrote and published with my good friend Jane Crowfoot. The beaded stripe on the front panel is a reworking of a bolster pattern that is in the book called ‘Zing’. The original colourway was in shades of pink, grey and neon yellow, but I decided to recolour it in shell pink, aqua and azure taking inspiration from all the wonderfully iced cakes and pastries that are presented so beautifully in their patisserie shops.
Below: the front panel of Reminisce.
Above: detail of the back panel of Reminisce.
The good news is that if you fancy knitting up this case then we are launching it in our online shop later this month as part of our ‘On The Case’ promotion. You can find out more about this later on in the blog…
The weather wasn’t quite as hot as we had expected, but that didn’t stop us from grabbing some rays as soon as the sun was out. We spent our knitting time either outside in the garden or in the large spacious workshop room overlooking the garden.
Above: (left to right around the table), Eileen, Kate, Christine, Sue, Jen, Katrin, Sue, Joan and Margaret.
Below: (left to right), Mary, Shelley and Marion.
All of the ladies worked so hard on the project, some of them opting to experiment with colour and recolour it in different shades of Cotton Glace - the results were amazing! I was thrilled that most of them managed to finish it by the end of the week, leaving only the lining fabric to sew in when they got home. Well done ladies!
Above: the various colourways of the project that the ladies knitted.
We did, of course visit a yarn shop, it was a lovely little one in Cognac that I’ve been to several times before called ‘My Little Mailles’. We were especially excited to see a range of yarn called Cowgirlblues that is a South African dye house and design studio owned by the daughter of Margaret who was on the holiday with us. Margaret had travelled all the way from Cape Town in South Africa to be with us in France, which is where her daughter Bridget also lives.
Above: Margaret in My Little Mailles with her daughter's yarn.
The yarns that she produces are absolutely beautiful, made from South African wool and mohair, and wound into the most irresistible hanks of loveliness! You can check out her website here and see all the wonderful yarns and designs that she produces, they really are worth a look (and a purchase!):
My week at Sue’s in France would not have been complete without a visit to two of my favourite shops - Amalgame in St Jean D’Angely and Maisons du Monde in Saintes. I love to browse around them, looking at the colour stories and themes, and finding interesting pieces to purchase. They are both homeware shops and are so inspirational for colour and design. And as usual, they didn’t disappoint! I just had to be careful that there was enough room in my suitcase for all the lovely bits and pieces I bought! These shops are just too tempting!
Above: beautiful home accessories in Amalgame in St Jean D'Angely.
Below: bright colours and bold prints in Maisons du Monde.
So although it’s the end of an era for Knitting Holidays In France, I feel incredibly thankful to Sue for inviting me to tutor so many workshops, and for the wealth of wonderful memories I have of my visits to France. Big thanks to Sue and Culli for all their fabulous hospitality and for making the workshops so thoroughly enjoyable. And to all the wonderful ladies that have joined me there over the past sixteen years, thank you for coming along and being such great holiday companions, it’s been so much fun!
WE ARE LAUNCHING OUR ‘ON THE CASE’ SPECIAL PROMOTION IN A COUPLE OF WEEKS TIME, so keep an eye on your inbox for news of this, especially if you fancy knitting up the ‘Reminisce Case’. As well as ‘Reminisce’, there are three other new kits to choose from - ‘Autumn Purse’, ‘Lavish Purse’ and ‘Chic Case’. For a limited period we are offering 10% discount off our whole range of cases and purses. So if you are ahead with your blanket squares each month and need something to fill the gap, this could be the perfect solution!
Above: new kit, Autumn Purse.
Below: (top to bottom), new kits Lavish Purse and Chic Case.
IF YOU HAVE NOT YET SIGNED UP TO MY 2023 MYSTERY BABY BLANKET CLUB, I AM DELIGHTED TO LET YOU KNOW THAT MEMBERSHIPS ARE STILL AVAILABLE! This is a reminder of what I have in store for you if you decide to join me on this new and hugely exciting new knitting KAL…
The project is knitted in Rowan Baby Cashsoft Merino, which is a mixture of merino wool, acrylic microfiber and cashmere. It is beautifully soft and has a luxurious handle, making it the perfect choice for a baby blanket. It is machine washable.
There are two colour options to choose from. The base palette includes soft green, camel, butter yellow, taupe, cream and faded denim, and to complete it there is a choice of either:
Above: Grey/Silver colourway.
Below: Rose/Candy colourway.
The kit for this blanket will be available to buy in our online shop from 1st June 2024 when the Club has finished, but there are lots of reasons to sign up now and grab yourself a membership. By joining the club you will benefit from:
10% off the cost of the membership (£139.50 + shipping after discount)
10% discount voucher for a single transaction in our online shop*
Free fabric gift bag (by Paper Mirchi)
A dedicated blog and technical support throughout the project
The opportunity to knit the blanket before anyone else!
*excludes Mystery products.
Each member will receive a knitting kit which includes over fifteen balls of Rowan Baby Cashsoft Merino yarn, seven sets of emailed patterns (with the option to purchase additional printed patterns), a fabric gift bag and a woven label. The finished size of the blanket is approximately 72cm x 98cm.
The blanket design includes the techniques of intarsia, fairisle, lace, textured stitches and stripes, offering you an exciting variety of squares to knit up over seven months. (There will be no beads or embellishments in this blanket).
Above: a previous Mystery Baby Blanket design, Love You To The Moon & Back.
If you would prefer to pay in instalments you can use our online payment system Splitit, which enables you to make your payment over two, three or four months - you choose what suits you best. Simply select this option at checkout when you make your first payment and then your remaining payments will be taken automatically from your account. It’s that easy!
You have until the end of August to get yourself signed up to the Mystery Baby Blanket Club before it begins on 1st October. We are signing up members from all over the world, so wherever you are, why not come and join in the fun!
IF YOU ARE STILL UNSURE ABOUT THE TITLE OF THIS YEAR’S MYSTERY BLANKET, THEN ANOTHER LETTER IN THE PUZZLE MIGHT BE JUST WHAT YOU NEED. Some more members have got it right, and so for Andrea Surgeoner, Maggie Bentley, Barbara Hathaway, Barbara Frenchman, Wendy Philippi, Stella Ho, Jane Turner, Valerie McNulty, Janet Holdsworth and Anna Wallis de Garay the mystery is over!
But for those of you who are still guessing, here is another clue. This month the letter I am giving you is... “O”:
T H _ / _ _ _ H A _ T _ D / _ O _ _ _ T
As the months go by it should be getting easier. So if you’ve got an idea, send your answer in to Sue at sue@debbieabrahams.com and she will let you know if you are right. You never know - your luck might be in this time!
THERE ARE FIVE SQUARES TO KNIT THIS MONTH, with alternative options for three of the squares:
Square 2, Hawthorn 2 (Option One) – fairisle pattern with stripes, textured stitches and hooked-in beads:
Square 2, Hawthorn 2 (Option Two) – textured pattern with stripes and hooked-in beads:
Square 3, Vines 2 – cable pattern with slip-stitch beads (same for both options):
Square 23, Dragonfly (Option One) – intarsia dragonfly motif with hooked-in and slip-stitch beads and Chain stitch details:
Square 23, Dragonfly (Option Two) – cable pattern with hooked-in beads, contrast-coloured bobbles and lace stitches:
Square 31, Foliage – lace pattern with hooked-in beads (same for both options):
Square 46, Wolfsbane (Option One) – fairisle pattern with stripes, textured stitches and hooked-in beads:
Square 46, Wolfsbane (Option Two) – textured pattern with stripes and hooked-in beads:
On each pattern page there is a list of Pattern notes and tips that are worth reading before you start to knit each square. These bits of advice will help you and give pre-warnings as to what look out for in the pattern instructions. Also take note of the description under the title of each square as this tells you what the stitch structure is.
You can use the tech vids to help you knit your squares. But here are a few extra tips to assist you:
SQUARE 2, HAWTHORN 2 (Option One): this is the first square that you will need to make a decision about this month. It is very similar to Square 44, but there are some colour changes.
Videos to watch for assistance with this square:
How to pick up stitches along a cast-off edge (February blog)
Mattress stitch (horizontal) (February blog)
Square 8, Pixies & Nixies (both options): how to knit the decorative slip-stitch (February blog)
How to bead, the hooking-in method (February blog)
How to carry yarns up the side of the work (February blog)
If you chose Option One for Square 44, then I would recommend that you choose Option One also for this square - that is if you want to keep the design balanced and symmetrical. The fairisle section, the decorative stitch pattern and the stripes are the same as Square 44, but there are changes to two of the colours, most noticeably Barn Red which has been swapped for Ginger.
Remember that there is a correction to this pattern. It’s in the picking up instructions at the top of page 7 where it says to pick up along the cast-off edge of Square 43. This should of course be Square 1.
There are several tech vids from previous blogs that you can take a look at if you need some assistance. However, as it is so similar to Square 44, you should find it fairly easy to knit. Just keep an eye on those colour changes!
SQUARE 2, HAWTHORN 2 (Option Two): like Option One, this square is very similar to Square 44 with two of the colours changed. It features the decorative loop stitch that was in Pixies & Nixies and Elves & Imps, so this is a technique you will be familiar with if you chose Option Two for these squares.
Videos to watch for assistance with this square:
How to pick up stitches along a cast-off edge (February blog)
Mattress stitch (horizontal) (February blog)
Square 8, Pixies & Nixies (both options): how to knit the decorative slip-stitch (February)
How to knit the decorative loop stitch (February blog)
How to bead, the hooking-in method (February blog)
How to carry yarns up the side of the work (February blog)
As with Option One, Barn Red has been swapped for Ginger and Pumpkin has been swapped for Maple. All the other colours remain the same. Isn’t it fascinating how this small change makes such a difference to how the pattern looks? The changes are small, but the effect is very different, resulting in a square that is much warmer and brighter in tone than its sister square.
Remember that there is a correction to this pattern. It’s in the picking up instructions at the top of page 10 where it says to pick up along the cast-off edge of Square 43. This should of course be Square 1.
SQUARE 3, VINES 2: this square revisits the cable that you knitted in the previous mail out for Square 45. There are no other changes apart from the colour of the yarn.
Videos to watch for assistance with this square:
How to pick up stitches along a cast-off edge (February blog)
Mattress stitch (horizontal) (February blog)
How to cable (February blog)
How to thread beads onto your yarn (March blog)
How to bead, the slip-stitch method (March blog)
Instructions for threading the beads are on page 12 and need to be followed carefully so that the beads are added to the knitting in the correct order. They are positioned slightly off-centre within each cable, and their positioning alternates as the cables twist back and forth from the front (left twist) to the back (right twist). You can double-check that the beads are in the right order as you follow the chart and/or the worded instructions which specify when and where each colour bead is to be placed. Fingers crossed then that your bead threading is spot on!
Remember that to keep the cables nice and neat you need to make sure that the yarn is pulled firmly as you take it back and forth between the cables. Sometimes the edge stitches of a cable can be a bit loose, so an extra tug on the yarn as you begin and finish each cable will help tidy them up.
SQUARE 23, DRAGONFLY (Option One): so here is our second creature in the blanket, and it’s an intarsia challenge for anyone who fancies a bit of colour work!
Videos to watch for assistance with this square:
How to pick up stitches along a cast-off edge (February blog)
How to pick up stitches along a cast-off edge using several colours (April blog)
Mattress stitch (horizontal) (February blog)
The intarsia technique (March blog)
How to thread beads onto your yarn (March blog)
How to bead, the slip-stitch method (March blog)
How to bead, the hooking-in method (February blog)
How to add Chain stitch to your knitting (March blog)
It does not matter which option you choose for this square, so go for whichever one you prefer. Option One is the trickier square to knit because it has intarsia colour work, however, don’t let that put you off - if you need any guidance there is a tech vid for the intarsia technique, and also for the chain stitch embroidery and beads. So all areas are covered!
There is quite a lot going on in this square, so it would be a good idea to give it a good read through before you begin. The secret of successful intarsia is to be prepared, so the winding off of yarn for the separate areas of colour is advisable before you cast on. I would suggest that you wind off one ball (or bobbin) of Barn Red, two of Harvest, two of Clay, two of Acorn and one of Blackberry. Remember that you need to keep the carrying across of yarns at the back of the work to a minimum and only do so when necessary.
If you need a reminder about how to pick up stitches to begin the square using several colours, you can go back to the April blog where you will find a tech vid for this. But if you are casting on rather than picking up stitches, you could take a look at the tech vid from the 2021 Mystery Cushion Club which shows how you do this:
The Black beads on the body are threaded onto the yarn and knitted in using the slip stitch method. The Emerald beads on the wings are hooked in.
After the square has been knitted, blocked and pressed there is some chain stitch embroidery to add to it. It is indicated on the chart, and you can also see it in the image on page 14. You can use these as a guide, but feel free to be as creative as you like with it, you don’t need to match exactly what you see on the chart, especially the two swirls at the bottom. These are finished with a sewn-on bead, as are the antennae, the details of which are at the end of the pattern instructions on page 15.
SQUARE 23, DRAGONFLY (Option Two): if you don’t fancy intarsia, then this is your alternative square to knit. There’s a lot going on in it with cables, lace stitches, beads and contrast-coloured bobbles, but there is an in depth new tech vid this month that guides you through the rows. So why not give it a go?
Videos to watch for assistance with this square:
How to pick up stitches along a cast-off edge (February blog)
Mattress stitch (horizontal) (February blog)
Square 23, Dragonfly: Option Two (Rows 1-7) (NEW THIS MONTH!)
There are worded instructions and a chart for this square, however, for some of the rows on the chart you need to read and follow the worded instructions - these are the ones that are in either red or green. You will see that under the chart on page 19 it says for two of the symbols to ‘see instructions in green/red for corresponding row’. My test knitters coped with this okay, so hopefully you will too!
On the chart there are coloured squares for the bobble stitches, but we’ve also included initials for the colours, just to make it super clear. In the tech vid you will see that the contrast colour for each bobble is purled on a wrong side row so that it is ready and in the right place to knit the bobble on the next right-side row. You will need to cut a length of yarn for each bobble (approx. 30cm). Details of what you need and how many of each colour are on page 16 below the image.
You will find the explanation for c5b on page 30 of the June mail out, it’s on the far right-hand side. Notice that some of the stitches in the cables are worked through the back of the loop to tighten up the edges. This makes them look extra neat and tidy.
I would strongly recommend that you watch the new tech vid for this square as it covers all the techniques you will need to knit it. In the demo I work on a reduced number of stitches - otherwise the film would have been twice as long! But I demonstrate enough of each row for you to get a good grasp of what to do. So, pop this on and either watch it all the way through first before you begin or watch it as you knit each row.
This square did take me some time to do - except for a few rows there is something extra to do on every row - a cable, a bobble, beads - so you’ll need to set aside plenty of time to knit this one. But it will be worth it - I promise!
SQUARE 31, FOLIAGE: this is a relatively easy square to knit (in comparison to the last one!) and combines basic lace stitches with hooked-in beads.
Videos to watch for assistance with this square:
How to pick up stitches along a cast-off edge (February blog)
Mattress stitch (horizontal) (February blog)
How to bead, the hooking-in method (February blog)
Understanding lace stitches (March blog)
You have a choice with this square to knit it from worded instructions or from a chart. The chart is on a separate page to the worded instructions, you’ll find it on page 22.
I just want to point out the abbreviation P2togtbl, which occurs first on Row 2. You have worked this before, it was in Square 17, Thicket from the second instalment. If you can remember back this far, it was a bit of a tricky decrease as the stitches need to be purled together through the back. But it is essential that they are worked in this way to ensure that the stitches travel smoothly and untwisted in the correct direction. You will see what I mean if you look at the right side of the square after you’ve worked a few rows. Intriguing, isn’t it!
SQUARE 46, WOLFSBANE (Option One): for the final square this month you need to make a choice between Option One and Option Two. This is the slightly trickier one as it has two sections of fairisle with hooked-in beads.
Videos to watch for assistance with this square:
How to pick up stitches along a cast-off edge (February blog)
Mattress stitch (horizontal) (February blog)
Square 8, Pixies & Nixies (both options): how to knit the decorative slip-stitch (February blog)
How to bead, the hooking-in method (February blog)
How to carry yarns up the side of the work (February blog)
You can choose whichever option you want for this one, it does not matter what choices you’ve made for other squares in the blanket so far. It is similar in stitch structure and design to Squares 2 and 44 (Hawthorn), so you might want to go for the option you didn’t knit for these two squares - just to mix it up a bit.
The tips I gave you for knitting Square 2 also apply to this square. As I just mentioned, it is very similar to Hawthorn/Hawthorn 2, but the colours are different with the warm tones swapped out for cooler ones. And there is a different fairisle pattern to knit as well, with hooked-in Indigo beads instead of Red.
SQUARE 46, WOLFSBANE (Option Two): like Option One, this square is very similar to Squares 2 and 44, but it’s a cooler colour palette with Shadow replacing Ginger/Barn Red.
Videos to watch for assistance with this square:
How to pick up stitches along a cast-off edge (February blog)
Mattress stitch (horizontal) (February blog)
Square 8, Pixies & Nixies (both options): how to knit the decorative slip-stitch (February)
How to knit the decorative loop stitch (February blog)
How to bead, the hooking-in method (February blog)
How to carry yarns up the side of the work (February blog)
As mentioned for Option One, it does not matter which choice you make for this square. So if you fancy trying out the decorative loop stitch, maybe for the first time, then go for it. The final decision is down to you!
HAVING A YARN STORE AT THE END OF YOUR ROAD IS JUST PERFECT FOR MONTHLY ‘MYSTERY CLUB’ MEETINGS! And at the beginning of May I found myself in the delightful company of Claire, Jan, Kerry, Alison, Mary, and Doreen for a couple of very enjoyable hours at Yarn Loft in Carrington, Nottingham. This was our second meeting, and it was great to be able to sit and chat about the project (and numerous other things!) while we knitted blanket squares. It’s always a very informal session and Doreen does a fantastic job of keeping us fed and watered with hot drinks and cake while we work on our squares. What could be better than sitting in a gorgeous yarn shop with like-minded people, knitting and being fed cake and a cup of tea!?!
Above: (left to right around the table), Mary, Claire, Jan, Kerry and Alison.
We chat about all sorts of things, and often new techniques or tips are exchanged, and solutions are found if there is a query with a square. Mary demonstrated to us how she knits a cable without a cable needle, which most of us found quite baffling. But she made it look so easy and explained it very clearly, so I think some of us might give it a go. It’s especially handy if you find yourself in that very frustrating situation when you need a cable needle and realise it’s not in your knitting bag! So thanks Mary for that, it’s a fabulous tip!
Below: Mary demonstrates how to cable without a cable needle - wow!
If you are interested in coming along to our next meeting on Wednesday 7th June then the meeting is between 4-6pm at Yarn Loft, 118 Hucknall Road, Carrington, Nottingham, tel number 07825 702433, website: www.yarnloft.co.uk. To cover the costs of hosting the meeting there is a small sub to pay (£3.00), which can be paid to Doreen on the day.
Above: some of the tempting goodies at Yarn Loft.
Just send a quick email to me at debbie@debbieabrahams.com to let me know you are coming and we will make sure that we have a cup of tea and a cake ready for you!
A FEW OF YOU HAVE BEEN IN TOUCH WITH UPDATES ABOUT WHAT YOU’VE BEEN KNITTING, PLUS THERE'S BEEN SOME HELPFUL KNITTING TIPS SENT IN. So I begin with Hazel Lackie from Bristol, UK, who sent in this picture of her amazing blanket which was inspired by the 2015 Mystery Blanket, ‘Back To The Country’. Isn’t it fabulous!
Above: Hazel's fabulous blanket design!
This is what Hazel had to say about her wonderful creation:
Hazel says: “Some time ago I told you about a blanket I was knitting for my sister-in-law based on Back to the Country. She saw my Back to the Country and asked if I would knit one for her. They live in Barbados and were returning to the UK when she retired, which is this September, so I had to finish it.
I didn’t have the right wool so I adapted it and used the wool I knitted my Harry Potter blanket with. So many of the colour tones had to change, for example the blue is darker as are the green and pink. But I found enough to make it work. I also changed some of the squares, designed a couple and moved some around to suit the subject. I used a couple of your designs from other blankets - Shingle and Shells (for the shingle beaches around Blakeney), and the fish I call ‘Bajan Whispers’ as she is a marine biologist. I designed my own Goldfinch as she used to watch them on our bird feeder and a Camberwell Beauty butterfly as her parents were members of the Norfolk butterfly society. The dragonfly became an Emperor using the colours I had. Then I created the diagonal squares - Hedgerows and Norfolk Lavender Fields.”
This is a real work of art, and the story behind it and the inspiration for the squares is truly lovely to read. The balance of colour is perfect, and it’s fascinating to see how well the new squares blend in with the original ones. I am sure that your sister-in-law will be bowled over when she sees what you have done for her Hazel! What a wonderful gift and one that will be kept and treasured forever.
ANOTHER ONE OF THE MEMBERS HAS BEEN KEEPING HERSELF BUSY AND CREATIVE WITH SOME FABULOUS HAT DESIGNS. Take a look at these beautiful creations by Daphne Cavanah from Wadebridge in Cornwall, UK! Inspired by the ‘Bracken’ square in this year’s Mystery Blanket, Daphne has designed these hats in three gorgeous colourways:
Above: colourway, A Cliff Top Walk'.
Below: and the inspiration for the design:
Daphne says:“I have been incorporating the Bracken pattern from MB2023 on the last three hats I have made. This one is called 'A Cliff Top Walk'. A friend of mine called Mary Lunnen often puts up photos of her walks. The idea of the bright yellow lichen on the rocks and the pink flowering Thrift has been running around my mind for a while. I love this hat and so does the friend it is going to!
And here is ‘The Riverbank’, with bobbles representing yellow irises, bullrushes and the flash of blue for a kingfisher. I have added the bobbles randomly and I am very pleased with the result."
Below: colourway, The Riverbank.
"Back to bed for a couple hours now, lol. That is if my creative mind will let me! I must get back to my cushion cover kit and the May mail out. So nice to be able to sit in the garden and knit. Keep being our inspiration Debbie!”
Above: a third colourway using the stitch pattern from Bracken.
You might remember that Daphne contributed a huge collection of lovely, knitted accessories to the Member’s Gallery which went live on our website back in January. These are just as beautiful, and I really love the fact that they are inspired by a square from the blanket - what a fantastic idea! The stories behind the colour palettes are intriguing too and so interesting to read. Thanks Daphne for sharing more of your wonderful creations with us! I can’t wait to see what you come up with next!...
SUSANNE IHMIG FROM ESSEN IN GERMANY HAD A COUPLE OF THINGS SHE WANTED TO SHARE WITH THE MEMBERS. First of all she has a great tip for reading intarsia charts and keeping track of what row you are on - which I have to admit can be a real problem.
Susanne says:“This is my method to keep up with the correct line in an intarsia square, I use a textmarker, so I can see the line ahead as well as the line below and I don't get puzzled..”.
Above: Susanne's textmarker (or hi-lighter!).
When I replied to Susanne she was quite intrigued to find that this is what we call in the UK a hi-lighter pen. I have used hi-lighter pens (or as Susanne calls them, textmarkers) to mark where I am on a chart, and it really does help a lot. So that’s a great tip Susanne, and one that some of the members might find very useful if they haven’t tried it before.
Susanne also wanted to share with us her recolour of Square 9, Toadstool, Option Two. She contacted me to ask whether she could knit it in a different colour, and look what she’s done! Doesn’t it look lovely in Maple!
Above: Toadstool recoloured in Maple.
Susanne says:“Not yet pressed but looks also great in Maple! I enjoyed knitting this pattern very much!”
I always find it fascinating how a change of colour can completely transform the look of a square. I think this one would look great in any colour, but Maple is a great choice. Thanks for sharing Susanne!
PLEASE KEEP SENDING IN PICS OF YOUR FURRY FRIENDS ASSISTING (OR HINDERING?!?) YOUR MYSTERY KNITTING. We’ve had a few more, but I know there’s many more of you out there who like to knit-a-long with your furry best friends by your side! I plan to show the pics in a fun gallery later on in the year, so if you want your pet to have its mini moment of fame, please send in a pic and a few words and I will be sure to include it. All pets are welcome 😊
DON’T FORGET TO FOLLOW US ON ALL OUR SOCIAL MEDIA PLATFORMS, and enjoy the messages and photos that are shared between myself and the members:
Instagram: debbieabrahams_knitting
Pinterest: debbieabrahams@debbieabrahamsk
Facebook: Debbie Abrahams Mystery Knitters
Facebook: Debbie Abrahams Handknits
Ravelry: Debbie Abrahams Handknits
AND FINALLY, I CLOSE THIS POST WITH THE FIFTH 2023 MYSTERY BLANKET CLUB PRIZE DRAW!!! Each month a member is picked at random to win a Debbie Abrahams prize. So it is worth reading right the way to the end of each blog to see if you are that lucky member!
PRIZE DRAW FIVE (JUNE): this month’s winner is member 143, Catherine Slater from Grimsby in the UK. Well done Catherine! Please choose a prize from the following selection:
Your choice of one of Debbie’s knitting kits up to the value of £28.00 (take a look at them in our online shop).
A £25 voucher towards a Debbie Abrahams Mystery Club membership: 2023 Mystery Cushion Club; 2023 Mystery Baby Blanket Club or 2024 Mystery Blanket Club.
A Mystery bag of five gifts!
We will notify Catherine to let her know the good news!
There are a few choices of squares to think about this month, but hopefully after reading this blog these decisions will be easier for you to make. Remember to check out the tech vids - old and new - for assistance, and if you’re still stuck then drop me a line, I am always happy to hear from you! Keep sending in your pics and stories about what you are knitting - they are always a joy to read and lovely to share in the blog. Perhaps you can let me know what the weather is like wherever you are knitting in the world? I am sitting here hopeful by that by next month the grey sky and even greyer clouds I can see outside the window are white and fluffy against a brilliant blue sky - come on sun, where are you?!? I am eager to get outside and knit, so all being good that’s what I will be doing when I talk to you again at the beginning of July. Until then, have fun with the June squares and keep those knitting needles busy, bye for now, Debbie, x
]]>
https://debbieabrahams.com/blogs/news/mail-out-4-may-square-1-chart-error2023-05-10T09:47:25+01:002023-05-10T09:47:25+01:00Mail Out 4, May, Square 1, Falling Leaves, chart errorDebbie Abrahams
It has come to my attention that there is an error in the chart for Square 1, Falling Leaves. All of the hooked in beads are in the incorrect position and should be two rows higher up (see revised chart below).
This is not only incredibly frustrating for all my members, but it is also hugely disappointing for me as I can see on the rough copies of my charts for this square that I did position the beads correctly and therefore my knitted square that you see in the image on page 6 is correct. Several revisions of this chart were done to get the rotation of the leaves and the changes to the colours of the embroidery correct, and it must have been during these rewrites of the charts that the beads were missed.
If you have not already knitted this square, then please use this revised chart.
If you have knitted this square, then these are my suggestions:
leave it as it is (if you didn't notice it then it probably won't worry you)
undo and reknit it (you will have enough of all the yarns in the kit to do this)
very carefully crack off the beads and sew them on, this can be done with a pair of pliers (I've done it plenty of times before myself).
If you decide to crack the beads off, then this must be done very carefully and remember that they are glass so you will need to make sure that any splinters are caught in a tissue and disposed of. I usually do this with a fine pair of pliers, taking care not to break the yarn as I remove them. Then I sew them back into place using a separate piece of matching yarn to the background colour. As the beads are hooked-in they should be positioned vertically on each stitch, but if you find it easier to sew them horizontally across the stitches, this is fine. Do whatever looks best.
I cannot apologise enough for this error and am hugely disappointed that I am having to write this message to you. But on the upside, you now have the opportunity to change it with the revised chart. And that is a decision I will leave with you.
]]>
https://debbieabrahams.com/blogs/news/mystery-blanket-club-2023-post-4-may2023-05-01T00:30:00+01:002023-05-01T00:30:00+01:00Mystery Blanket Club 2023: post 4, MayDebbie AbrahamsHELLO EVERYONE AND WELCOME TO THE MAY INSTALMENT OF THE 2023 MYSTERY BLANKET CLUB! We are about to begin the fourth instalment of this year’s club, and with Spring in full swing and the sun shining, what could be better than a bumper month of squares, with six patterns for you to knit!
Several of the squares have options with four out of the six of them offering an alternative pattern to knit. So you’re going to have to make some decisions which I will give you some guidance with in this blog. So make sure that you take some time to read it (and listen to my intro) as there is lots of help and advice in it, plus news of a brand new ‘mystery’ KAL and some member stories. So settle back, make yourself a cuppa and let’s get started!...
There are no new tech vids this month so I begin with my intro and a friendly hello from me. And then if you need help with any knitting techniques you can refer back to previous tech vids which will give you all the guidance you need.
This is a reminder of the techniques that were covered in previous blogs:
Square 8, Pixies & Nixies (both options): how to knit the decorative slip-stitch (February)
How to carry yarns up the side of the work (February)
How to pick up stitches along a cast-off edge (February)
Mattress stitch (horizontal) (February)
How to cable (February)
How to knit a contrast-coloured bobble (February)
Square 16, Forager: how to knit the exaggerated decorative purl stitch (February)
Understanding lace stitches (March)
How to thread beads onto your yarn (March)
How to bead, the slip-stitch method (March)
The intarsia technique (March)
How to add Chain stitch to your knitting (March)
How to add Swiss darning to knitting (March)
How to pick up stitches along a cast-off edge using several colours (May)
I BEGIN WITH THE VERY GOOD NEWS THAT ALL OF THE FIRST PARCELS HAVE NOW BEEN RECEIVED (HURRAY!) AND THE SECOND PARCELS ARE WELL ON THEIR WAY! Some of you have already let me know that you have your second knitting kit, but if you are still waiting then it shouldn’t be long before it drops onto your doormat. Sue and Julia started to parcel them up at the beginning of April and posted them in several batches with all the overseas shipped first followed by the UK. And with Royal Mail’s new super duper postal system, we are finding that parcels are reaching their destinations in much better time. So going forward, things are looking good!
BEWARE OF THE LITTLE COLOURED ENVELOPE IN YOUR PARCEL! This contains your Mystery Blanket woven label which has the name of the blanket on it. So if you’ve already guessed the title it’s no problem, go ahead and open it. But if you have not guessed it and want to keep guessing, then leave it somewhere out of sight in a safe place, and don’t be tempted! Later on in this blog I will be giving you another letter clue, so it might just spark an idea that results in a correct guess. Fingers crossed, let’s see…
I’VE HAD A FEW OF YOU ASK ABOUT A CHECKLIST FOR THE MAY PARCEL, which I did not include in the second kit. But you can check the contents using page 2 of your May mail out:
In the May Mail Out it says on page 2 that two packs of Red beads are included in your parcel, however, you might find that there is only one large pack instead. This is because one of my postal teams put them in two separate bags (there are over 500 in your second parcel) and the other postal team managed to put the whole quantity in one bag. So in total, with the Red beads that you received in your first parcel, you should have either two or three bags of them. And if you are not sure that you have the right amount, just send us an email and we will be able to advise you.
If on checking your May parcel you find that something is missing, please let us know straight away and we will send you what you need. I know that in some of the parcels the beads were tucked between and inside some of the yarns to keep them safe, so this would be worth a check before you contact us.
THE PRINTED PATTERNS HAVE ALL BEEN POSTED, with the overseas going out first on Saturday 22nd April and the UK on the 26th April. We had a few hold ups with some late corrections to make which delayed the printing of them by a few days. So apologies if you are still waiting for your printed patterns to arrive, but they should be with you soon.
UNFORTUNATELY THERE ARE TWO CORRECTIONS WHICH WERE NOTICED AFTER THE PATTERNS HAD GONE TO PRINT. One of them has been corrected in the digital file and only affects the printed patterns. It’s on page 25, Square 37, Toadstool (Option Two) and it’s rows 6 and 14. There are no Black beads in this square so where it says to hook in Black beads, these are Velvet. It states Velvet beads in the Beads list on page 24, so it just needs correcting on these two rows.
The second correction is minor but needs pointing out to you, and it’s in both the digital and printed file. It’s on page 13, Square 18, Butterflies, Option Two, and it’s the statement about needle sizes after the Pattern notes and tips on the right-hand side of the page. It says that 3.50mm and 3.75mm needles are used but it is 3.50mm and 2.75mm needles (as stated throughout the pattern instructions and in the boxed needle info to the right of the image). So just to be clear, it is 3.50mm and 2.75mm needles that are needed to knit this square.
I have listed these corrections on the Addendum page on our website:
I AM DELIGHTED TO LET YOU ALL KNOW THAT I HAVE LAUNCHED A BRAND NEW KNITTING CLUB THAT YOU MIGHT BE VERY INTERESTED IN. IT’S MY 2023 MYSTERY BABY BLANKET, AND MEMBERSHIP ARE ON SALE SO YOU CAN SIGN UP NOW! We are constantly asked about baby blankets, they really are very popular with babies being born around the world every day. So if you know someone who is getting ready to welcome a new baby into the world, or you are looking forward to your own new little one, then there’s no better time than now to get yourself prepped and ready for this wonderful occasion.
Above: the 2020 Mystery Baby Blanket Club, Love You To The Moon & Back.
The project is knitted in Rowan Baby Cashsoft Merino, which is a mixture of merino wool, acrylic microfiber and cashmere. It is beautifully soft and has a luxurious handle, making it the perfect choice for a baby blanket. It is machine washable. The finished size of the blanket is approximately 110cm x 80cm.
There are two colour options to choose from. The base palette includes soft green, camel, butter yellow, taupe, cream and faded denim, and to complete it there is a choice of either:
Grey/Silver
or
Rose/Candy
After the club has finished the kit for this blanket will be available to buy in our online shop from 1st June 2024 when the Club has finished, but there are lots of reasons to sign up now and grab yourself a membership. By joining the club you will benefit from:
10% off the cost of the membership (£139.50 + shipping after discount)
10% discount voucher for a single transaction in our online shop*
Free fabric gift bag (by Paper Mirchi)
A dedicated blog and technical support throughout the project
The opportunity to knit the blanket before anyone else!
*excludes Mystery products.
Each member will receive a knitting kit which includes over fifteen balls of Rowan Baby Cashsoft Merino yarn, seven sets of emailed patterns (with the option to purchase additional printed patterns), a fabric gift bag and a woven label.
The blanket design includes the techniques of intarsia, fairisle, lace, textured stitches and stripes, offering you an exciting variety of squares to knit up over seven months. (There will be no beads or embellishments in this blanket).
If you would prefer to pay in instalments you can use our online payment system Splitit, which enables you to make your payment over two, three or four months - you choose what suits you best. Simply select this option at checkout when you make your first payment and then your remaining payments will be taken automatically from your account. It’s that easy!
When your payment has been made you will be sent a confirmation email confirming your package and your membership number. We will send this to you within twenty-eight days of signing up.
Above: the alternative colourway of Love You To The Moon & Back.
I just love designing baby blankets, they are so much fun! And I have a lovely design in store for you with lots of interesting and cute patterns to knit up. So I really hope that you decide to join me on this new knitting adventure!
THE 2023 MYSTERY CUSHION CLUB HAS ALMOST SOLD OUT WITH UNDER TWENTY PLACES LEFT! So if you’ve been sitting on the fence and not made up your mind yet, then it’s time to make a decision. Here is a quick reminder of what I have in store for you…
Above: the 2022 Mystery Cushion Club, Pure Nouveau.
The theme of the Mystery Cushion is, as always, a ‘mystery’. However, I can tell you a few snippets about the project that won’t give the game away! This year’s design uses one of Rowan’s most popular summer yarns, Summerlite DK, in a colour palette of sweet, sugary colours that are vibrant and cheerful. Debbie has combined together a mixture of pretty fairisle patterns, beading and textured stitches that will take you on a calm and pleasant knitting excursion this summer, giving you the perfect project to pack away and take on holiday or relax with in the garden.
The knitting kit includes ten balls of Rowan yarn, Debbie Abrahams Beads and buttons for fastening and decoration.
For every Mystery Cushion sold we are making a donation to the mental health charity, Mind. Last summer we tragically lost a dear friend of ours and his last wish was for any money raised in his memory to be donated to Mind, so from the profit of each membership we are donating £5 to this charity. Mind gives support and help to those is need and works tirelessly to raise awareness of mental health issues. You can read more about this and about our friend Kyle in our blog: https://debbieabrahams.com/blogs/news/raising-donations-for-mind
If you want to spread your payment then you will have the option to pay in 2-4 instalments using our Splitit payment plan, or you can simply pay in one go. There are no admin fees for splitting your payment so you can choose whatever is easiest for you and your finances.
Fancy it? Then pop across to our online shop and grab one of the last remaining memberships before the club sells out. And then you can sit back and look forward to a brand new project beginning in June. I can’t wait and hope that you are excited too!
AFTER AN INITIAL FLOOD OF CORRECT GUESSES OF THE TITLE OF THE MYSTERY BLANKET, WE HAVE HAD A SLOW TRICKLE, which means that there are still many of you out there trying to guess what it is. Congratulations this month go to Jennifer Goodliffe, Donna Ryberg, Jo Boraston, Melanie Makin, Kathryn McAteer, Sian Bennett, Myra Sharp, Sheila Hatler, Jackie Smith, Judith Bridges, Vivian Burgess and Claire and the Woolly Wanderers. So very well done to you all, the guessing game is over!
But for those of you who are still guessing, here is another clue. This month the letter I am giving you is... “T”:
T H _ / _ _ _ H A _ T _ D / _ _ _ _ _ T
As the months go by it should be getting easier. So if you’ve got an idea, send your answer in to Sue at sue@debbieabrahams.com and she will let you know if you are right. Good luck everyone!
THERE ARE SIX SQUARES TO KNIT THIS MONTH, with alternative options for four of the squares:
Square 1, Falling Leaves 2 (Option One) – intarsia leaf motifs with hooked-in beads and Swiss-darned and chain stitch details:
Square 38, Bracken 2 – three-colour stripe slip-stitch pattern (same for both options):
Square 45, Vines – cable pattern with slip-stitch beads (same for both options):
On each pattern page there is a list of Pattern notes and tips that are worth reading before you start to knit each square. These bits of advice will help you and give pre-warnings as to what look out for in the pattern instructions. Also take note of the description under the title of each square as this tells you what the stitch structure is.
You can use the tech vids to help you knit your squares. But here are a few extra tips to assist you:
SQUARE 1, FALLING LEAVES (Option One): this is similar to Square 43, but the leaves have been rotated round and there are some differences to the colours of the embroidery too.
Videos to watch for assistance with this square:
The intarsia technique (March blog)
How to bead, the hooking-in method (February blog)
How to thread beads onto your yarn (March blog)
How to bead, the slip-stitch method (March blog)
How to add Chain stitch to your knitting (March blog)
How to add Swiss darning to knitting (March blog)
So what option should you go for? I would suggest that you opt for the same square you chose for Square 43 as this will keep the design balanced. But the choice is entirely up to you, and you may decide to go off-piste if you are not concerned about symmetry.
This is an intarsia square so that means either winding off small amounts of yarn for each section of colour, or using yarn bobbins (which is my preference). Remember that you are creating a single thickness multi-coloured fabric so there is very little carrying of yarns across the back of the work. This should only be done when you need to move a yarn across because of where you need to use it on the next row. So looking ahead to the next row is vital to make sure that you have the colours you need in the right place. You can use the fairisle technique to carry them across the back of the work.
I think it’s always best to block and press a square before embroidering it as this will ensure you have a nice, flat, smooth surface to work on. I did mention earlier on that some of the embroidery has changed colour, so watch out for the Chestnut leaf which has Harvest embroidery - that bright new yellow you have in your second parcel. And the stem on that same leaf is chain stitched using Blackberry.
SQUARE 1, FALLING LEAVES (Option Two): this is the second option and it’s almost the same as Square 43 but there is a slight difference to the beading.
Videos to watch for assistance with this square:
How to cable (February blog)
Understanding lace stitches (March blog)
How to thread beads onto your yarn (March blog)
How to bead, the slip-stitch method (March blog)
If you knitted this option before then you might remember that it has a variable stitch count, which means that the number of stitches changes throughout the pattern. When there is a change to the number of stitches this is stated at the end of a row. So to ensure you have the correct number it is important to count your stitches regularly as it’s far easier to go back one row than several.
The beads are threaded on before casting on and the colours are in the reverse order to Square 43. This is the only difference, the rest of the pattern instructions are the same as Square 43.
Several members got in a bit of a pickle with Row 1, so I just want to clarify how this works. It’s the instruction in the brackets which says, ‘(K1, yf) 3 times and K1’. This is all worked into the same stitch so it only uses one stitch up, and not two.
SQUARE 18, BUTTERFLIES (Option One): option one and option two for this square are quite similar, the difference being the fairisle section in the middle. So if you have not ventured into fairisle before and fancy a go at it over a small amount of rows, this is your chance.
Videos to watch for assistance with this square:
How to pick up stitches along a cast-off edge (February blog)
Mattress stitch (horizontal) (February blog)
How to thread beads onto your yarn (March blog)
How to bead, the slip-stitch method (March blog)
How to carry yarns up the side of the work (February blog)
Square 8, Pixies & Nixies (both options): how to knit the decorative slip-stitch (February blog)
How to bead, the hooking-in method (February blog)
You can choose either option for this square as at this point it will not affect the rest of the design.
It begins with an easy stripe which has beads set into garter stitch edged stripes. I would advise that you carry the Ginger yarn up the side of the work but cut off Pasture and Maple (as instructed in the pattern).
The decorative slip-stitch row uses the same technique as Pixies & Nixies from Mail Out 1, and the tech vid from February will help you if you need a reminder of it. This time it uses Pasture and Simply White to create a bold decorative stripe before the fairisle begins on Row 35.
Note there is an increase row before this which increases the stitches by six, resulting in 51 stitches. The chart is on page 12 and begins with a couple of rows of simple stranding with no weaving-in necessary. It’s on Chart Row 3 that weaving-in is recommended, and if you are not sure how to do this then there’s a tech vid to guide you through the technique.
On the image you can see there are black beads for the eyes, and you may wonder where they are on the chart. However, they are hooked-in on Row 44 at the bottom of page 11, which is the next row after the chart. So don’t despair, I haven’t forgotten their eyes!
Remember to change needle size when instructed as this will help to make those stripes extra neat, and keep the fairisle pattern uniform in width to the rest of the square. There is a change down to 2.75mm needles for the stripes and a change up to 3.75mm needles for the fairisle.
SQUARE 18, BUTTERFLIES (Option Two): this square begins in exactly the same way as Option One with beaded stripes, but the fairisle in the middle is replaced with a textured, decorative stripe.
Videos to watch for assistance with this square:
How to pick up stitches along a cast-off edge (February blog)
Mattress stitch (horizontal) (February blog)
How to thread beads onto your yarn (March blog)
How to bead, the slip-stitch method (March blog)
How to carry yarns up the side of the work (February blog)
Square 8, Pixies & Nixies (both options): how to knit the decorative slip-stitch (February blog)
Square 16, Forager: how to knit the exaggerated decorative purl stitch (February blog)
You will recognise the decorative stitch from Square 16, Forager. The exaggerated purl stitches are knitted in Pumpkin and Clay on a background of Maple.
Refer back to the tech vid from the February blog if you need a reminder of this. But once you get going, I think it will all come flooding back - it’s a fairly easy stitch to knit, and hopefully enjoyable too!
SQUARE 36, PIXIES & NIXIES (Option One): this square is a repeat of a previous square you’ve knitted before with no changes to it at all. There are two options, and this is the slightly trickier one.
Videos to watch for assistance with this square:
Square 8, Pixies & Nixies (both options): how to knit the decorative slip-stitch (February blog)
How to bead, the hooking-in method (February blog)
How to carry yarns up the side of the work (February blog)
I would recommend that you choose the same option that you knitted for Square 8. But if this square comes up again in the blanket (and I’m trying not to give anything away here!), then you could go for the other option then. But I will talk about this in more detail in a later blog when the decision has to be made.
So you’ve got a decorative slip-stitch, fairisle and some hooked-in beading to do in this square, and the tech vids from the first blog back in February are there to assist you if you need any reminders of the techniques. It should be an easy knit so sit back and enjoy!
SQUARE 36, PIXIES & NIXIES (Option Two): this is the easier option of the two and replaces the fairisle section with a decorative loop stitch pattern. It is exactly the same as Square 8, Option Two.
Videos to watch for assistance with this square:
Square 8, Pixies & Nixies (both options): how to knit the decorative slip-stitch (February blog)
How to knit the decorative loop stitch (February blog)
How to bead, the hooking-in method (February blog)
How to carry yarns up the side of the work (February blog)
The decorative loop stitch section on rows 8-31 may look quite complicated - there are a lot of instructions for some of the rows. But once you get going you should be fine as it’s the same as Square 8 - you’ve just got to think back to February! And the tech vid is always there as a back-up if you get stuck.
SQUARE 37, WISE OLD OWL (Option One): so here we are, our first creature in the blanket, and an intarsia challenge for anyone who fancies it!
Videos to watch for assistance with this square:
How to pick up stitches along a cast-off edge (February blog)
How to pick up stitches along a cast-off edge using several colours (April blog)
Mattress stitch (horizontal) (February blog)
The intarsia technique (March blog)
How to thread beads onto your yarn (March blog)
How to bead, the slip-stitch method (March blog)
How to add Chain stitch to your knitting (March blog)
How to add Swiss darning to knitting (March blog)
I would recommend that you opt for the same square you chose for Square 9 as this will keep the design balanced. But the choice is entirely up to you, and you may decide to go off-piste if you are not concerned about symmetry.
It would be a good idea to study the chart before you begin and get your bobbins (or small balls of yarn) wound off so you are ready to go. To begin you will need two balls/bobbins each of Chestnut and Maple, and one of Barn Red, but a second one of Barn Red for Row 3 when the owl’s bib in Clay begins (I would actually introduce the second ball/bobbin of Barn Red on Chart Row 4 when Clay is three stitches wide).
If you need a reminder about how to pick up stitches to begin the square using several colours, you can go back to the April blog where you will find a tech vid for this. But if you are casting on rather than picking up stitches, you could take a look at the tech vid from the 2021 Mystery Cushion Club which shows how you do this:
When I knitted this square, I decided to omit the single stitch of Barn Red (which begins on Chart Row 30, in the middle) and knitted straight across between the eyes with one bobbin of Chestnut. I then Swiss-darned the Barn Red stitches on afterwards. I found this much easier to do and might be something that you could try - fewer separate balls of yarn are needed and it saved on some loose ends as well.
There is some chain stitch embroidery to add to the knitting around the eyes using Harvest yarn. And if you look very carefully at the image on page 22 and at the chart on page 23, you will see that there are two smaller circles embroidered around each bead using Blackberry yarn.
I have not specified in the instructions that the single outlines of Simply White on the bib and the outer circles in Maple around the eyes are embroidered on, but I have suggested in the Pattern notes and tips that they could be Swiss-darned onto the square after it has been completed. This is what I did and I found it a lot easier to do. But the decision is up to you, and you need to do whatever is neatest.
This square is a bit of a challenge, but it’s not too tricky once you get started. It’s all in the preparation, and it will take time to knit as there is lots of technique involved. But it will be worth it if you want this feathered friend in your blanket!
SQUARE 37, TOADSTOOL (Option Two): this is your easier option to knit and it is the same as Square 9 from the April instalment, but a different colour (and different coloured beads as well).
Videos to watch for assistance with this square:
How to pick up stitches along a cast-off edge (February blog)
Mattress stitch (horizontal) (February blog)
How to bead, the hooking-in method (February blog)
This is the square with a variable stitch count. So it’s a good idea to count the number of stitches at the end of every row after there have been increases or decreases made, just to make sure you haven’t missed any.
Don’t forget that this square uses a smaller needle than the suggested main needle size of 3.50mm. So make sure you grab your 3.25mm needles and not the slightly larger ones!
SQUARE 38, BRACKEN 2: So here’s a square you will recognise from the previous mail out (April), but there’s been a change to the colours.
Videos to watch for assistance with this square:
How to pick up stitches along a cast-off edge (February blog)
Mattress stitch (horizontal) (February blog)
How to carry yarns up the side of the work (February blog)
You’ve got a three-colour stripe pattern and a four-row pattern repeat to contend with here, but if you can think back to last month when you knitted Bracken for the first time, you should be okay, it’s just a bit of revision with one colour change. Chestnut and Maple remain but Leaf is swapped out for Acorn which results in a slightly darker version of this square. I am fascinated how different it looks with just one colour change!
Because of the stitch structure - it’s a slip-stitch pattern - there are many more rows in this square than in others in the blanket, however, it should knit up to the same length as the other squares. I have had comments from a few members that it knits up rather long, and if this is the case then you may need to knit fewer rows. If your square is knitting up too long then this will be because your stitch tension is on the loose side, so you could try using a smaller needle. However, be careful as this will also affect the width of the square. If you have any queries over this, just send me an email and I will advise you.
SQUARE 45, VINES: if you like cabling then you’re in luck as this square is packed full of them, twisting to the back and the front with a scattering of glittering beads!
Videos to watch for assistance with this square:
How to pick up stitches along a cast-off edge (February blog)
Mattress stitch (horizontal) (February blog)
How to cable (February blog)
How to thread beads onto your yarn (March blog)
How to bead, the slip-stitch method (March blog)
The beads in this square are knitted in using the slip-stitch technique so this means you will need to pre-thread them. Instructions for this are on page 28.
You can choose to knit this square from either worded instructions or from a chart. If you are not too familiar with charts it might be worth working from the chart, and then you can check any rows you are not sure about against the worded instructions.
Cables and beads are knitted on right-side rows only which you can see this quite clearly if you look at the chart on page 30. You will also notice that the beads are knitted in on the same rows as stitches are cabled, but their position alternates every eight rows to give a staggered effect. This may look quite complicated, but once you make a start and complete the first few rows you will be fine. There is a strong repeat pattern which help, and you can always mark off the rows as you go to keep track of where you are.
To keep the cables nice and neat I would suggest that the yarn is pulled firmly as you take it back and forth between the cables. Sometimes the edge stitches of a cable can be a bit loose, so an extra tug on the yarn as you begin and finish each cable will help tidy them up.
IF YOU LIVE ANYWHERE CLOSE TO NOTTINGHAM, THEN YOU MIGHT BE INTERESTED TO KNOW THAT YARN LOFT ARE HOLDING MONTHLY MYSTERY CLUB MEETINGS. The good news for me is that this lovely knitting shop is at the end of my road, so I’m only a hop and a skip away from it! We have contacted members that are in Nottingham and the neighbouring areas to invite them to the meetings, but if you think this something you would like to come to, then let us know and we will send you the details.
We had our first Mystery Blanket meeting on the 5th April and I was delighted to be joined for a couple of hours by eight members, left to right: Carol Williams, Catherine Pope, Kerry Bloodworth, Vanessa Briscoe, Alison Riddell, Claire Goode, Lyn Fitzsimons and Mary Leeson. Doreen who owns the shop made us hot drinks and fed us cake while we chatted and knitted. The last time that I was at a meeting like this was way back before Covid times, so it was absolutely wonderful to be able to do this again.
Being in such a gorgeous shop surrounded by such a wide range of beautiful yarns and accessories was the perfect place for meeting up. If you have not visited Yarn Loft before then it really is a super shop that stocks not only Rowan yarn but a large selection of independent yarns as well. It was very tempting to be sat there for a couple of hours and some of the ladies did treat themselves with a purchase.
We always find so many things to chat about - it’s not just about the knitting! - but the meeting gave the ladies the opportunity to ask questions about the squares and the techniques, so we were able to sort out some of the queries too as we sat together and knitted. One thing that did come up was the length of the Bracken square from the April mail out. I talked about this further back in this blog and advised the same - to knit fewer rows if necessary.
A question was also asked about the washability of the blanket once it has been completed. All of the Rowan yarns used in it are machine washable. However, the Light Wool DK - my bespoke yarn - does not have a machine-wash finish on it. If you look at the ball-band, it states that it is handwash only. So I would not recommend that you machine-wash your Mystery Blanket. Handwashing is always the best option for a handknitted blanket as I don’t think it’s worth the risk putting it in the washing-machine. Just think if you were to put the wrong cycle on by mistake - it doesn’t bear thinking about! So my advice is to handwash it, it’s safer for you and your blanket!
If you are interested in coming along to our next meeting on Wednesday 3rd May then the meeting is between 4-6pm at Yarn Loft, 118 Hucknall Road, Carrington, Nottingham, tel number 07825 702433, website: www.yarnloft.co.uk. To cover the costs of hosting the meeting there is a small sub to pay (£3.00), which can be paid to Doreen on the day.
Just send a quick email to me at debbie@debbieabrahams.com to let me know you are coming and we will make sure that we have a cup of tea and a cake ready for you!
AND NOW FOR A COUPLE OF STORIES FROM THE MEMBERS, BEGINNING WITH VICKI LEAVERS FROM WESTLEIGHT, NSW, AUSTRALIA. I mentioned in a recent Instagram post about sending in photos of your happy knitting place, and Vicki responded with this most amazing photo!
Vicki says: “Just to advise you that my second parcel arrived today in Sydney Australia - great news! This is my first Mystery Blanket and it has been so enjoyable. I saw on Instagram that you asked to post a photo of our happy knitting place, so this is mine, Cowan Creek /Hawkesbury River, Sydney Australia. In the distance you can see the morning mist lifting, and this favourite spot of ours is about 20 kms from home so we frequent it as often as possible. My knitting always looks better when I’m in this special place.”
Your happy knitting place looks idyllic and is definitely a great place to knit. It’s wonderful to see your Mystery Blanket knitting out and about in such a beautiful location. Thanks so much for sending this in Vicki. And if anyone else wants to share their happy knitting place, then please send in your photos and a few words to me at debbie@debbieabrahams.com and I will include it in the next blog.
IT’S ALWAYS LOVELY TO SEE MY PROJECTS KNITTED UP, AND NICOLA FARR FROM LINCOLN IN THE UK HAS MADE A SPENDID JOB OF THE AUTUMN BAG! She has knitted it beautifully and lined it as well with the perfect fabric. I can see why Nicola is so pleased with her creation!
Nicola says: “I just wanted to share with you how delighted I am with my completed Autumn Bag. I loved the colour combinations as soon as I saw the kit for sale and found some wonderful fabric for the lining in a local shop. I’ve added a couple of pockets for phones etc - an extra challenge for myself as I do very little sewing. I’ve also recently knitted the free snowflakes mitts pattern that came with Winter Wonderland. Now looking forward to my first mystery cushion! Thanks for all the designs.”
Nicola was very lucky to get one of the last Autumn Bag kits in this colourway as they are now sold out. It used some of my bespoke Rowan Cotton Glace colours from the 2018 Mystery Blanket, Casa Batlló. The lining fabric is lovely and finishes it off so well. I always think that a knitted bag really benefits from a lining, and as it’s something that I am really no good at, I need to take some lessons from Nicola!
THANK YOU TO EVERYONE WHO SENT IN THEIR PHOTOS OF THEIR FURRY FRIENDS ASSISITING WITH THEIR MYSTERY BLANKET KNITTING! I mentioned this at the end of my previous blog after seeing many photos of furry friends on the Facebook group page. I am planning to include them all in one blog in a few months’ time. So if you have a photo, please send it into me along with the name of your pet and a few words. It will be good fun to see who’s assisting you with your blanket knitting! And any creatures are welcome, furry, feathered or scaly!
IF YOU MISSED OUT ON THE 2020 MYSTERY BLANKET CLUB, OUR PRECIOUS EARTH AND WOULD LIKE A KIT, please email Sue at debbie@debbieabrahams.com as one has come up for a private sale.
IF YOU WANT TO KEEP UP TO DATE WITH ALL THINGS ‘DEBBIE ABRAHAMS’ THEN WHY NOT FOLLOW US ON ALL OUR SOCIAL MEDIA PLATFORMS, and enjoy the messages and photos that are shared between myself and the members:
AND FINALLY, I CLOSE THIS POST WITH THE FOURTH 2023 MYSTERY BLANKET CLUB PRIZE DRAW!!! Each month a member is picked at random to win a Debbie Abrahams prize. So it is worth reading right the way to the end of each blog to see if you are that lucky member!
PRIZE DRAW FOUR (MAY): this month’s winner is member 192, Michelle Lally from Nottingham in the UK. Well done Michelle! Please choose a prize from the following selection:
Your choice of one of Debbie’s knitting kits up to the value of £28.00 (take a look at them in our online shop).
A £25 voucher towards a Debbie Abrahams Mystery Club membership: 2023 Mystery Cushion Club; 2023 Mystery Baby Blanket Club or 2024 Mystery Blanket Club.
A Mystery bag of five gifts!
We will notify Michelle to let her know the good news!
Thank you for reading my blog and listening to my intro. It’s always worth doing this before you make a start on each months’ squares so you are fully prepped and ready to go! Don’t forget that my new Mystery Baby Blanket Club is now on sale if you fancy taking on another exciting KAL this Autumn. And I also want to see who your furry friends are, so send in a pic if you have one for the blog. There’s a lot of squares to knit this month so I’m going to sign off and let you crack on. So until the next blog in June, please take care of yourselves, enjoy the squares and I will see you back here in a month (unless I see you before that at Yarn Loft!), bye for now, Debbie, x
]]>
https://debbieabrahams.com/blogs/news/mystery-blanket-club-2023-post-3-april2023-04-01T00:30:09+01:002023-04-01T00:30:09+01:00Mystery Blanket Club 2023: post 3, AprilDebbie AbrahamsWELCOME TO THE APRIL INSTALMENT OF THE 2023 MYSTERY BLANKET CLUB! I’ve just returned from a wonderful knitting evening in the beautiful Cheshire countryside with my lovely friends Jane and Andy Crowfoot, where we spent three delightful days knitting and crocheting with a group of fabulous people, some of which were Mystery Blanket members. So those of you who joined us at Nunsmere Hall Hotel, I hope you enjoyed your time there - we certainly did!
So now it’s back to my desk here in Nottingham to tell you all about the latest Mystery Blanket Club news! In this month’s blog there are more helpful tips plus one new tech vid to assist you with your April squares. Plus there are some member stories, an update on the overseas parcels and news of an Easter promotion (get your shopping baskets at the ready!). So grab yourself a cuppa, sit back, relax and take half an hour to find out what’s going on this month before you pick up your knitting needles and yarn…
After my intro there is one new tech vid this month, but you can also go back to the previous two blogs if you need a reminder of any of the other techniques that have been used in the squares so far.
NEW THIS MONTH: Debbie’s intro!
NEW THIS MONTH: How to pick up stitches along a cast-off edge using several colours
This is a reminder of the techniques that were covered in previous blogs:
Square 8, Pixies & Nixies (both options): how to knit the decorative slip-stitch (February)
How to carry yarns up the side of the work (February)
How to pick up stitches along a cast-off edge (February)
Mattress stitch (horizontal) (February)
How to cable (February)
How to knit a contrast-coloured bobble (February)
Square 16, Forager: how to knit the exaggerated decorative purl stitch (February)
Understanding lace stitches (March)
How to thread beads onto your yarn (March)
How to bead, the slip-stitch method (March)
The intarsia technique (March)
How to add Chain stitch to your knitting (March)
How to add Swiss darning to knitting (March)
AS OF THIS MORNING I AM RELIEVED TO SAY THAT THERE ARE NOW JUST TWO OVERSEAS PARCELS STILL TO BE DELIVERED, with all of the other overseas knitting kits safely received. I am keeping a close eye on these two parcels and following their progress daily, and they are slowly moving through the system. So all being good they will be received very soon and then all 560 members will be knitting. What a joyous moment that will be!
I want to send my heartfelt thanks again to all of my truly lovely overseas members who have been so patient during this very frustrating time. No one has been negative and indeed the mood has been quite the opposite with the camaraderie of the other members helping everyone through it with positive messages and good humour. So thank you to all the members for creating such a lovely knitting community. It has been a lifeline for many people and helped to make a bad situation much more bearable.
Just a quick note on the printed patterns. They were posted to the overseas members on the 18th March and to the UK members on Wednesday 29th March. Printed patterns are posted in a card-backed envelope, and from now onwards will be delivered at the beginning of each month.
WE ARE IN THE PROCESS OF PARCELLING UP THE SECOND PART OF YOUR KNITTING KIT, AND WE WILL BEGIN POSTING THEM TO THE OVERSEAS MEMBERS NEXT WEEK. So it’s not quite time yet to pounce on your postie, but do keep an eye out at the beginning of May. The second parcel will contain all of the remaining yarn and beads that you need for the project. There are two new colours of yarn and two new colours of beads too, plus more of some of the yarns that were in the first parcel. So there’s plenty more excitement to come!
PATTERN ADDENDUM AND INTRO BLOG ALERT! I have just noticed that on the chart for Square 9 Toadstool on page 7 of the April mail out, it says in the key that the Black beads are hooked in and the Velvet beads are knitted in using the slip-stitch method. However this is incorrect, it is the other way round. You thread on 12 Black beads and they are knitted in using the slip-stitch technique. It is the Velvet beads that are hooked in. If you look closely at the image of the square on page 6, you can see that the Black beads sit horizontally across the stitches (pb), and the Velvet beads sit vertically on stitches (hb).
I talked about this is my blog and followed what the chart said, so please ignore this and follow these amended instructions instead. I will also add this to the Addendum list on our website:
I apologise for this error and hope I’ve caught you before you make a start on this square.
THE 2023 MYSTERY CUSHION CLUB HAS BEEN ON SALE FOR A MONTH AND WE ARE DELIGHTED TO HAVE SOLD THREE-QUARTERS OF THE MEMBERSHIPS ALREADY! So I want to say a huge thank you to everyone that has decided to climb onboard and join me in June when all of the fun begins. There is still time to sign up if you haven’t made up your mind yet, so let me see if I can tempt you…
If you’re new to the Mystery Cushion then it’s a smaller project than the blanket, lasting for five months from June to October. The theme is different to the Mystery Blanket but it works in the same way with a knitting kit sent out to members at the beginning of the project and monthly emailed patterns. I write a separate blog for the Mystery Cushion as well which will include knitting technique videos, so you can get all the help and support you need as you knit along.
Above: 2016 Mystery Cushion Club, Geo Jungle.
The theme of the Mystery Cushion is, as always, a ‘mystery’. However, I can tell you a few snippets about the project that won’t give the game away! This year’s design uses one of Rowan’s most popular summer yarns, Summerlite DK, in a colour palette of sweet, sugary colours that are vibrant and cheerful. I have combined together a mixture of pretty fairisle patterns, beading and textured stitches that will take you on a calm and pleasant knitting excursion this summer, giving you the perfect project to pack away and take on holiday or relax with in the garden.
The knitting kit includes ten balls of Rowan yarn, Debbie Abrahams Beads and buttons for fastenings.
For every Mystery Cushion sold we are making a donation to the mental health charity, Mind. Last summer we tragically lost a dear friend of ours and his last wish was for any money raised in his memory to be donated to Mind, so from the profit of each membership we are donating £5 to this charity. Mind gives support and help to those is need and works tirelessly to raise awareness of mental health issues. You can read more about this and about our friend Kyle in our blog: https://debbieabrahams.com/blogs/news/raising-donations-for-mind
If you want to spread your payment then you will have the option to pay in 2-4 instalments using our Splitit payment plan, or you can simply pay in one go. There are no admin fees for splitting your payment so you can choose whatever is easiest for you and your finances.
It will be a lot of fun and I hope you decide to join me!
IF YOU FANCY A BIT OF A BARGAIN THEN WE ARE RUNNING A SPECIAL EASTER PROMOTION FROM 7th-14th APRIL! During this time you can take advantage of a 10% discount off the full price of products in our online shop. You will be sent an email to let you know that the sale has begun, but it would be a good idea to mark it on your calendar too.
The sales includes beads, books and knitting kits, with Mystery Clubs and Gift cards the only exception to the offer. It’s dead easy to get the discount. Simply go to checkout and it will be automatically applied, avoiding the need for a discount code.
So why not grab yourself a super bargain and set yourself up nice and early for your Spring/Summer knitting. It’s the ideal opportunity to get your projects lined up for the next few months!
WE ARE CONTINUING TO COLLECT DONATIONS FOR OUR UKRAINE WINTER WARMERS APPEAL, and have continued to be overwhelmed by the many beautifully handknitted accessories and garments, and bags and boxes of yarn which have been sent to Sue.
Above: you can see in the photos on the pin-board the lorries that are used to transport all the donations to Ukraine.
Sue and I visited the group in Peterborough about a month ago and we took with us all the donations that we had at that point. They filled up two cars to the roof, leaving just enough room for the driver! It was a very humbling experience as we met some young people who had come over from Ukraine within the last few days, leaving behind loved ones who were either fighting or refused to leave their country. One lady was a doll collector and she had to leave her whole collection back in Ukraine. She was very moved when she saw some of the knitted dolls that had been donated as she said that she would probably never see her own collection again. It was a very emotional visit.
At the moment we are continuing to collect donations, but as Sue has another steadily growing mountain of knitted items and yarn in her house that have already been donated, we are going to pause our collections at the end of April. So if you have anything to send in, please post or deliver it if you can before that date to Sue and it will be taken to the group when Sue visits them again.
Sue’s address is: 1 Mount Pleasant, Spaldwick, Cambridgeshire PE28 0TG.
Thank you in advance for anything you can send in. Everything goes directly to those who continue to be in need in Ukraine.
THE TITLE OF THIS YEAR’S MYSTERY BLANKET HAS BEEN GUESSED BY MANY OF YOU ALREADY, but there is still some guessing to be done. Congratulations this month go to another twenty-three members who have got it right: Jill Bignell, Christina Jones, Trisha Harrison, Susan Cumming, Kelley Coll, Andrea Harman, Kate Wood, Gail Schofield, Sarah Hopping, Venita Parry, Kerstin Hobo, Reena Patel, Sandra Couper, Dorothy Rodden, Ruth Atkinson, Linda Urwin, Sharon O’Donoghue, Linda Carey, Theresa Stredder, Marilyn Powell, Margaret Dunn, Leslie Foote and Mary Jensen.
But for those of you who are still guessing, here is another clue. This month the letter I am giving you is... “H”:
_ H _ / _ _ _ H A _ _ _ D / _ _ _ _ _ _
Any ideas?!? If you think you know what it is, send your answer in to Sue at sue@debbieabrahams.com and she will let you know if you are right. Good luck everyone!
THERE ARE FOUR SQUARES TO KNIT THIS MONTH, with alternative options for two of the squares:
Square 9, Toadstool (Option One) – intarsia motif with hooked-in and slip-stitch beads and chain stitch details:
Square 10, Bracken – three-colour stripe slip-stitch pattern (same for both options):
Square 30, Forager 2 – striped pattern with rows of contrast-coloured exaggerated purl stitch (same for both options):
Square 44, Hawthorn (Option One) – fairisle pattern with stripes, textured stitches and hooked-in beads:
Square 44, Hawthorn (Option Two) – textured pattern with stripes and hooked-in beads:
On each pattern page there is a list of Pattern notes and tips that are worth reading before you start to knit each square. These bits of advice will help you and give pre-warnings as to what look out for in the pattern instructions. Also take note of the description under the title of each square as this tells you what the stitch structure is.
You can use the tech vids to help you knit your squares. But here are a few extra tips to assist you:
SQUARE 9, TOADSTOOL (Option One): this is the second intarsia square in the blanket so you will need to make a decision as to whether you want an intarsia challenge or if you would prefer an easier option to knit (Option Two).
Videos to watch for assistance with this square:
How to pick up stitches along a cast-off edge using several colours (March blog)
Mattress stitch (horizontal) (February blog)
How to bead, the hooking-in method (February blog)
How to thread beads onto your yarn (March blog)
How to bead, the slip-stitch method (March blog)
The intarsia technique (March blog)
How to add Chain stitch to your knitting (March blog)
If you fancy a go at intarsia then this is a good square to start with. And it does not matter whether you chose intarsia for Square 43 - you can choose either option for this square. There are six main blocks of colour for which I would recommend a separate ball for each: two Acorn, one Pasture, two Clay and one Mulberry. I prefer to wind my yarns onto bobbins, but I will leave this decision up to you. You can see the type that I use in the image below. The reason why I use bobbins is because they keep the yarns organised, and I like the weight that the bobbins give which helps keep the stitches neat when crossing them over at colour changes. So they are an all-round winner for me!
There is a new tech vid that shows how to pick up stitches using several colours to begin the square. But if you are casting on rather than picking up stitches, you could take a look at the tech vid from the 2021 Mystery Cushion Club which shows how you do this:
There are both hooked-in and slip-stitch beads in this square, so watch out for them on the chart. Please make sure that you read and take note of my Addendum which I mentioned at the beginning of this blog. The Black beads are knitted in using the slip stitch method and the Velvet beads are hooked-in. This is the reverse of what it tells you to do in the key for the chart on page 7, so the key is incorrect as written (see below):
There are some small circles to embroider onto the knitting after you have knitted it using Pasture and Barn Red yarns. You can use the image and chart as guides, or if you prefer you can embroider them randomly and to your own liking - you don’t have to follow what I have done. There is also an outline of chain stitch across the bottom edge of the toadstool, and again you can choose to add this or not, or embroider it in a different colour. It would make it unique and I really don’t mind at all, so go off-piste if you want to with this one!
SQUARE 9, TOADSTOOL (Option Two): so you can go for this option if you don’t fancy tackling intarsia. It’s an all-over repeat textured stitch with hooked-in beads. This means that there is no pre-threading to do, but you’ll need to grab your fine crochet hook or dental floss.
Videos to watch for assistance with this square:
How to pick up stitches along a cast-off edge (February blog)
Mattress stitch (horizontal) (February blog)
How to bead, the hooking-in method (February blog)
There is a variable stitch count in this pattern which varies between 61 and 59 stitches. I have included the count at the end of every row. It’s a good idea to count the number of stitches at the end of every row in which there have been increases or decreases made, just to make sure you haven’t missed any. I found the ‘M3’ towards the end of Rows 7 and 15 particularly difficult to remember, so watch out for these.
I don’t think you’ve come across ‘sk2po’ or ‘M3’ so far in this blanket, so these are two new abbreviations that you will find explained on page 23 of your April mail out. The first one, ‘s2kpo’ is a double decrease, and ‘M3’ is a double increase. They are very easy to do, but it would be a good idea to check them out before you knit them as they might vary slightly in comparison to other patterns you have worked on previously.
There’s just one last thing to say about this square and that is that it uses a smaller needle than the recommended main needle size of 3.50mm. So make sure that you pick up the correct size otherwise your Toadstool square will knit up much bigger!
SQUARE 10, BRACKEN: I really enjoyed designing and knitting up this interesting three-colour stripe pattern and was intrigued by the repeat pattern that emerges as you rotate the colours round. There are no options for this square, so everyone is knitting the same version.
Videos to watch for assistance with this square:
How to pick up stitches along a cast-off edge (February blog)
Mattress stitch (horizontal) (February blog)
How to carry yarns up the side of the work (February blog)
Now, you might need to keep your wits about you with this one, because although it’s easy once you get going, there is a 4-colour pattern repeat which is worked over a 12-row colour rotation, with each of the three colours worked on four rows.
I found that the only way I could keep up with this was to mark off rows 2-13 on the pattern instructions as I completed them and their subsequent repeats (I don’t work from a digital format). And this kept me right on track with it all the way to the end. I must say that it was a thoroughly enjoyable square to knit, so I hope you enjoy it as much as I did!
SQUARE 30, FORAGER 2: you will recognise this square from the first mail out in February when you knitted Forager 1. But there is a change to the colours.
Videos to watch for assistance with this square:
How to pick up stitches along a cast-off edge (February blog)
Mattress stitch (horizontal) (February blog)
Square 16, Forager: how to knit the exaggerated decorative purl stitch (February blog)
How to carry yarns up the side of the work (February blog)
So this is a bit of revision for you as it has exactly the same stitch pattern as Square 16, but the colours have been swapped and changed. If you need a gentle reminder then the tech vid from the February blog will guide you through how to knit the exaggerated purl stitch. And remember that unless I instruct you to cut the yarns off, carry them up the side of the work to cut down on the amount of loose ends (there is a tech vid for this too!).
SQUARE 44, HAWTHORN (Option One): the final square to knit this month has two options, so you will need to decide whether you want to go for a pattern that has some fairisle in it (this one) or a textured stitch. This one is the trickier option.
Videos to watch for assistance with this square:
How to pick up stitches along a cast-off edge (February blog)
Mattress stitch (horizontal) (February blog)
Square 8, Pixies & Nixies (both options): how to knit the decorative slip-stitch (February blog)
How to bead, the hooking-in method (February blog)
How to carry yarns up the side of the work (February blog)
There are a mixture of yarns used in this square and in particular I really love the combination of Soft Yak and Felted Tweed in the fairisle section. If you decide to go for this option then the fairisle sections are pretty short and sweet with 18 rows in total worked using this technique. So this is a great opportunity to give it a go if you have not tried it before. It does not matter which option you choose, so go with whatever you fancy.
You’ve come across the decorative stripe pattern before in Pixies & Nixies and in Elves & Imps, but if you need a reminder of it then the tech vid from the February blog is there to refer back to.
There is a little bit of transferring of stitches back and forth which enables you to pick up and carry on knitting with a yarn that has been left at that side of the work, so a circular needle or double-pointed needles would be beneficial to knit this square.
I think I may have mentioned about the positioning of beads on a chart in a previous blog, but I know that some of you will take a look at the chart on page 15 and wonder why they are not positioned on chart row 5 (in the middle). The reason is because beads drop down by a row or two when they are knitted in - and that goes for both methods of beading. So they have to be knitted in higher up so that they look like they are in the centre. So don’t panic, it’s not an error, it’s just how it works.
SQUARE 44, HAWTHORN (Option Two): if you don’t fancy knitting fairisle then you can opt for this square instead. It combines the decorative loop stitch with textured stripes, and it has some hooked-in beads too.
Videos to watch for assistance with this square:
How to pick up stitches along a cast-off edge (February blog)
Mattress stitch (horizontal) (February blog)
Square 8, Pixies & Nixies (both options): how to knit the decorative slip-stitch (February)
How to knit the decorative loop stitch (February blog)
How to bead, the hooking-in method (February blog)
How to carry yarns up the side of the work (February blog)
This square uses all the techniques that were used in the Option Two versions of squares 8 and 22, but they are in a different arrangement. There are plenty of tech vids to assist you, so make sure that you check them out if you need some assistance. All in all this should be a very pleasant trip down memory lane!
Now it’s time for you to decide…fairisle or decorative stitches?...
AND NOW FOR A COUPLE OF STORIES AND TIPS FROM THE MEMBERS, BEGINNING WITH HAZEL LACKIE FROM BRISTOL IN THE UK. Hazel shares my philosophy that blocking and pressing results in the most perfect squares, and she has a very unique way of doing it which you might find very useful! She has shared with us her tip and some photos of a project she has been working on recently:
Hazel says: “When I block a knitted-on square, I block the measurement to the edge of the ‘visible’ knitting - ie leave out the edges. I use short blocking wires that I thread inside the cast-off row and the side selvedges and through the centre of the join.
Here are a couple of pictures. I have marked the square on my blocking mat. I thread the wires through the centre of the joins and they are pinned to the line directly underneath. The edge wires come inside the selvedge and they are pinned to the line where the wire is (leaving the selvedge outside). This way, I get a proper square. Hope that makes sense. I need very few pins and always get a straight edge.
I will never again knit a blanket in separate squares (I did it with a non-Debbie one once). Besides hating sewing, the extra ends from the sewing up horizontally made the corners very bulky.”
This is a great tip Hazel, and one which has excellent results. Blocking and pressing is so important to finish a knitted fabric as it relaxes the stitches and transforms the physical quality and handle of the knitting. And although I do invest time in it, admittedly it is not my favourite part of the knitting process! So any tips to make it easier and more enjoyable are always very welcome.
JANE BOYD FROM LEIGH IN WORCESTERSHIRE IN THE UK HAS RECENTLY COMPLETED SOME LOVELY ‘DEBBIE’ PROJECTS, and I was thrilled to see her latest achievements. Jane is so good at finishing things - which is something I fail at miserably. So it’s really inspiring to see her latest creations which as usual have been knitted and finished beautifully. She has also been diligently blocking and pressing her blanket squares - great work Jane!
Top to bottom: Chic Case, Lavish Purse, and Square 43 blocking!
AND FINALLY, I CLOSE THIS POST WITH THE THIRD 2023 MYSTERY BLANKET CLUB PRIZE DRAW!!! Each month a member is picked at random to win a Debbie Abrahams prize. So it is worth reading right the way to the end of each blog to see if you are that lucky member!
PRIZE DRAW THREE (APRIL): this month’s winner is member 359, Genevieve Le Visage from Rochefort-en-Terre in France. Well done Genevieve! Please choose a prize from the following selection:
Your choice of one of Debbie’s knitting kits up to the value of £28.00 (take a look at them in our online shop).
A £25 voucher towards a Debbie Abrahams Mystery Club membership: 2023 Mystery Cushion Club or 2024 Mystery Blanket Club.
A Mystery bag of five gifts!
We will notify Genevieve to let her know the good news!
Thank you to everyone for keeping in touch and please do continue to do that. I always love to hear from you, whether it’s to let me know that you have received your long awaited parcel, to share your most recent knitting achievements, or to share a tip or story. I have noticed on the Facebook group how many pictures are appearing of our furry friends assisting (or sometimes not!) with the blanket knitting. So I am asking next month for you to send in your pictures for my ‘Blanket Squares and Furry Friends’ feature so that we can share them together here - wouldn’t that be fun! And if there’s any feathers or scales, they are most welcome too! Until next time then, take extra special care of yourselves and remember to come back to see me here at the beginning of May, when, fingers crossed, you will all be raving about your successfully received second parcels! Happy knitting everyone, Debbie x
]]>
https://debbieabrahams.com/blogs/news/mystery-blanket-club-2023-post-2-march2023-03-10T00:00:00+00:002023-03-10T01:16:40+00:00Mystery Blanket Club 2023: post 2, MarchDebbie AbrahamsHELLO AND WELCOME TO THE MARCH INSTALMENT OF THE 2023 MYSTERY BLANKET CLUB! And as we brace ourselves here in the UK for another short snap of icy cold weather, it’s the perfect time to settle down with the next batch of Mystery Blanket squares. There are four squares to knit this month and two of them have an option, which means you are going to have to make some choices. Will you go for fairisle and intarsia or will you opt for textured decorative stitches? It’s time to stick the kettle on and have a ponder while you catch up with all the latest club news…
After my intro there are six new tech vids this month to help you with the March patterns, but you can also go back to the February blog if you need a reminder of any of the other techniques that were used in the first instalment:
NEW THIS MONTH: Debbie’s intro!
NEW THIS MONTH: Understanding lace stitches
NEW THIS MONTH: How to thread beads onto your yarn
NEW THIS MONTH: How to bead, the slip-stitch method
NEW THIS MONTH: The intarsia technique
NEW THIS MONTH: How to add Chain stitch to your knitting
NEW THIS MONTH: How to add Swiss darning to knitting
This is a reminder of the techniques that were covered in the February blog:
Square 8, Pixies & Nixies (both options): how to knit the decorative slip-stitch
Square 8, Pixies & Nixies (Option One): the Fairisle technique
How to knit the decorative loop stitch
How to bead, the hooking-in method
How to carry yarns up the side of the work
How to pick up stitches along a cast-off edge
Mattress stitch (horizontal)
How to cable
How to knit a contrast-coloured bobble
Square 16, Forager: how to knit the exaggerated decorative purl stitch
I HAVE TALKED ABOUT THE DELAYED DELIVERIES OF SOME OF THE OVERSEAS PARCELS IN MY INTRO, but I just want to clarify a few things so that if you are still waiting for your parcel to arrive, you are clear as to what the current situation is.
In the past week I have had confirmation that many of the parcels which have been stuck in the system following the Royal Mail cyber incident in January have been successfully delivered. And each day I am hearing more and more good news. I am keeping a close eye on each parcel that is still to be delivered and am checking the tracking information every few days to see if there is an update. And I am happy to say that for the majority of them there are reports of progress which show that many of them are now in transit in their destination country. There are a few parcels which are showing no movement since January, however, please be aware that this is probably not the case as I have had several delivered despite this, so these parcels are in transit, we are just not sure exactly where they are - but they are on their way.
I am incredibly proud of the patience and resilience that the overseas members have shown in these challenging circumstances. I truly understand how frustrating and disappointing this is if you are one of the members who is still waiting. However, after speaking daily to advisors at Royal Mail, I have been reassured that they all will arrive, in time, we just have to wait a bit longer. So I am asking for your continued patience and support with this while the parcels make their way to your doorsteps. And as soon as you your parcel arrives, please let me know (if you can remember in all the excitement!). I am waiting each day for this good news from you and hopefully that won’t be long now.
I have been assured that going forward from now deliveries to overseas destinations are much more efficient following the installation of a brand new modernised tracking system at Royal Mail. So you don’t need to worry about your second parcels or any other items you order from us arriving safely. These improvements mean you should receive them in much better time too.
Printed patterns for overseas members were posted on the 24th February (using the new modernised postal system) and the UK were posted on Wednesday 8th March. Printed patterns are posted in a card-backed envelope, and from April onwards will be delivered at the beginning of each month.
BALL-BAND ALERT! It has been reported to me that some balls of Pumpkin yarn have been banded incorrectly with Elfin bands. So please check your yarns very carefully before using them. Elfin is blue, shade number 027. And Pumpkin is orange, shade number 032.
If you find that yours do have incorrect bands on them, just make a note so that you don’t use the wrong colour in error.
IF YOU ARE HAVING ANY TENSION ISSUES WITH YOUR SQUARES, THEN DON’T DESPAIR! There are a lot of different stitch structures in the blanket, and sometimes this means that there is a change of needle size or a different number of stitches to cast on to achieve the correct measurement of 18cm x 18cm. However, as we all knit differently, it isn’t unusual for this to not work out for everyone, and so you might find that while tension using the main needle size is working out fine, some of the other needle size changes are not working out. Therefore, if this happens to you, it is important that you correct it by changing to a needle size that achieves the correct tension, and then make sure that you make this same needle size change again if the square is repeated. It’s a good idea to jot down any changes you make while you are knitting, and the perfect place for this is on your mail out if you’ve got a printed copy, or if you are working digitally, in a notebook. That way you will have a record you can refer back to as and when needed.
IN SOME OF THE PATTERNS YOU ARE ASKED TO TRANSFER THE STITCHES ONTO THE OTHER NEEDLE SO THAT THE WS/RS IS FACING AGAIN. In the March patterns you are instructed to do this in Square 22 for both options. This instruction is given to reduce the number of times you cut and rejoin yarns by enabling you to pick up the colour you need at the beginning or end of a previous row. And I have a handy trick that can speed this up. It uses double-pointed knitting needles which need to be long enough to accommodate all the stitches for the square. You need to use these needles to knit the whole square and then when you reach the instruction to transfer stitches you simply slide them to the other end of your double-pointed needle and voila! - you can continue with the next row. It’s a simple idea but it could save you a lot of time, so why not give it a go!?!
I HAVE BEEN ASKED A QUESTION ABOUT BLOCKING AND PRESSING. And it might be something that you are not sure about too, so I am going to clarify. If you work in strips then I would advise that you block each square as you knit it, rather than pressing the completed strip. Even though this is probably more time consuming, you will find that it is much easier to do it this way. And I think you get a better result too.
THE 2023 MYSTERY CUSHION CLUB IS NOW ON SALE IN OUR ONLINE SHOP and offers you the opportunity to sign up to a brand-new Debbie Abrahams Mystery project! All 2023 Mystery Blanket Club members who join receive a fabulous 10% discount off the cost of their membership. A unique discount code for this was included in the emailed newsletter we sent you on 1st March. However, if you did not receive it (or can’t find it), then no worries - send us a quick message and we will let you know what it is.
Above:Mystery Cushion Club 2016: Geo Jungle
If you are an Early Bird and sign up before March 31stthen you will receive a knitting kit for a small sparkly purse called Precious. The kit includes a ball of Rowan Cotton Glace yarn - choose from four shades, Nightshade, Silver, Precious or Azure - and Debbie Abrahams beads.
It’s a small, easy-to-knit project that is the perfect size to carry credit cards or other small items and will be sure to add a touch of glamour to your evening out! The kit will be included with your Mystery cushion knitting kit.
Above: top to bottom: Silver, Precious, Azure (purse knitted in Nightshade).
For every Mystery Cushion sold we are making a donation to the mental health charity, Mind. Last summer we tragically lost a dear friend of ours and his last wish was for any money raised in his memory to be donated to Mind, so from the profit of each membership we are donating £5 to this charity. Mind gives support and help to those in need and works tirelessly to raise awareness of mental health issues. You can read more about this and about our friend Kyle in our blog: https://debbieabrahams.com/blogs/news/raising-donations-for-mind
Thank you for your support.
If you’re new to the Mystery Cushion then it’s a smaller project than the blanket, lasting for five months from June to October. The theme is different to the Mystery Blanket but it works in the same way with a knitting kit sent out to members at the beginning of the project and monthly emailed patterns. I write a separate blog for the Mystery Cushion as well which will include knitting technique videos, so you can get all the help and support you need as you knit along.
Above: Mystery Cushion Club 2018: Eastern Promise.
The theme of the Mystery Cushion is, as always, a ‘mystery’. However, I can tell you a few snippets about the project that won’t give the game away! This year’s design uses one of Rowan’s most popular summer yarns, Summerlite DK, in a colour palette of sweet, sugary colours that are vibrant and cheerful. Debbie has combined together a mixture of pretty fairisle patterns, beading and textured stitches that will take you on a calm and pleasant knitting excursion this summer, giving you the perfect project to pack away and take on holiday or relax with in the garden.
The knitting kit includes ten balls of Rowan yarn, Debbie Abrahams Beads and buttons for fastening.
Are you tempted?!? You can sign up to the 2023 Mystery Cushion Club now in our online shop. There are packages for UK, Europe and the World - it’s a global project and everyone is invited to join in! But don’t delay as memberships are limited and are selling every day!
If you want to spread your payment then you will have the option to pay in 2-4 instalments using our Splitit payment plan, or you can simply pay in one go. There are no admin fees for splitting your payment so you can choose whatever is easiest for you and your finances.
I hope you decide to join me!
THE TITLE OF THE MYSTERY BLANKET is a fun guessing game and each month a new letter in the puzzle is given to help you discover what it is. Some years it is much more tricky to guess than others, however this year I’ve already received loads of correct guesses, so big congrats go out to…wait for it…63 members (and huge apologies if I have missed anyone): Brynne Baruch, Catherine McDonald, Margaret Hall-Craggs, Felicity Miller, Liz Bishop, Catherine Pope, Emma Dixey, Kathryn McClurg, Nancy Ferrier, Julia Green, Jennie Mathur, Viv Fox, Jane Waters, Lyn Fitzsimons, Angie Divaris, Julie Rennie-Doran, Sarah Robertson, Caroline Evans, Mary Leeson, Jane Routh, Debra Gombert, Karen Johnston, Gillian Bridge, Hazel Lackie, Mabel Farrar, Maggie Crompton, Sheelagh Kendra, Donna Calabrese, Lindsay-Brooke Hessa, Lisa Filatov, Elizabeth Webber, Alexandra Treiber, Jane McKeag, Sue Hayes, Anne Sutton, Paula Barham, Linda Howarth, Carol O’Brady, Tania Ashton-Jones, Emma Stroud, Maggie Fallon, Sandra Hand, Christine Chamillard, Debby Sutcliffe, Steve Booth, Jennifer Williams, Linda Allen, Alison Cossons, Jan Quigley, Marguerite Curran, Vanessa Briscoe, Valerie Briant, Sylvia Borrows, Rosemary Deacon, Christine MacDonald, Kay Underhay, Christine Thomas, Kate Nowak, Rita Dias, Sheila Jones, Gail Coles, Susanne Ihmig and Christina Schoeller. Phew, that’s a very long list!!! And if I did miss anyone, please let me know and I will include you in the list next month.
So for the remaining 497 members who are still guessing, this month the letter I am giving you is... “D”:
_ _ _ / _ _ _ _ A _ _ _ D / _ _ _ _ _ _
Any ideas?!? If you think you know what it is, send your answer in to Sue at sue@debbieabrahams.com and she will let you know if you are right. Good luck everyone!
THERE ARE FOUR SQUARES TO KNIT THIS MONTH, with alternative options for two of the squares:
Square 17, Thicket – lace pattern with hooked-in beads (same for both options):
Square 22, Elves & Imps (Option One) – fairisle pattern with stripes, textured stitches and hooked-in beads:
Square 22, Elves & Imps (Option Two) – textured pattern with stripes and hooked-in beads:
Square 29, Autumn Cable – cable pattern with slip-stitch beads (same for both options):
Square 43, Falling Leaves (Option One) – intarsia leaf motifs with hooked-in beads and Swiss-darned and chain-stitch details:
Square 43, Falling Leaves (Option Two) – textured pattern with mini cables and slip-stitch beads:
On each pattern page there is a list of Pattern notes and tips that are worth reading before you start to knit each square. These bits of advice will help you and give pre-warnings as to what look out for in the pattern instructions. Also take note of the description under the title of each square as this tells you what the stitch structure is.
You can use the tech vids to help you knit your squares. But here are a few extra tips to assist you:
SQUARE 17, THICKET: so are you ready for some lace knitting? This square gives you a gentle introduction to it and combines basic lace stitches with hooked-in beads to create a complex looking pattern.
Videos to watch for assistance with this square:
How to pick up stitches along a cast-off edge (February blog)
Mattress stitch (horizontal) (February blog)
Understanding lace stitches (March blog)
How to bead, the hooking-in method (February blog)
The first thing to note about this pattern is that it has a variable stitch count as mentioned in the first Pattern note and tip on page 6. This means that you will have an increased number of stitches - 49 stitches - at the end of all right side rows, and the same number you cast on - 44 stitches - at the end of all wrong side rows. This will not affect the width of your knitting which will look uniform all the way to the top.
When knitting a lace pattern it's a good idea to regularly count the number of stitches, and I found myself doing this at the end of every wrong side row - just to be sure that I had the correct amount. In lace knitting it is easy to miss a yarn over (an increase), and if you do then you won’t have the correct number of stitches and this will create a problem with the following rows - the work will have to be undone. So a regular check as you go along will reassure you that you are keeping on track and your lace knitting will look just as it should do, beautiful!
If you are unfamiliar with lace patterns then it would be a good idea to check out my lace tech vid this month which demonstrates the abbreviations skpo, yf, K2tog, P2tog and P2togtbl. They are also explained on page 23 of your mail out.
On last thing to watch out for are the colours of the beads. You will be using Velvet and Indigo, which in poor light might look quite similar to each other. So make sure that you are working in good light and that you pick up the correct colour when instructed in the pattern. They are hooked-in so that they sit in diagonal lines of four which alternate between the two colours as you work up the square.
SQUARE 22, ELVES & IMPS (Option One): so this is the first of the two squares that requires you to make a choice. It doesn’t matter which option you go for, so you can knit whichever one you prefer.
Videos to watch for assistance with this square:
Square 8, Pixies & Nixies (both options): how to knit the decorative slip-stitch (February blog)
How to bead, the hooking-in method (February blog)
How to carry yarns up the side of the work (February blog)
This square has similarities to Square 8, Pixes & Nixies, which you knitted last month. There is a fairisle section at the bottom in a green colourway with Gold beads. Then the upper section is a repeat of the stripe in Square 8, but recoloured.
Remember to watch out for the changes in needle size which are necessary to maintain an even width of knitting all the way to the top. These needle changes are hi-lighted in darker font in the pattern instructions so that you don’t miss them.
Gold beads are hooked into the fairisle section (Rows 10-20), so for this technique no pre-threading is required. If you look at the chart and compare it to the image of the square on page 8 the beads look as if they are positioned incorrectly, too high up on the chart. However, I just want to assure you that they are correct. Beads drop down to the row below when they are hooked in and so this is why the chart doesn’t match what you see when you look at the knitting.
When you are asked to transfer stitches onto the other needle you could try out the tip I mentioned earlier on in the blog which uses double-pointed needles. It certainly speeds things up and makes the knitting of this square a lot easier - which is always a plus in my book!
SQUARE 22, ELVES & IMPS (Option Two): this is the easier option and replaces the fairisle section with a decorative loop stitch pattern. It is the same as Square 8, Pixies & Nixies, but knitted in a green colourway with Gold beads.
Videos to watch for assistance with this square:
Square 8, Pixies & Nixies (both options): how to knit the decorative slip-stitch (February blog)
How to knit the decorative loop stitch (February blog)
How to bead, the hooking-in method (February blog)
How to carry yarns up the side of the work (February blog)
Remember to watch out for the changes in needle size which are needed to keep the tension nice and neat throughout the whole square.
If you knitted Option One for Square 8, but choose Option Two for this square, you might need to give the tech vid for how to knit the decorative loop stitch a watch. This vid from last month’s blog shows you how to knit this stitch which is worked across 12 rows (8-19).
SQUARE 29, AUTUMN CABLE: this neat, brightly coloured cable gives you the opportunity to try out the slip-stitch beading technique. And if you need help with this then there’s a tech vid to help you.
Videos to watch for assistance with this square:
How to cable (February blog)
How to thread beads onto your yarn (March blog)
How to bead, the slip-stitch method (March blog)
The tech vid for cables does not show you c7f, but it does show you how a cable is knitted. So you just need to apply the same technique to this (that is, crossing over two sets of stitches), replacing the number of stitches with seven stitches held to the front. This will make the cable twist to the left, as you can see in the image on page 14. You will need to reference c7f in the Abbreviations on page 23 which tells you exactly how to knit this cable pattern.
There are both worded instructions and a chart for this square, so choose whichever one you prefer to work from. You begin by working a RS and a WS row which are on page 14. Then on page 15 you opt to continue with either the worded instructions or the chart. Row 1 of the worded corresponds to Row 1 of the chart, and so on, so you can cross reference the two if you prefer. I decided to leave the background colour (Pumpkin) off the chart and drew it with a plain white background which makes the symbols clearer to see.
You will notice that some of the stitches are worked through the back of the loop (K1tbl and P1tbl). This twists the stitches and tightens them up, making them look much neater.
SQUARE 43, FALLING LEAVES (Option One): the final square to knit this month has two options, so you will need to decide whether you want to go for an intarsia pattern (this one) or a textured pattern. Option one is always regarded as the trickier option because it has colour work in it.
Videos to watch for assistance with this square:
The intarsia technique (March blog)
How to add Chain stitch to your knitting (March blog)
How to add Swiss darning to knitting (March blog)
How to bead, the hooking-in method (February blog)
Intarsia patterns are created by introducing separate balls or bobbins into the work to knit each area of colour. So unlike fairisle, there is no stranding or weaving (or very minimal), instead yarns are crossed over each other to stop gaps at the colour changes. It involves fewer techniques than fairisle knitting, so intarsia can appear to be easier to do, but it can be a struggle to get it neat. So practice is needed and this square gives you the perfect opportunity to give it a go. And if you need some guidance, then check out my tech vid in this blog which demos Chart rows 1-4. It will help you with joining in new colours, moving yarns across at the back of the work and crossing them at colour changes.
Like Square 29, I decided to leave the background colour (Maple) off the chart and drew it with a plain white background which makes the symbols and other colours easier to see.
After the knitting has been completed, there is embroidery to add to the leaf motifs. You can see this on the chart on the Chestnut and Barn Red leaves. You may prefer to knit these details in as you go, but I prefer to embroider them on afterwards. The choice is entirely up to you. However, if you choose to go for the embroidery I would suggest that you block and press your square first before you do this as you need the knitting to be beautifully flat to achieve the best results.
SQUARE 43, FALLING LEAVES (Option Two): if you don’t fancy intarsia then you can opt for this square instead. It combines mini beaded cables with a textured pattern in a single colour of yarn.
Videos to watch for assistance with this square:
How to cable (February blog)
Understanding lace stitches (March blog)
How to thread beads onto your yarn (March blog)
How to bead, the slip-stitch method (March blog)
The pattern has a variable stitch count which increases and then gradually decreases back to the original number cast on over a 14-row pattern repeat. The first Pattern note and tip on page 18 advises you to check the number of stitches after certain rows, and I strongly advise that you do this to make sure you are keeping on track. It is very easy in a pattern like this to miss an increase or a decrease and then you won’t have the right number of stitches for the next row. So you need to be vigilant!
If you need guidance with any of the abbreviations then you can look them up on page 23 of your mail out. You will come across yf, skpo, s2kpo, K2tog, P1tbl and K1tbl, all of which are explained on this page, along with c3b. I just want to hi-light yf which is the same as yo (yarn over) and is an increase of one stitch. To do this you simply keep the yarn held at the front of the work as you knit the next stitch, and the yarn goes over the needle and creates a stitch. This is an increase that a lot of knitters get wrong, so I am focusing on this to ensure you get it right.
There is no chart for this square so you are working from worded instructions. Each row has a lot of information so it might be worth striking off the rows as you complete them to keep track of where to are. There’s nothing worse than getting lost in a pattern and needing to be rescued!
A FEW OF THE MEMBERS HAVE BEEN IN TOUCH WITH STORIES AND TIPS. And I begin with a very helpful tip from Linda Carey from York in the UK. Linda has a great idea for keeping her blanket squares organised and thought you might find it useful.
Linda says: “In readiness for this year's Mystery Blanket, I thought your readers would be interested in my method for keeping all those knitted squares/strips in order.
First of all I have a dedicated box to keep my completed (and pressed) squares in.
I allocate seven individual freezer bags for each strip of squares and label them accordingly, ie 1-7, 8-14, 15-21, 22-28, 29-35, 36-42 and 43-49.
As I complete and press each completed square, it goes into the appropriate freezer bag ready for the next square.
Here's a photo of last year's blanket squares (in strips) in their labelled bags before joining the whole blanket together.
I hope some of your readers find this idea helpful in organising their knitted squares/strips.”
Tips like this are invaluable and go a long way to making the experience of knitting and assembling a blanket easier and so much more enjoyable. I think that this is a super way to keep everything in order, and it certainly ticks all my boxes as I love to be organised. Thanks Linda for a really helpful tip!
LIZ BISHOP FROM HERNE BAY IN KENT, UK, HAS BEEN KEEPING VERY BUSY KNITTING UP SEVERAL BLANKETS! Look at these two matching ones she has recently made for twins. I love the way that Liz has used blanket squares from various Debbie projects to create her own unique designs!
Liz says: “I am enjoying knitting the new Mystery Blanket but have only just started as my son asked if could knit something for his line manager who is expecting twins. I thought you might like to see how I combined many squares from your two blanket books combined with the idea and squares from the 2017 Mystery Blanket that had alternate white squares.”
The 2017 Mystery Blanket was titled a ‘A French Romance’, and the squares were knitted in pretty soft colours and brilliant white. So this was a great choice to use for baby blankets. I recognise some of the other squares in Liz’s blankets from designs in my blankets books including Afternoon Tea, Retro and Floor Coverings. What a superb choice which all work so well together. I am sure that your son’s line manager will be extremely pleased with these beautiful blankets!
HAVE YOU HEARD OF THE TORTOISE KNITTING CLUB? Viv Fox from Northampton in the UK, is the founder of this brilliant group which she set up on the Debbie Abrahams page on Ravelry. It’s for members who are catching up with past Mystery Blankets and need a bit of encouragement!
Viv says: “In keeping with being a founder member of The Tortoise Knitting Club on the Debbie page on Ravelry, I have finally finished your lovely Retrospective design. The delay in the start of 2023 blanket gave me time to deep dive into my UFO's and I extricated this project. I had the centre strip plus all the assembling to do. I knitted two extra pink lace bobble squares, which I like and changed the centre square, although I hadn't intended the Easter egg which seems to have appeared. I thought about omitting the flags on the border but their triangular shape so echoes the shapes in your lovely design, almost as if you had planned it (as of course you did!). Buttons and writing may be added later.
I really like how this blanket is in the true spirit of patchwork, ie lots of different designs melded into one. So thank you for the beautiful and many coloured design.”
It’s so lovely to see this blanket finished, and it must be a huge relief for you Viv to be able to tick this one off your list! I remember with great fondness designing this blanket. It was for the ten year anniversary of the Mystery Blanket Club and it combined together squares from all the previous nine blankets. It was a real challenge to get them all to work together, but it was an interesting project to work on, and has become one of my favourites in the collection. Thanks for sharing Viv! You might find a few more tortoises joining your club after reading this!
AND FINALLY, I CLOSE THIS POST WITH THE SECOND 2023 MYSTERY BLANKET CLUB PRIZE DRAW!!! Each month a member is picked at random to win a Debbie Abrahams prize. So it is worth reading right the way to the end of each blog to see if you are that lucky member!
PRIZE DRAW TWO (MARCH): this month’s winner is member 78, Katharine Henson from Reading in the UK. Well done Katharine! Please choose a prize from the following selection:
Your choice of one of Debbie’s knitting kits up to the value of £28.00 (take a look at them in our online shop).
A £25 voucher towards a Debbie Abrahams Mystery Club membership: 2023 Mystery Cushion Club or 2024 Mystery Blanket Club.
A Mystery bag of five gifts!
We will notify Katharine to let her know the good news!
As the snow continues to pour down this afternoon, there’s no better time to keep cosy indoors with some knitting. For those of you who have your kits, I hope you feel fully prepped and ready to make a start on the March squares. And for those of you who are still patiently waiting, I hope it won’t be too long before you can get going. Please do keep in touch, whether it’s to tell me the good news that your parcel has arrived, or to share a story or a helpful tip - it’s always lovely to keep in touch with you all. So until next month - which I can’t believe will be April! - I wish you a pleasant few weeks of knitting and crafting and I look forward to seeing you back here on the 1st. Take care everyone, Debbie x
]]>
https://debbieabrahams.com/blogs/news/raising-donations-for-mind2023-03-01T14:43:56+00:002023-03-01T16:09:01+00:00Raising donations for MindDebbie Abrahams
In June 2022 my dear friend and best friend to Steve, Kyle Ringland, took his own life after suffering from severe depression. On the outside Kyle was a fun-loving, happy guy who was the life and soul of the party, always with a story to tell and a joke up his sleeve. However, on the inside things couldn’t have been more different.
Kyle’s last wish was that any money raised in his memory be donated to the charity Mind. Mind gives help and support to people with mental health issues which have risen steeply in the UK over the past few years, and consequently they are in desperate need of funds to enable them to continue all their valuable work. One in four people suffer with mental health problems, however, like Kyle, most of them don’t get the help they need. Mind fight for people who have mental health issues to raise awareness and build the support network they need in everyday life.
So we are supporting this charity and fulfilling Kyle’s wish by donating £5 of every Mystery Cushion membership to Mind.
With your contribution we can help make a difference and give people who suffer with mental health issues the opportunity to get the lifesaving help and advice that Kyle never got. Thank you for your support.
]]>
https://debbieabrahams.com/blogs/news/mystery-blanket-club-2023-post-1-february2023-02-17T00:30:01+00:002023-02-23T15:18:27+00:00Mystery Blanket Club 2023: post 1, FebruaryDebbie AbrahamsWELCOME TO THE 2023 MYSTERY BLANKET CLUB! We are about to embark on the 16th Mystery Blanket adventure since the Club began in 2008, and I am just as excited about it as I was way back then! I love a new project and can’t wait for you to make a start on the first set of squares. But before you grab your knitting needles, I would recommend that you have a good read, and listen, to my blog which has lots of very important information in it about the Club. The tips and advice will help you to set off on this journey on the right foot, making your Mystery Blanket KAL an enthralling experience, super charged with challenges and surprises to keep you motivated right through to the final square!
I will write a blog at the beginning of each new instalment, so this is the place to come to every month before you start knitting your squares. Good preparation is the key to successful knitting, and each blog will be filled with tips and tricks so that you can get the best out of your Mystery Blanket adventure.
In addition to the written blog there will be knitting technique demonstrations included in the blogs which will help you learn new skills or master your existing ones. You will find all the tech vids for this month below, beginning with my intro. This month there are ten tech vids:
Debbie’s intro!
Square 8, Pixies & Nixies (both options): how to knit the decorative slip-stitch
Square 8, Pixies & Nixies (Option One): the Fairisle technique
How to knit the decorative loop stitch
How to bead, the hooking-in method
How to carry yarns up the side of the work
How to pick up stitches along a cast-off edge
Mattress stitch (horizontal)
How to cable
How to knit a contrast-coloured bobble
Square 16, Forager: how to knit the exaggerated decorative purl stitch
Mystery Blanket Club 2023 Debbie's Intro:
Square 8, Pixies & Nixies (both options): how to knit the decorative slip-stitch:
Square 8, Pixies & Nixies (Option One): the Fairisle technique:
How to knit the decorative loop stitch:
How to bead, the hooking-in method:
How to carry yarns up the side of the work:
How to pick up stitches along a cast-off edge:
Mattress stitch (horizontal):
How to cable:
How to knit a contrast-coloured bobble:
Square 16, Forager: how to knit the exaggerated decorative purl stitch:
THE MYSTERY BLANKET CLUB HAS ALWAYS BEEN A GLOBAL KAL, AND THIS YEAR IS NO EXCEPTION! I am delighted that we have members signed up from all over the world including USA, New Zealand, Australia, Malaysia, Canada, Israel, Switzerland, Belgium, Denmark, Iceland, Finland, Norway, Sweden, France, Spain, Germany, Poland, Italy, the Netherlands, Ireland, the Channel Islands and the UK. Wow! – isn’t that amazing!?!
ALL OF THE PARCELS HAVE NOW BEEN POSTED AND MANY OF THEM HAVE ARRIVED SAFELY. However, we are aware that some are still in transit. The impact of the cyber incident at Royal Mail which happened over five weeks ago is still causing delays to overseas parcels. Having said that, all of the parcels have been posted and we have been assured by Royal Mail that they will arrive. So if you are still waiting for yours, we ask that you remain patient, it will be with you soon. We totally understand your frustration but are keeping a close eye on the situation and will forward any updates to you as soon as we get them. Please note that the tracking numbers for the first batch of parcels that were posted just before the incident are not working and if checked will say that there is no movement. However, please do not panic as we know that this is not the case and that these parcels are moving through the system. We are just not sure where they are, but they are on their way.
When you receive your parcel we ask that you check the contents of it against the list on page 2 of your February mail out. And if anything is missing, please let us know immediately and we will post it to you.
FOLLOWING THE CYBER INCIDENT I DECIDED TO DELAY THE START OF THE CLUB TO THE 17TH FEBRUARY to enable as many of us as possible to start knitting on the same day. The second instalment will be sent in three weeks’ time on the 10th March. And then after that the launch day will shift to the regular date of the 1st of the month, giving four weeks between the remaining instalments.
You should find an email from us in your inbox with a link to the first set of patterns for the blanket. If you cannot find this email then please check your Spam folder. Often our emails end up in there and are not seen. However, if you are still unable to find it please contact Sue and she will check that we have your correct email details in our database.
MEMBERS THAT PAID FOR PRINTED PATTERNS will receive them each month in a separate card-backed envelope. If you did not sign up for printed patterns but have changed your mind, you can contact Sue and she will be able to set this up for you for an additional cost. All members, including the printed pattern members, will be emailed the remaining nine mail outs each month from March - November.
EACH MONTH, IN ADDITION TO YOUR EMAILED PATTERNS, YOU WILL BE ABLE TO DOWNLOAD THE FILE FROM YOUR ACCOUNT ON OUR WEBSITE. This is a quick guide to how you can do this:
Under "MYSTERY CLUB DOWNLOADS" click "View all downloads"
Your latest available mail-outs will be visible here in PDF format to download
PLEASE NOTE THAT THE COLOURS IN THE MAIL-OUTS MIGHT NOT BE COMPLETELY ACCURATE TO THE COLOUR OF THE ACTUAL YARNS – both in the printed paperwork and in the digital files. We have done our best to make sure that the colours are as accurate as possible, however some discrepancies might occur. Therefore, it is always best to read the name and shade number of the colours rather than going by the photographs of the knitting.
THE PIECING DIAGRAMS ON PAGE 4 OF YOUR MARCH MAIL OUT SHOW WHERE THE SQUARES ARE POSITIONED IN THE BLANKET. There are two diagrams – one for Option One and one for Option Two. Each month the new squares will be added to them so that you can see how the overall design is progressing. This year we have added in square numbers to the images which will hopefully make it easier to keep track of which ones you have completed.
ON THE PENULTIMATE PAGE OF EACH MAIL OUT YOU WILL FIND THE ABBREVIATIONS. This will be updated each month with any new additions to the list, so make sure that you always check out the latest instalment for any recent updates.
IT IS ADVISABLE, ALTHOUGH NOT NECESSARY, TO WORK IN VERTICAL STRIPS. Not only does this make it easier to keep track of which squares are which - there will be some repeats. But it also means less finishing off at the end of the project as you will only have seven strips to sew together instead of forty-nine individually knitted squares. Over the ten months you will be sent the squares in such a way that they can be knitted in strips, so this is what I would advise you do. Instructions are included in the patterns for this, it’s done by picking up stitches along the cast-off edge of a square to begin the next one in the strip. And if you’re not sure how to do this, there’s a tech vid this month to help you. So if you don’t like picking up stitches or find it a struggle, hopefully my vid will help you to master the technique, and you never know - you might actually enjoy it once you see how easy it is to do! There is more advice about this on page 3 of your February mail out. You’ll find it on the right hand side of the page under the heading Working in vertical strips.
SOME OF THE SQUARES IN THE BLANKET HAVE A SECOND OPTION. This means that when there is a square that involves a more advanced technique such as fairisle or intarsia, you can opt to knit an alternative square, Option Two, which replaces it with something that is easier to knit. This will be either a textured, beaded or striped pattern. It is clearly stated in the pattern instructions when there is an option – there is a note in the left-hand column of the first pattern page for each square - and you can also see it on the Piecing Diagrams.
Throughout the project you can stick completely to either Option One (pink-headed pages) or Option Two (blue-headed pages), or, if preferred, you can choose to mix your options. Patterns that do not have an option are purple-headed. Mixing options is perfectly okay to do, so you could pick and choose and go for Option One for some of the squares and Option Two for others. This gives the project increased flexibility and means that although you are all working on the same design you can, if you choose, make your blanket unique! Occasionally it is important to repeat the choice of an option to keep the overall design balanced. But when this happens there will be a note in the left column on the first page of each pattern advising you about this choice.
BLOCKING AND PRESSING THE SQUARES IS VERY IMPORTANT, and although it’s not everyone’s favourite task, it really should be done if you want to create a professional looking blanket. Blocking the squares ensures that they are all a uniform size, which in turn will make joining them together so much easier to do. You might find that you have to ease some of them in or stretch some of them out to get them to the same measurements as other squares, and within reason this is fine - I know I had to do this with some of mine. Alternatively, other squares may block out quite easily with no easing in or out required. If your individual squares are measuring slightly bigger or smaller than 18xm x 18cm, then this should not be a problem either. But you will need to decide on what size you are going to block them all to and stick to this throughout the whole blanket.
Blocking is the pinning out of your knitting, and, unless instructed otherwise, you should always pin it out with the wrong side facing upwards. Pin frequently along each edge, keeping all four edges as flat and even as possible. There is no need to use heat to press your squares. Much more preferable – and safer too – is cold water. So, if you have one available, fill up a plant spray bottle and use this to generously wet down the knitting, making sure that the water is dispersed right across the knitting from edge to edge. And then leave it to dry completely before removing the pins.
Pressing is the process of applying either heat or water to your knitting which relaxes the stitches and softens the fibres, resulting in a much more fluid and pleasant feeling fabric. After pressing you will find that your knitting drastically changes in quality and will feel beautiful and soft.
Blocking and pressing also helps the edges of the knitting stay flat rather than curling over, as is the tendency with most stitch structures.
I would suggest that you block and press your squares after you have knitted each one. I think it’s far easier to do this as you go along rather than leaving them all to the end. It also ensures that as you work through the squares they are all knitting up to the correct measurements.
So I hope you agree with me - it’s really important to do and should become part of your finishing routine for everything you knit. You and your knitting will be so much happier 😊
NOBODY LIKES AN ERROR IN A KNITTING PATTERN, AND I KNOW JUST HOW FRUSTRATING THEY ARE FOR EVERYONE. However, despite the test knits and numerous checks which are carried out before we sign off each set of patterns, unfortunately they do still occur. When an error is reported it is checked and once it is confirmed it is listed in the ‘Addendum’ section on the website. It can be accessed through a link at the bottom of the Homepage. I would advise that you check this before you start knitting each square just in case anything has been found. It could save you a lot of time.
IT IS VERY IMPORTANT THAT WE HAVE YOUR CORRECT CONTACT DETAILS ON FILE, SO PLEASE NOTIFY US IMMEDIATELY IF ANY OF THESE DETAILS ARE INCORRECT. This goes for both your email and postal addresses. Any discrepancies in your postal address can affect the speed at which your parcels are delivered to you, or at worst they might not arrive at all. And an incorrect email address will mean that you will not receive our emailed patterns or club updates. So please let Sue know as soon as possible if we need to revise any of these details for you.
IF YOU HAVE ANY QUERIES OR CONCERNS WHILST WORKING ON YOUR MYSTERY BLANKET, please contact Sue at sue@debbieabrahams.com and she will assist you. Sue may pass your email onto me if it is a knitting query, or onto Jason if you need technical support. Throughout the project we will do our very best to assist you in every way we can to ensure that your knitting experience is as smooth and enjoyable as possible. So do get in touch if you have a query, we are always here to help!
I MENTIONED EARLIER ABOUT HOW IMPORTANT GOOD PREPARATION IS BEFORE YOU START KNITTING, so here are a few things I would suggest you do before you make a start on your blanket.
First of all, have a good read of the February mail out and familiarise yourself with the contents. The patterns are laid out in exactly the same way each month, so once you get familiar with them and how the patterns are written, they should be easy to follow.
On page 3 of your February mail out there is lots of general information about the project including information about tension/gauge. It is very important that you test your tension before you start knitting.
The tension for this project is 24 stitches and 34 rows to 10cm (4in) measured over stocking stitch using 3.50mm needles and using Debbie Abrahams Light Wool yarn.
I would suggest that you use Leaf for your tension sample as you will have plenty of this in your kit.
Any discrepancies in your tension could lead to shortages of yarn, especially if you knit looser that the given tension. So please take time to do this. Here are some tips about measuring tension:
the tension sample should be longer and wider than the stated tension, so it is advisable to cast on a minimum of 30 stitches and work a minimum of 40 rows
use a solid ruler rather than a tape measure to measure your stitches and rows
start and finish counting the stitches and rows in from the edges of the knitting and not from edge to edge
if your tension is too loose you will need to resample using a smaller metric size needle
if you tension is too tight you will need to resample using a larger metric size needle
if you need to change your needle size then you will need to change all of the other needles used in the project as well by the same number of sizes
stitch tension is more important then row tension, so if you are unable to match both to the recommended tension, choose the needle size that gives you the closest match.
One more thing I would suggest you do before you start knitting is to set up your Colour coder. You will find this in your kit, it’s a piece of card onto which you can tie samples of each of the yarns in your kit and write their colour names and shade numbers. This is such a handy tool to have while you are knitting and means you can easily check yarns against the pattern instructions, especially as some of them are very similar in colour. Watch out for Chestnut (031) and Barn Red (196), and Maple (030) and Mulberry (207), which could easily be mistaken for each another.
It's also a good idea to keep each colour of yarn in a separate bag with either its ball-band or a note of which colour and shade number it is. Then you can be sure to pick up the correct colour and not risk knitting with the wrong one. If you use the wrong colour then you could run short of yarn.
THE TITLE OF THE MYSTERY BLANKET remains a ‘mystery’ until you guess it. But with each instalment comes more clues as you work your way through the squares. If you think you might know what it is, then send in your guess and we will let you know if you are right. However, if you are still guessing in November, it will be revealed in the final instalment.
As well as clues in the monthly squares, I will also give you extra help with your guesses by giving you a clue in each blog. Here is the first clue for the title of this year’s Mystery Blanket. This month the letter I am giving you is “A”:
_ _ _ / _ _ _ _ A _ _ _ _ / _ _ _ _ _ _
Please send in your guesses to Sue. There are no prizes for the correct answer – it is simply a a bit of fun each month. And if you do guess it right, with your permission we will include your name in the next blog.
THERE ARE THREE SQUARES TO KNIT THIS MONTH:
Square 8, Pixies & Nixies (Option One) – fairisle pattern with stripes, textured stitches and hooked-in beads:
Square 8, Pixies & Nixies (Option Two) – textured pattern with stripes and hooked-in beads:
Square 15, Chestnuts – cable pattern with contrast-coloured bobbles (same for both options):
Square 16, Forager – striped pattern with rows of contrast-coloured exaggerated purl stitch (same for both options):
On each pattern page there is a list of Pattern notes and tips that are worth reading before you start to knit each square. These bits of advice will help you and give pre-warnings as to what look out for in the pattern instructions. Also take note of the description under the title of each square as this tells you what the stitch structure is.
You can use the video demos to help you knit your squares. But here are a few extra tips to assist you:
SQUARE 8, PIXIES & NIXIES (Option One): so we begin with you having to make a choice between Option One and Option Two. Option One is the trickier option because it includes colour work, in this case, fairisle. If you have not tried this technique before then it’s a great introduction to it - you’ve only got an 18cm x 18cm square to knit.
Videos to watch for assistance with this square:
Square 8, Pixies & Nixies (both options): how to knit the decorative slip-stitch
Square 8, Pixies & Nixies (Option One): the Fairisle technique
How to bead, the hooking-in method
How to carry yarns up the side of the work
There are some changes in needle size to watch out for in this square. These are necessary to maintain an even width of knitting all the way to the top as there are different stitch patterns and structures in it which affect tension. These needle changes are hi-lighted in darker font in the pattern instructions so that you don’t miss them.
Indigo beads are hooked into the fairisle section (Rows 10-21), but because they are dark blue circles on a grey background, they might be a bit tricky to see. So just to be clear, they are hooked in on Chart rows 6 and 9 on stitches 5, 22, 39, and on stitches 14, 31 and 48 respectively. This technique requires no pre-threading so you simply hook them in when indicated on the chart. If you've never hooked in beads before there's a tech vid to help you with this technique.
I have advised in the second Pattern note and tip on page 5 of the Mail Out to carry some of the yarns up the side of the work, and if you do this it will help to reduce the amount of loose ends. No one likes sewing in ends (do they?), so the fewer you have, the easier it is to complete the square. In the fourth Pattern note and tip I suggest that you weave in some of the loose ends as you knit. You can do this using the fairisle weaving-in technique which is demonstrated in The Fairisle technique vid this month. It’s worth doing and could save you a lot of time.
One last thing to mention about this square is the transferring of stitches onto the other needle, which you are instructed to do several times. This is necessary to get you to the correct end of the work for the start of the next row. It saves cutting and rejoining yarns, which in turn saves loose ends and your time. So just in case you're wondering, this is why it’s there in the instructions. You will come across it in other squares too.
SQUARE 8, PIXIES & NIXIES (Option Two): this is the easier option and replaces the fairisle section with a decorative loop stitch pattern. It looks very similar to Option One because the rest of the square is the same with stripes and textured contrast-coloured stitches.
Videos to watch for assistance with this square:
Square 8, Pixies & Nixies (both options): how to knit the decorative slip-stitch
How to knit the decorative loop stitch
How to bead, the hooking-in method
How to carry yarns up the side of the work
As with Option One there some changes in needle size, so make sure that you pick up the right needles when instructed to keep the tension nice and neat throughout the whole square.
The decorative loop stitch is worked on Rows 8-30 and is one that you may recognise from other Debbie projects. A similar stitch was knitted in the 2022 Mystery Blanket, Deco Dreams, and it also features in the Summer and Autumn Bag kits. I love this stitch and find it very satisfying to do. It might look quite complicated at first but it is easy once you get going. And if you get stuck there is a tech vid to help you, so make sure you check it out if you need some guidance.
I have advised in the Pattern notes and tips on page 8 to weave in some of the loose ends as you knit this square, however, this will involve the fairisle technique. So if you are not sure how to do this, either watch The Fairisle technique vid for assistance or simply sew them in later on.
SQUARE 15, CHESTNUTS: this cable pattern has contrast-coloured bobbles which are knitted in as you go. However, if you prefer you can opt instead to knit them using Chestnut yarn (self-coloured) instead of Barn Red and Maple. You don’t need to make that decision straight away though, the first bobble is on Row 6 so you’ve got a little bit of time to make your mind up. See how you feel!
Videos to watch for assistance with this square:
How to cable
How to knit a contrast-coloured bobble
The tech vid for cables shows how to knit a variety of different cables including the ones in this square - c4f and cfb. It explains how cables are created and will be helpful for any of the cable patterns in this blanket. If you have not knitted a cable pattern before then this is a really good opportunity to give it a go. They are such good fun to knit and the possibilities are endless. This one is relatively easy too, so it’s a great one to start with.
You are given both worded instructions and a chart for this square, so you can choose whichever one you prefer to work from. Row 1 of the worded pattern corresponds to Row 1 of the chart, and so on, so you can cross reference the two if you prefer. I decided to leave the background colour (Chestnut) as plain white as this makes the symbols clearer to see. There is a key under the chart which tells you what they mean, and there are a few there to get familiar with, so I would advise that you give this a thorough read before you start knitting.
The colours for the bobbles are in colour on the chart, but they might be difficult to see so I have also included initials for them under each bobble, BR is Barn red and M is Maple. If you decide to go for the contrast-coloured bobbles then I would advise that you watch the tech vid for this technique first as it shows you how to introduce the colour on the row before (for example, on Row 6), and then how they are knitted on the next row (for example, on Row 7). Just be wary of the Barn Red yarn as Felted Tweed can be quite fragile, and under duress could break. So when you tighten the bobbles, bear this in mind and pull gently but firmly on this yarn.
You will notice that some of the stitches are worked through the back of the loop (K1tbl and P1tbl). This twists the stitches and makes them tighter. It will crisp up the edges of the cables and make them look much neater, so make sure that you remember to do this when instructed.
SQUARE 16, FORAGER: the final square to knit this month has no options and is a really fun stripe pattern with a textured stitch. Despite the change of techniques there are no needle size changes to worry about so the whole square is knitted using the suggested main needle size of 3.50mm.
Videos to watch for assistance with this square:
How to pick up stitches along a cast-off edge
Square 16, Forager: how to knit the exaggerated decorative purl stitch
To begin this square you will need to either cast it on separately or pick up stitches along the cast-off edge of Square 15. Instructions for both are on page 15 of the Mail Out. I would recommend that you pick up the stitches as it will cut down on the finishing at the end of the project and save you vast amounts of time, but I will leave that decision with you…
The tech vid will guide you how to knit the decorative stitch which is first knitted on Rows 4-5. It’s a two-row instruction which involves slipping alternate stitches and increasing purlwise into the stitches in between on one row, and then slipping the same stitches and purling together the increased stitches on the next row. It results in a really attractive stitch which is easy to knit. However, just watch your tension on these rows and make sure that the stitches are spread to the correct width on the needle so that the knitting doesn’t bunch up.
IF YOU ENJOY SOCIAL MEDIA THEN YOU MIGHT WANT TO JOIN THE VERY FRIENDLY AND HELPFUL GROUPS FOR THE MYSTERY BLANKET ON RAVELRY AND FACEBOOK. Here you will find a bunch of very welcoming and informative members who will be only too pleased to talk to you about your project. It is a great way to get help and answers if you get stuck and need some quick advice.
If you are not already a Ravelry member, then it is very easy (and free!) to join. Just follow the instructions on their website: http://www.ravelry.com
The Debbie Abrahams Mystery Knitters group on Facebook is another fun way to keep in touch with other members. It was set up a couple of years ago and has grown in size to over 500 members, so that’s well worth joining too.
I also have an Instagram and a Facebook page which include updates on all things Debbie Abrahams, so if you want to keep ahead with all the latest news, please follow us on all our social media platfoms. It’s a great way to keep up with what is happening!
Instagram: debbieabrahams_knitting
Facebook: facebook.com/debbieabrahamshandknits/
ON WEDNESDAY 1st MARCH WE ARE LAUNCHING OUR 2023 MYSTERY CUSHION CLUB, offering you the opportunity to sign up to a brand-new Debbie Abrahams Mystery project! And the good news is that all 2023 Mystery Blanket Club members who join will receive a fabulous 10% discount off the cost of their membership. A unique discount code for this will be included in the emailed newsletter we will send you as soon as memberships are available to purchase. So keep an eye on your inbox!
Above: Mystery Cushion 2017, Metropolis
The Mystery Cushion is a much smaller project than the blanket, lasting for five months from June to October. The theme is different to the Mystery Blanket but it works in the same way with a knitting kit sent out to members at the beginning of the project and monthly emailed patterns. I write a separate blog for the Mystery Cushion which will include knitting technique videos, so like the Mystery Blanket, you can get all the help and support you need as you knit along.
The yarn used for the project will be beautiful summery shades of Rowan Summerlite DK and will be combined with sparkling beads. More details about the project will be released when the product is launched in the shop on the 1st March.
Following the sudden and tragic passing of a close friend of ours, we are donating £5.00 of every Mystery Cushion membership to the mental health charity, Mind. We thank you in advance for your support.
AND FINALLY, I CLOSE THIS POST WITH THE FIRST 2023 MYSTERY BLANKET CLUB PRIZE DRAW!!! Each month a member is picked at random to win a Debbie Abrahams prize. So it is worth reading right the way to the end of each blog to see if you are that lucky member!
PRIZE DRAW ONE (FEBRUARY): this month’s winner is member 175, Carol Clark from Truro in the UK. Well done Carol! Please choose a prize from the following selection:
Your choice of one of Debbie’s knitting kits up to the value of £28.00 (take a look at them in our online shop).
A £25 voucher towards a Debbie Abrahams Mystery Club membership: 2023 Mystery Cishion Club or 2024 Mystery Blanket Club.
A Mystery bag of five gifts!
We will notify Carol to let her know the good news!
Thank you for taking the time to read my blog, and hopefully you are feeling fully prepped and ready to get going on the first set of squares. For those of you who are still waiting for your kit to arrive, we appreciate your continued patience and ask that you keep in touch with us about any progress. We are waiting for the good news from you that it has arrived, which it will do very soon. When it does please let us know.
We love to hear from our members, so please get in touch if you have any photos or stories that you would like to share, and with your permission we will include them in the next blog.
Now it's time to grab your knitting needles, settle down in your favourite comfy chair and make a start! I wish all of you happy knitting and look forward to seeing you back here on the 10th March for instalment number two! Until then, take care and keep busy, Debbie x
]]>
https://debbieabrahams.com/blogs/news/mystery-blanket-club-2023-delay-to-the-launch-date2023-02-01T14:17:13+00:002023-02-01T14:17:13+00:00MYSTERY BLANKET CLUB 2023: delay to the launch dateDebbie Abrahams
This is a reminder to all the 2023 Mystery Blanket Club members that the launch of the club has been delayed until the 17th February due to the impact of the cyber incident at Royal Mail.
We sent an email about this to all of our members last week. If you have not seen this, please can you read this extract from the message we sent out as it contains important information about the launch and the change to the dates of the first two mail outs:
Due to the ongoing issues at Royal Mail with posting overseas mail we have made the decision to postpone the launch of the 2023 Mystery Blanket Club.
The Mystery Blanket is a global project and every year our aim is to have everyone starting to knit at the same time. So by moving the launch date back we hope that most if not every member will have their knitting kit.
Although Royal Mail are not planning any more postal strikes this month, there is uncertainty over what action they might take in the weeks after that. So all of our UK parcels will be posted in small batches week commencing 23rd January, beginning with the Special Deliveries.
This is the revised schedule for the ten mail outs:
MO1: Friday 17th February (launch date), three squares to knit
MO2: Friday 10th March, four squares to knit
MO3-MO10: 1st April and the the 1st of each month thereafter, four or five squares to knit.
Unfortunately we do not know when the issues at Royal Mail will be resolved and whether further delays will happen as a result. But regardless of that we will launch on the 17th February and keep everything crossed that we are all ready to make a start by then.
We apologise sincerely for this delay and assure you that we are keeping a close eye on the situation and doing all we can to get your parcels on their way to you as soon as possible. We appreciate your understanding and ask for your patience whilst this is being resolved.
I would like to add to this that printed patterns for the members who paid for them will be posted to the UK members week commencing 13th February. Printed patterns for the overseas members have been posted this week.
Thank you,
Debbie
]]>
https://debbieabrahams.com/blogs/news/members-gallery-20222023-01-31T20:03:40+00:002023-02-04T16:09:00+00:00Member's Gallery!Debbie AbrahamsHELLO EVERYONE! I AM HUGELY PROUD TO PRESENT THE MEMBER’S GALLERY, WHICH SHOWCASES THE BRILLIANT WORK DONE BY MY LOVELY MEMBERS! Some of the projects in the gallery are Mystery Blankets and Cushions from 2022, but there are lots of other lovely pieces of work to browse through as well that have been lovingly made over the past year. There’s some great ideas for stash-busting too, so take some time out, settle down with a cuppa and immerse yourself in a wealth of beautiful projects…
…and I begin with the 2022 Mystery Blanket, Deco Dreams, which was knitted up by 600 members last year. It was a challenging design with lots of intricate patterns, a ton of beads and plenty of sparkle. It was embraced wholeheartedly with enthusiasm and determination, and the results are stunning.
First up is Kelly Symons from Alexander in Arizona, USA and she sent in these wonderful pictures of her completed Deco Dreams blanket which looks incredible. What an amazing backdrop to the blanket and so lovely to see it out in all that glorious Arizona sunshine. The cat seems to be loving it too!
Kelly says: “Thank you for such a beautiful blanket! I think it is a truly inspired design. I love, love, LOVE the beads and all the sparkle! It is hard to pick a favourite square between the little beaded swags, the tiny cables, sparkly yarn and rhinestones…it was a beautiful journey all year long.
This blanket will go to live in Oklahoma with my mom, and I am proud to give it to her. She is excited too, she often called making sure I was knitting!!
Thank you again for a beautiful design, I am in love with it.”
Annabel Casey from Banbury in Oxfordshire, UK has knitted many of the Mystery Blankets over the years, and every one of them has been knitted beautifully. Deco Dreams is another one to add to her ever-growing collection. And she’s all signed up for next year too!
Annabel says: “Some squares this year took a long time, but it was worth it in the end. It’s very heavy! It’s going to my friend Linda who’s very excited at the prospect of being the owner of a Mystery Blanket. Which reminds me I must sew on the label!”
Another Mystery Blanket Club regular is June McBain from Edinburgh in Scotland, UK and she was thrilled with her Deco Dreams blanket! Doesn’t it look gorgeous, especially on that garden bench in the natural light. The edgings look lovely too, so neatly knitted, great job June!
Jane Boyd from Leigh in Worcestershire, UK sent in regular updates on her Mystery Blanket knitting last year, and you may remember that she knitted the blanket alongside a group of knitters who decided to take it on together as a joint project. It was so successful that they have decided to do it all over again this year, under the guidance of Jane who keeps them on their toes! This is Jane’s lovely blanket, complete with a very content looking cat!
Jane says: “I just wanted to thank you for yet another absolutely gorgeous blanket. I don’t know where your inspiration comes from but it’s limitless! Looking forward to starting the 2023 MB!”
I am always amazed at how many blankets one can knit, and Catherine Pope from Nottingham, UK has knitted at least six from the collection, plus Mystery Cushions and many other Debbie projects too. I met Catherine several years ago at Yarn in Chilwell (how I miss that lovely shop!), and she regularly came to Mystery Club meetings and workshops there. She’s a fabulous knitter and is always so happy to share her completed projects. And here’s another one, her beautifully knitted Deco Dreams!
Catherine says: “I managed to finish the 2022 blanket just before Christmas and am delighted with it. Here's a picture of it as I know how much you like to see the finished products!”
Beverley Green from Mill Hill in London, UK has a unique way of completing her Mystery Blankets which makes them larger and more suitable for a bigger bed. I think it’s a great idea, and all the extra hard work is definitely worth it. Check out her Deco Dreams and House of Aphrodite (from 2011!) blankets, don’t they look amazing!
Beverley says: “Here is a picture of my completed Mystery Blanket for 2022. As I have knitted all mystery blankets (except the first one) and given them as gifts for my children and grandchildren, I sew them onto a larger bedspread and replicate the border onto the larger bedspread to finish them off. This one I made for ourselves. I knitted the whole bedspread and inserted the Mystery Blanket into the centre. I am now looking forward to starting the 2023 Mystery Blanket!”
Can you imagine knitting not just one Mystery Blanket but two of the same design?!? Margaret Hall-Craggs from London, UK did just that, but decided to stash-bust and knit one of them using all her left over bits and pieces of yarn. I am amazed at what she has come up with. It’s a truly beautiful piece of work, and the colours all work so well together. What a great project and a brilliant way to make use of all those odds and ends!
Margaret says: “Alongside my lovely Mystery Blanket I have used almost all my bits of left over wool to make a parallel blanket. I only needed to buy some of your beads and the metallic thread. As I gave my Mystery Blanket away as a present I am really pleased to have this one to save on my energy bills! Blanket knitting is a wonderful way of relaxing and being productive. Like growing vegetables!”
Julia Green from Bristol, UK has also been busy knitting two Deco Dreams blankets, and wow – look what she has come up with! Like Margaret, she decided to use up bits and pieces of yarn from her stash and had a strict rule that nothing extra could be purchased for it. What a brilliant idea and a wonderful project! This is such a great stash-busting project, and it’s resulted in the creation of a whole second blanket – genius!
Julia says: “Just a quick note to say how much I have enjoyed the journey and how much I have learned doing my first Mystery Blanket. I am delighted with it and very proud. Encouraged by my knitting group I made a parallel blanket from my stash of yarn. This was a real mix of colour, weight and fibre from cotton to acrylic and 4 ply to chunky. I used few beads, the rule was just reuse, recycle and buy nothing. And as the MBs design is known only to you Debbie, naturally there was no planning of colour and quite a bit of running out and clashing. All in all I am really pleased with the zany results, and so pleased to finally use some yarn that’s been around over thirty years. I am looking forward to this year’s launch, the first delivery is here and I am about to do a tension square.”
Sarah Johnston from Newport on Tay in Fife, Scotland, UK was thrilled to have completed her Deco Dreams blanket and made a small change to the design, which makes it much more personal and unique. This is something I love to see and always welcome with any of my designs. So thanks Sarah for sending in your photo and sharing your ideas!
Sarah says: “I have finished my blanket! I have loved every moment of the knitting. It's in the process of its final blocking in our back bedroom. I went my own direction with the centre square! And by the way, not one knot, I loved the yarn!”
Alison Riddell from Worcester, UK successfully completed her Mystery Blanket and already has a new project lined up and ready to go! She has a knitting companion to work alongside her this time which I am sure will make the experience so much more enjoyable!
Alison says: “I just wanted to say thank you for the free pattern (Nordic Village Hot-Water Bottle cover) which is plugging the gap while waiting for the start of the 2023 Mystery Blanket. It has inspired me to put together a knitting kit for my ninety-three-year-old Mum. She loves my 2022 blanket and wants to have a go at something smaller. We are going to knit alongside each other, and I can’t wait to see how much she can do after so many years away from knitting. Thank you for giving me more motivation and for inspiring me to do this.”
If you fancy working on two Mystery projects then did you know that there is an annual Mystery Cushion Club which runs in a similar way to the Mystery Blanket? Myra Sharp from Reading in Berkshire, UK took on both challenges last year and was thrilled to get them completed before the start of the 2023 Mystery Blanket. You can see her One Thousand & One Nights Mystery Blanket in one of the photos, and it looks so good coupled with the Pure Nouveau Mystery Cushion – what a great combo!
Myra says: “Here is my 2022 Mystery Blanket and Mystery Cushion! I thoroughly enjoyed making them and got finished just in time for the 2023 blanket. I did Option One throughout, but I did add a few extra buttons to my blanket, and I actually liked what I am sure was meant to be the reverse side, so I went a bit rebellious and sewed them on probably upside down! This mystery blanket was quite different to last year’s but it wouldn’t do if they were all the same. I do keep hoping there will be a pictorial blanket one year, either animals or flowers, as I have missed previous ones as last year was my first blanket. So here’s hoping, but I do look forward to the mystery. Thank you so much for such enjoyable projects. Ooh, I am so looking forward to this year’s Mystery Blanket!”
And while we are talking about the Mystery Cushion, here is another splendid Pure Nouveau, completed by Jane Campbell from Ellon, Aberdeenshire in Scotland, UK. This was Jane’s first ever KAL, and by the sound of it, she may be hooked! Her intarsia skills are to be commended – it’s not easy dealing with all those bobbins at once. Well done Jane!
Jane says: “This is the first time I have taken part in a mystery KAL and I thoroughly enjoyed it. I would get quite excited when I knew the next patterns were due! I particularly enjoyed the chevron stitch pattern but also had a lot of fun with the bobbins dangling as I used the intarsia technique. The video technique explanations were very helpful.”
Jan Quigley from Skibbereen in Co. Cork, Ireland decided to take on the 2022 Mystery Cushion as her first Debbie project, and what an amazing job she’s made of it! This was quite a complex design that mixed together lots of different techniques including fairisle, chevron stitch and intarsia, so for Jan this was a real adventure into the unknown. But look how brilliantly she’s done. I’m not sure that I would have been quite so brave!
Jan says: “Here is my completed cushion! I thoroughly enjoyed this five month project - my first from you - and am looking forward to next year’s Mystery Blanket. I’d not done intarsia or beading before so this was new to me. I had done fairisle but not ‘properly’ - I used to run it along the back over far too many stitches - so the weaving in was also new to me. As you can see from the photos I went a bit ‘rogue’ on the upper back panel with the s2kpo (I slipped and knitted individually rather than doing both stitches together) but it seemed to work ok! I can see some mistakes (one of my beads went a bit wonky) but that’s me being picky - on the whole I’m quite chuffed with my effort. It adds so much colour and brightness to the dark winter evenings and I love the colour mixes which I would never have been brave enough to put together myself. Trying to get my head around crochet now for the next few months until my Mystery Blanket comes knocking!”
When you have several grandchildren it is likely that you are going to be asked to knit the same thing several times so that each child has their own handknitted gift from grandma. And this is exactly what happened to Andrea Gostick from Purley in Surrey, UK. Here is her pair of I Feel Love cushion covers, one knitted in the original pink colourway, with the second one knitted in a vibrant leaf green. Andrea used the same colours of beads on both projects, but was pleasantly surprised at how different the background colour makes the beads look. I had to look twice as I thought she had recoloured the beaded hearts too! They look tremendous together and I am sure will be much loved by her grandchildren.
Daphne Cavanah from Wadebridge in Cornwall, UK has been super busy knitting accessories and garments and sent in pictures of her huge collection of recently completed projects. She must have been knitting non-stop to produce so many items! Daphne made some of them for gifts which I am sure were very gratefully received. It’s lovely to see such a prolific portfolio of work and all knitted so beautifully too. It’s a very inspiring collection which I am sure will motivate others to get their knitting needles clicking. Thanks for sharing your wonderful collection with us Daphne!
Daphne says: “The cardi was inspired by knitting your Mystery Blanket 2022, using Baby Cashsoft Merino and the yellow was some Felted Tweed I had left over. It is a Martin Storey design adapted by me. My cardi was very gratefully received. I was very happy with the way it worked out.
This hat was inspired by Summer in Cornwall, sea, sand and sky. It’s knitted in Felted Tweed, Baby Cashsoft Merino, and a multi coloured yarn that I bought years back. I just dig out my odd yarns and put them together. I used a simple graph and adapted Martin Storey's Lattice hat pattern.
The next hat has the same patterning but is inspired by Autumn leaves. The yarns used are different shades of Felted Tweed.
And this hat uses Alpaca Soft DK in Green Teal and Rainy Day. The patterning is the same as the other hat. I knitted it especially for my granddaughter.”
And here is another super collection of knitted items which spans across many years of Debbie projects! Jo Rawlins from Norfolk, UK has been knitting up blankets, cushions and bags since I met her well over ten years ago. And as you can see, she has a huge collection which she is very proud of. Jo is always up for learning new techniques and improving on her existing skills. So it’s great to see such a professionally finished and polished collection of projects. Many of them I can hardly remember myself as I designed them so many years ago. So it’s good to see them again – like old friends! - and so beautifully knitted too. Well done Jo, there’s enough there to fill a small museum!
Cynthia Wenden from London, UK has been extremely busy and not only knitted up many Mystery Blankets, but she’s made cushions to match them too! I love the way that Cynthia has combined together different selections of patterns and colours from the blankets to make the cushions. The choice of squares for the front panels work really well. And the abstract patterns on the back of the cushions are just brilliant, I really love the large blocks of colour and the bold patterns – they look so dynamic! And the choice of random buttons is just perfect and finishes them off beautifully. These are a joy to see!
Cynthia says: “I have been knitting Mystery Blankets since 2012. I have seven grandchildren and decided that I would give them a blanket each when they went to university - they were allowed to choose the one they would like. As there is always plenty of wool left so I knitted each of them a cushion to match their blanket and gave it to them at Christmas. This year grandchild numbers five and six both started at university. One had chosen the 2019 Blanket, Winter Wonderland, and the other chose 2020, Our Precious Earth. I had two cushions to finish by Christmas so I am very behind on the 2022 blanket. Luckily the final grandchild doesn't leave school until 2024, so hopefully I can catch up by then!”
To conclude the Member’s Gallery is this lovely contribution from Ximena Verdugo Mozo from Valparaíso in Chile, who some of may remember knitted the 2022 Mystery Blanket, One Thousand & One Nights, and regularly sent in updates of her progress for the blog. For the past year she has been working on the Picnic blanket from my first book, Blankets & Throws To Knit, and has created this most beautiful gift for her grandson. I am sure he will absolutely love it and treasure it forever.
Ximena says: “I want you share with you the Picnic Blanket which I have just finished knitting for my oldest grandson Mateo, who is now living in Mainz, Germany with his family. He chose this blanket from your wonderful book “Blankets & Throws to Knit” which I bought last year and enjoy every time I look at the different amazing projects.
I knitted it with yarn I found here in Chile in similar colours as I didn’t find the exact jeans denim blue and had some trouble with the beads because I couldn’t find the 6 mm size… but as I’m a very persistent woman I did it with silver and pearl beads of 2mm (hard to put on the yarn but I did it!). I also adapted it to six instead of nine rows of nine squares each because Mateo didn’t wanted it so big. It looks beautiful and I feel really happy and proud! I could follow all the instructions and had no problem to achieve the goal! The instructions in the book are very clear and precise.
As I live so far away in Viña Del Mar, Chile, I think it is better to buy the yarn and beads here as it takes time and much more money to buy it from you in the UK. But I thought you would like to know that although I live really far away from your place I’m really inspired by your beautiful ideas, techniques and projects. I’ve learned many new ways to knit and use beads!
So, thank you very much and good wishes to you! I’ll be checking your news at Instagram and YouTube as well as in my mail!”
I want to say a huge thank you to everyone who contributed to the Member’s Gallery and made it such a vibrant and exciting collection of work! It is wonderful to see the projects that have been knitted up and to hear such lovely positive feedback. I hope that you all stay creative and inspired throughout this year and continue to make lots of beautiful things with your yarn and needles. Don’t forget to keep in touch. Happy knitting everyone, Debbie, x